Use the following menu options to navigate the SL1 user interface:
- To view a pop-out list of menu options, click the menu icon (
).
- To view a page containing all the menu options, click the Advanced menu icon (
).
This
What are Role-Based User Accounts?
Remote support personnel or contractors sometimes require temporary or limited access to an SL1 appliance to perform maintenance tasks or to troubleshoot problems. For these situations, you can grant access to the SL1 appliance using one of the following limited access, role-based accounts:
- SL1User
- SL1Admin
Role-based accounts are supported on All-In-One Appliances and in the distributed SL1 architecture. These accounts are not currently supported for the extended SL1 architecture.
These role-based accounts are installed by default in SL1 version 11.1.0 and higher. No configuration is required to enable the accounts.
The sections that follow provide more details about these accounts.
Role-Based sl1admin Account
The sl1admin account enables the system owner to grant temporary access to support staff who perform maintenance and troubleshooting tasks.
- The sl1admin account does not appear in SL1 user interface. This account is available for SSH or console access to the command line of an SL1 appliance only.
- SL1 grants one-time passwords from a file of hash values. The initial file is generated upon install or upgrade of Sl1. This file is regenerated each time half the passwords in the file have been granted or when the file reaches 7-days old, whichever occurs first.
- Each time a one-time password is granted, SL1 creates a log entry in the Audit Logs page (System > Monitor > Audit Logs).
- The sl1admin user does not have full root access. The sl1admin user uses a tmux shell and has access to only a limited set of commands. The sl1admin user can restart services, shutdown and reboot SL1 appliances, and run sudo commands that do not require root access.
- All sudo actions by the sl1admin user are logged in the file /var/log/secure.
- Additionally, the SL1 administrator can attach to the session in read-only mode to watch the sl1admin session in progress or attach in read-write mode, which allows the SL1 administrator to take over the session, if necessary.
Using the sl1admin Account
To log into the sl1admin account:
-
In a console or command window, SSH to the SL1 appliance, as follows, using the IP address of the SL1 appliance.
ssh sl1admin@<ip_address>
-
The password prompt will display a 3- or 9-digit number. Make note of this number to use in the next step.
The numeric code is 3 digits unless you have canceled out in the middle of your most recent login or if another user is also logging in to the sl1admin user account at the same time. In either of those cases, you will be given a 9-digit numeric code such as 001/030/009.
- Open the SL1 user interface and go to the Appliances page (System > Settings > Appliances). Find the appliance you are logging in to in the list of appliances and click its padlock (
 ) icon. The One Time Password modal appears.
 -
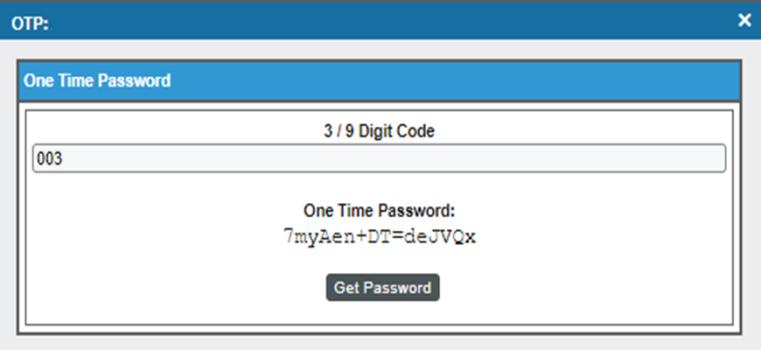
Enter the numeric code that was displayed in step 3 into the One Time Password modal. Click . The generated password appears as shown in the figure below.
- Type the generated password into the console window at the password prompt. Press Enter. After authentication is complete, the sl1admin user session begins in a tmux shell. You will see a green status bar at the bottom of the screen.
Monitoring an sl1admin Session in Progress
You can monitor an sl1admin session that is in progress using the em7admin account. To monitor the session:
- In a console or command window, SSH to the SL1 appliance where the sl1admin user session is in progress. Log in with an administrator account.
-
Obtain the unique identifier (UID) of the tmux session in progress by entering the following command.
file /tmp/tmux*/default
-
Note the UID returned by the command. In the following example, the UID is "1001"
/tmp/tmux-1001/default: socket
-
Use the UID to attach to the tmux session with the following command.
tmux -S /tmp/tmux-<uid>/default attach
The command above provides read/write access to the tmux session. If you want to attach as read-only, append "-r" to the command string.
-
Exit the attachment to the session by pressing Ctrl+b, and then "d".
Role-Based sl1user Account
The sl1user account allows a user to perform maintenance tasks from a set of menu options.This menu allows the sl1user account to administer a Data Collector.
- The sl1user account does not appear in SL1 user interface. This account is available for SSH or console access to the command line of an SL1 appliance only.
- The sl1user account can:
- modify the IP address of a network interface
- test DNS entries
- modify and test NTP entries
- view system status
- view the message of the day
- Each action performed by the sl1user account is logged in /var/log/em7/slmenu.log.
Changing the Password for the sl1user Account
During installation or upgrade to version 11.1.0 or later, the password for the em7admin account is copied and set as the sl1user account password.
SciencLogic strongly recommends that you change the initial password before granting access to the sl1user account. Because the initial default password for the sl1user account is the same as the password for the em7admin account, you must change the password before the first use of the sl1user account .
To change the password for the sl1user account:
- Log in to the console of the Database Server or SSH to the Database Server.
-
Enter the following command:
sudo passwd sl1user
- When prompted, type and re-type the new password.
Using the sl1user Account
To use the sl1user account:
-
In a console or command window, SSH to the SL1 appliance, as follows, using the IP address of the SL1 appliance and the sl1user password.
ssh sl1user@<ip_address>
-
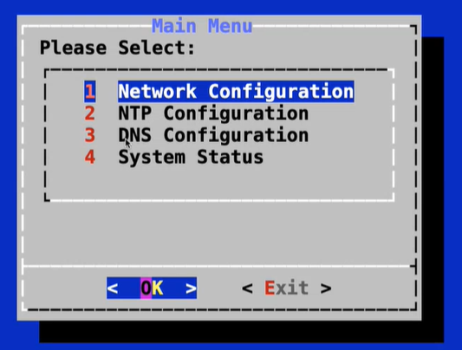
At the sl1user main menu, shown below, make a selection using the number of the selection or the arrow keys. Click OK.
-
When you are finished, choose from the main menu to close the session.
Menu Options for sl1user
The menu options available for the sl1user account are described below.
- Network Configuration. The Network Configuration menu lets the sl1user select an interface from a list of interfaces and edit the configuration for that interface. For example, if the gateway or DNS entry was configured incorrectly during installation, the sl1user can choose this menu option to correct the configuration.
- NTP Configuration. The NTP Configuration menu lets the sl1user perform basic NTP actions. Menu options are as follows:
- Edit configuration. Edit the existing NTP server entries.
- Test configuration. Check if the configured NTP servers are responsive.
- Force Sync. Force a sync with the NTP servers in case of clock drift, for example.
- Restart Service. Restarts the chronyd service.
- DNS Configuration.
- Edit configuration. Edit the existing DNS server entries.
- Test configuration. Check if the configured DNS servers are responsive.
- System Status.
- View System Status Log. Displays the contents of the last run of the system status script.
- Run System Status. Runs the system status script on demand.
- Message of the Day. Because the sl1user login is inside a shell, the message of the day is not displayed after the sl1user authenticates. This menu option provides a way for the sl1user to view the message of the day.
To move back to the previous menu, use the Exit option. If you are at the top-level menu, the Exit option ends the sl1user session.

