![]()
This
Use the following menu options to navigate the SL1 user interface:
- To view a pop-out list of menu options, click the menu icon (
 ).
). - To view a page containing all the menu options, click the Advanced menu icon (
 ).
).
The following video describes the improvements to upgrading to the latest version of SL1:
This
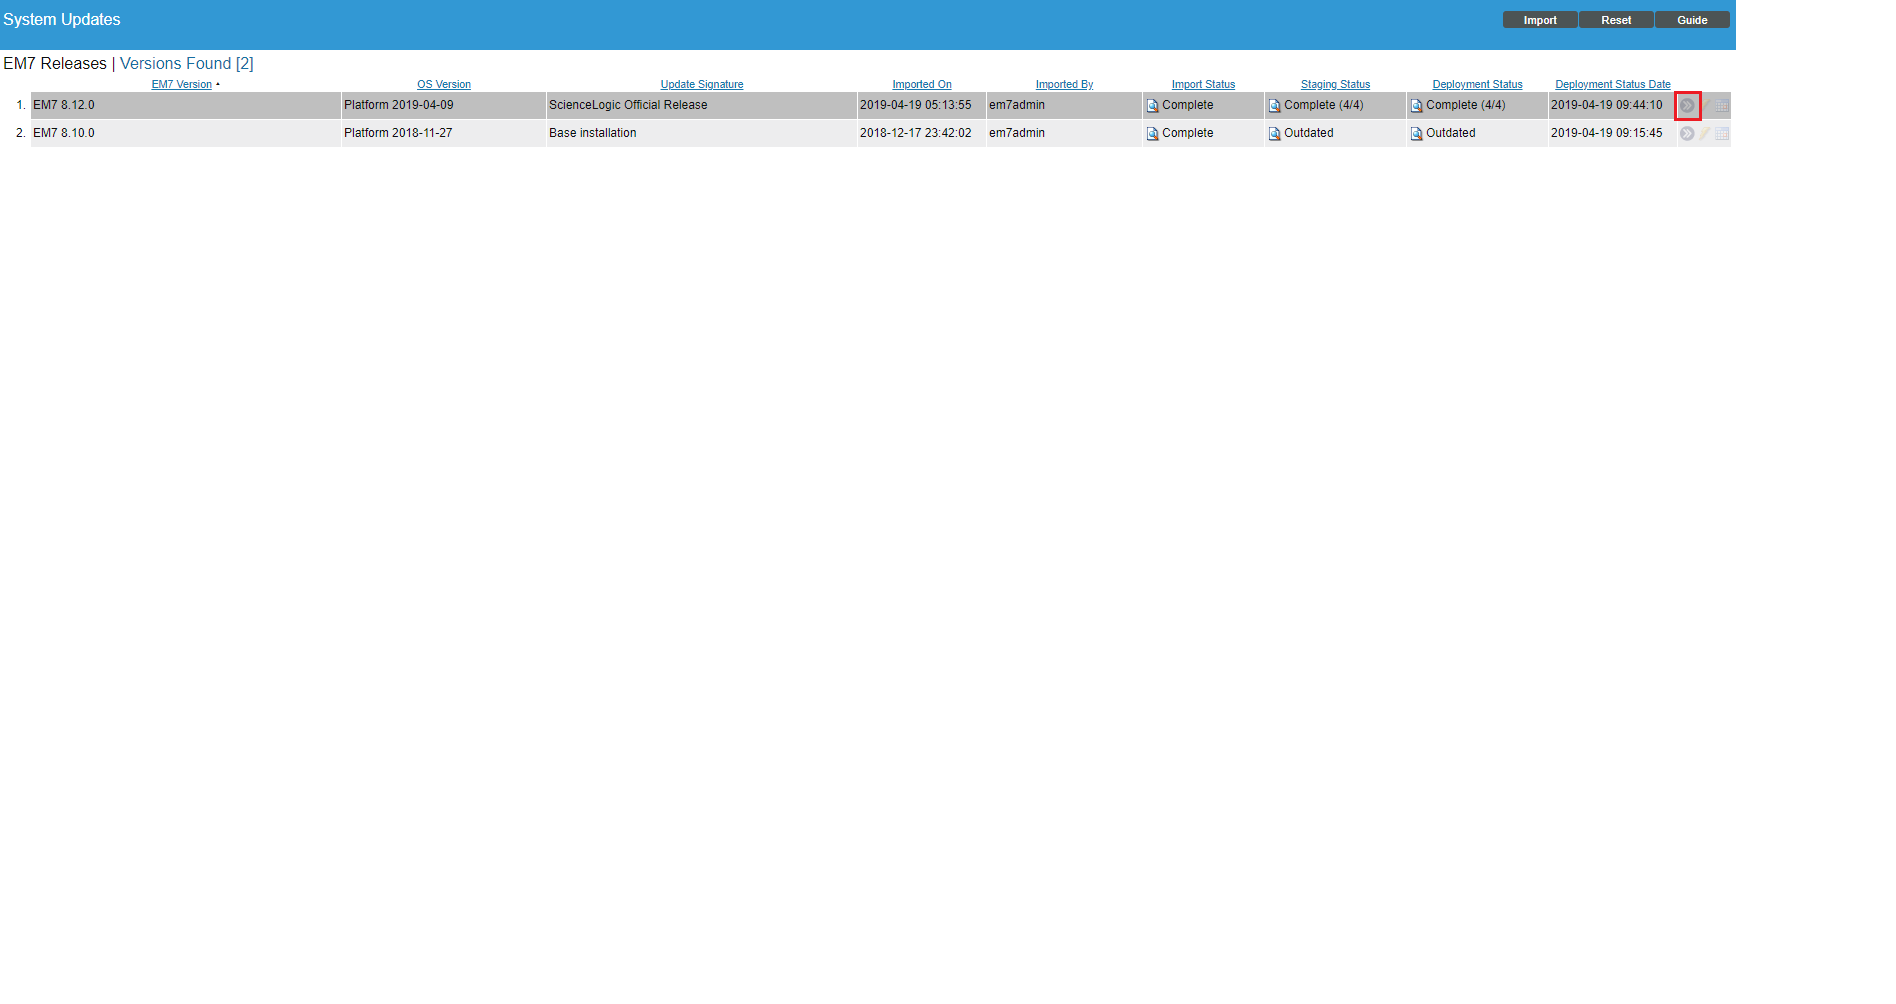
Reference: The System Updates Page
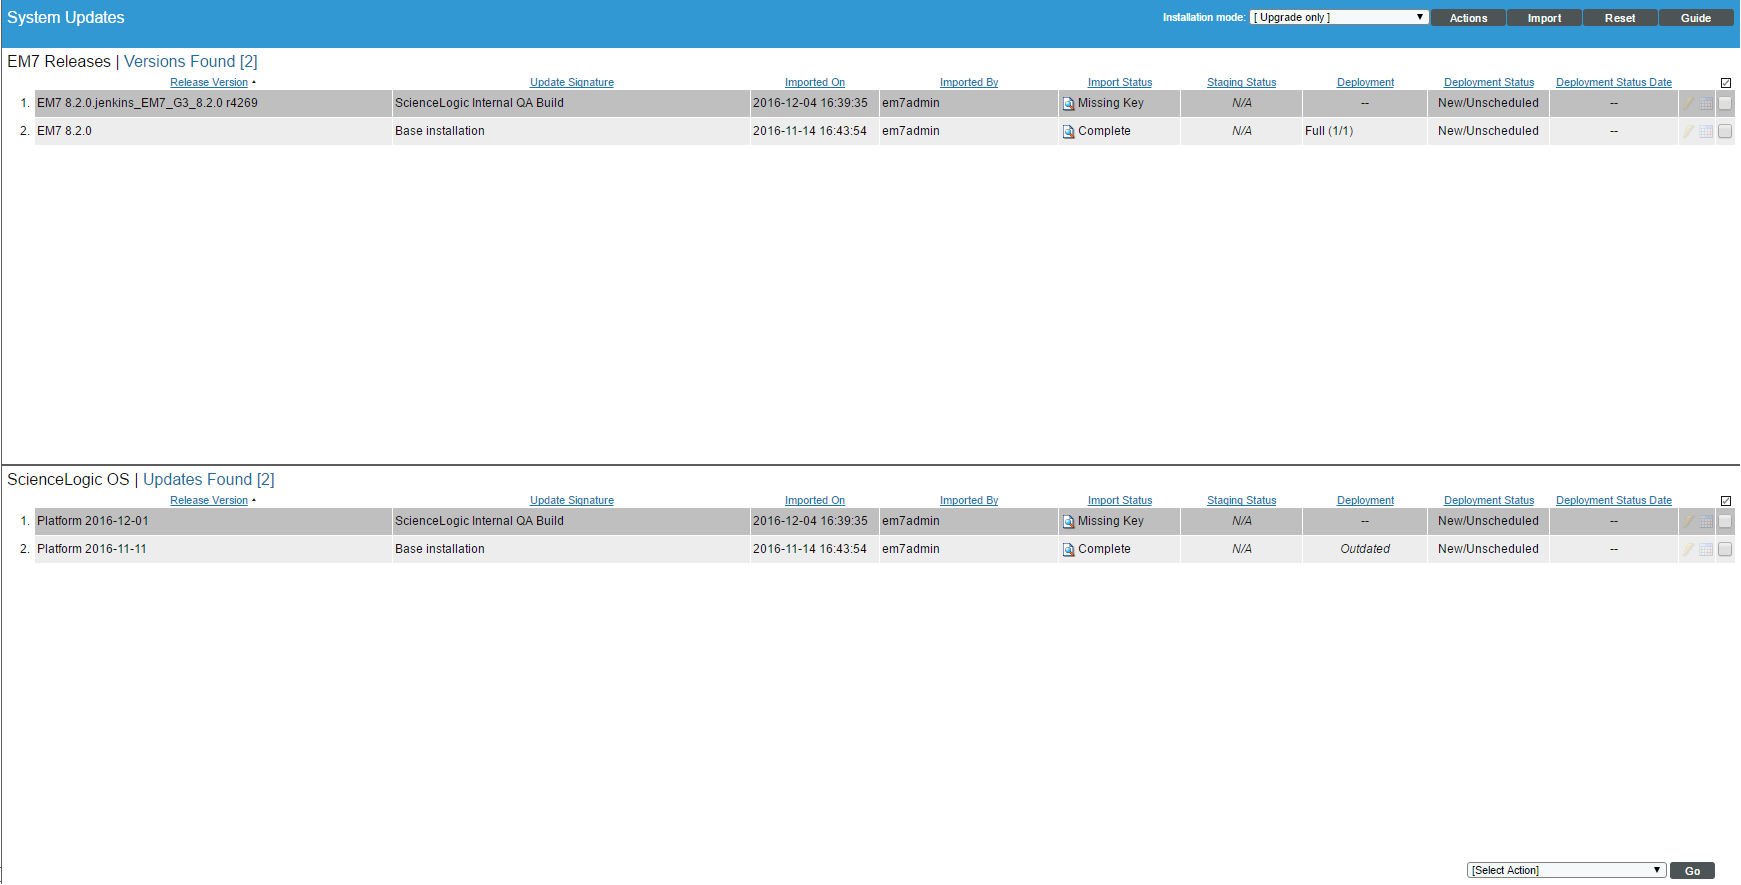
The System Updates page (System > Tools > Updates) allows you to update the software on your SL1 appliances.
You must first download the update file to the local computer.
You can then import the software update through the user interface.
After you import a software update to your SL1 system, the SL1 system can automatically stage the software update. Staging is when the software is copied to each ScienceLogic appliance. Staging allows SL1 to simultaneously apply the software changes to each ScienceLogic appliance, regardless of the speed of the connection to each ScienceLogic appliance.
You can allow the SL1 system to automatically stage the software or you can manually stage the software.
After the software update is staged, you can deploy the software.
To apply updates to an existing Data Collector, that Data Collector must be a member of a Collector Group. In some SL1 systems, users might have to create a Collector Group for a single Data Collector before applying updates.
To conserve disk space on Data Collectors and Message Collectors, after an update, SL1 removes previous Docker images.
Reference: Viewing the List of Updates
The System Updates page (System > Tools > Updates) displays the following about each update:

TIP: To sort the list of update files, click on a column heading. The list will be sorted by the column value, in ascending order. To sort by descending order, click the column heading again. The Deployed Status Date column sorts by descending order on the first click; to sort by ascending order, click the column heading again.
- EM7 Version. Name and version number for the software update.
- OS Version. Name and number of the platform OS update.
- Update Signature. Name of the entity that released the update and type of update. Usually "ScienceLogic Official Release".
- Imported On. Date and time the software update was loaded onto the .
- Imported By. Name of the ScienceLogic user who loaded the software update onto the .
- Import Status. Status of the import process. Clicking on the log icon displays the log file associated with importing the selected software. Possible values are:
- In Progress. Software is currently being imported by the .
- Complete. Software has been imported successfully.
- Failed. Software import has failed due to an unexpected condition. Contact ScienceLogic Support for assistance.
- Missing Base. The cannot import this software until another software package has been imported. The dependency is for compression purposes. Check the log for a message stating which software package needs to be imported.
- Staging Status. Status of the staging process. Clicking on the log icon displays the log file associated with staging the selected software. Possible values are:
-
--. No staging request is active and software has not been staged on any SL1 appliances.
-
Scheduled. The is aware of the staging request and is preparing for staging.
-
In Progress. Staging is in progress but has not completed.
-
Complete. Staging has completed, and all appliances are ready to deploy the software.
-
Incomplete. Staging has completed, and one or more appliances are ready to deploy the software.
-
Canceled. User manually canceled the staging process.
-
Outdated. The current update is not the latest or has already been installed.
-
Failed. An unexpected error occurred in the staging process. Contact ScienceLogic Support.
NOTE: If you did not select Auto Stage during import, the Staging Status column will include an asterisk (*) until you manually stage the update.
- Preupgrade Status. You can run the pre-upgrade check after importing and staging an update but before deploying the update. The pre-upgrade check will ensure that all criteria are met before deploying.
- If you want to run the pre-upgrade check, select the purple checkmark for the selected row.
- The possible values in this field are In Progress or Complete.
- Clicking on the magnifying-glass icon (
 ) in this column displays the output of the pre-upgrade check.
 - If a pre-upgrade criterion fails, the button will be disabled for the selected row.
- If an appliance fails the pre-upgrade criteria, you can view the output from the system status script for each failed appliance. Go to the Appliance Manager page (System > Settings > Appliances), find the appliance that failed, and click on the magnifying-glass icon ().
- For details see the section on the Pre-Upgrade Check .
- Deployment Status. Specifies the current deployment state. Possible values are:
-
--. No deployment request is active, and software has not been deployed on any SL1 appliances.
-
Scheduled. The is aware of the deployment request and is preparing for deployment.
-
In Progress. Deployment is in progress but has not completed.
-
Complete. Deployment has completed, and all appliances are updated.
-
Incomplete. Deployment has completed, and one or more appliances are updated.
-
Canceled. User manually canceled the deployment.
-
Outdated. The current update is not the latest or has already been installed.
-
Failed. An unexpected error occurred in the deployment process. Contact ScienceLogic Support.
- Deployment Status Date. Specifies the date and time the software update was last deployed.
Reference: Viewing the Log Files for Updates
From the System Updates page, you can view a log file that displays the history of the software update. To view this log file:
- Go to the System Updates page (System > Tools > Updates).
- In the System Updates page, find the software update for which you want to view the log files. Go to its Import Status column, Staging Status column, or Deployment Status column and click the log icon ().
- The appropriate log page appears. In this modal page, each log entry displays:
- Information about the status of the software update and its related actions.
- For each action, the name and IP address of the appliance where the action occurred
- The date and time each action occurred.
Workflow
The following sections describe the steps to plan and deploy an SL1 update.
If would like assistance planning an upgrade path that minimizes downtime, please contact your Customer Success Manager.
The workflow for upgrading SL1 is:
- Planning
- Scheduling maintenance windows
- (If necessary) updating SL1 Appliances to a versions of SL1 that uses RedHat Linux (SL1 8.1.1 and later).
- Pre-upgrade best practices for SL1
- Backing Up Custom Settings in the NextUI
- Backing Up SSL Certificates
- Setting the Timeout for PhoneHome Watchdog
- Adjusting Timeout for slow connections
- Running the system status script on the Database Server or All-In-One before upgrading.
- (If necessary) Upgrading the SL1 Distributed Architecture on SL1 Versions 8.5.0 and Earlier using the System Update tool (System > Tools > Updates).
- Upgrading the SL1 Distributed Architecture on SL1 Versions 8.6.0 and Later using the System Update tool (System > Tools > Updates).
- Removing SL1 Appliances from Maintenance Mode
- (As needed) Manual updates for systems upgrading from 8.4.x and earlier
- (As needed) Upgrading MariaDB
- (As needed) Rebooting SL1 Appliances
- Restoring Custom Settings in the NextUI
- Restoring SSL Certificates
- Resetting the Timeout for PhoneHome Watchdog
- Updating PowerPacks
- (One-time) Configure Subscription Billing. For details, see
Refer to the release notes for your current release to determine if you must upgrade MariaDB.
Refer to the release notes for your current release to determine if you must reboot all SL1 appliances after upgrading.
Planning
Before upgrading SL1, perform the following steps that are specific to your organization:
- Read the release notes to determine:
- What is fixed?
- What is new?
- What has changed?
- What has been deprecated?
- Read the Known Issues for the release at https://support.sciencelogic.com/s/topic/0TO0z000000E6w7GAC
- Identify all integrations and third-party applications that access the SL1 database or manipulate data on SL1. Determine how to disable these integrations during the deployment and re-enable after deployment.
- Identify activities and customers that will be affected by maintenance windows and schedule and inform appropriately.
- Identify custom work (PowerPacks, Run Book Automations, Event policies, Dashboard widgets) and ensure that it is backed up so you can restore it if necessary.
NOTE: Ensure that the each SL1 appliance has 3GB of free space in the /var partition to allow you stage the upgrade. Ensure that each SL1 appliance has 1GB of free space in / (the root partition) to allow you to deploy the upgrade.
Scheduling Maintenance Windows
Upgrading SL1 includes a minimum of two and possibly four maintenance windows:
- Import and stage update and run the pre-upgrade script. These steps can take place prior to the day of upgrade and do not affect SL1 functionality. ScienceLogic suggest you perform these steps at least three days before the planned upgrade and ideally a week before the planned upgrade.
- Deploy update. On the day of the upgrade, put all SL1 appliances in maintenance mode. The SL1 system will not be available during this procedure. Update he SL1 Distributed systems.
- Update MariaDB (if required). The SL1 system will not be available during this procedure.
- Reboot Appliances (if required). Individual SL1 appliances will not be available during these procedures.
- Identify activities and customers that will be affected by maintenance windows and schedule and inform appropriately.
If you are upgrading from a version of SL1 prior to 8.6.0, you will have to perform the first two bullets twice, once to upgrade to 8.6.0 and then again to upgrade to the latest update. You will need an additional maintenance window for the extra deploy step.
Refer to the release notes for your current release to determine if you must upgrade MariaDB.
Refer to the release notes for your current release to determine if you must reboot all SL1 appliances after upgrading.
Updating SL1 Appliances to Oracle Linux
SL1 Release Prior to 8.1.1
SL1 8.1.1 included a complete update of the operating system for each SL1 appliance, from CentOS 5.11 to Oracle Linux. Major operating system components, including the database, web server, and High Availability/Disaster Recovery packages have been updated or replaced by new industry-standard packages.
When upgrading from a version prior to 8.1.1, each appliance must be migrated to 8.9.0 and the Oracle Linux 7.5 operating system.
ScienceLogic strongly suggests that you contact Customer Support or your Customer Success Manager to plan your migration from CentOS (versions of SL1 prior to 8.1.1) to the latest release.
SL1 Releases Prior to 8.10.0
Please note that SL1 8.10.0 and later versions do not support "mixed-mode", where the Database Servers and Administration Portals are running Oracle Linux (SL1 versions 8.1.1 and later) and the Data Collectors and Message Collectors are running CentOS (SL1 version prior to 8.1.1). If your system uses "mixed-mode", you must reinstall the Data Collectors and Message Collectors with an SL1 ISO that matches the SL1 version running on the Database Servers or Administration Portals before upgrading to the current versions of SL1.
ScienceLogic strongly suggests that you contact Customer Support or your Customer Success Manager to plan your migration from mixed mode to SL1 versions 8.10.0 and later
Pre-Upgrade Best Practices
Before you upgrade, check the following:
- Before you install an SL1 upgrade, ScienceLogic recommends reviewing the hardware specifications of all the appliances in your system to ensure they meet the requirements for the current usage of your system. For more details about sizing and capacity for your specific environment, contact your Customer Success Manager and see https://support.sciencelogic.com/s/system-requirements.
- Before installing an SL1 upgrade, ScienceLogic recommends that you verify that recent backups are available for your system.
- Ensure that each SL1 appliance has a valid license.
- To apply updates to an existing Data Collector, that Data Collector must be a member of a Collector Group. In some SL1 systems, users might have to create a Collector Group for a single Data Collector.
- Ensure that each Data Collector is "available" to the Database Server. To check, see the Collector Status page (System > Monitor > Collector Status).
Backing Up Settings in the NextUI
To save any custom settings in the NextUI:
- Login to the console of the Database Server or SSH to the Database Server.
- Open a shell session.
-
Enter the following at the shell prompt:
cp /opt/em7/nextui/nextui.env /opt/em7/nextui/nextui.env.backup
Backing Up SSL Certificates
To back up your SSL Certificates:
- Log in to the console of the Database Server or SSH to the Database Server.
- Open a shell session.
-
Enter the following at the shell prompt:
cp /etc/nginx/silossl.key /etc/nginx/silossl.key.bak cp /etc/nginx/silossl.pem /etc/nginx/silossl.pem.bak - Repeat these steps on each Database Server in your SL1 system.
Setting the Timeout for PhoneHome Watchdog
You can manually adjust the settings for the PhoneHome Watchdog server, to reduce CPU consumption during the upgrade process. To do this:
- Log in to the console of the Data Collector as the root user or open an SSH session on the Data Collector.
-
At the command line, type the following:
phonehome watchdog view -
You should see something like the following:
Current settings: autosync: yes interval: 20 state: enabled autoreconnect: yes timeoutcount: 2 check: default - Note the settings for interval and timeoutcount, so you can restore them after the upgrade.
-
To change the settings for SL1 upgrade, type the following at the command line:
sudo phonehome watchdog set interval=120; sudo phonehome watchdog set timeoutcount=2; systemctl stop em7_ph_watchdog; systemctl start em7_ph_watchdog; - Repeat the steps in this section on each Data Collector.
- Repeat the steps in this section on each Message Collector.
- Repeat the steps in this section on each Database Server.
Adjusting the Timeout for Staging and Deploying
If you have slow connections between SL1 appliances, you can adjust the timeout values for staging and deploying upgrades.
SL1 8.14 and Later Releases
To do this on an SL1 system running 8.14.0 or later:
- Log in to the console of the Database Server or SSH to the Database Server.
- Open a shell session.
-
Enter the following at the shell prompt:
sudo pcli set-patcher-param staging_wait_time <timeout_in_seconds>where:
<timeout_in_seconds> is the timeout value, in seconds, for staging for each SL1 appliance. The default value is 1800 seconds (30 minutes). You can increase this value for slow connections.
-
Enter the following at the shell prompt:
sudo pcli set-patcher-param deploy_wait_time <timeout_in_seconds>where:
<timeout_in_seconds> is the timeout value, in seconds, for deploying to each SL1 appliance. The default value is 3600 seconds (1 hour). You can increase this value for slow connections
SL1 8.12 and Prior Releases
To do this on SL1 systems running versions prior to 8.14.0:
- Log in to the console of the Database Server or SSH to the Database Server.
- Open a shell session.
-
Enter the following at the shell prompt:
silo_mysql -e "UPDATE master.system_settings_patcher SET value=<timeout_in_seconds> WHERE param='staging_wait_time'"where:
<timeout_in_seconds> is the timeout value, in seconds, for staging for each SL1 appliance. The default value is 1800 seconds (30 minutes). You can increase this value for slow connections.
-
Enter the following at the shell prompt:
silo_mysql -e "UPDATE master.system_settings_patcher SET value=<timeout_in_seconds> WHERE param='deploy_wait_time'"where:
<timeout_in_seconds> is the timeout value, in seconds, for deploying to each SL1 appliance. The default value is 3600 seconds (1 hour). You can increase this value for slow connections.
Running the System Status Script Before Upgrading
SL1 includes a script, system_status.sh, that provides diagnostic data for each appliance in your SL1 system.
On SL1 Systems prior to 10.2.0, after running the system status script, you must ensure that the file /var/lob/em7/silo.log has the owner and group "s-em7-core".
The following video explains the features and benefits of the system status script:
Running the System Status Script on SL1 8.14.0 and Later Releases
If you are running SL1 version SL 8.14.0 or later, SL1automatically runs the system status script every 15 minutes on each appliance in your SL1 system.
For SL1 systems running 8.14.0 or later, ScienceLogic recommends that you view the output from the system status script before upgrading:
- In SL1, go to the Appliance Manager page (System > Settings > Appliances).
- Locate the SL1 appliance that you want to view diagnostic information about.
- Click on its magnifying-glass icon () to view the output of the system status script for that appliance.
- If the output includes errors and you need help fixing them, contact ScienceLogic Customer Support to fix the errors before upgrading.
- Repeat for each appliance in your SL1 system.
- To get the very latest status before upgrading, manually run the system status script on each Database Server or All-In-One Appliance.
Running the System Status Script on SL1 8.12.x Releases
If you are running an SL1 version in the 8.12.x line of releases, SL1 includes the system status script already installed in the /opt/em7/bin directory. However, there is no user interface option in the Appliance Manager page (System > Settings > Appliances) until SL1 version 8.14.0.
Before upgrading from any 8.12.x or later version, ScienceLogic recommends that you manually run the system status script on each Database Server or All-In-One Appliance, to get the latest results.
To run the system status script on each SL1 appliance:
- Either go to the console of the SL1 appliance or use SSH to access the SL1 appliance.
- Open a shell session on the server.
-
Navigate to /opt/em7/bin:
cd /opt/em7/bin -
At the shell prompt, enter the following:
sudo system_status.sh > /tmp/status - Enter the root password.
-
Navigate to /tmp/status to view the results.
cd /tmp cat status - If the output includes errors and you need help fixing them, contact ScienceLogic Customer Support to fix the errors before upgrading.
-
After fixing any errors and running the system_status.sh script again, check the ownership of /var/log/em7/silo.log:
ls -l /var/log/em7/silo.log -
Ensure that the file has owner "s-em7-core" and "group s-em7-core":
chown s-em7-core:s-em7-core /var/log/em7/silo.log - Repeat these steps on each SL1 appliance in your SL1 system.
: SL1 Systems 10.2.0 and later will automatically reset the ownership of /var/log/em7/silo.log if necesssary before upgrade.
Running the System Status Script on SL1 8.10 and Prior Releases
If you are running an SL1 release prior to 8.12.0, you can download and run the system status script before upgrading. You should run this script on each SL1 appliance.
To download and run the system_status.sh script:
- Go to https://docs.sciencelogic.com/system_status/system_status.sh to download the system status script. Save the file to a local computer.
- Using WinSCP or another file-transfer utility, copy the file system_status.sh to a directory on the SL1 appliance.
- Go to the console of the SL1 appliance or use SSH to access the SL1 appliance.
- Navigate to the directory that includes the system_status.sh file.
-
Enter the following to make the script executable:
chmod +x system_status.sh -
To execute the script with the default options:
sudo ./system_status.sh -
You can use the help option to view all the options:
./system_status.sh --helpYou should see something like this:
-l [--logcollect] = gather logs into a single file
-c [--crmreport] = create CRM report for HA/DR issues
-f [--fix] = fix mode (fix anything marked [fixable])
-m [--mysql-tuning] = a MySQL configuration tuning script (formerly known as "Gold Changes")
-n [--no-upgrade] = Do not upgrade or prompt to upgrade, even if an upgrade is available
-o [--outage] = outage investigator
-p [--ptstalk] = run pt-stalk
-h [--help] = help message (what you're reading now)
-u [--autoupdate] = if an update is available, upgrade without prompting
-v [--version] = show version number
Here is a sample output of the script run without options:
System Status v3.11 Tue Jul 17 15:39:43 UTC 2019 Using latest revision Results marked with [KB ####] refer to a KB article number you can reference at https://support.sciencelogic.com/s/article/#### Database Specs: SL1 Architecture: AIO SL1 Specs: SL1 Release: EM7 8.10.0 [build 1023] ISO Release: 8.1.1 Managed Devices: 2 (2 active) Managed Components: 0 (0 active) Managed Interfaces: 14 (3 active) OS Specs: OS Release: Oracle Linux Server release 7.5 Hostname: ha2 Active IPs: - 192.168.##.##/22 Licensed IP: 192.168.##.## Appliance Model: AIO Appliance Type: Virtual - VMware Virtual Platform MySQL Version: 10.1.36 Number of Cores: 2 Total RAM: 6GB Disk Size: 60GB - Disk size below minimum for 2 active devices, should be a minimum of 80GB /data.local/db size: 27G 5 Minute Load Avg: 2.74 Memory Utilization: 65% Other Information: Disabled Processes [KB 1277]: - Enterprise Database: Asset Record Maintenance - Enterprise Database: Subscription Usage Crunch Checking for errors... - Devlogging ON [KB 1049] - More than three kernels installed. [KB 1294] - DRBD active, but DRBD SNMP extensions for monitoring not found [KB 1278] [fixable] All Done! - If the output includes errors and you need help fixing them, contact ScienceLogic Customer Support to fix the errors before upgrading.
-
After fixing any errors and running the system_status.sh script again, check the ownership of /var/log/em7/silo.log:
ls -l /var/log/em7/silo.log -
Ensure that the file has owner "s-em7-core" and "group s-em7-core":
chown s-em7-core:s-em7-core /var/log/em7/silo.log - Repeat these steps on each SL1 appliance in your SL1 system.
: SL1 Systems 10.2.0 and later will automatically reset the ownership of /var/log/em7/silo.log if necesssary before upgrade.
Upgrading the SL1 Distributed Architecture on SL1 Versions 8.5.0 and Earlier
To use the steps in this section, you must be running SL1 version 8.1.1 or later. If you are running a previous version, ScienceLogic strongly suggests that you contact Customer Support or your Customer Success Manager to plan your migration from CentOS (versions of SL1 prior to 8.1.1) to the latest release.
The upgrade process might include importing multiple upgrade files. You must wait until an update file has imported successfully (i.e. the Import Status column displays Complete) before importing the next update file.
Any distributed system running 8.6.0 or later can be upgraded by importing, staging, and deploying a single update file. After you upgrade to 8.6.0, you can use the delta-less upgrade feature.
The 8.4.2 release changed the firewall on all appliances from iptables to firewalld. If you have added a custom firewall rule, such as a non-standard port for Phone Home Collectors, these rules must be migrated before upgrading to an 8.4.2 or later release. Please contact ScienceLogic Support for more information.
Upgrading the Distributed Stack for SL1 includes the following steps:
- Disabling automatic staging
- Downloading the Updates
- Importing the Updates
- Staging the Updates
- Running the Pre-Upgrade Check
- Putting All SL1 Appliances in Maintenance Mode
- Deploying the Update
- Putting All SL1 Appliances Out of Maintenance Mode
SL1 versions 8.10.0 and later do not support Data Collectors and Message Collectors running the CentOS operating system. If your system includes Data Collectors and Message Collectors running the CentOS operating system, contact your Customer Success Manager for details on upgrading Data Collectors and Message Collectors to Oracle Linux before upgrading.
Disabling Automatic Staging
For systems running an SL1 version prior to 8.12.0, go to the System Updates page and disable automatic staging (System > Tools > Updates > Actions > Disable automatic staging).
If you have previously used manual staging, perform these additional steps:
- Select all updates in the EM7 Releases pane and select all updates in the ScienceLogic OS pane.
- In the Select Action menu, select Unstage Update (remove staging policy override). Click .
- For software that was previously staged with automatic staging, Unstage Update (remove staging policy override) does not affect staging.
Downloading the Updates
These steps do not affect the performance of SL1. ScienceLogic recommends that you perform these steps at least 3 days before upgrading.
To download updates for previous SL1 software versions that have reached their End of Life date and are no longer supported by ScienceLogic, contact ScienceLogic Support or a designated Customer Success Manager to get the update files.
Store the update files in a location that you can use to upload files to the SL1 system
Importing the Updates
These steps do not affect the performance of SL1. ScienceLogic recommends that you perform these steps at least 3 days before upgrading.
If your system is not currently running a recent release, the upgrade process includes importing multiple update files. You must wait until an update file has imported successfully (i.e. the Import Status column displays Complete in both the EM7 Releases pane and the ScienceLogic OS pane) before importing the next update file.
Although you must import all the update files between your current release and SL1 8.6.0, you must stage only the final update.
To import an update:
- Go to the System Updates page (System > Tools > Updates
- Select the button.
- In the Import a new update modal page, navigate to the software file for the update and select it. Select the button.
- The Import Status column displays the status of the import. Possible values are:
- Processing. Software update is currently being imported by the SL1 system.
- Complete. Software update has been imported successfully.
- Failed. Import has failed due to an unexpected condition. Contact ScienceLogic Support for assistance.
- Missing Base. The SL1 system cannot import this software update until another software package has been imported. Check the log for a message stating which software package needs to be imported.
- The update file will load an update in both the EM7 Releases pane and the ScienceLogic OS pane. You must wait until the update file has imported successfully (i.e. the Import Status column displays Complete) before importing the next update file.
- For more detailed information about importing, in the Import Status column, select the log icon ( ).
- Repeat these steps for each update file between your current version and 8.6.0
Staging the Update
These steps do not affect the performance of SL1. ScienceLogic recommends that you perform these steps at least 3 days before upgrading.
When you manually stage a software update, SL1 checks the status of the software on each SL1 appliance. The platform then stages the software update only to those SL1 appliances that have not yet been staged for this software update.
You must stage only the latest update. For example, if you downloaded updates for 8.4.0, 8.5.0, and 8.6.0, you must stage only the update for 8.6.0.
To manually stage a software update:
- Go to the System Updates page (System > Tools > Updates
- In the EM7 Releases pane, find the software update for EM7 8.6.0 . Select its checkbox.
- In the ScienceLogic OS pane, find the latest OS update. Select its checkbox.
- In the Select Actions field in the lower right, select Stage Update (prepare for installation). Click the button.
- The Staging Status column displays the status of the staging process. Possible values are:
- -- Software is not currently being staged, but one or more SL1 appliances can install it.
- N/A. This update cannot be installed in the current Installation mode.
- Obsolete. The current update is not the latest or has already been installed. If the Installation Mode is set to Upgrade Only, you cannot install an obsolete update.
- Failed. An unexpected error occurred in the staging process. Contact ScienceLogic Support.
- In progress. Staging is in progress but has not completed.
- Complete. Staging has completed and all appliances are ready to deploy the software.
- For more detailed information about staging, in the Staging Status column, select the log icon ( ).
- SL1 will copy the software update to each SL1 appliance that has not yet been staged.
Running the Pre-Upgrade Check
These steps do not affect the performance of SL1. ScienceLogic recommends that you perform these steps at least 3 days before upgrading.
The pre-upgrade check examines the following:
All SL1 Appliances:
The pre-upgrade-checkv2.sh script checks the following on all SL1 appliances:
- Hostname and hosts file
- Uptime and average CPU load
- SL1 version
- OS versions
- MariaDB version
- Current disk utilization
- Is post update running?
- Checks yum config for configured proxy
- Check for packages installed outside of official SL1 update
- Filters out unsupported appliance types
- Gathers system status
Active Database Server:
The pre-upgrade-checkv2.sh script checks the following on all active Database Servers:
- Identifies Data Collectors that are not members of a Collector Group
- Lists all active SL1 appliances
- Lists all SL1 appliances that are disabled or ineligible for upgrade
- Checks for active staging schedules
- Check for active deployment schedules
- Are backups configured and successful?
- Checks pruner status
- Checks SIGTERMs for past 24 hours
- Compares number of tables on disk to the table definition cache
- Lists the largest 10 databases by size
- Searches for long running queries
- Shows status of used mysql connections and variables
- Lists mysql config files
- Gathers pt-diststats at 15 second interval three times
- Checks for system status wrapper bug
- Ensure that silo.log ownership is correct
All Database Servers:
The pre-upgrade-checkv2.sh script checks the following on all Database Servers:
- Checks for a minimum of 300 MB disk space on /var partition
- Checks HA/DR status
- Checks for CRM bans
- Checks for old CRM templates in HA/DR setups
-
Fixes the missing SysVInit script for the MariaDB service
- Are custom SSL certs named silo default?
- Gathers output of top
- Is this SL1 Appliance memory swapping?
Administration Portal:
The pre-upgrade-checkv2.sh script checks the following on all Administration Portals:
- Checks web processes
- Are custom SSL certs named silo default?
Data Collectors and Message Collectors:
The pre-upgrade-checkv2.sh script checks the following on all active Data Collectors and Message Collectors
- Checks running Python processes
Downloading and Running the Pre-Upgrade Check
To download and run the pre-upgrade check:
- Contact ScienceLogic Customer Support to get the file. Save the file to a local computer.
- Use WinSCP or another file-transfer utility to copy the file pre-upgrade-check-v2.sh to the directory /home/em7admin of each SL1 appliance.
- Go to the console of each SL1 appliance or open a SSH session to each SL1 appliance.
- Navigate to the directory /home/em7admin.
-
At the shell prompt, enter the following to make the script executable:
chmod +x pre-upgrade-check-v2.sh -
To execute the script with the default options:
sudo ./pre-upgrade-check-v2.sh -<appliance_type> > /tmp/preupgrade-check-v2-`hostname -s`.`date "+%Y%m%d"` 2>&1 - -d = Database Appliance
- -o = All-In-One
- -c = Data Collector
- -m = Message Collector
- -a = Admin Portal
where:
appliance_type is one of the following:
- To view the output from the script, view the file /tmp/pre-upgrade-check-v2-<current hostname>.<today's date>
- If the output includes errors and you need help fixing them, contact ScienceLogic Customer Support to fix the errors before upgrading.
- Perform these steps on each SL1 appliance.
Putting All SL1 Appliances into Maintenance Mode
ScienceLogic recommends that you perform these steps during a maintenance window.
Immediately before deploying a software update, ScienceLogic recommends that you put all SL1 appliances in maintenance mode. This will prevent spurious error messages and events during the deployment.
To enable user maintenance mode for all the SL1 appliances in your SL1 system:
- Go to the Appliance Manager page (System > Settings > Appliances). Note the list of SL1 appliances in your system.
- Go to the Device Manager page (Registry > Devices > Device Manager):
- In the Device Manager page, select the checkbox for each SL1 appliance in your SL1 system. This includes both primary and secondary Database Servers.
- In the Select Action drop-down list, select the following:
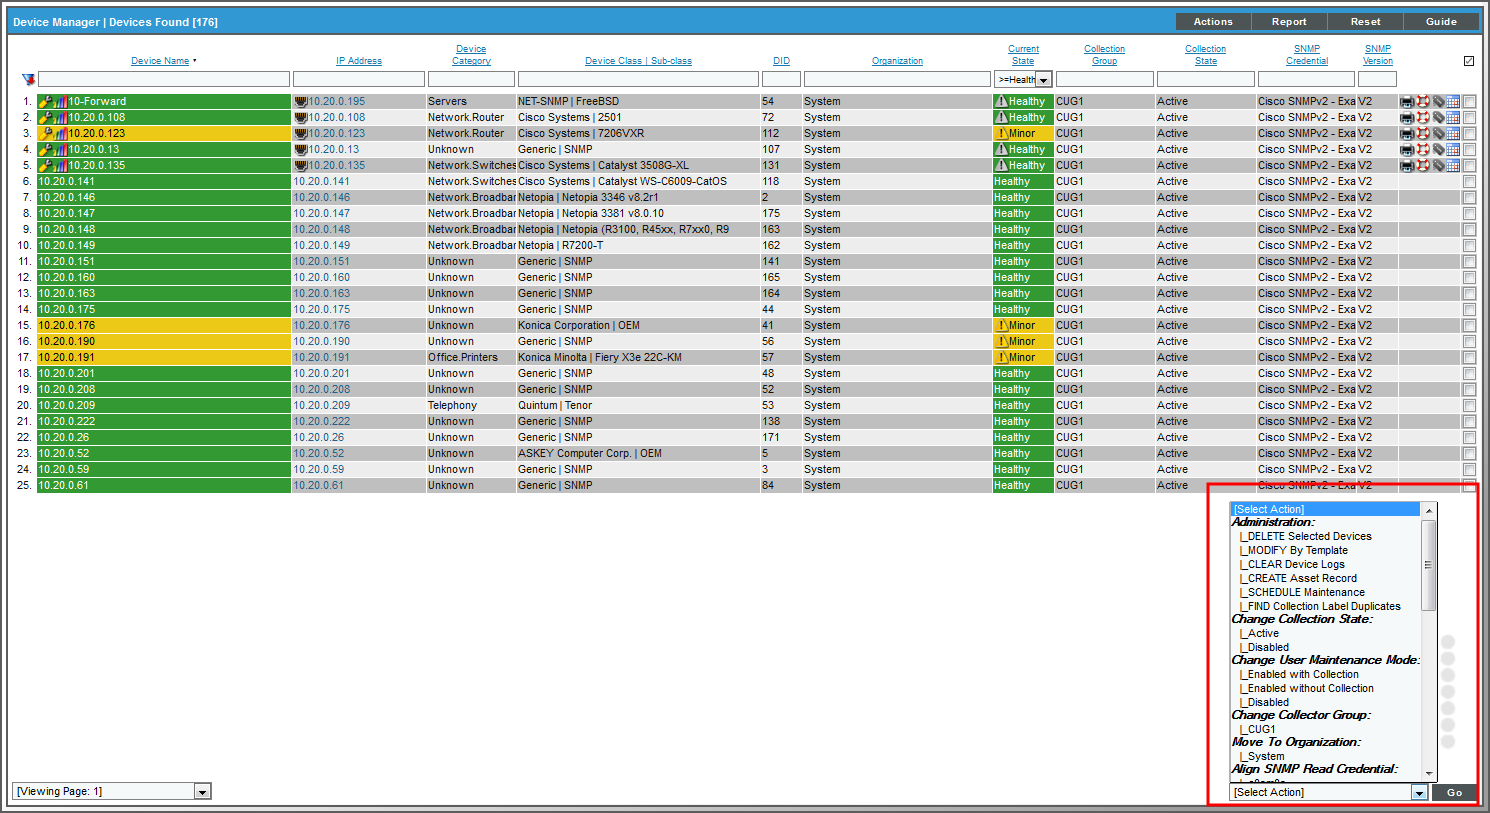
- Change User Maintenance Mode: Enabled without Collection. This option puts the selected devices into user maintenance mode with collection disabled. The devices will remain in this state until you or another user disables user maintenance mode.
- Click the button.
Deploying the Update
ScienceLogic recommends that you perform these steps during a maintenance window.
When you deploy a software update, SL1 checks the status of the software on each SL1 appliance. SL1 can deploy the software update to those SL1 appliances that have been successfully staged.
If SL1 is still staging the software update when you select the lightning bolt icon (![]() ), SL1 will wait until staging has completed before deploying the updates to each SL1 appliance.
), SL1 will wait until staging has completed before deploying the updates to each SL1 appliance.
You must deploy only the latest update. For example, if you downloaded updates for 8.4.0, 8.5.0, and 8.6.0, you must deploy only the update for 8.6.0.
To deploy a software update:
- Go to the System Updates page (System > Tools > Updates
- Ensure that the software update for EM7 8.6.0 has a Staging Status of Complete.
- In the EM7 Releases pane, find the software update for EM7 8.6.0 . Select its lightning bolt icon (
 ).
). - In the ScienceLogic OS pane, find the latest OS update. Select its lightning bolt icon ().
- The software update will be deployed to those SL1 appliances in your system that have been successfully staged.
- The Deployment Status column displays the status of the deployment. Possible values are:
- Full. Software was fully deployed to all SL1 appliances.
- Partial. Software was deployed to some but not all SL1 appliances.
- Outdated. Software is not the latest version. A later version has been deployed.
- --. Software has not been deployed on any SL1 appliances.
- For more detailed information about deployment, in the Deployment Status column, select the log icon ( ).
- SL1 will install the software update on each SL1 appliance .
Taking All SL1 Appliances Out of Maintenance Mode
To disable user maintenance mode for all the SL1 appliances in your SL1 system:
- Go to the Appliance Manager page. Note the list of SL1 appliances in your system.
- Go to the Device Manager page (Registry > Devices > Device Manager):
- In the Device Manager page, select the checkbox for each SL1 appliance in your SL1 system.
- In the Select Action drop-down list, select the following:
- Change User Maintenance Mode: Disabled. This option disables user maintenance mode for the selected devices.
- Click the button.
Performing Deltaless Upgrades
After performing the steps to upgrade to SL1 8.6.0, continue to the Upgrading the SL1 Distributed Architecture on SL1 versions 8.6.0 and Later to upgrade to the latest SL1 release.
Upgrading the SL1 Distributed Architecture on SL1 versions 8.6.0 and Later
As of 8.12.0, SL1 uses an improved System Updates tool (System > Tools > Updates).
Version 8.12.1.3 introduced delta-less upgrades, meaning that you can import a single file and upgrade to the latest version. Delta-less upgrades can upgrade the SL1 system from any SL1 release 8.6.0 or later to the current release, using only a single update.
You must be running SL1 8.6.0 or later to use delta-less updates.
Ensure that the each SL1 appliance has 3GB of free space in the /var partition to allow you stage the upgrade. Ensure that each SL1 appliance has 1GB of free space in / (the root partition) to allow you to deploy the upgrade.
Any distributed system running 8.6.0 or later can be upgraded by importing, staging, and deploying a single update file.
Upgrading the Distributed Stack for SL1 includes the following steps:
- For systems prior to 8.12.0, disabling automatic staging
- Downloading the Update
- Importing the Update
- Staging the Update
- Monitoring Staging
- Running the Pre-Upgrade Check
- Putting All SL1 Appliances in Maintenance Mode
- Deploying the Update
- Monitoring Deployment
- Putting All SL1 Appliances Out of Maintenance Mode
Special Steps for SL1 8.12.0 and Earlier
For systems running an SL1 version prior to 8.12.0, go to the System Updates page and disable automatic staging (System > Tools > Updates > Actions > Disable automatic staging).
If you have previously used manual staging, perform these additional steps:
- Select all updates in the EM7 Releases pane and select all updates in the ScienceLogic OS pane.
- In the Select Action menu, select Unstage Update (remove staging policy override). Click .
- For software that was previously staged with automatic staging, Unstage Update (remove staging policy override) does not affect staging.
Downloading the Update
To download updates for previous software versions that have reached their End of Life date and are no longer supported by ScienceLogic, contact ScienceLogic Support or a designated Customer Success Manager to get the update files.
Before you can load a patch or update onto your instance of the , you must first download the patch or update to your local computer.
The following steps do not affect the performance of the . ScienceLogic recommends that you perform these steps at least 3 days before upgrading.
To download the patch or update:
- Log in to https://support.sciencelogic.com. Use your ScienceLogic customer account and password to access this site.
- Select the button, select the Product Downloads menu, and choose Platform.
-
Find the release you are interested in and click its name.

- In the Release Version article, click on the link for the release image or release patch you want to download. Scroll to the bottom of the page.
- Under Files, select the link for the file you want to download. The file is then downloaded to your local computer.
Importing the Update
To import a product update on to your :
These steps do not affect the performance of the . ScienceLogic recommends that you perform these steps at least 3 days before upgrading.
- Make sure that you can navigate to the patch file.
- In the , go to the System Updates page (System > Tools > Updates).
- In the System Updates page, click the button.
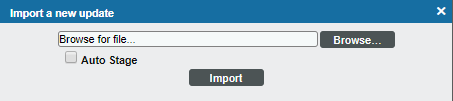
- In the Import a new update modal page, browse to the product update file and select it.
- If you select the Auto Stage button, the will begin staging as soon as the import is completed.
- If you do not select the Auto Stage button, you must click the staging button(
 ) after import is completed. You can do so at any time after import has completed.
 - For more information on automatic staging and manual staging, see the section on
- Click the button.
- In the System Updates page, the Import Status column can have one of the following statuses:
- In Progress. Software is currently being imported by the .
- Complete. Software has been imported successfully.
- Failed. Software import has failed due to an unexpected condition. Contact ScienceLogic Support for assistance.
- Missing Base. The cannot import this software until another software package has been imported. The dependency is for compression purposes. Check the log for a message stating which software package needs to be imported.
- The update file or patch file is imported to and appears in the System Updates page.
NOTE: For details on the import process, go to the System Updates page, find the entry for the software you are interested in, go to its Import Status column, and click the log icon (![]() ).
).
Staging the Update
After you import a software update to your , you must stage the software update. During staging, the copies the software update to each . Staging allows SL1 to simultaneously apply the software changes to each , regardless of the speed of the connection to each . The stages updates per import. You can choose to automatically stage imports or manually stage import.
For easiest troubleshooting, ScienceLogic recommends that you manually stage imports.
These steps do not affect the performance of the . ScienceLogic recommends that you perform these steps at least 3 days before upgrading.
After the software update is imported and staged, you can deploy the software.
Automatic Staging
To enable automatic staging:
- In SL1, go to the System Updates page (System > Tools > Updates).
- In the System Updates page, click the button.
- In the Import a new update modal page, browse to the product update file and select it.
- If you select the Auto Stage button, the will begin staging as soon as the import is completed.
- After import, in the System Updates page, the Staging Status column will display the number of ScienceLogic appliances that have been successfully stage compared to the total number of ScienceLogic appliances.
NOTE: For details on the staging process, go to the System Updates page, find the entry for the software you are interested in, go to its Staging Status column, and click the log icon (![]() ).
).
- The Staging Status column can have one of the following statuses:
-
--. No staging request is active and software has not been staged on any SL1 appliances.
-
Scheduled. The is aware of the staging request and is preparing for staging.
-
In Progress. Staging is in progress but has not completed. The page displays the percentage complete as staging progresses.
-
Complete. Staging has completed, and all appliances are ready to deploy the software.
-
Incomplete. Staging has completed, and one or more appliances are ready to deploy the software.
-
Canceled. User manually canceled the staging process.
-
Outdated. The current update is not the latest or has already been installed.
-
Failed. An unexpected error occurred in the staging process. Contact ScienceLogic Support.
To disable automatic staging:
- In SL1, go to the System Updates page (System > Tools > Updates).
- In the System Updates page, click the button.
- In the Import a new update modal page, browse to the product update file and select it.
- If you do not select the Auto Stage button, you must click the staging button() after import is completed. You can do so at any time after import has completed.
NOTE: For details on the staging process, go to the System Updates page, find the entry for the software you are interested in, go to its Staging Status column, and click the log icon (![]() ).
).
Manually Staging an Update
You can manually stage a software update to one or more SL1 appliances.
For example, you can manually stage a software update:
- If you imported an update but do not want to stage it immediately.
- If you add another ScienceLogic appliance to your SL1 system and need to apply software updates.
- If staging failed on one or more ScienceLogic appliances.
- If you want to ensure that a previous staging process was successful.
When you manually stage a software update, SL1 checks the status of the software updated on each ScienceLogic appliance. SL1 then stages the software update only to those SL1 appliances that have not yet been staged for this software update.
To manually stage a software update:
- In SL1, go to the System Updates page (System > Tools > Updates).
- In the System Updates page, find the software update you want to stage. Select its staging icon ().
- The software update will be copied to each ScienceLogic appliance that has not yet been staged.
- The Staging Status column will display the number of ScienceLogic appliances that have been successfully stage compared to the total number of ScienceLogic appliances.
NOTE: For details on the staging process, go to the System Updates page, find the entry for the software you are interested in, go to its Staging Status column, and click the log icon (![]() ).
).
- The Staging Status column can have one of the following statuses:
-
--. No staging request is active and software has not been staged on any SL1 appliances.
-
Scheduled. The is aware of the staging request and is preparing for staging.
-
In Progress. Staging is in progress but has not completed.
-
Complete. Staging has completed, and all appliances are ready to deploy the software.
-
Incomplete. Staging has completed, and one or more appliances are ready to deploy the software.
-
Canceled. User manually canceled the staging process.
-
Outdated. The current update is not the latest or has already been installed.
-
Failed. An unexpected error occurred in the staging process. Contact ScienceLogic Support.
Monitoring Staging
For SL1 versions 8.12.0 and later, you can monitor staging. To do so:
- Either go to the console of the Database Server or use SSH to access the Database Server.
-
Enter the following at the shell prompt:
monitor_stage -
You should see something like the following image:
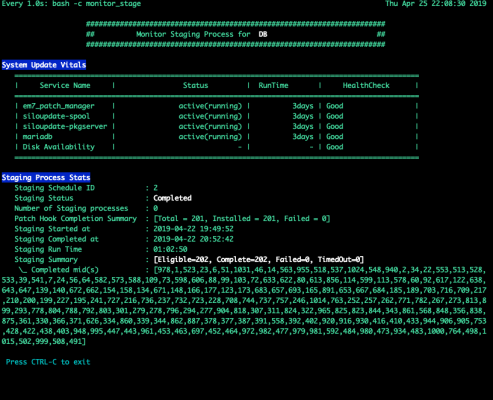

- System Update Vitals. Displays the current status of the services that are required for System Update.
- Staging Process Stats. Displays status of staging on all SL1 appliances.
Running the Pre-Upgrade Check for SL1 10.1 and Later
After importing and staging an update, you can run a pre-upgrade check before deploying. The pre-upgrade check will ensure that all criteria are met before deploying.
These steps do not affect the performance of SL1. ScienceLogic recommends that you perform these steps at least 3 days before upgrading.
The pre-upgrade check examines the following:
- Is each SL1 Appliance eligible to be updated?
- Are updates enable on each SL1 Appliance?
- Are any of the SL1 Appliances running CentOS 5?
- Is this hostfile on each SL1 Appliance correctly configured?
- Is each Data Collector and Message Collector in a Collector Group?
- Is there enough free space on the disk to perform the upgrade?
- Is the RPM database corrupted?
- Are the RPM packages corrupted?
- Does the patch hook directory have the correct owner assigned?
- Detect out-of-date CRM templates on High Availability and Disaster Recovery systems
- If /etc/init.d/mysql does not exist, creates the file
- Skips SL1 appliances that have been deleted since the last upgrade
Running the Pre-Upgrade Check
To run a pre-upgrade check:
- Go to the System Updates page (System > Tools > Updates.
- Find the upgrade that you want to deploy.
- Click the purple checkmark at the end of the row. The pre-upgrade check will run.
- If a pre-upgrade criterion fails, the button will be disabled for the selected row.
- To view the output from the pre-upgrade check, click on the on the magnifying-glass icon () in the selected row.
- If the pre-upgrade check finds a failure, see the list below for possible causes.
- Fix all failures before deploying the update.
CentOS 5 Failure
CentOS 5 is no longer supported by System Update. If one or more Data Collectors are running CentOS5, the pre-upgrade check will fail. Contact your Customer Success Manager to determine how to upgrade your Data Collectors.
Collector Group Membership
This test checks that each Data Collector and Message Collector is a member of a Collector Group.
If a Data Collector or Message Collector is not a member of a Collector Group, the pre-upgrade test will define the appliance as "not eligible for patching.
To fix this error, add the Data Collector or Message Collector to a Collector Group.
Eligibility Failure
The most common reasons for eligibility failure are:
- The SL1 appliance is not licensed or the license has expired
- The SL1 appliance cannot be reached over the network
- The Data Collector has failed over
- The SL1 appliance is not configured
- The Data Collector is waiting to be returned to service
- The Data Collector is not assigned to a Collector Group
Enabled Failure
By default, all SL1 appliances are enabled for patching.
However, if you have used a command-line tool to exclude an SL1 appliance from updates, the pre-upgrade check will fail. To fix this error, include the SL1 appliance for updates.
Free Disk-Space Failure
This test checks the root partition and requires 1GB of free disk space. If the root partition does not have 1GB of free disk space, the pre-upgrade check will fail.
If the root partition does not have 1GB of free disk space, you must archive or delete files that are no longer required or add a new empty disk and resize the filesystem.
Host File Failure
This test validates the /etc/hosts file for the presence of an IPv6 entry for localhost, which is required by System Update.
If /etc/hosts does not include an IPv6 entry for localhost, the pre-upgrade test automatically adds the required entry.
Check for following in case of failure:
- The /etc/hosts file exists
- The /etc/hosts can be edited by root
Patch-Hook Ownership Failure
If the owner of the patch hook directory ((/var/lib/em7/patch_hook) is incorrect, the pre-upgrade test automatically fixes the ownership. However, if this error occurs, check for the following:
- The patch hook directory (/var/lib/em7/patch_hook) does not exist
- The s-em7-core user or the s-em7-core group does not exist
RPM Database Failure
If the RPM database fails the pre-upgrade test, the RPM database is corrupted.
Follow these steps on this page to recover the RPM database:
- Either go to the console of the Database Server or use SSH to access the Database Server. Log in with the credentials you defined when you installed the Database Server.
-
At the shell prompt, enter the following:
mkdir -p /tmp/rpm.bak
cp /var/lib/rpm/* /tmp/rpm.bak
rm -f /var/lib/rpm/__db*
rpm --rebuilddb -vv
rpm -q kernel
-
If the last command returns a value, you can delete the backup directory using the following command.
rm -Rf /tmp/rpm.bak
RPM Package Failure
If one or more RPM packages failed the pre-upgrade test, possible causes are:
- Packages are not staged, and hence some files are missing. This can be caused due to a failed staging or a timeout during staging. You can try to stage again. You can also adjust the timeout for staging.
- Duplicate packages
- Conflicting packages
- Unmet dependencies
Duplicate Packages:
- Either go to the console of the Database Server or use SSH to access the Database Server. Log in with the credentials you defined when you installed the Database Server.
-
At the shell prompt, enter the following command:
sudo package-cleanup --dupes -
If there are duplicate packages, use the following command to remove them:
sudo package-cleanup --cleandupes --removenewestdupes
Conflicting Packages
- Look for conflicting packages in the staging log
- Verify that the package is a part of SL1 ISO or patch bundle
- If the package is not part of the SL1 ISO or patch bundle, uninstall the package.
Unmet dependencies
You'll have to reset the staging status of the appliance and stage it again. Contact ScienceLogic Customer Success for help in resetting the staging status.
Running the Pre-Upgrade Check for SL1 8.14 and Earlier
These steps do not affect the performance of SL1. ScienceLogic recommends that you perform these steps at least 3 days before upgrading.
The pre-upgrade check examines the following:
All SL1 Appliances:
The pre-upgrade-checkv2.sh script checks the following on all SL1 appliances:
- Hostname and hosts file
- Uptime and average CPU load
- SL1 version
- OS versions
- MariaDB version
- Current disk utilization
- Is post update running?
- Checks yum config for configured proxy
- Check for packages installed outside of official SL1 update
- Filters out unsupported appliance types
- Gathers system status
Active Database Server:
The pre-upgrade-checkv2.sh script checks the following on all active Database Servers:
- Identifies Data Collectors that are not members of a Collector Group
- Lists all active SL1 appliances
- Lists all SL1 appliances that are disabled or ineligible for upgrade
- Checks for active staging schedules
- Check for active deployment schedules
- Are backups configured and successful?
- Checks pruner status
- Checks SIGTERMs for past 24 hours
- Compares number of tables on disk to the table definition cache
- Lists the largest 10 databases by size
- Searches for long running queries
- Shows status of used mysql connections and variables
- Lists mysql config files
- Gathers pt-diststats at 15 second interval three times
- Checks for system status wrapper bug
- Ensure that silo.log ownership is correct
All Database Servers:
The pre-upgrade-checkv2.sh script checks the following on all Database Servers:
- Checks for a minimum of 300 MB disk space on /var partition
- Checks HA/DR status
- Checks for CRM bans
- Checks for old CRM templates in HA/DR setups
-
Fixes the missing SysVInit script for the MariaDB service
- Are custom SSL certs named silo default?
- Gathers output of top
- Is this SL1 Appliance memory swapping?
Administration Portal:
The pre-upgrade-checkv2.sh script checks the following on all Administration Portals:
- Checks web processes
- Are custom SSL certs named silo default?
Data Collectors and Message Collectors:
The pre-upgrade-checkv2.sh script checks the following on all active Data Collectors and Message Collectors
- Checks running Python processes
Downloading and Running the Pre-Upgrade Check
To download and run the pre-upgrade check:
- Contact ScienceLogic Customer Support to get the file. Save the file to a local computer.
- Use WinSCP or another file-transfer utility to copy the file pre-upgrade-check-v2.sh to the directory /home/em7admin of each SL1 appliance.
- Go to the console of each SL1 appliance or open a SSH session to each SL1 appliance.
- Navigate to the directory /home/em7admin.
-
At the shell prompt, enter the following to make the script executable:
chmod +x pre-upgrade-check-v2.sh -
To execute the script with the default options:
sudo ./pre-upgrade-check-v2.sh -<appliance_type> > /tmp/preupgrade-check-v2-`hostname -s`.`date "+%Y%m%d"` 2>&1 - -d = Database Appliance
- -o = All-In-One
- -c = Data Collector
- -m = Message Collector
- -a = Admin Portal
where:
appliance_type is one of the following:
- To view the output from the script, view the file /tmp/pre-upgrade-check-v2-<current hostname>.<today's date>
- If the output includes errors and you need help fixing them, contact ScienceLogic Customer Support to fix the errors before upgrading.
- Perform these steps on each SL1 appliance.
Putting All SL1 Appliances into Maintenance Mode
ScienceLogic recommends that you perform these steps during a maintenance window.
Immediately before deploying a software update, ScienceLogic recommends that you put all SL1 appliances in maintenance mode. This will prevent spurious error messages and events during the deployment.
To enable user maintenance mode for all the SL1 appliances in your SL1 system:
- Go to the Appliance Manager page (System > Settings > Appliances). Note the list of SL1 appliances in your system.
- Go to the Device Manager page (Registry > Devices > Device Manager):
- In the Device Manager page, select the checkbox for each SL1 appliance in your SL1 system. This includes both primary and secondary Database Servers.
- In the Select Action drop-down list, select the following:
- Change User Maintenance Mode: Enabled without Collection. This option puts the selected devices into user maintenance mode with collection disabled. The devices will remain in this state until you or another user disables user maintenance mode.
- Click the button.
Deploying the Update
During deployment, avoid the following tasks:
- Running integrations and third-party applications that access the SL1 database or manipulate data on SL1
- Running discovery sessions
- Running nightly discovery
- Bringing HA/DR out of maintenance mode
- Adding new SL1 Appliances
- Importing a new patch
- Adding Data Collectors to a Collector Group
- Removing Data Collectors from a Collector Group
- Rebalancing a Collector Group
- Killing processes related to patching and upgrading
- Run reporting jobs
- Unpausing the proc_mgr process
After you have imported and staged an update to , run the pre-upgrade check, and fixed all errors found by the pre-upgrade check, you can either immediately deploy the update or deploy the update at a later time.
When you deploy an update, the update is installed on all appliances that have already been staged.
NOTE: When you deploy an update, checks to ensure that you have already deployed all required updates. If you have not, will generate an error message specifying the updates you must deploy before continuing with the current update.
To deploy a software update on your appliances:
- Make sure that you have imported and staged the update file.
- Go to the System Updates page (System > Tools > Updates).
- In the System Updates page, find the software update you want to deploy. Click the lightning bolt icon (
 ) to deploy the software.
NOTE: If is still staging the patch when you click the lightning-bolt icon (![]() ), SL1 will wait until staging has completed before deploying the updates to each ScienceLogic appliance.
), SL1 will wait until staging has completed before deploying the updates to each ScienceLogic appliance.
- The software update will be deployed to all appliances in your SL1 system that have already been staged. If one or more appliances in your SL1 system have been successfully staged, will deploy the update to those appliances.
- During deployment, the Deployment Status column can have one of the following statuses:
-
--. No deployment request is active, and software has not been deployed on any SL1 appliances.
-
Scheduled. The is aware of the deployment request and is preparing for deployment.
-
In Progress. Deployment is in progress but has not completed.
-
Complete. Deployment has completed, and all appliances are updated.
-
Incomplete. Deployment has completed, and one or more, but not all, appliances are updated.
-
Canceled. User manually canceled the deployment.
-
Outdated. The current update is not the latest or has already been installed.
-
Failed. An unexpected error occurred in the deployment process. Contact ScienceLogic Support.
NOTE: For details on the deployment process, go to the System Updates page, find the entry for the software you are interested in, go to its Deployment Status column, and click the log icon (![]() ).
).
Troubleshooting System Update
You can use the sysuptb troubleshooting tool to determine issues with System Update and to generate diagnostic information about the update. You can also use the phtb tool to troubleshoot issue with the PhoneHome configuration.
These tools can be useful when System Update does not work as expected, or if you have issues with the PhoneHome configuration or with communication between appliances and the Database Server. These tools are available on all SL1 appliances starting with SL1 version 10.2.0, and the tools are backwards-compatible to SL1 version 8.12.0.
Using the sysuptb Troubleshooting Tool
To use the sysuptb troubleshooting tool:
- Either go to the console of any SL1 appliance or use SSH to access the appliance
-
Enter the following at the shell prompt:
sudo sysuptb -h
-
For more information about each argument, enter the following at the shell prompt:
sudo sysuptb <argument> -h
Available Commands
-
The following command executes all troubleshooting tests for System Update:
sudo sysuptb all <optionally -x name_of_test_to_exclude>To learn more about a test run, use this command: sudo sysuptb help <test-name>
-
Example:
sudo sysuptb allExecuting filestore tests 912 / 912 [-----------------------------------------------------] 100.00% 14 p/s Filestore test summary: [Total: 912, Intact: 912, Incomplete: 0, Corrupt: 0] Executing test for deleted appliances in patch history No deleted appliances were found in the patch history Executing test for invalid file id in patch schedules No patch schedules were found to have invalid file id Executing test for RPM database corruption RPM database is intact Executing test to check if filestore is empty Filestore has 1026 files Executing test for deactivating services Service test summary: [Total: 1, Active: 1, Inactive: 0, Healed: 0, Skipped: 0, Failed (to heal): 0] Executing test for free disk space Free disk space test summary: [Total: 2, Pass: 2, Failed: 0] Executing test for service errors Service error test summary: [Total: 2, Without Errors: 2, Restarted: 0, Failed: 0] Executing hosts file check for IPV6 entry (::1) for localhost An entry for ::1 is already present in the hosts file Proxy is not configured for yum. Executing test for hung yum process No yum processes found Yum process summary: [Total: 0, Hung: 0]
-
The following command searches the logs for errors that match a service name and restarts services if any errors are found.
sudo sysuptb check-service-error <optionally -s name_of_service>If you do not provide the name of a service, the command searches the logs for errors for siloupdate-pkgserver.service and silopupdate-spool.service.
-
Example:
sudo sysuptb check-service-errorExecuting test for service errors Service error test summary: [Total: 2, Without Errors: 2, Restarted: 0, Failed: 0]
-
The following command removes deleted SL1 appliances from the history of system updates so that they SL1 does not search for them during update.
sudo sysuptb clear-mids
-
Example:
sudo sysuptb clear-midsExecuting test for deleted appliances in patch history No deleted appliances were found in the patch history
-
The following command cancels al schedule updates that include an invalid ID for the patch file.
sudo sysuptb clear-schedule
-
Example:
sudo sysuptb clear-scheduleExecuting test for invalid file id in patch schedules No patch schedules were found to have invalid file id
-
The following command checks the filestore of downloaded packages for corrupt files and marks the corrupt files as incomplete.
sudo sysuptb filestore
-
Example:
sudo sysuptb filestoreExecuting filestore tests 912 / 912 [------------------------------------------------------------------------------------------------------------------------------------------------------------------------------------------------------------------] 100.00% 14 p/s Filestore test summary: [Total: 912, Intact: 912, Incomplete: 0, Corrupt: 0]
-
The following command checks the file system for available free space.
sudo sysuptb free-space <optionally, -d path_for_drive = minimum_size>If you do not provide the path and minimum size of the directory, the command examines /var to make sure it has 300MB of free space and / to make sure it has 1GB of free space.
-
Example:
sudo sysuptb free-space --disk /var=300MBExecuting test for free disk space Free disk space test summary: [Total: 1, Pass: 1, Failed: 0]
-
The command checks for update services that are stuck in a deactivating state and then heals them.
sudo sysuptb heal-service <optionally -s service_name>If you do not specify a service, the command examines the service em7_patch_manager.service.
-
Example:
sudo sysuptb heal-service
Executing test for deactivating services
Service test summary: [Total: 1, Active: 1, Inactive: 0, Healed: 0, Skipped: 0, Failed (to heal): 0]
-
The following command checks the /etc/hosts file for an entry for IPv6 for the current server (like a loopback address). If no entry exists, the command adds ::1 to the /etc/hosts file.
sudo sysuptb hosts
-
Example:
sudo sysuptb hostsExecuting hosts file check for IPV6 entry (::1) for localhost An entry for ::1 is already present in the hosts file
-
The following command check is the filestore that holds the upgrade packages is empty.
sudo sysuptb is-filestore-empty
-
Example:
sudo sysuptb is-filestore-emptyExecuting test to check if filestore is empty Filestore has 1026 files
-
The following command checks the RPM database on /var/lib/rpm for corruption. If the command detects corruption, the output includes steps for remediation.
sudo sysuptb rpmdb
-
Example:
sudo sysuptb rpmdbExecuting test for RPM database corruption RPM database is intact
-
The following command checks for a yum process which is hung.
sudo sysuptb yum-proc <optionally, -t timeout_in_minutes>If you do not specify a running time, in minutes, the command searches for yum processes that have been running for more than 120 minutes.
-
Example:
sudo sysuptb yum-procExecuting test for hung yum process No yum processes found Yum process summary: [Total: 0, Hung: 0]
-
The following command checks if yum is configured with proxy. If so, the command removes the proxy configuration.
sudo sysuptb yum-proxy
-
Example:
sudo sysuptb yum-proxyProxy is not configured for yum.
Using the phtb Troubleshooting Tool
To use the phtb troubleshooting tool:
-
Either go to the console of an SL1 appliance using PhoneHome communication or use SSH to access the appliance.
-
Enter the following at the shell prompt:
sudo phtb -h
-
For more information about each argument, enter the following at the shell prompt:
sudo phtb <argument> -h
To learn more about a test run, use this command: sudo phtb help <test-name>
Available Commands
-
The following command checks destinations for SSH connectivity issues:
sudo phtb destination -
The following command checks the target host for SSH connectivity issues:
sudo phtb probe-host -
The following command checks connectivity to the proxy host, if configured:
sudo phtb proxy
Monitoring Deployment
For SL1 versions 8.12.0 and later, you can monitor deployment. To do so:
- Either go to the console of the Database Server or use SSH to access the Database Server.
-
Enter the following command at the shell prompt:
monitor_deploy -
You should see something like the following figure:

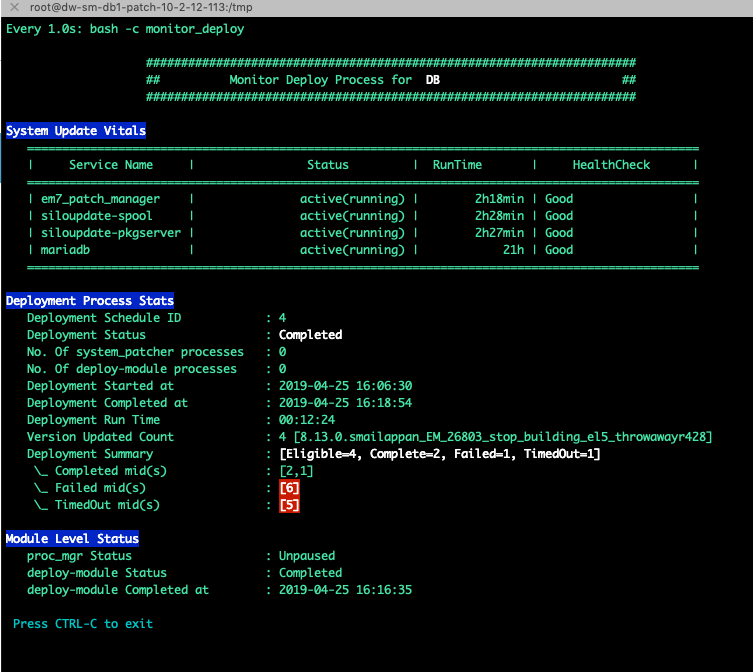
- System Update Vitals. Displays the current status of the services that are required for System Update.
- Deployment Process Stats. Displays status of deployment on all SL1 appliances.
- Module Level Status. Displays the status of the three deployment steps.
Taking All SL1 Appliances Out of Maintenance Mode
To disable user maintenance mode for all the SL1 appliances in your SL1 system:
- Go to the Appliance Manager page. Note the list of SL1 appliances in your system.
- Go to the Device Manager page (Registry > Devices > Device Manager):
- In the Device Manager page, select the checkbox for each SL1 appliance in your SL1 system.
- In the Select Action drop-down list, select the following:
- Change User Maintenance Mode: Disabled. This option disables user maintenance mode for the selected devices.
- Click the button.
Refer to the release notes for your current release to determine if you must upgrade MariaDB after upgrading.
Refer to the release notes for your current release to determine if you must reboot all SL1 appliances after upgrading.
Upgrading SL1 Extended Architecture
As of January 1, 2021, new installations of SL1 Extended Architecture are available only on SaaS deployments.
For existing on-premises deployments of SL1 Extended Architecture, please contact ScienceLogic Customer Support for upgrade documentation and help with technical issues.
Manual Steps for Updates to 8.4.x and Earlier Systems
If you upgraded from an 8.4.x system or earlier, you must manually apply the following changes to every Message Collector and All-In-One Appliance in your SL1 system:
- Either go to the console or use SSH to access the SL1 appliance.
- Log in as user em7admin with the appropriate password.
-
Enter the following at the command line:
sudo visilo -
Locate the following line:
eventmanager = syslog,trap,internal
-
Add ",agent" to the end of the line. The line should now look like this:
eventmanager = syslog,trap,internal,agent - Save the file and exit vi (:wq).
On an All-In-One Appliance, this line will include additional entries in the comma-delimited list.
8.4.2 included a new feature for Ticketing. The Note Editor for tickets includes a drop-down menu where the user can specify that the note be saved as Plain Text or HTML. Ticket notes created in the API can also be saved as Plain Text or HTML. HTML is the default format for ticket notes in both the Note Editor and the API.
This new feature required a change to the database schema that will be performed immediately after a system is upgraded to 8.4.2 or later for the first time. If your system has not been upgraded to 8.4.2 or later, this schema change will be performed after upgrading to 8.6.0.
During the post-patch process, all exiting ticket notes will be migrated to the new schema in batches. During the migration, all ticket notes will be unavailable. The user interface and API will not display ticket notes. Ticket notes cannot be viewed or updated during the post-patch process. On a system that included 2,000,000 ticket notes, this process took approximately 6 hours.
If you require access to all ticket notes immediately after installing an 8.4.2 or later release, contact ScienceLogic Customer Support for details on manually updating the database schema before you upgrade to 8.4.2 or later.
Automatically Upgrading MariaDB with a Script
To reduce spurious events, you can put the Database Server in maintenance mode while you upgrade MariaDB. For details, see the chapter on Putting the Database Server into Maintenance Mode
Refer to the release notes for your current release to determine if you must upgrade MariaDB. Not every SL1 update requires an upgrade of for MariaDB.
SL1 will automatically update MariaDB-client, MariaDB-common, and MariaDB-shared RPMs but will not update the MariaDB Server RPM. You must update the MariaDB Server RPM.
SL1 10.1.0 and later releases include the module_upgrade_mariadb script to automatically upgrade MariaDB server.
You should store all custom configuration settings for each MariaDB database in the file /etc/siteconfig/mysql.siteconfig. If you have added custom settings to the file /etc/my.cnf.d/silo_mysql.cnf, those changes will be overwritten each time you upgrade MariaDB. Before upgrading, copy any custom settings to the file /etc/siteconfig/mysql.siteconfig. SL1 will save these custom settings and apply them after you upgrade MariaDB.
The module_upgrade_mariadb script:
- Upgrades the following SL1 appliances:
- All Database Servers
- All-In-One Appliances
- Data Collectors
- Message Collectors
- Upgrades High Availability (HA) and Disaster Recovery (DR) systems
- Includes a "test only" option before executing upgrade
- Enforces upgrading the primary Database Server before upgrading secondary Database Server and the Data Collectors.
- Will skip SL1 appliances that have already been updated
- Logs entire sequence of commands and output for later analysis
- Stores log files in /data/logs/module_upgrade_mariadb.log and /data/logs/.upgrade_mariadb.log
- Checks for differences between current configuration and version you are about to install and spawns an alert. To skip this check, use the -s -s option
To upgrade MariaDB, perform the following:
- Either go to the console of the Database Server or use SSH to access the Database Server.
-
At the shell prompt, enter the following command:
sudo /opt/em7/bin/module_upgrade_mariadb -m all -
To see all the options for the module_upgrade_mariadb script, enter the following command at the shell prompt:
/opt/em7/bin/module_upgrade_mariadb -hUsage:
module_upgrade_mariadb -m <module_id> [-t|--test] [-y|--assumeyes] [-s|--skip_conf_file_error][-p|--pool size <number_of_modules>][-h|--help]
- The script includes these options:
- -m parameter specifies the SL1 appliances that you want to upgrade. You can specify:
- -m <mid1, mid2…midN> provides a comma-separated module IDs.
- -m all : upgrade all appliances (Database Servers, All-In-One Appliances, Data Collectors, and Message Collectors).
- -m all -db : upgrade all Database Servers.
- -m all-cu : upgrade all Data Collectors and Message Collectors.
- -t parameter specifies not to upgrade but instead to run a test of the upgrade script.
- -y parameter specifies to automatically enter "yes" at all prompts.
- -s parameter specifies to ignore errors in the MySQL configuration files and proceed with the upgrade.
- -p parameter specifies the number of Data Collectors that you want to upgrade simultaneously. Database Servers will be upgraded one at a time. Possible values are 1 - 20. The default value is 1.
- -p <number_of_modules> is the number of Data Collectors to upgrade simultaneously. Values are 1 - 20. The default value is 1.
-
To view the status of the automatic upgrade, enter the following command:
monitor_upgrade_mariadb
Additional Steps for MariaDB Upgrades in 10.1.x
SL1 10.1.x includes an upgrade to MariaDB. The upgrade did not include a tool, jemalloc, that helps manage memory usage.
This section applies only to the following releases:
- 10.1.0
- 10.1.1
- 10.1.2
- 10.1.3
- 10.1.4
- 10.1.4.1
- 10.1.4.2
- 10.1.5
- 10.1.5.1
For SL1 versions later than 10.1.5.1, jemalloc is included with the platform. For SL1 versions prior to 10.1.0, jemalloc is included with the platform.
To avoid problems with memory usage on Database Servers, perform the following steps after upgrading MariaDB for 10.1.x.
Perform these steps first on the active Database Server and then on each additional Database Server in your SL1 System.
- Open an SSH session to the Database Server.
-
To verify that the Database Server is not currently running jemalloc, enter the following command at the shell prompt:
silo_mysql -e 'show global variables like "version_malloc_library"' -
Search for the file /usr/lib64/libjemalloc.so.1.
If the file does not exist, contact ScienceLogic Customer Support to request the file jemalloc-3.6.0-1.el7.x86_64.rpm.
To install the RPM, use a file-transfer utility, copy the file to a directory on the SL1 appliance. Then enter the following commands at the shell prompt:
cd /usr/lib64 sudo yum install jemalloc-3.6.0-1.el7.x86_64.rpm -
Create the file /etc/systemd/system/mariadb.service.d/jemalloc.conf, as follows:
vi /etc/systemd/system/mariadb.service.d/jemalloc.conf -
Add the following lines to the file:
[Service] Environment="LD_PRELOAD=/usr/lib64/libjemalloc.so.1" - Save and close the file.
-
Reload the systemd config files with the following command:
sudo systemctl daemon-reload -
Restart the Database Server:
To restart the standalone Database Server or the primary Database Server in a cluster, enter the following:
sudo systemctl restart mariadbTo restart each secondary Database Server in a cluster:
-
Open an SSH session to the secondary Database Server. At the shell prompt, enter:
coro_config - Select 1.
- When prompted to put the Database Server into maintenance, select y.
-
Open an SSH session to the primary Database Server. To pause SL1, enter the following command at the shell prompt:
sudo touch /etc/.proc_mgr_pause -
In the SSH session for the secondary Database Server, restart MariaDB:
crm resource restart mysql -
After MariaDB has restarted successfully on the secondary Database Server, return to the SSH session on the primary Database Server. Remove the pause file for SL1 using the following command:
sudo rm /etc/.proc_mgr_pause -
In the SSH session on the secondary Database Server, take the Database Server out of maintenance. At the shell prompt, enter:
coro_config - Select 1.
- When prompted to take the Database Server out of maintenance, select y.
-
To verify that jemalloc is running on the Database Server, enter the following command at the shell prompt:
silo_mysql -e 'show global variables like "version_malloc_library"' - Perform these steps on each Database Server in your SL1 system.
If the Database Server is not currently running jemalloc, the shell will display the following:
| Variable Name | Value |
| version_malloc_library | system |
If the Database Server is currently running jemalloc, the shell will display something like the following:
| Variable Name | Value |
| version_malloc_library | jemalloc 3.6.0-0-g46c0af68bd248b04df75e4f92d5fb804c3d75340 |
Manually Upgrading MariaDB
Refer to the release notes for your current release to determine if you must upgrade MariaDB. Not every SL1 update requires an upgrade of MariaDB.
ScienceLogic strongly recommends that you upgrade MariaDB using the script described in Automatically Upgrading MariaDB with a Script.
To reduce spurious events, you can put the Database Server in maintenance mode while you upgrade MariaDB. For details, see the chapter on Putting the Database Server into Maintenance Mode
If you prefer to upgrade MariaDB manually, the following sections describe how to upgrade the MariaDB server for different SL1 appliance types and architectures.
When you update MariaDB, you must update the following SL1 appliances:
- All Database Servers
- All-In-One Appliances
- Data Collectors
- Message Collectors
You should store all custom configuration settings for each MariaDB database in the file /etc/siteconfig/mysql.siteconfig. If you have added custom settings to the file /etc/my.cnf.d/silo_mysql.cnf, those changes will be overwritten each time you upgrade MariaDB. Before upgrading, copy any custom settings to the file /etc/siteconfig/mysql.siteconfig. SL1 will save these custom settings and apply them after you upgrade MariaDB.
Download RPMs to SL1 Appliances
Before upgrading MariaDB, you must copy the RPMs from the primary Database Server to the Database Servers, All-In-One Appliances, Data Collectors, and Message Collectors in your SL1 system. To do this.
- Open an SSH session to the Database Server.
-
To download the latest RPMs from the Database Server, enter the following at the shell prompt:
For SL1 version 10.1.0 to 10.1.5:
wget --output-document /tmp/MariaDB-server-10.4.12-1.el7.centos.x86_64.rpm http://localhost:10080/MariaDB-server.rpmwget --output-document /tmp/galera-4-26.4.3-1.rhel7.el7.centos.x86_64.rpm http://localhost:10080/galera-4.rpmFor SL1 version 10.1.6 and higher, download all of the packages listed when you enter the command:
cat /opt/em7/share/db_packageswget --output-document /tmp/MariaDB-server.rpm http://localhost:10080/<mariadb-server-pkg-from-db_packages> wget --output-document /tmp/galera-4.rpm http://localhost:10080/<galera-4-pkg-from-db_packages> wget --output-document /tmp/socat.rpm http://localhost:10080/<socat-pkg-from-db_packages> -
Verify if the downloaded packages are valid (not corrupt or incomplete downloads) by entering the following commands:
rpm -qip /tmp/MariaDB-server.rpm
rpm -qip /tmp/galera-4.rpm
rpm -qip /tmp/socat.rpm
If any errors are reported, try restarting siloupdate-pkgserver, using the following command, and retry downloading and verifying the RPM files again.
systemctl restart siloupdate-pkgserver - Use SCP or another secure copy program to copy these files to the /tmp directory on each Database Server, All-In-One Appliance, Data Collector, and Message Collector:
- MariaDDB-server.rpm
- galera-4.rpm
: To conserve disk space, ScienceLogic recommends you delete the RPMs from the /tmp directory the on the Database Servers, All-In-One Appliances, Data Collectors, and Message Collectors in your SL1 system after you successfully upgrade MariaDB.
Manually Upgrade Two Database Servers Configured for High Availability or Disaster Recovery
To upgrade a High Availability or Disaster Recovery cluster, perform the following steps:
The system will be unavailable when performing these steps.
Step 1: On the Secondary Database Server
You must put the secondary Database Server in maintenance mode. To do this:
- Open an SSH session to the Database Server.
-
At the shell prompt, assume root privileges:
sudo -s - When prompted, enter the administrator password.
-
At the shell prompt, enter the following command:
coro configThe following menu appears:
1) Enable Maintenance 2) Option Disabled 3) Promote DRBD 4) Stop Pacemaker 5) Resource Status 6) Quit - Enter "1".
Step 2: On the Primary Database Server
-
To determine the current installed version of the RPMs, enter the following command:
sudo rpm -qa ^MariaDB-* -
To stop SL1 and MariaDB, enter the following commands at the shell prompt:
sudo systemctl stop em7 sudo systemctl stop mariadb.service -
To stop the MySQL resource, enter the following command:
sudo crm resource stop mysql -
To save the current enabled state for mariadb.service, enter the following command:
export MSRV=`sudo systemctl is-enabled mariadb.service` -
Check the version of MariaDB-server that you are running.
rpm -q MariaDB-server - MariaDB-server version 10.1.x. If you are running MariaDB-server version 10.1.x:
-
Remove MariaDB-server by using the following commands:
sudo rpm --nodeps -ev MariaDB-server -
Replace the Galera package and install the new MariaDB-server package by using the following commands:
sudo yum --disablerepo=* swap -- remove galera -- install /tmp/galera-4.rpm sudo yum --disablerepo=* install /tmp/MariaDB-server.rpm -
MariaDB-server version 10.4.12 and higher. If you are running MariaDB-server version 10.4.12 or higher, upgrade the MariaDB-server package and dependent packages (galera-4 and socat) by using the following commands:
sudo yum --disablerepo=* install /tmp/galera-4.rpm /tmp/socat.rpm sudo yum --disablerepo=* upgrade /tmp/MariaDB-server.rpm -
To remove incompatible backup packages, enter the following command:
sudo yum remove percona-xtrabackup -
To regenerate the configuration file for MariaDB, enter the following command:
sudo /opt/em7/share/scripts/generate-my-conf.py -f -o /etc/my.cnf.d/silo_mysql.cnf -
To re-start MariaDB, enter the following command:
sudo systemctl daemon-reload sudo systemctl start mariadb -
To restart the MySQL resource, enter the following command:
sudo crm resource start mysql -
To restore the mariadb.service enabled state, enter the following command:
sudo systemctl ${MSRV::-1} mariadb.service -
To upgrade the internal configuration for the database, enter the following:
sudo mysql_upgrade -u root -p -
To restart the em7 service, enter the following commands:
sudo systemctl start em7
sudo rpm -qa ^MariaDB-*
You must follow the steps below that correspond to your version of MariaDB. Step 6 is specific to MariaDB-server version 10.1.x, while Step 7 is specific to MariaDB-server versions 10.4.12 and higher.
Do these steps in order. Doing the steps in any other order will result in unintended consequences.
NOTE: If the "yum remove" command fails, it means that the package does not exist on the SL1 appliance. You can ignore the error message.
Step 3: On the Secondary Database Server
-
Determine the current installed version of the RPMs using the following command:
sudo rpm -qa ^MariaDB-* -
To save the current enabled state for mariadb.service, enter the following:
export MSRV=`sudo systemctl is-enabled mariadb.service` -
Check the version of MariaDB-server that you are running.
rpm -q MariaDB-server - MariaDB-server 10.1.x: If you are running MariaDB-server version 10.1.x:
-
Remove MariaDB-server by using the following command:
sudo rpm --nodeps -ev MariaDB-server -
Replace the Galera package and install the new MariaDB-server package by using the following commands:
sudo yum --disablerepo=* swap -- remove galera -- install /tmp/galera-4.rpm sudo yum --disablerepo=* install /tmp/MariaDB-server.rpm -
MariaDB-server 10.4.12 or higher: If you are running MariaDB-server version 10.4.12 or higher, upgrade the MariaDB-server package and dependent packages (galera-4 and socat)by using the following commands:
sudo yum --disablerepo=* install /tmp/galera-4.rpm /tmp/socat.rpm sudo yum --disablerepo=* upgrade /tmp/MariaDB-server.rpm -
To remove incompatible backup packages, enter the following command:
sudo yum remove percona-xtrabackup -
To regenerate the configuration file for MariaDB, enter the following command:
sudo /opt/em7/share/scripts/generate-my-conf.py -f -o /etc/my.cnf.d/silo_mysql.cnf -
To restore the mariadb.service enabled state, enter the following command:
sudo systemctl ${MSRV::-1} mariadb.service -
To take the secondary Database Server out of maintenance mode, enter the following command at the shell prompt:
sudo -s - When prompted, enter the administrator password.
-
At the shell prompt, enter the following command:
coro configThe following prompt appears:
1) Disable Maintenance 2) Option Disabled 3) Promote DRBD 4) Stop Pacemaker 5) Resource Status 6) Quit - Enter "1".
You must follow the steps that correspond to your version of MariaDB. Step 4 is specific to MariaDB-server version 10.1.x, while Step 5 is specific to MariaDB-server versions 10.4.12 and higher.
Do these steps in order. Doing the steps in any other order will result in unintended consequences.
NOTE: If the "yum remove" command fails, it means that the package does not exist on the SL1 appliance. You can ignore the error message.
Manually Upgrade Three Database Servers Configured for High Availability and Disaster Recovery
To upgrade a High Availability/Disaster Recovery cluster, perform the following steps:
The system will be unavailable when performing these steps.
Step 1: On the Secondary Database Server
You must put the secondary Database Server in maintenance mode. To do this:
- Open an SSH session to the Database Server.
-
At the shell prompt, assume root privileges:
sudo -s - When prompted, enter the administrator password.
-
At the shell prompt, enter the following command:
coro config -
The following prompt appears:
1) Disable Maintenance 2) Option Disabled 3) Promote DRBD 4) Stop Pacemaker 5) Resource Status 6) Quit - Enter "1".
Step 2: On the Primary Database Server
-
Determine the current installed version of the RPMs:
sudo rpm -qa ^MariaDB-* -
Stop SL1 and MariaDB using the following commands:
sudo systemctl stop em7 sudo systemctl stop mariadb.service -
Stop the MySQL resource:
sudo crm resource stop mysql -
Save the current enabled state for the mariadb.service:
export MSRV=`sudo systemctl is-enabled mariadb.service` -
Check the version of MariaDB-server that you are running:
rpm -q MariaDB-server - MariaDB-server version 10.1.x. If you are running MariaDB-server version 10.1.x:
-
Remove MariaDB-server by using the following command:
sudo rpm --nodeps -ev MariaDB-server -
Replace the Galera package and install the new MariaDB-server package by using the following commands:
sudo yum --disablerepo=* swap -- remove galera -- install /tmp/galera-4.rpm sudo yum --disablerepo=* install /tmp/MariaDB-server.rpm -
MariaDB-server version 10.4.12 and higher. If you are running MariaDB-version 10.4.12 or higher, upgrade the MariaDB-server package and dependent packages (galera-4 and socat) by using the following commands:
sudo yum --disablerepo=* install /tmp/galera-4.rpm /tmp/socat.rpm sudo yum --disablerepo=* upgrade /tmp/MariaDB-server.rpm -
Remove incompatible backup packages:
sudo yum remove percona-xtrabackup -
Regenerate the configuration file for MariaDB:
sudo /opt/em7/share/scripts/generate-my-conf.py -o -f /etc/my.cnf.d/silo_mysql.cnf -
Restart MariaDB:
sudo systemctl daemon-reload sudo systemctl start mariadb -
Restart the MySQL resource:
sudo crm resource start mysql -
Restore the mariadb.service enabled state:
sudo systemctl ${MSRV::-1} mariadb.service -
Upgrade the internal configuration for the database:
sudo mysql_upgrade -u root -p -
Restart the em7 service:
sudo systemctl start em7
You must follow the steps that correspond to your version of MariaDB.
Do these steps in order. Doing the steps in any other order will result in unintended consequences.
NOTE: If the "yum remove" command fails, it means that the package does not exist on the SL1 appliance. You can ignore the error message.
Step 3: On the Secondary Database Server
-
Save the current enabled state for the mariadb.service:
export MSRV=`sudo systemctl is-enabled mariadb.service` -
Check the version of MariaDB-server that you are running:
rpm -q MariaDB-server - MariaDB-server version 10.1.x. If you are running MariaDB-server version 10.1.x:
-
Remove MariaDB-server:
sudo rpm --nodeps -ev MariaDB-server -
Replace the Galera package and install the new MariaDB-server package by using the following commands:
sudo yum --disablerepo=* swap -- remove galera -- install /tmp/galera-4.rpm sudo yum --disablerepo=* install /tmp/MariaDB-server.rpm -
MariaDB-server version 10.4.12 and higher. If you are running MariaDB-version 10.4.12 or higher, upgrade the MariaDB-server package and dependent packages (galera-4 and socat) by using the following commands:
sudo yum --disablerepo=* install /tmp/galera-4.rpm /tmp/socat.rpm sudo yum --disablerepo=* upgrade /tmp/MariaDB-server.rpm -
Remove incompatible backup packages:
sudo yum remove percona-xtrabackup -
Regenerate the configuration file for MariaDB:
sudo /opt/em7/share/scripts/generate-my-conf.py -o -f /etc/my.cnf.d/silo_mysql.cnf -
Restore the mariadb.service enabled state:
sudo systemctl ${MSRV::-1} mariadb.service -
Assume root privileges:
sudo -s - When prompted, enter the administrator password.
-
At the shell prompt, enter the following command:
coro config -
The following prompt appears:
1) Disable Maintenance 2) Option Disabled 3) Promote DRBD 4) Stop Pacemaker 5) Resource Status 6) Quit - Enter "1".
You must follow the steps that correspond to your version of MariaDB.
Do these steps in order. Doing the steps in any other order will result in unintended consequences.
NOTE: If the "yum remove" command fails, it means that the package does not exist on the SL1 appliance. You can ignore the error message.
Step 4: On the Disaster Recovery Database Server
- Open an SSH session to the Disaster Recovery Database Server.
-
Assume root privileges:
sudo -s - When prompted, enter the administrator password.
-
Save the current enabled state for the mariadb.service:
export MSRV=`sudo systemctl is-enabled mariadb.service` -
Check the version of MariaDB-server that you are running:
rpm -q MariaDB-server - MariaDB-server version 10.1.x. If you are running MariaDB-server version 10.1.x:
-
Remove MariaDB-server:
sudo rpm --nodeps -ev MariaDB-server -
Replace the Galera package and install the new MariaDB-server package by using the following commands:
sudo yum --disablerepo=* swap -- remove galera -- install /tmp/galera-4.rpm sudo yum --disablerepo=* install /tmp/MariaDB-server.rpm -
MariaDB-server version 10.4.12 and higher. If you are running MariaDB-version 10.4.12 or higher, upgrade the MariaDB-server package and dependent packages (galera-4 and socat) by using the following commands:
sudo yum --disablerepo=* install /tmp/galera-4.rpm /tmp/socat.rpm sudo yum --disablerepo=* upgrade /tmp/MariaDB-server.rpm -
Remove incompatible backup packages:
sudo yum remove percona-xtrabackup -
Regenerate the configuration file for MariaDB:
sudo /opt/em7/share/scripts/generate-my-conf.py -o -f /etc/my.cnf.d/silo_mysql.cnf -
Restore the mariadb.service enabled state:
sudo systemctl ${MSRV::-1} mariadb.service
You must follow the steps that correspond to your version of MariaDB.
Do these steps in order. Doing the steps in any other order will result in unintended consequences.
NOTE: If the "yum remove" command fails, it means that the package does not exist on the SL1 appliance. You can ignore the error message.
Manually Upgrading Standalone Database Servers, All-In-One Appliances, Data Collectors, and Message Collectors
To upgrade MariaDB on one or more Database Servers that are not configured for high availability or disaster recovery, a single All-In-One Appliance, one or more Data Collectors, or one or more Message Collectors, perform the following steps:
The Database Server, All-In-One Appliance, Data Collector, or Message Collector will be unavailable when performing these steps.
- Go to the console or open an SSH session to the SL1 appliance.
-
Stop SL1 and mariadb:
sudo systemctl stop em7 sudo systemctl stop mariadb.service -
Save the current enabled state for the mariadb.service:
export MSRV=`sudo systemctl is-enabled mariadb.service` -
Check the version of MariaDB-server that you are running:
rpm -q MariaDB-server - MariaDB-server version 10.1.x. If you are running MariaDB-server version 10.1.x:
-
Remove MariaDB-server:
sudo rpm --nodeps -ev MariaDB-server -
Replace the Galera package and install the new MariaDB-server package by using the following commands:
sudo yum --disablerepo=* swap -- remove galera -- install /tmp/galera-4.rpm sudo yum --disablerepo=* install /tmp/MariaDB-server.rpm -
MariaDB-server version 10.4.12 and higher. If you are running MariaDB-version 10.4.12 or higher, upgrade the MariaDB-server package and dependent packages (galera-4 and socat) by using the following commands:
sudo yum --disablerepo=* install /tmp/galera-4.rpm /tmp/socat.rpm sudo yum --disablerepo=* upgrade /tmp/MariaDB-server.rpm -
Remove incompatible backup packages:
sudo yum remove percona-xtrabackup -
Regenerate the configuration file for MariaDB:
sudo /opt/em7/share/scripts/generate-my-conf.py -o -f /etc/my.cnf.d/silo_mysql.cnf -
Restart MariaDB:
sudo systemctl daemon-reload sudo systemctl start mariadb -
Restore the mariadb.service enabled state:
sudo systemctl ${MSRV::-1} mariadb.service -
Upgrade the internal configuration for the database:
sudo mysql_upgrade -u root -p -
Restart the em7 service:
sudo systemctl start em7 - Repeat all the steps in this section on each non-HA/DR Database Server, All-In-One Appliance, Data Collector, and Message Collector.
You must follow the steps that correspond to your version of MariaDB.
Do these steps in order. Doing the steps in any other order will result in unintended consequences.
NOTE: If the "yum remove" command fails, it means that the package does not exist on the SL1 appliance. You can ignore the error message.
Additional Steps for MariaDB Upgrades in 10.1.x
SL1 10.1.x includes an upgrade to MariaDB. The upgrade did not include a tool, jemalloc, that helps manage memory usage.
This section applies only to the following releases:
- 10.1.0
- 10.1.1
- 10.1.2
- 10.1.3
- 10.1.4
- 10.1.4.1
- 10.1.4.2
- 10.1.5
- 10.1.5.1
For SL1 versions later than 10.1.5.1, jemalloc is included with the platform. For SL1 versions prior to 10.1.0, jemalloc is included with the platform.
To avoid problems with memory usage on Database Servers, perform the following steps after upgrading MariaDB for 10.1.x.
Perform these steps first on the active Database Server and then on each additional Database Server in your SL1 System.
- Open an SSH session to the Database Server.
-
To verify that the Database Server is not currently running jemalloc, enter the following command at the shell prompt:
silo_mysql -e 'show global variables like "version_malloc_library"' -
Search for the file /usr/lib64/libjemalloc.so.1.
If the file does not exist, contact ScienceLogic Customer Support to request the file jemalloc-3.6.0-1.el7.x86_64.rpm.
To install the RPM, use a file-transfer utility, copy the file to a directory on the SL1 appliance. Then enter the following commands at the shell prompt:
cd /usr/lib64 sudo yum install jemalloc-3.6.0-1.el7.x86_64.rpm -
Create the file /etc/systemd/system/mariadb.service.d/jemalloc.conf, as follows:
vi /etc/systemd/system/mariadb.service.d/jemalloc.conf -
Add the following lines to the file:
[Service] Environment="LD_PRELOAD=/usr/lib64/libjemalloc.so.1" - Save and close the file.
-
Reload the systemd config files with the following command:
sudo systemctl daemon-reload -
Restart the Database Server:
To restart the standalone Database Server or the primary Database Server in a cluster, enter the following:
sudo systemctl restart mariadbTo restart each secondary Database Server in a cluster:
-
Open an SSH session to the secondary Database Server. At the shell prompt, enter:
coro_config - Select 1.
- When prompted to put the Database Server into maintenance, select y.
-
Open an SSH session to the primary Database Server. To pause SL1, enter the following command at the shell prompt:
sudo touch /etc/.proc_mgr_pause -
In the SSH session for the secondary Database Server, restart MariaDB:
crm resource restart mysql -
After MariaDB has restarted successfully on the secondary Database Server, return to the SSH session on the primary Database Server. Remove the pause file for SL1 using the following command:
sudo rm /etc/.proc_mgr_pause -
In the SSH session on the secondary Database Server, take the Database Server out of maintenance. At the shell prompt, enter:
coro_config - Select 1.
- When prompted to take the Database Server out of maintenance, select y.
-
To verify that jemalloc is running on the Database Server, enter the following command at the shell prompt:
silo_mysql -e 'show global variables like "version_malloc_library"' - Perform these steps on each Database Server in your SL1 system.
If the Database Server is not currently running jemalloc, the shell will display the following:
| Variable Name | Value |
| version_malloc_library | system |
If the Database Server is currently running jemalloc, the shell will display something like the following:
| Variable Name | Value |
| version_malloc_library | jemalloc 3.6.0-0-g46c0af68bd248b04df75e4f92d5fb804c3d75340 |
Rebooting Appliances in the SL1 Distributed Stack
Refer to the release notes for your current release to determine if you must reboot all SL1 appliances. Not every SL1 update requires rebooting.
When an upgrade requires a reboot, use the steps listed in this section to reboot all SL1 appliances in the Distributed stack.
Rebooting the Administration Portal
You can reboot Administration Portals either from the user interface or from the command line.
Rebooting Multiple Administration Portals
If your SL1 system includes multiple Administration Portals, you can remotely reboot Administration Portals from another Administration Portal. To do so:
- Go to the Appliance Manager page (System > Settings > Appliances).
- Select the checkboxes for the SL1 appliances you want to reboot.
- In the [Select Action] menu, select Reboot and click the button.
- Click the button when the "Are you sure you want to reboot the selected appliances?" message is displayed.
- During the reboot, the user interface for the affected Administration Portal unavailable.
- When the reboot has completed, the Audit Logs page (System > Monitor > Audit Logs) will include an entry for each appliance that was rebooted.
Rebooting a Single Administration Portal
If your SL1 system include only a single Administration Portal, perform the following steps to reboot that Administration Portal:
- Either go to the console of the Database Server or use SSH to access the Database Server.
- Log in as em7admin with the appropriate password.
-
At the shell prompt, execute the following:
python -m silo_common.admin_toolbox <appliance_ID> "/usr/bin/sudo /usr/sbin/shutdown -r +1"
where:
- appliance_ID is the appliance ID for the Data Collector, Message Collector, or Administration Portal.
Rebooting Data Collectors and Message Collectors
You can reboot Data Collectors and Message Collectors either from the user interface or from the command line.
Rebooting Data Collectors and Message Collectors from the Appliance Manager page
From the SL1 user interface, perform the following steps to reboot a Data Collector or a Message Collector:
- Go to the Appliance Manager page (Appliance Manager).
- Select the checkbox for each SL1 appliance you want to reboot.
- In the [Select Action] menu, select Reboot and click the button.
- Click the button when the "Are you sure you want to reboot the selected appliances?" message is displayed.
-
During the reboot, go to the System Logs page (System > Monitor > System Logs). You should see this message:
- When the reboot has completed, the Audit Logs page (System > Monitor > Audit Logs) will include an entry for each appliance that was rebooted.
Major: Could not connect to module (5) database USING SSL=TRUE: Error attempting to connect to database with SSL enabled True: (2003, 'Can't connect to MySQL server on '10.2.12.77' (113 "No route to host")')
Rebooting Data Collectors and Message Collectors from the Command Line
From the console of the Database Server or SSH to the Database Server, perform the following steps to reboot Data Collector or Message Collector:
- Either go to the console of a Database Server or SSH to access the Database Server.
- Log in as em7admin with the appropriate password.
-
At the shell prompt, execute the following:
python -m silo_common.admin_toolbox <appliance_ID> "/usr/bin/sudo /usr/sbin/shutdown -r +1" - appliance_ID is the appliance ID for the Data Collector, Message Collector, or Administration Portal.
where:
Rebooting Standalone All-In-One Appliance and Standalone Database Server
Perform the following steps to reboot a standalone All-In-One Appliance or a standalone Database Server:
- Either go to the console or use SSH to access the SL1 appliance.
- Log in as em7admin with the appropriate password.
-
On the SL1 appliance, pause the system and shutdown MariaDB.
sudo touch /tmp/.proc_mgr_pause sudo systemctl stop mariadb -
Reboot the SL1 appliance:
sudo reboot - After the SL1 appliance has rebooted, either go to the console or use SSH to access the SL1 appliance.
- Log in as em7admin with the appropriate password.
-
Un-pause the SL1 Appliance:
sudo rm /tmp/.proc_mgr_pause
Rebooting Two Database Servers Configured for Disaster Recovery
Perform the following steps to reboot two Database Servers configured for Disaster Recovery:
- Either go to the console of the primary Database Server or use SSH to access the primary Database Server.
- Log in as em7admin with the appropriate password.
-
Check the status of both Database Servers. To do this, enter the following at the shell prompt:
cat /proc/drbdYour output will look like this:
1: cs:Connected ro:Primary/Secondary ds:UpToDate/UpToDate C r---- ns:17567744 al:0 bm:1072 lo:0 pe:0 ua:0 ap:0 ep:1 wo:b oos:12521012 -
Pause the system and shutdown MariaDB on the primary Database Server. Enter the password for the em7admin user when prompted:
sudo touch /tmp/.proc_mgr_pause sudo systemctl stop pacemaker sudo systemctl stop mariadb -
Reboot the primary Database Server:
sudo reboot - After the primary appliance has rebooted, log in to the console of the primary Database Server again.
-
Execute the following commands on the primary Database Server:
sudo rm /tmp/.proc_mgr_pause - Enter the password for the em7admin user and confirm the command when prompted.
- Log in to the secondary Database Server as the em7admin user using the console or SSH.
-
Execute the following command on the secondary Database Server to reboot the appliance:
sudo reboot - Enter the password for the em7admin user when prompted.
Rebooting Two Database Servers in a High Availability Cluster
Perform the following steps to reboot two Database Servers in a high availability cluster:
- Either go to the console of the secondary Database Server or use SSH to access the secondary Database Server.
- Log in as em7admin with the appropriate password.
-
Check the status of both Database Servers. To do this, enter the following at the shell prompt:
cat /proc/drbdYour output will look like this:
-
Stop the cluster service on the secondary Database Server:
sudo systemctl stop pacemaker - Enter the password for the em7admin user when prompted.
- Either go to the console of the primary Database Server or use SSH to access the primary Database Server.
- Log in as em7admin with the appropriate password.
-
Pause the system and stop the cluster service on the primary Database Server. Enter the password for the em7admin user when prompted:
sudo touch /tmp/.proc_mgr_pause sudo systemctl stop pacemaker sudo systemctl stop mariadb -
Reboot the primary Database Server:
sudo reboot - After the primary Database Server has rebooted, either go to the console of the primary Database Server or use SSH to access the primary Database Server.
- Log in as em7admin with the appropriate password.
-
Execute the following command on the primary Database Server:
sudo rm /tmp/.proc_mgr_pause - Enter the password for the em7admin user and confirm the command when prompted.
- Either go to the console of the secondary Database Server or use SSH to access the secondary Database Server.
- Log in as em7admin with the appropriate password.
-
Reboot the secondary Database Server:
sudo reboot - Enter the password for the em7admin user when prompted.
1: cs:Connected ro:Secondary/Primary ds:UpToDate/UpToDate C r----
ns:17567744 al:0 bm:1072 lo:0 pe:0 ua:0 ap:0 ep:1 wo:b oos:12521012
If your output includes "ro:Secondary/Primary", but does not include "UpToDate/UpToDate", data is being synchronized between the two appliances. You must wait until data synchronization has finished before rebooting.
Rebooting Three Database Servers Configured for High Availability and Disaster Recovery
Perform the following steps to reboot three Database Servers configured for high availability and disaster recovery. In this configuration, two Database Servers are configured as a High Availability cluster and one Database Server is configured for Disaster Recovery.
- Either go to the console of the secondary Database Server in the HA cluster or use SSH to access the secondary Database Server in the HA cluster,
- Log in as em7admin with the appropriate password.
-
Check the status of both Database Servers in the HA cluster. To do this, enter the following at the shell prompt:
cat /proc/drbdYour output will look like this:
-
Stop the cluster service with the following command on the secondary Database Server in the HA cluster:
sudo systemctl stop pacemaker - Enter the password for the em7admin user when prompted.
- Either go to the console of the primary Database Server in the HA cluster or use SSH to access the primary Database Server in the HA cluster.
- Log in as em7admin with the appropriate password.
-
Pause the system and stop the cluster service on the primary Database Server in the HA cluster :
sudo touch /tmp/.proc_mgr_pause sudo systemctl stop pacemaker sudo systemctl stop mariadb - Enter the password for the em7admin user when prompted
-
Reboot the primary Database Server in the HA cluster:
sudo reboot - After the primary Database Server in the HA cluster has rebooted, either go to the console of the primary Database Server in the HA cluster or use SSH to access the primary Database Server in the HA cluster.
-
Execute the following command on the primary Database Server in the HA cluster:
sudo rm /tmp/.proc_mgr_pause - Enter the password for the em7admin user and confirm the command when prompted.
- Either go to the console of the secondary Database Server in the HA cluster or use SSH to access the secondary Database Server in the HA cluster.
- Log in as em7admin with the appropriate password.
-
Reboot the secondary Database Server in the HA cluster:
sudo reboot - Enter the password for the em7admin user when prompted.
- Either go to the console of the Database Server for Disaster Recovery or use SSH to access the Database Server for Disaster Recovery.
- Log in as em7admin with the appropriate password.
-
Reboot the Database Server for Disaster Recovery:
sudo reboot - Enter the password for the em7admin user when prompted.
10: cs:Connected ro:Secondary/Primary ds:UpToDate/UpToDate C r----
ns:17567744 al:0 bm:1072 lo:0 pe:0 ua:0 ap:0 ep:1 wo:b oos:12521012
If your output includes "ro:Secondary/Primary", but does not include "UpToDate/UpToDate", data is being synchronized between the two appliances. You must wait until data synchronization has finished before rebooting.
Restoring Settings for NextUI
To restore the backup of the custom settings in the NextUI:
- Login to the console of the Database Server or SSH to the Database Server.
- Open a shell session.
-
Enter the following at the shell prompt:
cp /opt/em7/nextui/nextui.env.backup /opt/em7/nextui/nextui.env
Restoring the SSL Certificate
To restore your SSL Certificates:
- Login to the console of the Database Server or SSH to the Database Server.
- Open a shell session.
-
Enter the following at the shell prompt:
cp /etc/nginx/silossl.key.bak /etc/nginx/silossl.key cp /etc/nginx/silossl.pem.bak /etc/nginx/silossl.pem - Repeat these steps on each Database Server in your SL1 system.
Resetting the Timeout for PhoneHome Watchdog
You can manually reset the settings for the PhoneHome Watchdog server back to the settings you used before the upgrade.
To edit the settings for the watchdog service:
- Log in to the console of the Data Collector as the root user or open an SSH session on the Data Collector.
-
View your PhoneHome Watchdog settings:
phonehome watchdog viewYour output will look like the following:
Current settings:
autosync: yes
interval: 120
state: enabled
autoreconnect: yes
timeoutcount: 1
check: default
Note the settings for interval and timeoutcount, so you can restore them after the upgrade.
-
To change the settings for SL1 upgrade, type the following at the command line:
sudo phonehome watchdog set interval=<previous setting>; sudo phonehome watchdog set timeoutcount=<previous setting>; systemctl stop em7_ph_watchdog; systemctl start em7_ph_watchdog; - Repeat these steps on each Data Collector.
- Repeat these steps on each Message Collector.
- Repeat these steps on each Database Server.
Updating Default PowerPacks
Every time you install a software update on your appliances, ScienceLogic recommends that you also install the updates for all the PowerPacks that were included in the software update.
ScienceLogic includes multiple PowerPacks in the default installation of SL1. When you apply an update to your system, new versions of the default PowerPacks will be automatically imported in to your system. If a PowerPack is included in an update and is not currently installed on your system, SL1 will automatically install the PowerPack. If a PowerPack is included in an update and is currently installed on your system, SL1 will automatically import (but not install) the PowerPack.
If PowerPacks have been imported into your system but have not been installed, the Update column appears in the PowerPack Manager page (System > Manage > PowerPacks). For each PowerPack that has been imported to your system but has not been installed, the lightning bolt icon (![]() ) appears in the Update field on the PowerPack Manager page.
) appears in the Update field on the PowerPack Manager page.
To install the updates for multiple PowerPacks:
- Go to the PowerPack Manager page (System > Manage > PowerPacks).
- In the PowerPack Manager page, select the checkbox for each PowerPack you want to install.
- In the Select Action drop-down field (in the lower right), choose Update PowerPack(s).
- SL1 will display the following message before updating the PowerPack(s):
Update the selected PowerPacks?
NOTE: Any customizations to items contained in updated PowerPacks will be overwritten by the version contained within the more recently imported PowerPack file.
Click the button to continue the installation. Click the button to quit the update.
- Click the button. If you completed the update, updated information about the PowerPack will appear in the PowerPack Manager page. All the items in the PowerPack will be automatically installed in your SL1 system.
NOTE: You can install multiple PowerPacks with the Select Action drop-down list only if each selected PowerPack includes an embedded Installation Key. PowerPacks that do not include embedded Installation Keys will fail to install.
Configuring Subscription Billing
If your SL1 system is configured to communicate with the ScienceLogic billing server, usage data will be sent automatically from your SL1 system to the ScienceLogic billing server once a day. After the ScienceLogic billing server receives the usage data, SL1 will automatically mark the license usage file as delivered.
Sending usage data to the ScienceLogic billing server ensures that your bill is accurate and that ScienceLogic can continue making improvements to the SL1 products.
To determine if you have correctly configured Subscription Billing:
- Go to the System Usage page (System > Monitor > System Usage)
- For air-gapped SL1 systems, the value of Summary Date should be within the past 48 hours.
- For SL1 systems that connect to ScienceLogic, the value of Summary Date should be within the past 48 hours and the value of Delivery Status is 1.
For details on configuring subscription billing, see