When the requirements of a ticket are satisfied and a solution is implemented, the ticket can be resolved. This
After a ticket is resolved, SL1 does not display the ticket in the Ticket Console page by default. However, you can view a list of resolved tickets in the Ticket Console page if you modify the filters for the page.
Use the following menu options to navigate the SL1 user interface:
- To view a pop-out list of menu options, click the menu icon (
).
- To view a page containing all the menu options, click the Advanced menu icon (
).
This
Resolving a Ticket
You can resolve a ticket when its requirements are satisfied and a solution is implemented. After a ticket is resolved, SL1 can automatically generate an email and send that email to other users to notify them of the change to the ticket. To set the status of a ticket to resolved:
- Go to the Ticket Console page ( tab).
- Find the ticket you want to resolve and click its wrench icon (
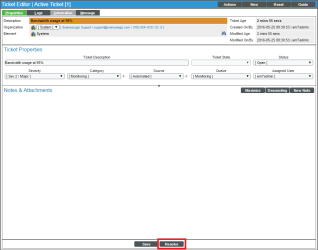
 ). The Ticket Editor page appears.
 - There are two ways to resolve a ticket from the Ticket Editor page, either selecting Resolve Ticket from the menu, or clicking the button.
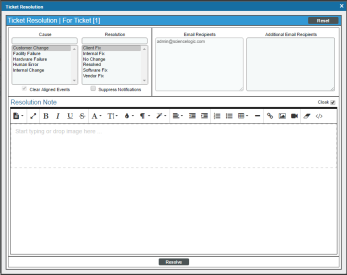
- To resolve the ticket using the menu, click the menu and choose Resolve Ticket. The Ticket Resolution modal page appears.
- The Ticket Resolution modal page contains the following fields:
- Cause. The cause of the problem associated with the ticket. Administrators can use the Select Objects Editor page (System > Customize > Select Objects) to customize the entries that appear in this field. You can also select one of the default options from the list. Default choices are:
- Customer Change
- Facility Failure
- Hardware Failure
- Human Error
- Internal Change
You can use the field above the Cause field to filter the list of values. If you enter an alpha-numeric string in the filter field, the Cause field will include only values that match the string.
- Resolution. Describes how the ticket was resolved. Administrators can use the Select Objects Editor page (System > Customize > Select Objects to customize the entries in this field. You can also select one of the default options from the list. Default choices are:
- Client Fix
- Internal Fix
- No Change
- Resolved
- Software Fix
- Vendor Fix
You can use the field above the Resolution field to filter the list of values. If you enter an alpha-numeric string in the filter field, the Resolution field will include only values that match the string.
- Clear Aligned Events. If the ticket is associated with an event, the event will be cleared after the ticket is resolved. Select this checkbox to clear the event; do not select it if you would not like to clear the aligned event.
- Suppress Notifications. By default, when a ticket is updated, including when its status changes, SL1 automatically sends an email message to the ticket creator, ticket assignee, and any ticket watchers for the ticket. If you select this checkbox, SL1 will not send an email message when the ticket is resolved. By default, this checkbox is not selected and SL1 notifies the ticket creator, ticket assignee, and any ticket watchers when the ticket is resolved.
NOTE: On the Behavior Settings page (System > Settings > Behavior, if the field Automatic Ticketing Emails is set to Disabled, all assignee and watchers will not receive automatic email notifications about any tickets. By default, the field is set to Enabled.
- Email Recipients. This field lists the email addresses that SL1 will automatically send an email message to when the ticket is resolved. By default, SL1 automatically sends an email message to the ticket creator, ticket assignee, and any ticket watchers for the ticket when the ticket is resolved.
- Additional Email Recipients. In addition to the ticket creator, user assigned to the ticket, and all ticket watchers, you can specify additional people to be emailed about the resolved ticket. If you want SL1 to notify additional people, you must manually enter their email address(es) in this field.
- Resolution Note. You can enter text to include with the resolved ticket. You can format the text and include links and images in this field.
- Cloak checkbox. When you select this checkbox, the note you entered in the Resolution Note field is "cloaked". A cloaked note can be viewed only by users who have the Access Hook "Ticket:Notes:Cloaked".
- To resolve the ticket and clear it from the list of active tickets in the Ticket Console page, click the button at the bottom of the Ticket Resolution page. To clear the fields in the Ticket Resolution modal page without saving any values, click the button.
- You can also resolve the ticket by clicking the button located at the bottom of the Ticket Editor page. Clicking the button will bring up the Ticket Resolution page, where you can fill out the fields described above to resolve the ticket.
NOTE: You can also use the Select Action fields, a Run Book action, or an Escalation Policy to set a ticket's status to "Resolved".
Viewing a List of Resolved Tickets
By default, the Ticket Console page displays a list of active tickets only. You can, however, define additional filters that cause the Ticket Console page to display tickets that are resolved. This can be helpful if you have a ticket and would like to see how similar tickets were resolved, or you would simply like to see a full ticket history. To view a list of resolved tickets:
- Go to the Ticket Console page ( tab).
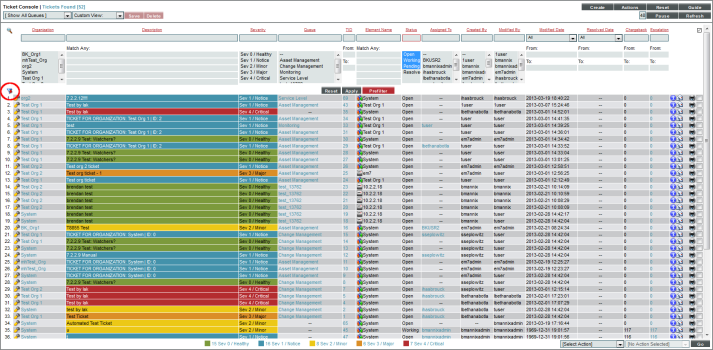
- In the Ticket Console page, click the Funnel icon (
 ) in the upper left of the page.
- The Advanced Filter Tool displays a list of options for filtering the list of tickets in the Ticket Console page. You can define a filter for one, multiple, or all columns in the Ticket Console page. For example, you can choose to view tickets from certain organizations only, certain queues only, or certain severity only.
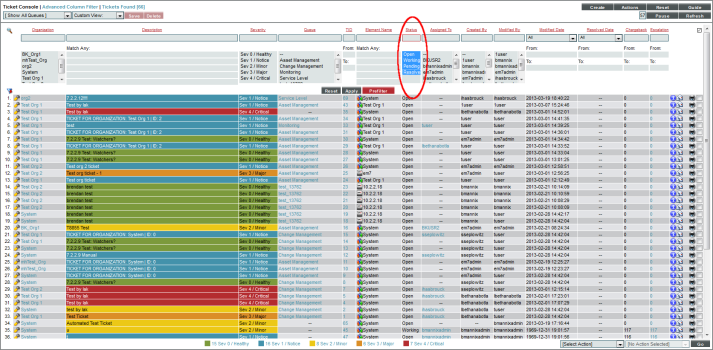
- In the Status field, by default, all statuses are highlighted except for Resolved. To display tickets with a status of Resolved, select Resolved in this field. You can select multiple options by holding down the <Shift> key.
NOTE: After selecting one or more filters, you can reduce the number of options displayed in the remaining filters by clicking the [Pre Filter] button. When [Pre Filter] is clicked, SL1 calculates how many tickets would be displayed if the chosen filters are applied. The options displayed for the remaining filters are reduced to only those that apply to the potential list of displayed tickets.
For example, suppose that five organizations are defined in your implementation of SL1. Initially, all five organizations will be displayed in the Organizations filter. Suppose that all tickets with a severity of "Critical" are associated with either the "System" organization or the "East Coast NOC" organization. Now suppose you select "Critical" in the Severity filter, then click the [Pre Filter] button. The Organizations filter would display only the organizations "System" and "East Coast NOC".
- To apply the new filters, click the button. To reset the filters and disregard any changes, click the button.


