![]()
This
This
What is a PowerFlow Application?
In PowerFlow, an application is a JSON file that specifies which steps to execute and the order in which to execute those steps. An application also defines variables and provides arguments for each step.
The following is an example of a PowerFlow application:
PowerFlow application JSON objects are defined by configuration settings, steps that make up the application, and application-wide variables used as parameters for each step. The parameters of each step can be configured dynamically, and each step can be named uniquely while still sharing the same underlying class, allowing for maximum re-use of code.
Applications can be executed through the REST API and are processed as an asynchronous task in PowerFlow. During processing the user is provided a unique task ID for the application and each of its tasks. Using the task IDs, the user can poll for the status of the application and the status of each individual running step in the application.
Executing an application from the REST API allows the user to dynamically set parameter values for the variables defined in the application.
The required parameters of applications are strictly enforced, and PowerFlow will refuse to execute the application if all required variables are not provided.
Default PowerFlow Application
The PowerFlow system includes a pre-defined application called integration_template. This default application appears in the PowerFlow user interface as the Template App application.
To view the integration_template application:
-
Using an API tool like Postman or cURL, use the API GET /applications/{application_name}:
GET URL_for_your_PowerFlow_system/api/v1/applications/integration_template
where URL_for_your_PowerFlow_system is the IP address or URL for the PowerFlow system.
Requirements
To create a PowerFlow application, you must perform these tasks:
- Download or copy the application template, called integration_template.
- Define the required fields for the application.
- Create the list of steps and step parameters.
- Define application variables.
- Upload the application to PowerFlow.
- Validate and test the application steps.
Creating an Application from the Application Template
The easiest way to create a new application is to use the application template that is included with the PowerFlow system. To copy this template to your desktop:
-
Using an API tool like Postman or cURL, use the API GET /applications/{application_name }:
GET URL_for_your_PowerFlow_system/api/v1/applications/integration_template
where URL_for_your_PowerFlow_system is the IP address or URL for the PowerFlow system.
-
Select and copy all the text in the application.
-
Open a source-code editor and paste the application in the source-code editor.
-
Save the new file as newfilename.json
where newfilename.json is the new name of the application includes the .json suffix. The file name must be unique within your PowerFlow system and cannot contain spaces.
Defining Required Fields for the Application
Each application should include the following key:value pairs
"author": "name of the author",
"configuration": "if this application uses configuration variables, specify the name of the configuration",
"description": "description of the application",
"friendly_name": "name that appears in the user interface",
"name": "file name without the py suffix".
"version": "version number",
The integration_template includes these required fields. You can edit the value for each key. To do so:
-
Using an API tool like Postman or cURL, use the API GET /applications/{application_name}:
GET URL_for_your_PowerFlow_system/api/v1/applications/application_name
where:
-
URL_for_your_PowerFlow_system is the IP address or URL for the PowerFlow system.
-
application_name is the application you want to edit.
-
-
Copy the contents of the application to a source-code editor.
-
Search for the section of the file that contains the text "description".
-
Supply new values for the following keys:
- author. User who created the application template.
- configuration (if applicable). Configuration variables are defined in a stand-alone file (called a configuration object) that lives on the PowerFlow system and can be accessed by all PowerFlow applications and their steps. If your application or the steps in the application reference configuration variables, you must specify the name of the configuration object in this value. For more details on creating a configuration, see the section on Defining a Configuration Object.
- description. This description will be displayed in the PowerFlow user interface when viewing the available applications.
- friendly_name. The name of the application as it will appear in the user interface.
- name. Name of the file, without the .py suffix.
- Version. Version number of the application.
- Save your changes. Save the file to the same name (application_name.json.)
- To upload the application to the PowerFlow system, see the section on Uploading an Application.
Creating the List of Steps and Step Parameters
In the PowerFlow application, you must specify the steps to execute and the order in which they should be executed.
If steps do not have dependencies, the PowerFlow system will execute steps in parallel. If steps have dependencies (meaning one of the steps requires data from another step), the PowerFlow system will execute the step that provides data and then execute the step that consumes that data.
To edit the steps section of the application:
- Using an API tool like Postman or cURL, use the API GET /applications/{application_name}:
GET URL_for_your_PowerFlow_system/api/v1/applications/application_name
where:
- URL_for_your_PowerFlow_system is the IP address or URL for the PowerFlow system.
- application_name is the application you want to edit.
- Copy the contents of the application to a source-code editor.
- Search for the section of the file that contains the text "steps".
- The section of the application that specifies steps should look like this:
"steps":[
{
"name": "GETgoogle.com",
"file": "QueryREST",
"prefix_url": "http://google.com",
"method": "GET",
"output_to": ["next_step"]
},
{
"name": "next_step",
"file": "someOtherTask"
}
]
- Edit the "steps" section as needed and save your changes. Be sure to your file as a .JSON file with the same name as the application your downloaded.
- To upload the application to the PowerFlow system, see the section on Uploading an Application.
Specifying Values for name and file
For each step, you must specify its name and the file it executes. These two keys can have the same value.
- name. The name for the step. Other steps in the application can use this name to refer to the step. This value can include spaces. This name must be unique to the application.
- file. The name of the file that will be executed by the step. You could write step logic in a single file but use that step logic with different applications and use different names for the step in each application.
Specifying the Parameters
When you add a step to an application, you must view the step and determine if it includes any required parameters.
To view details about a step (in our example, the step file is named QueryREST):
- Using an API tool like Postman or cURL, use the API GET /steps/{step_name}:
GET URL_for_your_PowerFlow_system/api/v1/steps/QueryREST
where:
- URL_for_your_PowerFlow_system is the IP address or URL for the PowerFlow system.
- The step GETgoogle.com (and its parent file, QueryREST) includes the following parameters that are defined as "required":
self.new_step_parameter(name=METHOD, sample_value="GET", description="HTTP method to perform", required=True)
self.new_step_parameter(name=PREFIX_URL, description="used with relative_url to create the full URL.",sample_value="http://10.2.11.253", default_value=None, required=True)
- Therefore, when the application includes the step GETgoogle.com, the application must supply values for the required parameters.
"method": "GET",
"prefix_url": "http://google.com",
Transferring Data Between Steps
An essential part of integrations is passing data between tasks. The PowerFlow system includes native support for saving and transferring Python objects between steps. Within a step, you can use one of the functions in the included in the ipaascore.BaseStep class.
In a PowerFlow application, you can use the ouput_to key to specify that the results of a step should be piped to one or more specified steps. The output_to key uses the following syntax:
"output_to": ["step_name1", "step name2"]
To pass data from step to step, you must include the output_to key along with the parameters for a step.
To edit the step parameters in the application:
- Using an API tool like Postman or cURL, use the API GET /applications/{application_name}:
GET URL_for_your_PowerFlow_system/api/v1/applications/application_name
where:
- URL_for_your_PowerFlow_system is the IP address or URL for the PowerFlow system.
- application_name is the application you want to edit.
- Copy the contents of the application to a source-code editor.
- If you wanted the step "GETgoogle.com" to pass its output to the step "next-step",the application would include the following :
"steps":[
{
"name": "GETgoogle.com",
"file": "QueryREST",
"prefix_url": "http://google.com",
"method": "GET",
"output_to": ["next_step"]
},
{
"name": "next_step",
"file": "someOtherTask"
}
]
If steps have dependencies , the PowerFlow system will first analyze all steps in an application and ensure that data-gathering steps are performed before steps that require that data.
- Edit the "steps" section as needed and save your changes. Be sure to your file as a .JSON file with the same name as the application your downloaded.
- To upload the application to the PowerFlow system, see the section on Uploading an Application.
Defining Retry Options for a Step
The following parameters allows you to define multiple retry options for a step. You can specify that the PowerFlow system try to re-run a step if that step fails. Retries work following the rules of exponential backoff: the first retry will have a delay of 1 second, the second retry will have a delay of 2 seconds, the third retry will delay 4 seconds, the fourth retry will delay 8 seconds, and so on.
As a best practice, you should only edit the retry_max parameter and avoid editing any of the other retry parameters. Only advanced users who understand how the retries work and their side effects when they are not set correctly should change the other retry parameters.
You can include the following retry options in the PowerFlow application file, where you define parameters for each step:
- retry_max . The maximum number of times the PowerFlow system will retry to execute the step before it stops retrying and logs a step failure. For example, if retry_max is 3, PowerFlow will retry after 1 second, then 2 seconds, then 4 seconds, and stop if the last retry fails. The default value is 3.
- retry_backoff. Instead of using a defined interval between retries, the PowerFlow system will incrementally increase the interval between retries. Possible values are True or False. The default value is False.
- retry_jitter. Instead of using a defined interval between retries, the PowerFlow system will retry the step execution at random intervals. Possible values are True or False. The default value is False.
- retry_backoff_max. The maximum time interval for the retry_backoff option, in seconds. For example, This means, if you have retry_max set to 15, the delays will be 1, 2, 4, 8, 16, 32, 64, 120, 240, 480, 600, 600, 600, 600, and 600. The default value is 600 seconds.
-
retry_countdown. The interval between retries, in seconds. If you enabled retry_backup, the PowerFlow system will incrementally increase this interval. The default value is 180.
Use caution when editing the retry_countdown option. If you set it to a value smaller than the default of 180 seconds, PowerFlow might experience collisions between task executions, and PowerFlow might stop unexpectedly. If you set this option to a value larger than the default, you might have to wait longer for a task to execute.
To define the retry options for a step in the application file:
- Using an API tool like Postman or cURL, use the API GET /applications/{application_name}:
GET URL_for_your_PowerFlow_system/api/v1/applications/application_name
where:
- URL_for_your_PowerFlow_system is the IP address or URL for the PowerFlow system.
- application_name is the application you want to edit.
- Copy the contents of the application to a source-code editor.
- If you wanted to add retry options to the step "GETgoogle.com", you could include the following:
"steps":[
{
"name": "GETgoogle.com",
"file": "QueryREST",
"prefix_url": "http://google.com",
"method": "GET",
"retry_max": 5
"retry_backoff": True
"retry_backoff_max": 600
"retry_countdown": 120
"output_to": ["next_step"]
},
{
"name": "next_step",
"file": "someOtherTask"
}
]
- Edit the "steps" section as needed and save your changes. Be sure to your file as a .JSON file with the same name as the application your downloaded.
Defining Variables for an Application
Application variables are defined in the PowerFlow application. These variables can be accessed only by steps in the application. In a step, including the appvar. prefix in a variable tells the PowerFlow system to look in the application to resolve the variable. In a step, application variables are used in step parameters.
To define an application variable:
- Using an API tool like Postman or cURL, use the API GET /applications/{application_name}:
GET URL_for_your_PowerFlow_system/api/v1/applications/application_name
where:
- URL_for_your_PowerFlow_system is the IP address or URL for the PowerFlow system.
- application_name is the application you want to edit.
- Copy the contents of the application to a source-code editor.
- Search for the section of the file that contains the text "app_variables".
- In the integration_template file, the section looks like this:
"app_variables": [
{
"name": "exampleVariable", "value": "exampleValue","description": "Variables defined here will be available in all steps of an application","required": true,"sample_value": "SampleValue", "default_value": "DefaultValue"
}
],
- You can copy and paste the example section above for each application variable you want to define.
- For each application variable, supply values for the following keys:
- name. This key requires a value. The name of the variable.
- value. This key requires a value. This is the value that the variable will resolve to at runtime.
- description. A description of this variable. This description appears in the user interface. The default value is null.
- required. Specifies whether the variable is required. Possible values are "True" or "False". The default value is "False". If the variable is required, but a value is not specified and a default value is not specified, the application will fail.
- sample_value. A sample value of the required data type or schema. The default value is null. For example, if the parameter is "port" and the expected value is an integer, a good sample_value would be "443".
- default_value. If no value is specified for this variable (in the value key), use the value of this key. The default value of this key is null.
- Edit the "app_variables" section as needed and save your changes. Be sure to your file as a .JSON file with the same name as the application your downloaded.
- To upload the application to PowerFlow system, see the section on Uploading an Application.
Uploading the Application to PowerFlow
When you create a new application or edit an existing application, you must upload the application to the PowerFlow system. There are two ways to upload an application to the PowerFlow system:
- at the command line with the iscli tool
- with the API
Uploading an Application with iscli
The PowerFlow system includes a command-line utility called iscli. When you install PowerFlow system, iscli is automatically installed.
To upload an application to the PowerFlow system using iscli:
- Either go to the console of the PowerFlow system or use SSH to access the server.
- Log in as isadmin with the appropriate password.
- Enter the following at the command line:
iscli -u -a -f path_and_name_of_application_file.py -H hostname_or_IP_address_of_PowerFlow_system -P port_number_of_http_on_PowerFlow_system -U user_name -p password
where:
- name_of_application_file is the full pathname for the application.
- hostname_or_IP_address_of_PowerFlow_system is the hostname or IP address of the PowerFlow system.
- port_number_of_http_on_PowerFlow_system is the port number to access the PowerFlow system. The default value is 443.
- user_name is the user name you use to log in to the PowerFlow system.
- password is password you use to log in to the PowerFlow system.
Uploading an Application with the API
The PowerFlow system includes an API. When you install the PowerFlow system, the API is available.
To upload an application with the IS API:
POST /applications
{
"name": "name_of_application",
contents of the .json file for the application
}
The API returns one of the following:
- 200. Application successfully updated or added.
- 400. Name or data parameter is missing.
- 500. Internal error. Database connection might be lost.
Running the Application
After uploading an application to PowerFlow, you can run it to ensure that it works as designed.
To run an application from the API:
- Using an API tool like Postman or cURL, use the API POST/applications/{application_name}/run:
POST https"//URL_for_your_PowerFlow_system/api/v1/applications/run
where:
- URL_for_your_PowerFlow_system is the IP address or URL for the PowerFlow system.
- application_name is the application you want to edit.
- The body of the post should contain:
{
"name": "name_of_application",
"params": {}
}
- You can include the following parameters with the POST request:
- parameters use the syntax:
"parameter name":"parameter value"
- wait. Number of seconds to wait for application to complete.
- configuration. The configuration file to use with the application. For details, see the section on configurations.
- The API returns one of the following:
- 200. Application started successfully.
- 400. Name or data parameter is missing.
- 404. Application not found.
- 500. Internal error. Database connection might be lost.
Running the Application with a Custom Queue
If your PowerFlow system runs multiple applications, you might want to ensure that one of those applications runs before other applications in the processing queues. To do this, you can align a queue with a worker process; the worker process will be dedicated to only that queue, will listen only to that queue, and process only jobs from that queue. You can then configure the high-priority application to use the queue that you aligned with its own worker process.
There are two steps to using a custom queue:
- Defining the queue and aligning it with a worker
- Configuring the application to use the custom queue
Defining a Custom Queue
To create a custom queue:
- SSH to the PowerFlow system.
- Use a text editor like vi to edit the file /opt/iservices/scripts/docker-compose.yml.
- The docker-compose.yml file contains definitions for worker processes. For example, you might see something like this:
services:
steprunner:
image: sciencelogic/is-worker:latest
environment:
LOGLEVEL: 10
celery_log_level: 10
logdir: /var/log/iservices
broker_url: 'pyamqp://guest@rabbit//'
result_backend: 'redis://redis:6379/0'
db_host: 'couchbase,localhost'
secrets:
- is_pass
- encryption_key
deploy:
replicas: 2
networks:
- isnet
depends_on:
- redis
- rabbitmq
- couchbase
volumes:
- "/var/log/iservices:/var/log/iservices"
- "statedb:/var/run/celery/states/"
steprunner_1:
image: sciencelogic/is-worker:latest
environment:
LOGLEVEL: 10
celery_log_level: 10
logdir: /var/log/iservices
broker_url: 'pyamqp://guest@rabbit//'
result_backend: 'redis://redis:6379/0'
db_host: 'couchbase,localhost'
user_queues: 'test_queue'
secrets:
- is_pass
- encryption_key
deploy:
replicas: 2
networks:
- isnet
depends_on:
- redis
- rabbitmq
- couchbase
volumes:
- "/var/log/iservices:/var/log/iservices"
- "statedb:/var/run/celery/states/"
steprunner_2:
image: sciencelogic/is-worker:latest
environment:
LOGLEVEL: 10
celery_log_level: 10
logdir: /var/log/iservices
broker_url: 'pyamqp://guest@rabbit//'
result_backend: 'redis://redis:6379/0'
db_host: 'couchbase,localhost'
user_queues: 'critical_queue'
secrets:
- is_pass
- encryption_key
deploy:
replicas: 2
networks:
- isnet
depends_on:
- redis
- rabbitmq
- couchbase
volumes:
- "/var/log/iservices:/var/log/iservices"
- "statedb:/var/run/celery/states/"
- The services with names that start with "steprunner" are the workers for the PowerFlow system.
-
Notice that the service named "steprunner" does not include any queues. This means that the worker "steprunner" listens to the default queues in the PowerFlow system.
ScienceLogic recommends that you allot at least one worker to handle the default queues.
- To add additional services to your PowerFlow system. copy all the lines included in the service definition, paste it into the file, and rename the service.
- For example, you could copy all the lines from "steprunner_2", paste the text in the "services" section, and rename the service "steprunner_3".
- To create one or more queues and dedicate a worker to them, enter the following line in definition of the worker, under the environment section:
user_queues: 'queue_name1, queue_name2'
where:
- queue_name1, queue_name2. The name of the new queues. The worker will monitor only these queues and execute tasks only from these queues.
- After you have updated the docker-compose file, you can update and re-deploy the PowerFlow system to pick up the changes to the docker-compose.yml file. To do this, SSH to the PowerFlow system and execute the following command:
docker stack deploy -c /opt/iservices/scripts/docker-compose.yml is4
Configuring an Application to Use a Custom Queue
There are two ways to specify that an application should use a custom queue:
- In the .JSON file for an application , you can specify that the application should always use a custom queue.
- At run time, you can specify that an application should use a custom queue only for that single execution of the application.
Configuring an Application to Always Use a Custom Queue
To specify that an application always uses a custom queue, edit the .JSONfile for the application. To do this:
- Using an API tool like Postman or cURL, use the API GET /applications/{application_name}.
GET URL_for_your_PowerFlow_system/api/v1/applications/application_name
where:
- URL_for_your_PowerFlow_system is the IP address or URL for the PowerFlow system.
- application_name is the application you want to edit.
- Copy the contents of the application to a source-code editor.
- Search for the section of the file that contains the lines "author", "configuration", "description", "friendly_name", and "name".
- In that section of the file, added the bolded line:
"queue": "name_of_queue",
where:
- name_of_queue is one of the custom queues you defined in the docker-compose.yml file.
- For example:
"author": "ScienceLogic, Inc.",
"configuration": "",
"description": "Read SL1 and ServiceNow devices and write them to a cache.",
"friendly_name": "Cache SL1 Devices using GraphQL",
"name": "cache_em7_device_data",
"generate_report": true,
"queue": "test_queue",
- Save your changes. Save the file to the same name (application_name.json.)
- The application will now always use the specified queue.
- To upload your changes to the PowerFlow system, see the section on Uploading an application.
Configuring an Application to Use a Custom Queue at Run Time
After uploading an application, you can run it and specify a queue. To run an application from the IS API:
- Using an API tool like Postman or cURL, use the API POST/applications/{application_name}/run:
POST https://URL_for_your_PowerFlow_system/api/v1/applications/run
where:
- URL_for_your_PowerFlow_system is the IP address or URL for the PowerFlow system.
- application_name is the application you want to edit.
- The body of the post should contain:
{
"name": "name_of_application",
"params": {
"queue": "custom_queue"
}
}
- You can include the following parameter with the POST request:
"queue": "name_of_queue"
where:
- name_of_queue is one of the custom queues you defined in the docker-compose.yml file.
- The API returns one of the following:
- 200. Application started successfully.
- 400. Name or data parameter is missing.
- 404. Application not found.
- 500. Internal error. Database connection might be lost.
Defining a Configuration Object
Configuration variables are defined in a stand-alone JSON file called a configuration that lives on the PowerFlow system and can be accessed by all applications and their steps.
In a step, including the config. prefix with a variable tells the PowerFlow system to look in a configuration file to resolve the variable.
If you want to re-use the same settings (like hostname and credentials) between applications, define configuration variables.
To define a configuration file:
- Use a source-code editor to open a new file.
- Copy and paste the following example text into the new file:
{
"author": "ScienceLogic, Inc.",
"description": "Fsun's config for demo.",
"name": "fsun-demo-settings",
"friendly_name": "Demo Settings",
"configuration_data": [
{
"encrypted": false,
"name": "em7_host",
"value": "10.2.11.42"
},
{
"encrypted": false,
"name": "em7_user",
"value": "em7admin"
},
{
"encrypted": true,
"name": "em7_password",
"value": "+dqGJe1NwTyvdaO2EizTWjJ2uj2C1wzBzgNqVhpdTHA="
},
],
}
- To create your own configuration file, edit the following keys:
- author. Name of the author of the configuration file. This field is optional.
- description. Description of the configuration file. This field is optional.
- name. Name of the configuration file. The name cannot contain any spaces and should be unique in your PowerFlow system.
- friendly_name. User-friendly name for the configuration.
- The section under "configuration_data" defines each configuration variable. You can use these variables as examples.
- To create your own configuration variables, note the syntax:
- The variable definition is surrounded by curly braces
- Each key:value pair in the definition is separated with a comma.
- To create your own configuration variable, define the following keys:
- encrypted. Specifies whether the value will appear in plain text or encrypted in this .json file. If set to "true", specifies that when the value is uploaded, the PowerFlow system will encrypt value of the variable. The plain text value will never again be retrievable by an end user. The encryption key is unique to each PowerFlow system.
- name. Name of the configuration file (without the .json suffix). This value appears in the user interface.
- value. The value to assign to the variable.
- Repeat steps 5-6 for each configuration variable.
- Save the new file as config_file.json
where:
- config_file.json is the name of the configuration file. This value must match the name key in the file. The file name must be unique within your PowerFlow system and cannot contains spaces.
Uploading the Configuration File to PowerFlow
When you create a new configuration file or edit an existing configuration object, you must upload the step to the PowerFlow system. There are two ways to upload a configuration object file to the PowerFlow system:
- at the command line with the iscli tool
- with the API
Uploading a Configuration with iscli
The PowerFlow system includes a command line tool called iscli. When you install PowerFlow system, iscli is automatically installed.
To upload a configuration file to the PowerFlow system using iscli:
- Either go to the console of the PowerFlow system or use SSH to access the server.
- Log in as isadmin with the appropriate password.
- Type the following at the command line:
iscli -u -c -f path_and_name_of_configuration__file.py -H hostname_or_IP_address_of_PowerFlow_system -P port_number_of_http_on_PowerFlow_system -U user_name -p password
where:
- path_and_name_of_configuration__file is the full pathname for the step.
- hostname_or_IP_address_of_PowerFlow_system is the hostname or IP address of the PowerFlow system.
- port_number_of_http_on_PowerFlow_system is the port number to access the PowerFlow system. The default value is 443.
- user_name is the user name you use to log in to the PowerFlow system.
- password is password you use to log in to the PowerFlow system.
Uploading a Configuration with the API
The PowerFlow system includes an API. When you install the PowerFlow system, the API is available.
To upload a configuration with the API:
POST /configurations
{
contents of the .json file for the configuration
}
The API returns one of the following:
- 200. Configuration successfully updated or added.
- 400. Name or data parameter is missing.
- 500. Internal error. Database connection might be lost.
Viewing a Report for a PowerFlow Application
In the PowerFlow user interface, the Reports page (![]() ) contains a list of reports associated with PowerFlow applications. You can search for a specific report by typing the name of that report in the Search field at the top of the Reports page. The user interface filters the list as you type.
) contains a list of reports associated with PowerFlow applications. You can search for a specific report by typing the name of that report in the Search field at the top of the Reports page. The user interface filters the list as you type.
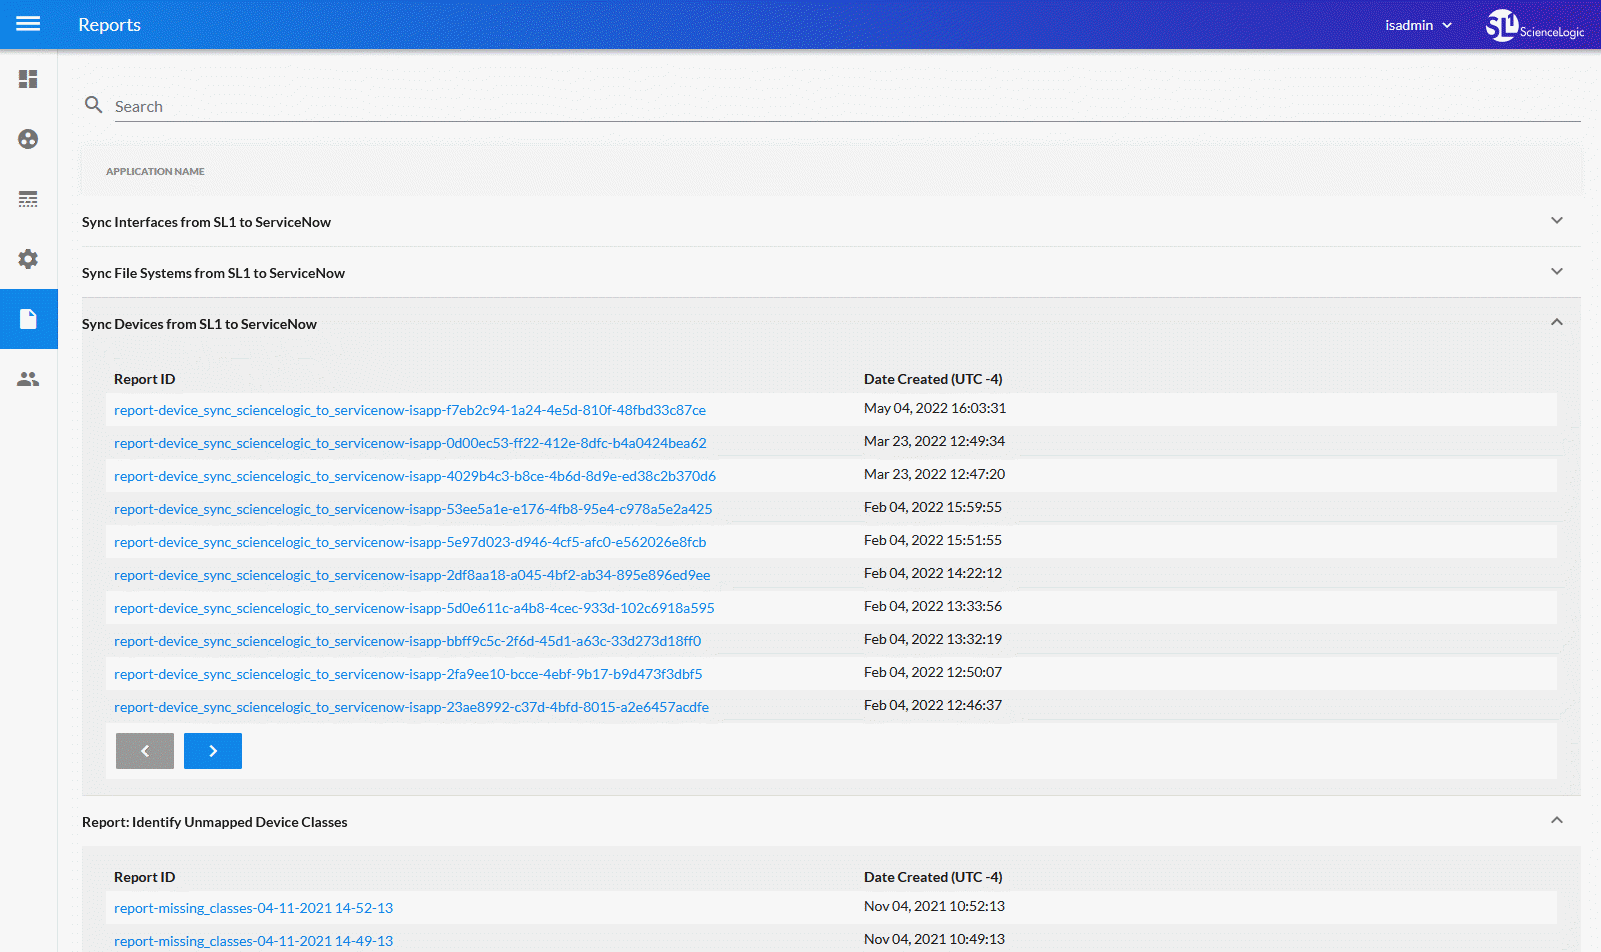
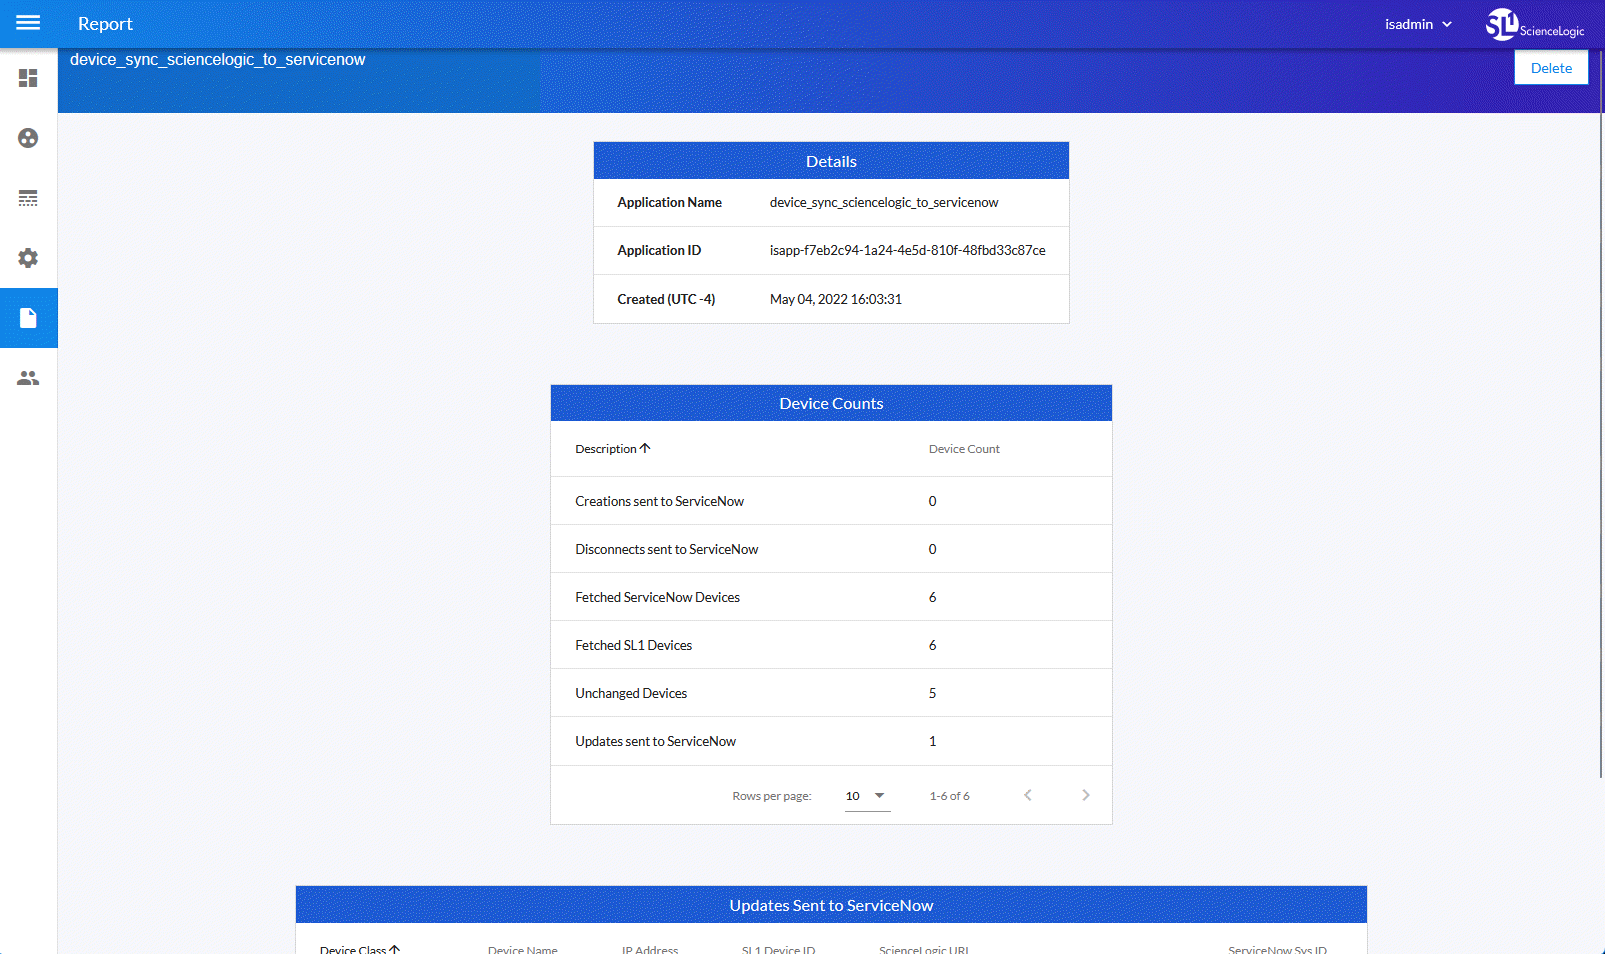
If a PowerFlow application supports reports and the reporting feature is enabled, PowerFlow will generate a report each time you run the application. Each report displays data only from the most recent run of the application; a report is not an aggregation of all previous runs.
From the detail page for a PowerFlow application, click (![]() ) to go to the Reports page.
) to go to the Reports page.
To view a report:
-
On the Reports page (
 ), click the name of the application or the down arrow (
 ) to expand the list of reports for that application.
 Click the arrow buttons under the list of reports to scroll forward and back through the list.
-
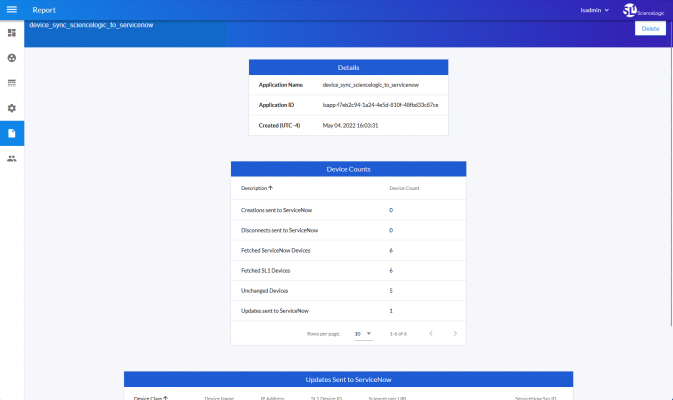
Click a report name in the Report ID column. The Report Details page appears:
To delete the report, click .
Viewing Logs for an Application
After running an application, you can view its log information. To view the log information for an application:
- In PowerFlow, run an application.
- Using an API tool like Postman or cURL, use the API GET /applications/{appName}/logs:
GET URL_for_your_PowerFlow_system/api/v1/applications/integration_application_name/logs
where:
- URL_for_your_PowerFlow_system is the IP address or URL for the PowerFlow system.
- You should see something like this:
{
"app_name": "example_integration",
"app_vars": {},
"href": "/api/v1/tasks/isapp-af7d3824-c147-4d44-b72a-72d9eae2ce9f",
"id": "isapp-af7d3824-c147-4d44-b72a-72d9eae2ce9f",
"start_time": 1527429570,
"state": "SUCCESS",
"steps": [
{
"href": "/api/v1/tasks/2df5e7d5-c680-4d9d-860c-e1ceccd1b189",
"id": "2df5e7d5-c680-4d9d-860c-e1ceccd1b189",
"name": "First EM7 Query",
"state": "SUCCESS",
"traceback": null
},
{
"href": "/api/v1/tasks/49e1212b-b512-4fa7-b099-ea6b27acf128",
"49e1212b-b512-4fa7-b099-ea6b27acf128",
"name": "second EM7 Query",
"state": "SUCCESS",
"traceback": null
}
],
"triggered_by": [
{
"application_id": "isapp-af7d3824-c147-4d44-b72a-72d9eae2ce9f",
"triggered_by": "USER"
}
]
}
- Notice the bolded lines that start with href and id. You can use these lines to view the logs for the application.
- To use the href value to get details about an application, use an API tool like Postman or cURL and use the API GET /applications/{appName}:
GET URL_for_your_PowerFlow_system/href_value
where:
- URL_for_your_PowerFlow_system is the IP address or URL for the PowerFlow system.
-
href_value is the href value you can copy from the log file. The href value is another version of the application name.
To view logs for subsequent runs of the application, you can include the href specified in the last_run field.
- To use the task id value to views details about an application, use an API tool like Postman or cURL and use the API GET /tasks/{task_ID}:
GET URL_for_your_PowerFlow_system/task_id
where:
- URL_for_your_PowerFlow_system is the IP address or URL for the PowerFlow system.
- task_id is the id value you can copy from the log file for the application. The task ID specifies the latest execution of the application.
Working with Applications in the PowerFlow User Interface
You can log into the PowerFlow user interface to edit, configure, and run an application.
Editing an Application in the User Interface
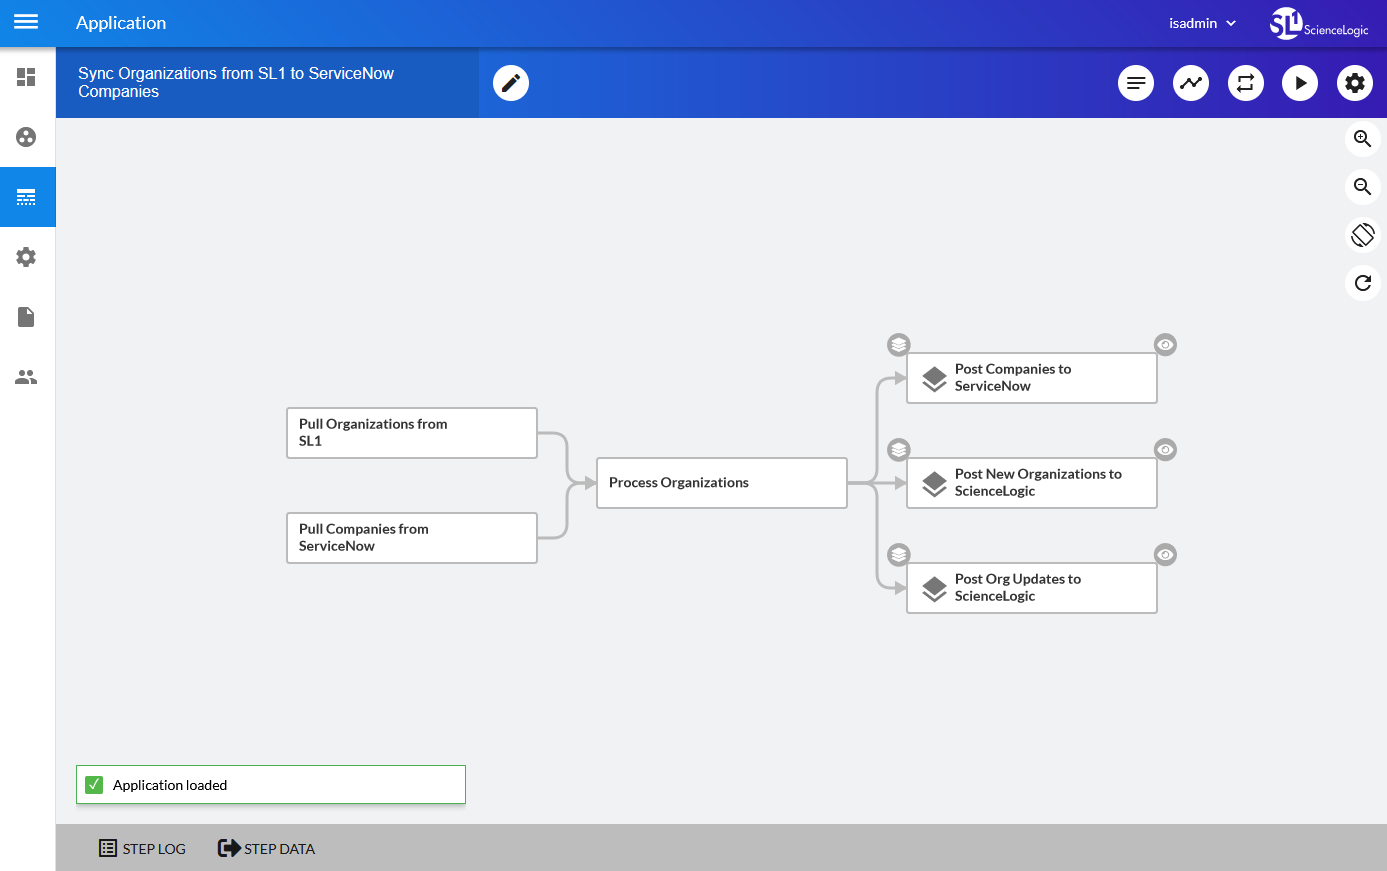
In the PowerFlow builder interface, you can edit an existing application and its steps. You can also add and remove steps from that application.
You cannot overwrite applications where ScienceLogic, Inc. is listed as the "Author", but you can edit a ScienceLogic application and save it with a different name.
To edit an application:
- From the Applications page, select the application that you want to edit. The Application detail page appears.
-
Click the button (
 ). The PowerFlow builder interface appears, including the Steps Registry pane, which contains a list of all of the available steps.
-
On the Steps Registry pane, you can search for a step or filter the list of steps to help you find the step you need:
- Click the tab (
 ) to search the entire list of steps from the Search Steps Registry field.
 - Click the tab (
 ) to group the steps by Synchronization PowerPack, by a tag, or to show all of the steps in one list.
Click the button (
 ) on a step in the Steps Registry pane to view more information about that step, including the step ID, the Synchronization PowerPack for that step, the version, and creator of the step. You can also click to edit the code for that step.
 - Click the tab (
-
To create a step, click (
 ) on the Steps Registry pane, type a file name, and edit the step code for the new step.
 - Click the step or steps you want to add from the Steps Registry pane and drag them to the main viewing pane ("canvas") to add them to the application. Add any relevant information to the Configuration pane for that step, and click to close the Configuration pane.
- To adjust the position of any step in the application, click the step you want to move and drag it to its new location.
-
To redirect the arrow between steps, click the arrow and drag it to reposition it.
-
To edit the configuration for a step, click the gear icon (
 ) on the step and update the fields as needed on the Configuration pane.
 You can also right-click the gear icon (
) on a step to edit the step or delete the step. - While editing a step, click to view the JSON configuration data for the step. Click to view the fields instead.
- To remove a step, click the step to select it and press the key on your keyboard.
- To save the changes you made to the application, click . You can also click the Save as option to save the application with a new name.
- To stop editing and close the Search Steps Registry pane, click the button (
 ).
).
Configuring an Application in the PowerFlow User Interface
Before you can run a PowerFlow application, you must align the application with a configuration object from the Configurations page. A configuration object defines global variables, such as endpoints and credentials, that can be used by multiple steps and applications. Each variable in a configuration object is set up as a name and value pair. You can also encrypt a variable to protect sensitive data like a password.
You can "align" the configuration object you want to use with an application from the Configuration pane for that application.
To align a configuration object with an application:
- From the Applications page (
 ), select the application that you want to align with a configuration object. The Application page for that application appears.
 -
Click (
 ). The Configuration pane opens on the right side of the Application page:
To view a pop-up description of a field on the Configuration pane for an application, hover over the label name for that field.

-
Select a configuration from the Configuration drop-down to "align" to this application. This step is required for all applications.
You can select none from the Configuration drop-down to clear or "un-align" the selected configuration object from an application. Also, if you did not select a configuration object when editing fields on the Configuration pane, the previously set configuration object will remain aligned (if there was a previously set configuration object).
-
Click to view the JSON configuration data for the configuration object. Click again to view the fields instead.
-
As needed, edit the other configuration values for the application. Press after editing an item to make sure your changes are saved.
To prevent potential issues with security and configuration, any fields that are encrypted and any configuration-specific fields containing a padlock icon (
 ) on the Configuration pane cannot be edited.
- Click and wait for the "App & Config modifications saved" pop-up message to appear. The Configuration pane automatically closes after this message appears.
Running or Stopping an Application in the PowerFlow User Interface
You can run an application directly from the Applications page (the list view) or from an Application page (the detail view). If you run the application from the Application page, you have the following additional options:
- Run. Executes the application normally, with a log level of 1. This is the default, and it is the same as the Run Now option from the Applications page.
- Debug Run. Executes the application in Debug Mode with a log level of 10.
- Custom Run. Executes the application using a logging level that you specify (Error, Warning, Info, or Debug). You can also add any customer parameters that you might want to use to test specific features in the application.
To run an application:
-
From the Applications page (
), click the button ( ) for the application you want to run and select Run Now.
You can also select an application from the Applications page and click (
 ) from the Application page. If you hover over the button, you can select Debug Run or Custom Run.
-
As the application runs, the color of the border around each step represents whether it is running, is successful, or has failed:
Step Color Icon State Blue 
Running Green 
Successful Red 
Failed Yellow 
Warning
Pop-up status messages also appear in the bottom left-hand corner of the Application page to update you on the progress of the application run.
After you start a run, you can click (![]() ) to stop that application and end all running tasks for that application.
) to stop that application and end all running tasks for that application.
- If a step triggers a child application, a branch icon (
 ) appears in the upper left-hand corner of the step. Double-click the branch icon to open the child application. Click the branch icon once to display the triggered application's run ID as a link in a pop-up window. If no run ID is present, the branch icon displays "NONE".