![]()
This
A PowerFlow application is a JSON object that includes all the information required for executing an integration on the PowerFlow platform. In this Synchronization PowerPack, the applications are aligned with an SL1Run Book Automation that you can configure to ensure that whenever SL1 detects a new, acknowledged, or cleared Event, a corresponding Incident is created or updated in ServiceNow.
This
Overview of the Run Book Automation for Incident Sync
You can configure a Run Book Automation to ensure that whenever SL1 detects a new, acknowledged, or cleared event, a corresponding incident is created or updated in ServiceNow:
The "ServiceNow: Add/Update/Clear Incident" Run Book Action policy is responsible for sending the SL1 payload to PowerFlow. PowerFlow then sends that payload to ServiceNow and creates, updates, acknowledges, or clears an incident, as needed.
SL1 features three Run Book Automation policies that facilitate this process:
- ServiceNow: [Incident] Add/Update
- ServiceNow: [Incident] Event Acknowledged
- ServiceNow: [Incident] Event Cleared
A fourth Run Book Automation policy, "ServiceNow: [Incident] Click to Create" lets you manually create an incident in ServiceNow by clicking the life-preserver icon (![]() ) in SL1. For more information, see Configuring the "ServiceNow: [Incident] Click to Create" Automation Policy.
) in SL1. For more information, see Configuring the "ServiceNow: [Incident] Click to Create" Automation Policy.
The "Sync Incident State from ServiceNow to SL1 Event" application does not have an associated Run Book Action that triggers Incident Sync. You must schedule this application to run every minute, or to a time suitable for your requirements. You can use a cron job to trigger this schedule, or you can use the PowerFlow user interface to schedule the application. For more information about scheduling, see
Each Run Book Automation policy calls a single Action in SL1. Ensure that the configuration object aligned with PowerFlow application points to the relevant SL1 system and ServiceNow instance. The Run Book Action then calls a PowerFlow application that determines the workflow to execute.
Events in SL1 frequently occur and resolve due to fluctuations in the network and other changing conditions. However, the Run Book Automation policies above use a de-duplication algorithm to ensure that only a single open ServiceNow incident exists per device.
If a device already has an existing ServiceNow incident, the following updates are made:
- The "Work Notes" is updated when there is an Acknowledge action.
- Impact and Urgency are updated, if they are different.
- The State is updated, and the Assigned to field is cleared when an incident state moves from Resolved to In Progress .
- If an event is cleared in SL1 and then later reoccurs before the incident has been "Closed" in ServiceNow, then the subsequent events appear in the original ServiceNow incident record for that device. If an incident record has been "Closed," then ServiceNow will create a new incident record when a cleared event reoccurs in SL1.
- By default, if an event is acknowledged in SL1, the ServiceNow incident record will be updated with the work notes and the acknowledging user. Clearing an SL1 event will move the ServiceNow incident record state to "Resolved". If all SL1 events associated with a ServiceNow incident record are clear, the ServiceNow incident record will, by default, move to a "Resolved" state.
You can edit the snippet code in the Run Book Action to adjust the behavior for changing states when an SL1 event is acknowledged or cleared. For more information, see Customizing the Snippet Code in the Input Parameters Pane.
Configuring Incident Sync
This workflow covers how to set up the Run Book Automation to run Incident Sync:
- Create a configuration object in the PowerFlow user interface.
- Configure the following PowerFlow applications:
- "Sync Cached Events to ServiceNow"
- "Sync SL1 Event to ServiceNow Incident"
- "Sync Incident Details from ServiceNow to SL1 Events"
- "ServiceNow: [Incident] - Add/Update"
- "ServiceNow: [Incident] - Event Acknowledged"
- "ServiceNow: [Incident] - Event Cleared
- Enable and customize the most recent "ServiceNow: Add/Update/Clear Incident" Run Book Action Policy (which uses the "ServiceNow: Send to PowerFlow" Action Type).
- Optionally, send custom data to ServiceNow using the Passthrough Option.
- Optionally, enable and configure the "ServiceNow: Click to Create Incident" Policy.
Creating a Configuration Object
A configuration object supplies the login credentials and other required information needed to execute the steps for a PowerFlow application. The Configurations page (![]() ) of the PowerFlow user interface lists all available configuration objects for that system.
) of the PowerFlow user interface lists all available configuration objects for that system.
You can create as many configuration objects as you need. A PowerFlow application can only use one configuration object at a time, but you can use (or "align") the same configuration object with multiple applications.
To use this Synchronization PowerPack, you will need to use an existing configuration object in the PowerFlow user interface or create a new configuration object. Next, you need to align that configuration object to the relevant applications that are triggered by the Run Book Actions in SL1.
Depending on your SL1 environment and the third-party environment with which you are syncing data, you might be able to use the same configuration object with more than one Synchronization PowerPack.
For this Synchronization PowerPack, you can make a copy of the "ServiceNow SyncPack" configuration object, which is the sample configuration file that was installed with the ServiceNow Base Synchronization PowerPack.
The "ServiceNow SyncPack" configuration object contains all of the required variables. Make a copy of the configuration object and update the variables from that object to match your SL1 and ServiceNow settings.
To create a configuration object based on the "ServiceNow SyncPack" configuration object:
- In the PowerFlow user interface, go to the Configurations page (
 ).
). -
Click the button (
 ) for the "ServiceNow SyncPack" configuration object and select Edit. The Configuration pane appears:
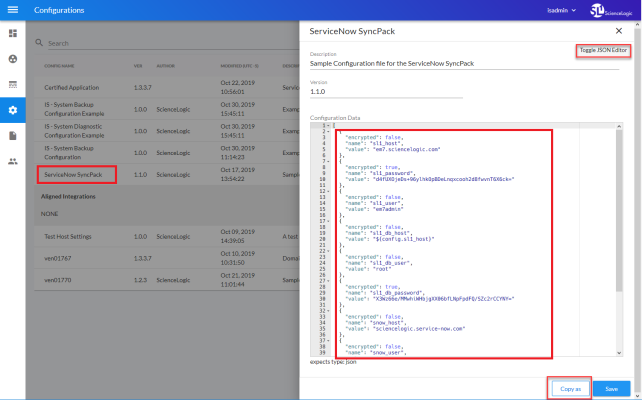
Click to show the JSON code. Click the button again to see the fields.

-
Click . The Create Configuration pane appears.
This step is required. Do not use the original configuration object to run PowerFlow applications.
-
Complete the following fields:
- Friendly Name. Name of the configuration object that will display on the Configurations page.
- Description. A brief description of the configuration object.
- Author. User or organization that created the configuration object.
- Version. Version of the configuration object.
-
In the Configuration Data field, include the required block of code to ensure that the applications aligned to this configuration object do not fail:
{
"encrypted": false,
"name": "<sl1_db_host?",
"value": "${<config.sl1_host>}"
}
For example:
{
"encrypted": false,
"name": "sl1_db_host",
"value": "10.2.11.42"
}
If you are using IPv6 for IP addresses, wrap the IP string in brackets, such as https://[2001:db8:3333:4444:5555:6666:7777:8888]
Click to show the JSON code. Click the button again to see the fields. You can also click and add a new name-value pair in the Configuration Data Values section.
If you are using SL1 with an External Database (SL1 Extended architecture or a cloud-based architecture), update the "value" of that block of code to be the host of your database. This field accepts IP addresses. For example: "value": "db.sciencelogic.com". If you are not using the SL1 Extended architecture or a cloud-based architecture, you do not need to make any changes to the block of code other than pasting the code into the configuration object.
-
In the Configuration Data Values field, update the default variable definitions to match your PowerFlow configuration.
The region value is a user-defined variable that identifies your SL1 instance within ServiceNow.
- To create a configuration variable in the JSON Editor, define the following keys:
- encrypted. Specifies whether the value will appear in plain text or encrypted in this JSON file. If you set this to "true", when the value is uploaded, PowerFlow encrypts the value of the variable. The plain text value cannot be retrieved again by an end user. The encryption key is unique to each PowerFlow system. The value is followed by a comma.
- name. Specifies the name of the configuration file, without the JSON suffix. This value appears in the user interface. The value is surrounded by double-quotes and followed by a comma.
- value. Specifies the value to assign to the variable. The value is surrounded by double-quotes and followed by a comma.
- Click . You can now align this configuration object with one or more applications.
Configuring the PowerFlow Applications
To run Incident Sync, you must "align" the configuration object to run with the following PowerFlow applications:
- Sync Cached Events to ServiceNow. Bulk processes all of the cached SL1 Events and posts them to ServiceNow. Sends a "Sync Success" or "Sync Failed" status update to PowerFlow based on the result of the post. ScienceLogic suggests that you schedule this application to run every 60 seconds or longer.
-
Sync Incident Details from ServiceNow to SL1 Events. Acknowledges or clears SL1 Events from ServiceNow, updates the user note, and populates the incident number in the external ticket reference. This application also include the new user_note_template field that accepts a Jinja2 template to generate custom user notes. ScienceLogic suggests that you schedule this application to run every 60 seconds.
-
Sync SL1 Event to ServiceNow Incident. The "ServiceNow: Add/Update/Clear Incident" Run Book Action triggers this application whenever an SL1 Event is created, updated, or cleared.
This application processes the SL1 Event, caches it to PowerFlow to allow for bulk processing for ServiceNow by the "Sync Cached Events to ServiceNow" application, and then sends a status update to SL1.
In previous releases of this Synchronization PowerPack, this application was named the "Sync Incident State from ServiceNow to SL1 Event" application.
In addition, you can configure additional fields from the Configuration pane for the "Sync Incident Details from ServiceNow to SL1 Events" and the "Sync Cached Events to ServiceNow" PowerFlow applications.
If you are using the ServiceNow CMDB Synchronization PowerPack and you want to link incidents with ServiceNow Configuration Items (CIs), you will need to run the "Sync Devices from SL1 to ServiceNow" application. If this is the first time you are running the Incident Sync, you will need to run the "Sync Devices from SL1 to ServiceNow" application twice to build the internal cache. For more information, see
To configure the PowerFlow applications:
- On the Applications page of the PowerFlow user interface, open the "Sync SL1 Event to ServiceNow Incident" application and click (
 ). The Configuration pane for that application appears.
 - From the Configurations drop-down, select the configuration object you want to use.
- Click to align that configuration object with the "Sync SL1 Event to ServiceNow Incident" application. You do not need to edit any other fields for that application.
- Go to the Applications page, open the "Sync Cached Events to ServiceNow" application, and click (). The Configuration pane for that application appears.
- From the Configurations drop-down, select the configuration object you want to use.
- Update the following fields, as needed:
- retry_max. The maximum number of times PowerFlow will retry to execute the step before it stops retrying and logs a step failure. For example, if retry_max is 3, PowerFlow will retry after 1 second, then 2 seconds, then 4 seconds, and stop if the last retry fails. The default is 0.
- retry_jitter. Instead of using a defined interval between retries, the PowerFlow system will retry the step execution at random intervals. The default is unselected.
- retry_backoff. Instead of using a defined interval between retries, PowerFlow will incrementally increase the interval between retries. The default is unselected.
- retry_backoff_max.The maximum time interval for the retry_backoff option, in seconds. For example, This means, if you have retry_max set to 15, the delays will be 1, 2, 4, 8, 16, 32, 64, 120, 240, 480, 600, 600, 600, 600, and 600. The default is 600.
- limit. Specify the number of events to send per batch. The default is 2000.
- Click .
-
Go to the Applications page, open the "Sync Incident Details from ServiceNow to SL1 Events" application, and click (
). The Configuration pane for that application appears: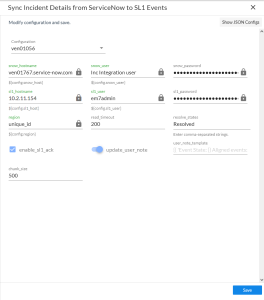
This application populates the incident numbers in SL1 as well as updating other incident behaviors.
- From the Configurations drop-down, select the configuration object you want to use.
- Update the following fields, as needed:

- resolve_states. Specify one or more state labels that PowerFlow will consider as "Resolved", separated by commas. SL1 Events associated with a ServiceNow Incident in these states will be cleared.
- enable_sl1_ack. Select this option to allow this integration to acknowledge events. The application attempts to acknowledge with the user assigned to the incident.
- update_user_note. De-select this option if you do not want this application to update the User Note in SL1.
-
user_note_template. Lets you add a Jinja2 template to define a customer format for populating the User Notes in SL1. If you leave this field blank, PowerFlow uses the state label that displays in gray text. For more information about Jinja2 filters, see the List of Built-in Filters in the Jinja2 documentation.
The following is an example of a Jinja2 template that you can use in this field:
{{'Incident {} is assigned to {} has {} events aligned to it and is currently in state {}'.format(incident.incident_number, incident.user.user|default(None), incident.events|length, incident.state)}}
- Click .
-
ScienceLogic recommends that you run the following PowerFlow applications on a schedule:
- "Sync Incident Details from ServiceNow to SL1 Events": every 60 seconds
-
"Sync Cached Events to ServiceNow": every 60 seconds; less than 60 seconds might cause adverse performance issues within ServiceNow
For more information about scheduling applications, see
Updating ServiceNow Incident State when an Incident is Acknowledged in SL1
In version 4.0.0 of this Synchronization PowerPack, if you acknowledge an event in SL1, PowerFlow adds a work note to the incident in ServiceNow, but the incident status does not change to "In Progress" in ServiceNow. To work around this issue, you can update the business rule settings in ServiceNow to ensure that your SL1 Events sync properly with your ServiceNow Incidents.
In ServiceNow, the "Inc work notes update for ack events" business rule updates the work notes for the Incident, based on conditions. This business rule is only for updating work notes for acknowledged events and has no affect on the rest of the Incident process.
The following customization is customer-supported only.
To configure ServiceNow settings to acknowledge synced SL1 events:
-
In ServiceNow, go to Server Development > Business Rules and select the "Inc work notes update for ack events" business rule.
Instead of updating this business rule, ScienceLogic recommends that you create a new business rule. You can also do an "Insert and stay" and update the code to only have the state modifications. Taking one of the actions will avoid overwriting the business rule if there are any changes to the rule in future updates for this application.
-
Copy the code from the "Inc work notes update for ack events" business rule, and create a new business rule with the same conditions and code.
-
Open the new business rule, and go to the tab. The relevant code is in lines 18-19:
gr.work_notes="Event "+current.u_event_id+" Acknowledged by "+current.u_username;
gr.update();

-
Update the code at line 18 to include state modifications instead of updating work notes. For example: gr. state = '2';
-
Save the business rule. After you configure the business rule in ServiceNow, any time an event is acknowledged in SL1, the work notes on the Incident synced to that event in ServiceNow is updated with the message Event 'id' Acknowledged by 'username'. There are no State changes for an incident synced to the event that is acknowledged. This is the expected default behavior for the "ScienceLogic SL1: Incident Automation" certified application in ServiceNow.

Creating a ServiceNow Credential in SL1
To configure SL1 to communicate with ServiceNow, you must first create a SOAP/XML credential. This credential allows the Run Book Automation scripts and the Dynamic Applications in the ServiceNow Base Pack PowerPack to connect with your ServiceNow instance. These Run Book Automations are responsible for sending the SL1 event data to PowerFlow, which ultimately sends the data to a ServiceNow.
The ServiceNow RBA - Example credential from the ServiceNow Base Pack PowerPack is an example SOAP/XML credential that you can configure for your own use.
To configure the ServiceNow RBA - Example credential:
- In SL1, go to the Credential Management page (System > Manage > Credentials).
-
Locate the ServiceNow RBA - Example credential and click its wrench icon (
 ). The Edit SOAP/XML Credential page appears:
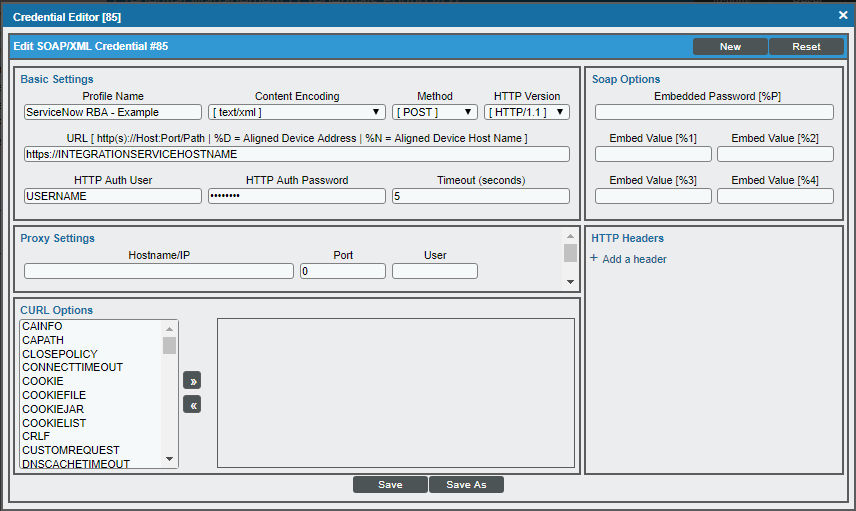
- Complete the following fields:
- Profile Name. Type a new name for the ServiceNow credential.
- Content Encoding. Make sure text/xml is selected.
- Method. Make sure POST is selected.
- HTTP Version. Select HTTP/1.1.
- URL. Type the URL for your PowerFlow instance.
- HTTP Auth User. Type the username of your PowerFlow instance.
- HTTP Auth Password. Type the password of your PowerFlow instance.
- Timeout. Type "5".
- Click .
- When the confirmation message appears, click .
-
On the Credential Management page (System > Manage > Credentials), make a note of the value in the ID column for the credential you just created:

You will use this value with the sl1_credential_id parameter when you edit the snippet code of the "ServiceNow: Add/Update/Clear" Run Book Action Policy:


Enabling the Run Book Automation Policies
Before you can run the "ServiceNow: Add/Update/Clear" Run Book Action, you must enable the relevant Run Book Automation policies in SL1:
- ServiceNow: [(Cases, Events, or Incident)] - Add/Update
- ServiceNow: [(Events or Incident)] - Event Acknowledged
- ServiceNow: [(Cases, Events, or Incident)] - Event Cleared
Versions 104 and later of the ServiceNow Base Pack PowerPack separated these Run Book Action policies by Cases, Events, and Incident, such as "ServiceNow: [Events] - Add/Update" and "ServiceNow: [Cases] - Add/Update". This update lets you choose the Run Book Actions based on if you are using the Cases, Events, or Incident Synchronization PowerPack.
Version 106 and later of the ServiceNow Base PackPowerPack aligned all default Incident Automation policies with the new "ServiceNow: Send to PowerFlow" Action Type. If you have upgraded to the ServiceNow Base Pack PowerPack version 106 or later, but not the ServiceNow Incident Synchronization PowerPack version 4.0.0 or later, you will need to update those default Automation policies to align with the older Action Type. If you made copies of the Automation policies, you will not need to update them.
To enable the three ServiceNow Run Book Automation policies:
- In SL1, go to the Automation Policy Manager page (Registry > Run Book > Automation).
-
Locate the "ServiceNow: [(Cases, Events, or Incident)] - Add/Update" automation policy and click its wrench icon (
 ). The Automation Policy Editor page appears:
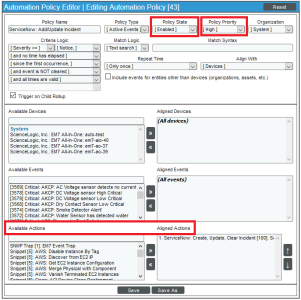
- Update the following fields:
- Policy State. Select Enabled.
- Policy Priority. Select High to ensure that this PowerFlow automation policy is added to the top of the queue.
-
Available Actions. If it is not already selected, select the corresponding ServiceNow Run Book Action policy. Filter the Available Actions section by typing "ServiceNow" in the search field.
By default, the "ServiceNow: [Incidents] Add/Update" automation policy will create ServiceNow Incidents for all devices. You can limit the devices affected by making changes to the Organization, Severity, Match Logic, Aligned Devices, and/or Aligned Events fields.
ScienceLogic highly recommends that you do not make changes to the Policy Type, Repeat Time, or Align With fields or the And event is NOT acknowledged setting.
- Click .
- Repeat steps 2-4 for the "ServiceNow: [(Events or Incident)] - Event Acknowledged" and "ServiceNow: [(Cases, Events, or Incident)] - Event Cleared" Run Book Automation policies.
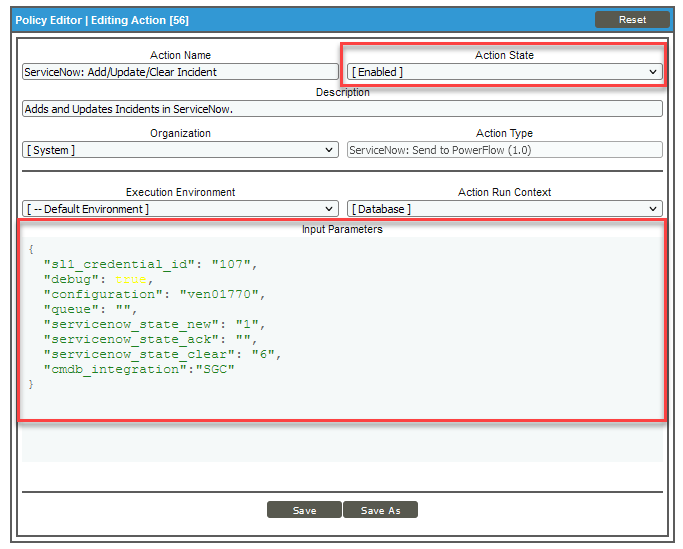
Enabling and Customizing the Run Book Action Policy
The "ServiceNow: Add/Update/Clear Case", the "ServiceNow: Add/Update/Clear Event", and the "ServiceNow: Add/Update/Clear Incident" Run Book Action policies contain snippet code that you can customize to use with the relevant Synchronization PowerPack. You edit these values in the Input Parameters pane of the Action Policy Editor page for this policy.
If you are using the ServiceNow Incident Synchronization PowerPack version 4.0.0, make sure that you are using the latest version of the "ServiceNow: Add/Update/Clear Incident" Run Book Action policy.
To enable and customize the Run Book Action policy:
- In SL1, go to the Action Policy Manager page (Registry > Run Book > Actions).
-
Locate the ServiceNow: Add/Update/Clear policy that you want to use and click its wrench icon (
). The Action Policy Editor page appears:
- For the Action State filed select Enabled.
- For the sl1_credential_id field in the Input Parameters pane, specify the credential ID form the ID column on the Credential Management page (System > Manage > Credentials). For example: "sl1_credential_id": "107"
- Edit the snippet code as necessary, using the information in the Customizing the Snippet Code in the Input Parameters Pane section, below. When you are finished, click .
Customizing the Snippet Code in the Input Parameters Pane
SL1 Run Book Action snippets are written in Python. In the event of a syntax error, the policies will no longer run. As a result, you must ensure that all edits adhere to Python standards. True and False options are case-sensitive and must not contain quotes.
The Correlation ID (correlation _type in the Run Book Action Input Parameters) is no longer set in SL1 or PowerFlow starting with version 4.0.0 of the ServiceNow Incident Synchronization PowerPack. The Correlation ID is now set in the transformation map within ServiceNow. The preset Correlation IDs that were provided in past applications are also included and can be set by using the Properties page in the ServiceNow Application. You can address custom behavior within the transformation map.
You can customize the following values in the "ServiceNow: Add/Update/Clear" Run Book Action snippet code:
- sl1_credential_id. Specifies the ID of the credential object. You can find this value in the ID column of the Credentials page (System > Manage > Credentials of SL1. For example: "sl1_credential_id": "107"
- debug. A true/false value that determines if the action is logged in SL1 and if the application is run in Debug Mode on PowerFlow. Troubleshooting logs are written to /data/tmp/servicenow_rba.log.
-
configuration. Specifies the ID of the configuration object used on PowerFlow. The configuration ID is all lower-case, with spaces in the configuration object "friendly" name replaced by underscores. For example: "configuration": "servicenow_syncpack_configs"
To find the configuration ID with the API, make a GET request on this endpoint: https://<powerflow_hostname>/api/v1/configurations.
- queue. Specifies the worker queue on which the application runs. Leave this as default.
- integration. Currently not in use.
The following parameters are specific to the "ServiceNow: Add/Update/Clear Incident" Run Book Action, and they show the ServiceNow default values, which might not align with your specific ServiceNow instance.
- servicenow_state_new:
- 1. Incident state is "New". This is the default value.
- 2. Incident state is "In Progress".
- 3. Incident state is "On Hold".
- 6. Incident state is "Resolved".
- 7. Incident state is "Closed".
- 8. Incident state is "Canceled".
- servicenow_state_ack:
- 1. Incident state is "New". There is no default value.
- 2. Incident state is "In Progress".
- 3. Incident state is "On Hold".
- 6. Incident state is "Resolved".
- 7. Incident state is "Closed".
- 8. Incident state is "Canceled".
- servicenow_state_clear:
- 1. Incident state is "New".
- 2. Incident state is "In Progress".
- 3. Incident state is "On Hold".
- 6. Incident state is "Resolved". This is the default value.
- 7. Incident state is "Closed".
- 8. Incident state is "Canceled".
- cmdb_integration. Specifies which CMDB Synchronization PowerPack you are using to ensure that PowerFlow sends the correct identifiers to ServiceNow. If you are using the ServiceNow CMDBSynchronization PowerPack, use CMDB, such as "cmdb_integration":"CMDB". If you are using the ServiceNow Service Graph Connector Synchronization PowerPack, use SGC.
- pf_app_override. If you are using a custom PowerFlow application to consume SL1 Events, add the system name of that application to this parameter. Optional. If this parameter is not present and populated, PowerFlow will use the default application for consuming events.
-
You can assign the assignment group to one of the new, acknowledged, or cleared incidents that are mapped. To disable this feature, ensure that no values are set. To assign an assignment group, set the variable value to the sys_id of the ServiceNow Assignment Group. In the following example, the assignment group is assigned to incidents that are cleared:
"assignment_group_new": "",
"assignment_group_ack": "",
"assignment_group_clear": "sys_id"
Customizing Logging in the Run Book Action
You can customize the following logging-related items in the "ServiceNow: Add/Update/Clear" Run Book Action snippet code:
- logfile = /data/tmp/ServiceNow_add_update_clear_incident.log
- Location for logging output.
- Will be created if it does not exist.
- Will be appended with each Run Book job.
- Is case-sensitive.
- do_debug_logging = True
- True is on, False is off.
- Is case-sensitive.
- For troubleshooting, these can be enabled or changed.
- Writes logs to /data/tmp/servicenow_rba.log.
Sending Custom Data to ServiceNow Using the Passthrough Option
You can use the "ServiceNow: [Incident] Add/Update" Run Book Automation and the "ServiceNow: Add/Update/Clear Incident" Run Book Action to "pass through" custom data about incidents to ServiceNow. For example, you might want to use the passthrough functionality to overwrite the impact and urgency of a ServiceNow Incident, which is the only way to change the priority of the Incident.
You can also use the "ServiceNow: [Cases] Add/Update" Run Book Automation and the "ServiceNow: Add/Update/Clear Cases" Run Book Action to "pass through" custom data about cases to ServiceNow. Similarly, you can use the "ServiceNow: [Events] Add/Update" Run Book Automation and the "ServiceNow: Add/Update/Clear Event " Run Book Action to "pass through" custom data about events to ServiceNow.
To pass custom data to ServiceNow:
- Create a new Run Book Action that pulls the relevant data and adds it to a dictionary called EM7_RESULT.
- Add the new Run Book Action to the "ServiceNow: [(Cases, Events, or Incident)] Add/Update " Run Book Automation Policy, ahead of the "ServiceNow: Add/Update/Clear (Case, Event, or Incident)" Run Book Action so that the new Action runs first, and then is consumed by the ServiceNow Action.
Passing Custom Data to ServiceNow
The following procedure describes how to configure the passthrough functionality, using the "ServiceNow: [Incident] Add/Update" Run Book Automation and the "ServiceNow: Add/Update/Clear Incident" Run Book Action as examples.
To pass custom data to ServiceNow:
-
In SL1, go to the Action Policy Manager page (Registry > Run Book > Actions) and click to create a new Run Book Action policy:
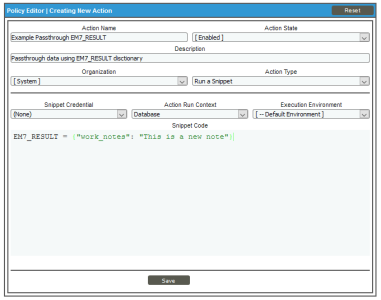
- Complete the following fields:
- Action Name. Type a unique name for the Action.
- Action State. Select Enabled.
- Action Type. Select Run a Snippet.
- Execution Environment. Select ServiceNow Base Pack.
- Complete the other fields as needed.
- In the Snippet Code pane, add the snippet code you want to include for the EM7_RESULT dictionary. For example, the following snippet code lets you override the ServiceNow Incident work notes with a hardcoded note:
EM7_RESULT = {"work_notes": "This is a new note"}
Additional notes about the structure of the EM7_RESULT dictionary:
- EM7_RESULT = is required for the dictionary, and the formatting of the keys should match the example above.
- All keys defined in the EM7_RESULT dictionary need to map to field IDs on the ScienceLogic Events table in ServiceNow.
- You can hard-code the values in the EM7_RESULT dictionary, or you can use variables and functions, like the "Snippet Code Example", below.
- As a best practice, avoid sending null passthrough values to ServiceNow. If you must send 'null' or 'NULL' values to ServiceNow, pass through that value as an empty string, such as
"location":"". Also, only pass through values that you need. For example, instead of sending{"location": "", "work_notes": "stuff"}, simply send{"work_notes": "stuff"}. -
A long snippet might delay the ticket being created
- Click .
- Go to the Automation Policy Manager page (Registry > Run Book > Automation) and open the "ServiceNow: Add/Update Incident" Run Book Automation Policy.
-
In the Available Actions section, add the new Run Book Action before the "ServiceNow: Create, Update, Clear Incident" Run Book Action:
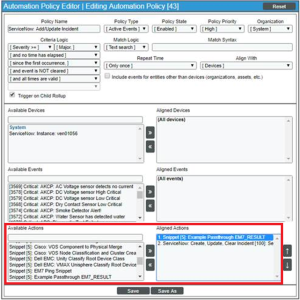
The output of this new Run Book Action will be consumed by the "ServiceNow: Create, Update, Clear Incident" Run Book Action, ensuring that the EM7_RESULT dictionary is passed through to ServiceNow. The "ServiceNow: Create, Update, Clear Incident" Run Book Action automatically populates the passthrough values with any values from EM7_LAST_RESULT. The passthrough overwrites any other previously defined fields, such as assignment group.
- You can add additional Run Book Actions to the Run Book Automation Policy for any additional workflows that you might want to run. The Automation Policy execute these Actions in a sequential, top-down order. However, the "ServiceNow: Create, Update, Clear Incident" Run Book Action only consumes the EM7_RESULT dictionary from the Run Book Action directly above it.
Snippet Code Example
The following snippet code example shows how to pull additional information and make it available for passthrough. All of the additional information that is going to be sent is contained in a dictionary variable called EM7_RESULT. You can pass through multiple items through in a single Run Book Action by adding additional keys to the EM7_RESULT dictionary.
This example lets you assign assignment groups to an Incident based on certain criteria, such as event policy IDs:
from future.utils import iteritems


def invert_mappings(mappings):
    """
    Invert received one-to-many mappings and converts it into a one-to-one
    mapping.

    Args:
        mappings (dict): Dictionary of mapped values

    Returns:
        dict: inverted dictionary.

    """
    inverted_mappings = dict()
    for key, values in iteritems(mappings):
        for sub_value in values:
            invert_mappings[sub_value] = key
    return inverted_mappings


# Example of assignment group to list of event policy ids mapping.
assignment_groups_to_event_policies = {
    "sys_id_1": [1, 2, 3, 4, 5],
    "sys_id_2": [6, 7, 8, 9, 10],
}
# which sys_id to use if the current event_policy_id isn't mapped
default_sys_id = "sys_id_3"

# invert the mappings
event_policy_to_assignment_group = invert_mappings(assignment_groups_to_event_policies)

# Send assignment group sys_id to IS RBA
EM7_RESULT = {
    "assignment_group": event_policy_to_assignment_group.get(
        EM7_VALUES["%3"], default_sys_id
    )
}
Configuring the "ServiceNow: Click to Create Incident" Automation Policy
The "ServiceNow: [Cases, Events, or Incident] Click to Create" Run Book Automation policy lets you manually create a case, event, or incident in ServiceNow by clicking the Actions button (![]() ) in SL1 for an event and selecting "Create External Ticket" (or by clicking the life-preserver icon (
) in SL1 for an event and selecting "Create External Ticket" (or by clicking the life-preserver icon (![]() ) for an event in the classic user interface).
) for an event in the classic user interface).
This Run Book Automation policy is available in the ServiceNow Base Pack PowerPack.
Versions 104 and 105 of the ServiceNow Base Pack PowerPack separated this Run Book Automation policy into the following: "ServiceNow: [Cases] Click to Create", "ServiceNow: [Events] Click to Create", and "ServiceNow: [Incident] Click to Create".
To configure the "ServiceNow: Click to Create" Run Book Automation policy:
- In SL1, go to the Behavior Settings page (System > Settings > Behavior) and set the Event Console Ticket Life Ring Button Behavior option to Create/View External Ticket.
-
Click to save your changes. You might need to log out of SL1 and log back into SL1 for the changes to update.
- Go to the Automation Policy Manager page (Registry > Run Book > Automation).
-
Locate the ServiceNow: [(Cases, Events, or Incident)] Click to Create policy and click its wrench icon (
). The Automation Policy Editor page appears:
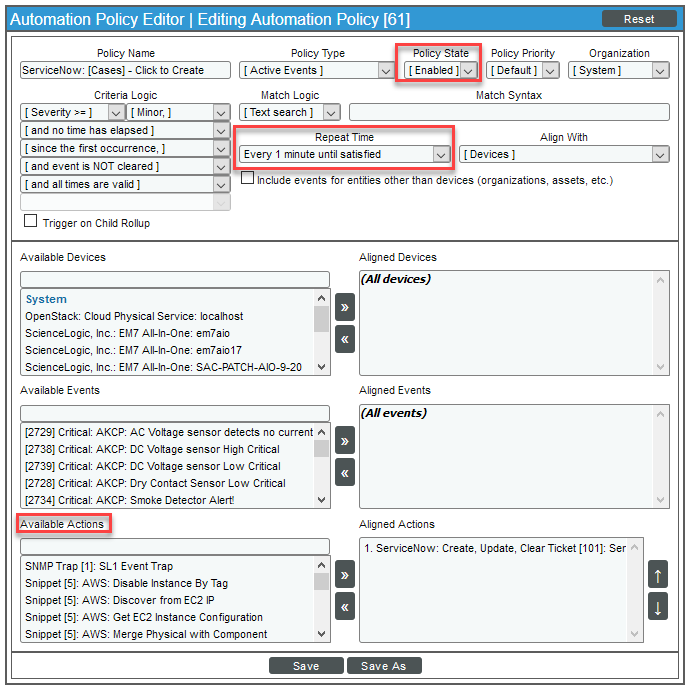
- Update the following fields:
- Policy State. Select Enabled.
- Repeat Time. Specify the frequency at which SL1 should execute the automation policy while the conditions are still met. The choices range from "every 30 seconds until satisfied" to "every 2 hours until satisfied", or "only once". By default, the policy only runs once.
- Available Actions. If it is not already selected, select the corresponding ServiceNow Run Book Action policy to add it to the Aligned Actions field.
- Click .
Viewing Events with ServiceNow
Within ServiceNow, the Incident Sync sends as much data as possible, but limits what is sent or updated directly to the incident table. All SL1 Event-specific data is mapped to a separate record and custom application-specific table. A related list option is available to provide event record data that you can view from the incident.
The related list [SL1] Events is not configured when you install the Certified application. You need to add that related list to the incident form.
You can also view the actual Event records at ScienceLogic SL1: Incident Automation > Event > ScienceLogic Events.
Incident Topology Suppression
Incident topology suppression is used when ServiceNow incidents that have been synced with SL1 devices occur on devices that have a parent/child relationship. If you choose to enable incident topology suppression in SL1, child events synced with ServiceNow incidents do not appear in the SL1 Event Console as separate events. Instead, the child events are nested under the parent event.
The steps in this process use the Classic user interface for SL1.
To enable incident topology suppression:
- In SL1, navigate to the Event Policy Manager page (Registry > Events > Event Manager) and click the button. The Event Policy Editor modal appears:
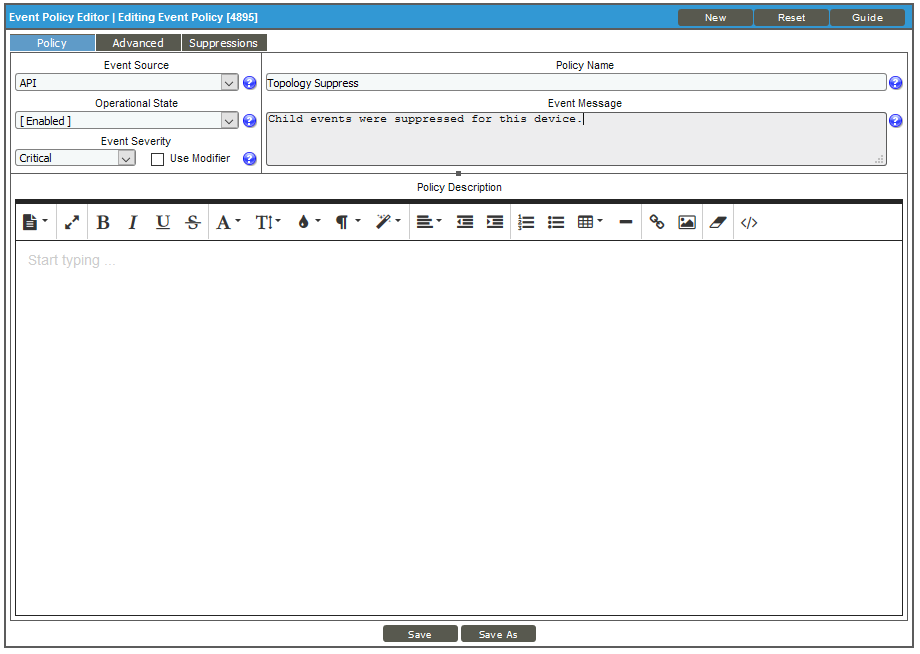
- On the tab, update the following fields:
- Event Source: Select API.
- Operational State: Select Enabled.
- Event Severity: Select Critical as the severity of the event.
- Policy Name. Type the name of the event. Can be any combination of alphanumeric characters, up to 48 characters in length
- Event Message. Type the message that will appear when this event occurs.
- Click the tab.
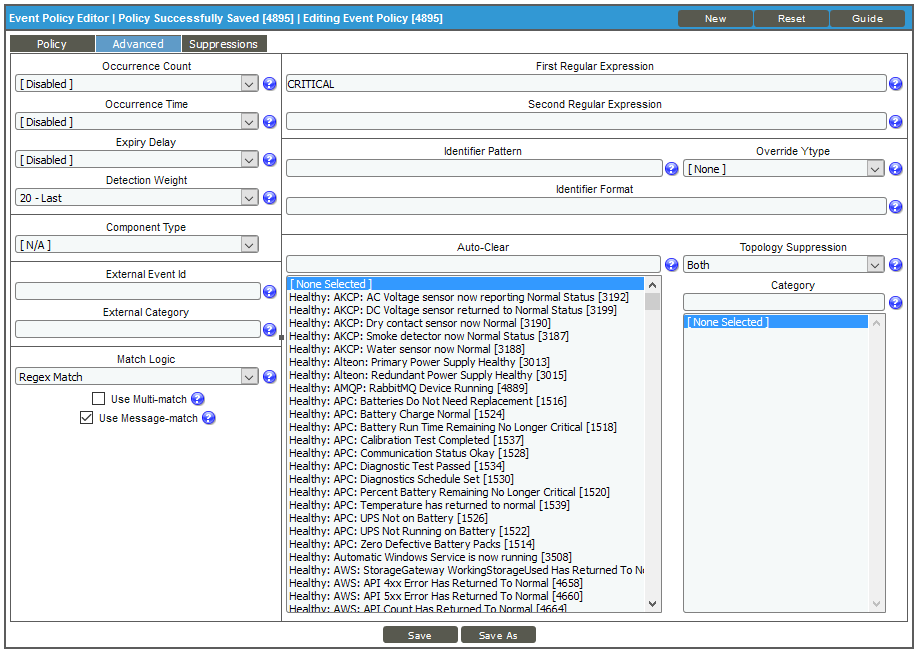
- On the tab, update the following fields:
- Detection Weight. Select 20 - Last. If two event definitions are very similar, the weight field specifies the order in which SL1 should match messages against the similar event definitions. The event definition with the lowest weight will be matched first. This field is most useful for events that use expression matching. Options range from 0 (first) - 20 (last).
- Match Logic. Select Regex Match. Specifies whether SL1should process the First Match String field and Second Match String as regular expressions or as simple text matches. Because you selected Regex Match, you cannot define a "match all" expression by leaving the First Match String and Second Match String fields empty.
- Use Message-match. Select this option. If SL1 has generated an event and then a second log message or alert matches the same event policy for the same entity, SL1 will not generate a second event, but will increase the count value for the original event. This behavior will occur only if the log messages or alerts contain the same message.
- First Regular Expression. Type "CRITICAL" as the string used to correlate the event with a log message.
- Topology Suppression. Select Both. If this event occurs on a parent device, it behaves as a suppressing event. If this event occurs on a child device, it behaves as a suppressible event.
- Click and close the Event Policy Editor modal.
- Next, go to the Device Groups page (Registry > Device Groups) and click the button. A Device Group Editor page appears:
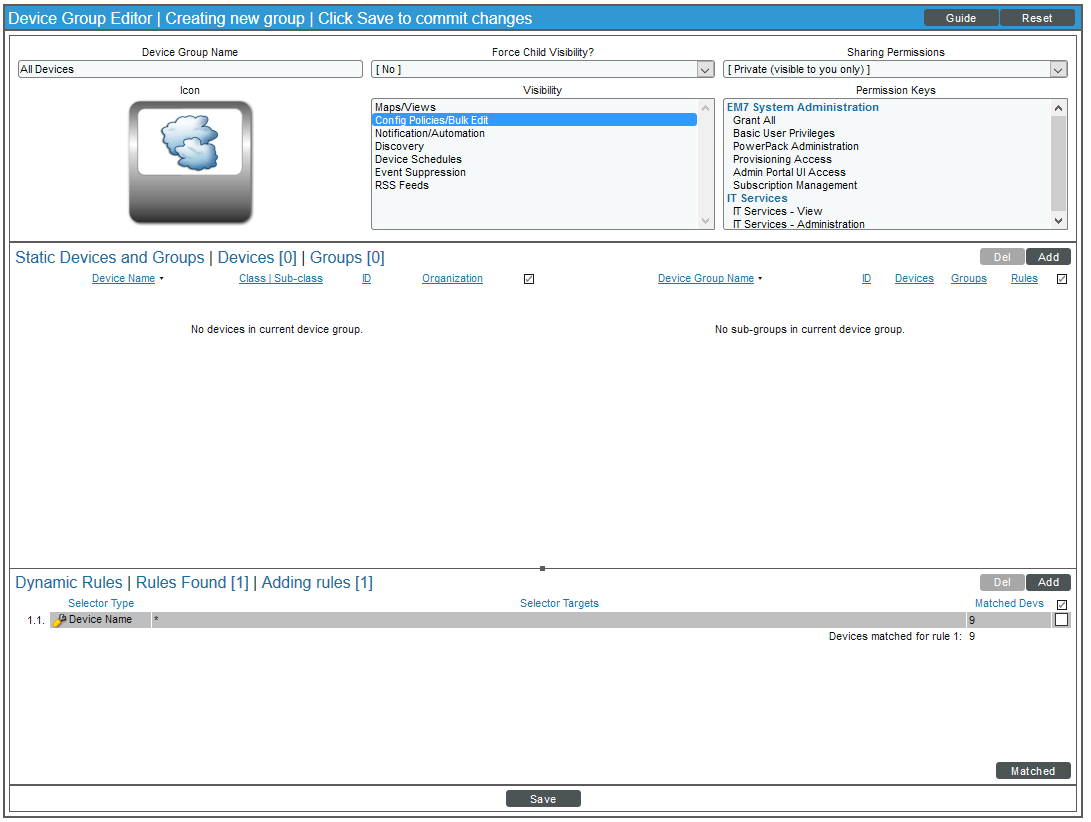
- Complete the following fields, and leave the default settings for the remaining fields:
- Template Name. Specify the name of the new device group.
- Force Child Visibility. Select "No".
- Visibility. Select Config Policies/Bulk Edit to let you configure all the devices in the new device group using a device template.
- Click the button and then click the button in the Dynamic Rules pane to add dynamic rules to the new device group. The Device Group Rule Editor modal page appears:
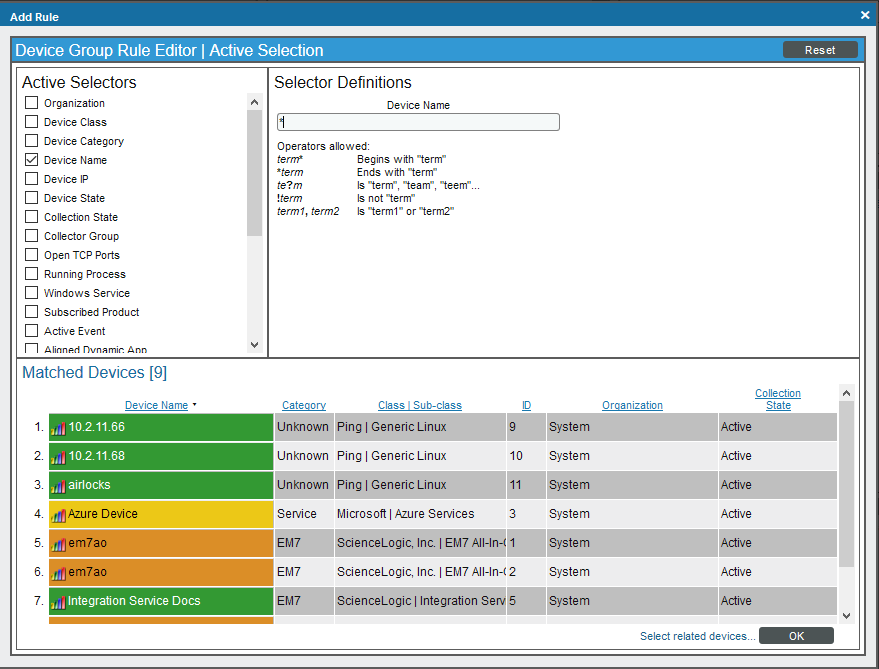
- In the Active Selectors pane, select Device Name.
- Optionally, in the Selector Definitions pane, type an asterisk (*) in the Device Name field. Using the * includes all devices by Device Name. In the Matched Devices pane, a list of all devices appears.
- Click to close the modal page.
- On the Device Group Editor modal page, click and close the page.
- Next, create a Device Group Template that will disable Event Masking for all devices in the new Device Group. Click the building blocks icon (
 ) for the new device group. A Device Template Editor page appears:
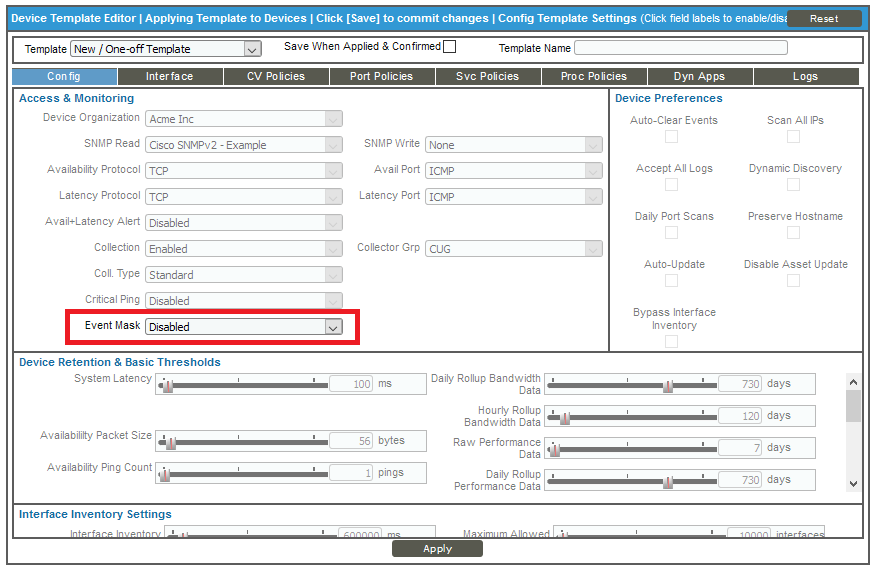
- Because all of the fields are disabled (grayed-out) by default, click the Event Mask field name to enable the field. Use the default setting of Disabled.
- Click and click on the Device Template Editor page.
- Next, turn off the Trigger on Child Rollup option on the "ServiceNow: Add/Update Incident" Run Book Automation. Go to the Automation Policy Manager page (Registry > Run Book > Automation) and click the wrench icon () for the "ServiceNow: Add/Update Incident" Run Book Automation. The Automation Policy Editor page appears:
- Make sure the Trigger on Child Rollup option is not selected and click . Close the Automation Policy Editor page.
Hyperlinking Events
Both ServiceNow and SL1 provide mechanisms for hyperlinking to multiple active events and incidents. This section describes those processes.
ServiceNow Hyperlinking
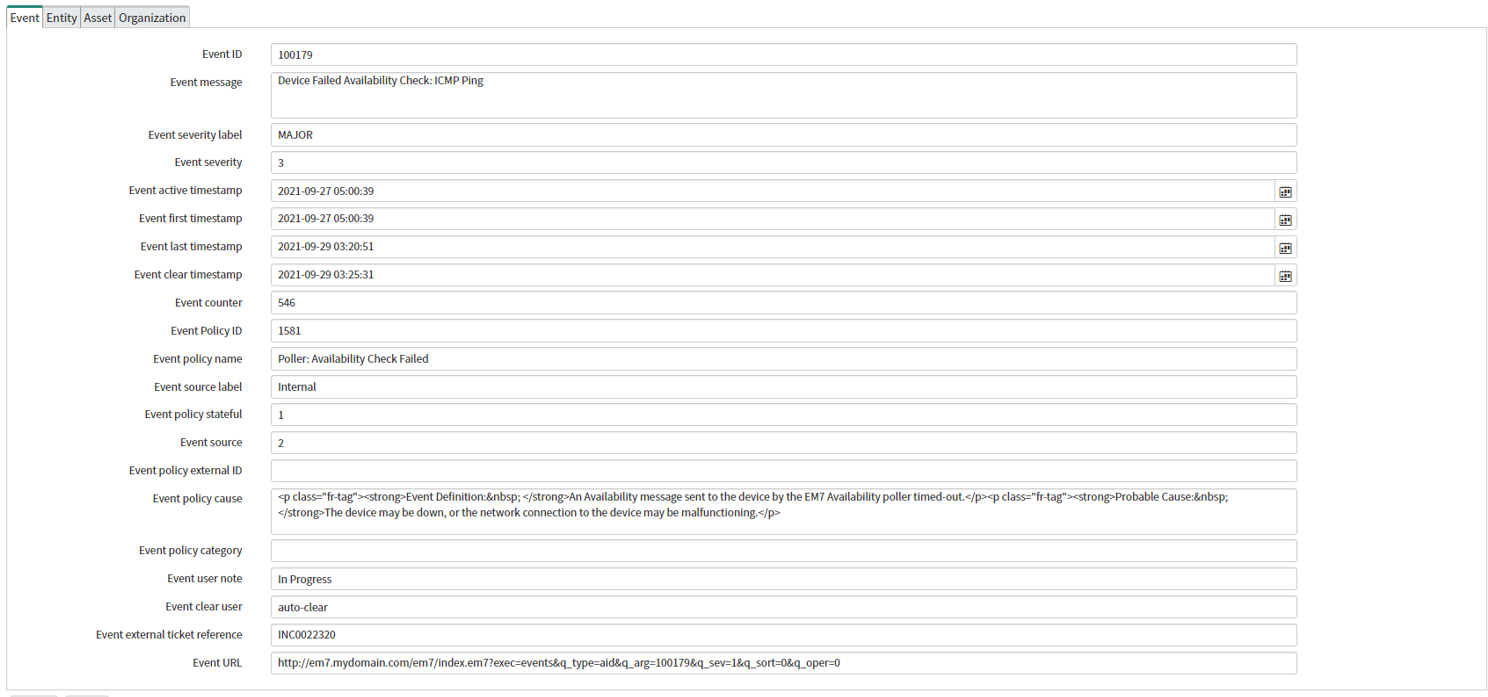
Each Incident in ServiceNow will have one or more events aligned with it through a related list: [SL1] Event.
By default the Hyperlink field "Event URL" only appears on the Event (x_sclo_incident_event) custom table provided by the Certified application. If a URL link is required, you would need to customize it to be applied to different location.
The following image shows the Event record for an event aligned with an Incident:
Viewing the Incident Import Table in ServiceNow
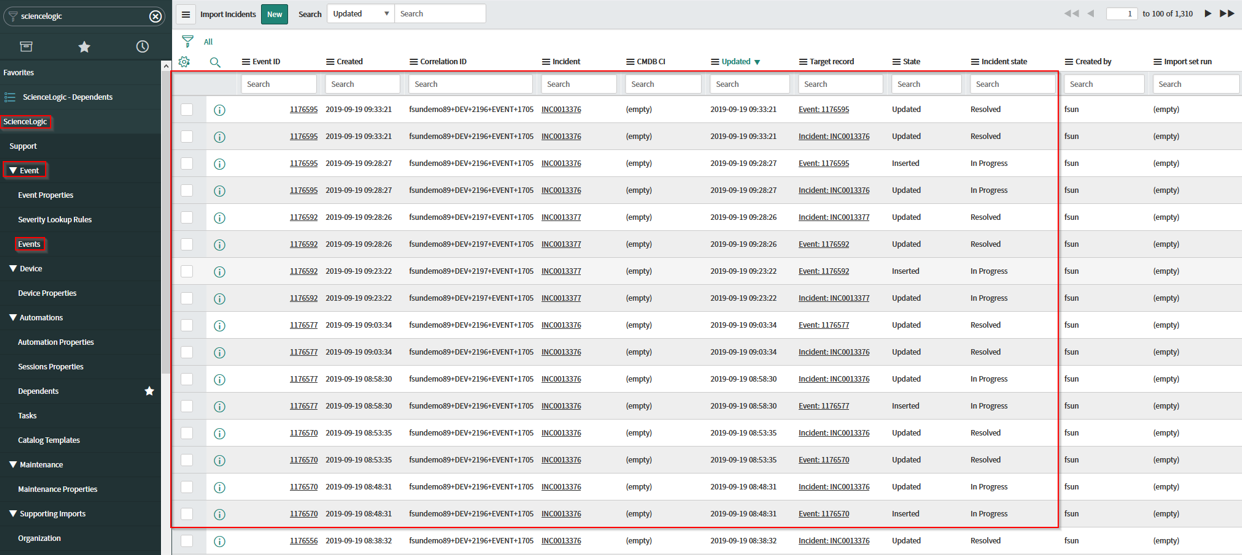
Each time SL1 creates or changes an incident in ServiceNow, data is inserted into a temporary import table on the ServiceNow system. This table displays all inbound data from SL1 and is a useful tool to determine what data is being sent and imported. The incident import table is created automatically when you install the ScienceLogic Certified (Scoped) Application.
To view the data and the status of the import process, go to the Import Incidents page (ScienceLogic > Event > Events) in ServiceNow:
You can view a complete audit of all import data and transforms by going to the Transform Histories page (System Import Sets > Advanced > Transform History):
![]()
SL1 Event to ServiceNow Incident Impact/Urgency Matrix
By default, when SL1 triggers an Event, the Event is sent to ServiceNow through PowerFlow. The following mappings are currently in place for mapping the Severity of an SL1 Event to the Impact and Urgency of a ServiceNow Incident:
| SL1 Event Severity | ServiceNow Incident Impact | ServiceNow Incident Urgency |
|---|---|---|
| Critical | 1-High | 1-High |
| Major | 2-Medium | 2-Medium |
| Minor | 2-Medium | 3-Low |
| Notice | 3-Low | 3-Low |
| Healthy | 3-Low | 3-Low |
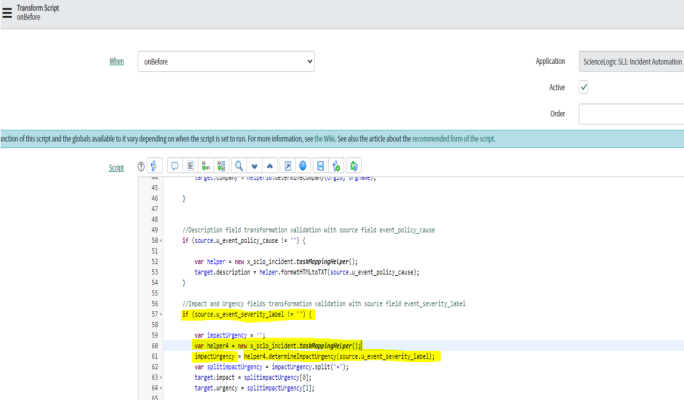
The Severity conversions are handled in an "onBefore" transform script under the "ScienceLogic (SL1) Incident" transform map that automatically deploys with the ScienceLogic Certified (Scoped) Application.
The "onBefore" transform script calls a script include called "taskMappingHelper" that handles the conversion from Severity to Impact or Urgency.
To customize a Severity to Impact or Urgency conversion rule:
-
In ServiceNow, create a new script include with new conversion rules. You can change the return values for SL1 Severity labels to the desired Impact and Urgency values. The following is an example:
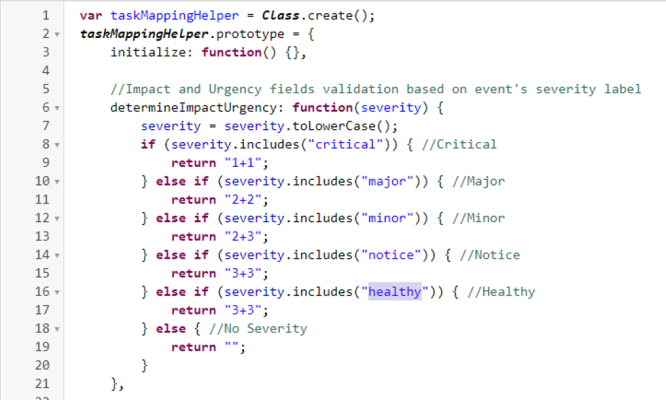
In the above example, if the SL1 Severity label is Minor, return the corresponding ServiceNow Incident Impact of 2 and Urgency of 3.
- In the "onBefore" transform script under the "ScienceLogic (SL1) Incident" transform map:

- Modify line 60 to call the newly created script include.
-
Modify line 61 to call the newly created function under script include with the same parameter source.u_event_severity_label.
For example:

By default, the Incident Priority field is read-only and must be set by selecting the Impact and Urgency values.
Adding Additional Fields to the Transform Map
If you require additional mandatory fields to be filled out to resolve an incident, you can add those fields to the transform map in ServiceNow.
For example, if you require four mandatory fields in the ServiceNow Incident—Assignment Group, IT Service, Service Component, and Description—to be filled out before that incident can be resolved in SL1, you would perform the following steps.
![]()
To add an assignment group:
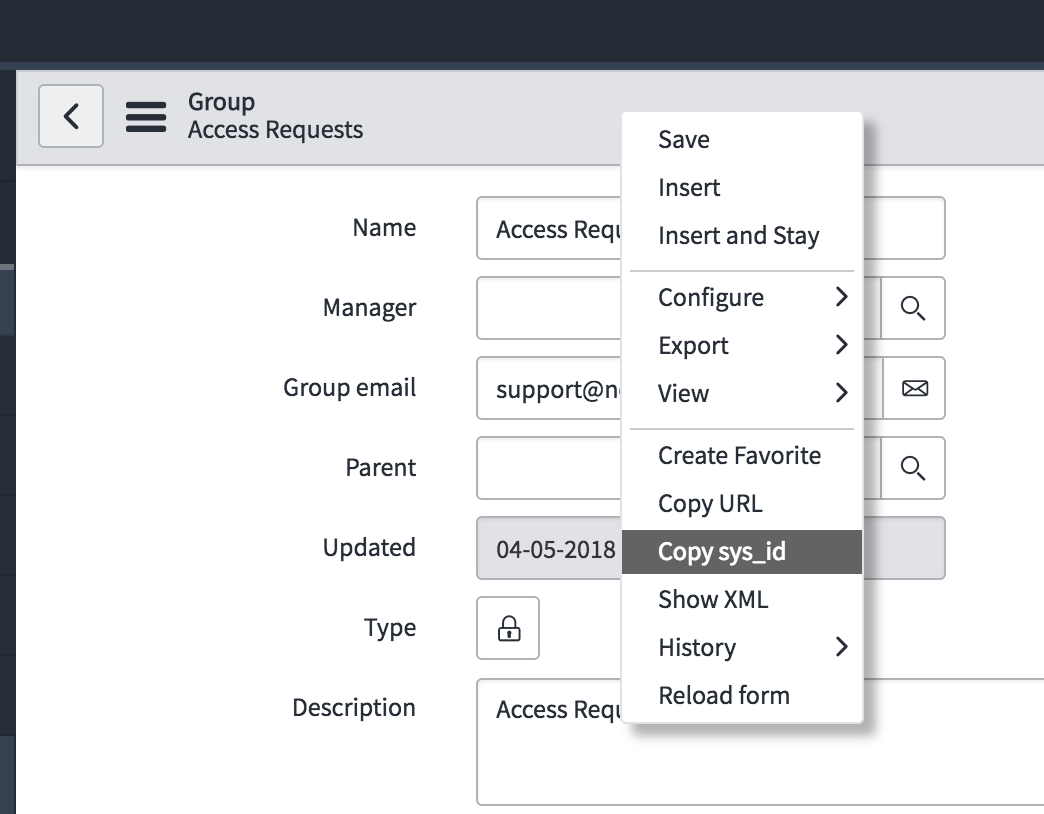
- Navigate to User Administration > Groups and select the assignment group you want to add. The Group record appears.
- Right-click the gray task bar at the top and select Copy sys_id.
- In SL1, open to the "ServiceNow: Add/Update/Clear Incident" Run Book Action (Registry > Run Book > Actions).
- Edit the Input Parameters of the Run Book Action to add the sys_id to the relevant parameter or parameters to assign the assignment group to one of the new, acknowledged, or cleared incidents that are mapped. After an incident is created, the assignment group value will not be changed by the Run Book Action.
In the following example, the assignment group is assigned to incidents that are cleared:
"assignment_group_new": "",
"assignment_group_ack": "",
"assignment_group_clear": "sys_id"
The IT Service, Service Component, and Description fields in our example must be filled in before an Incident can be closed. To do this, changes must be made in the transform maps that are provided in the form of update sets from ScienceLogic.
For more information about mapping new fields and other mappings options, see https://docs.servicenow.com/bundle/newyork-platform-administration/page/script/server-scripting/concept/c_MappingOptions.html.
To add the Description field:
- In ServiceNow, search for "transform map" in the filter navigator. Click Transform Maps.
- In the list of transform maps, search for "ScienceLogic" in the field above the Name column.
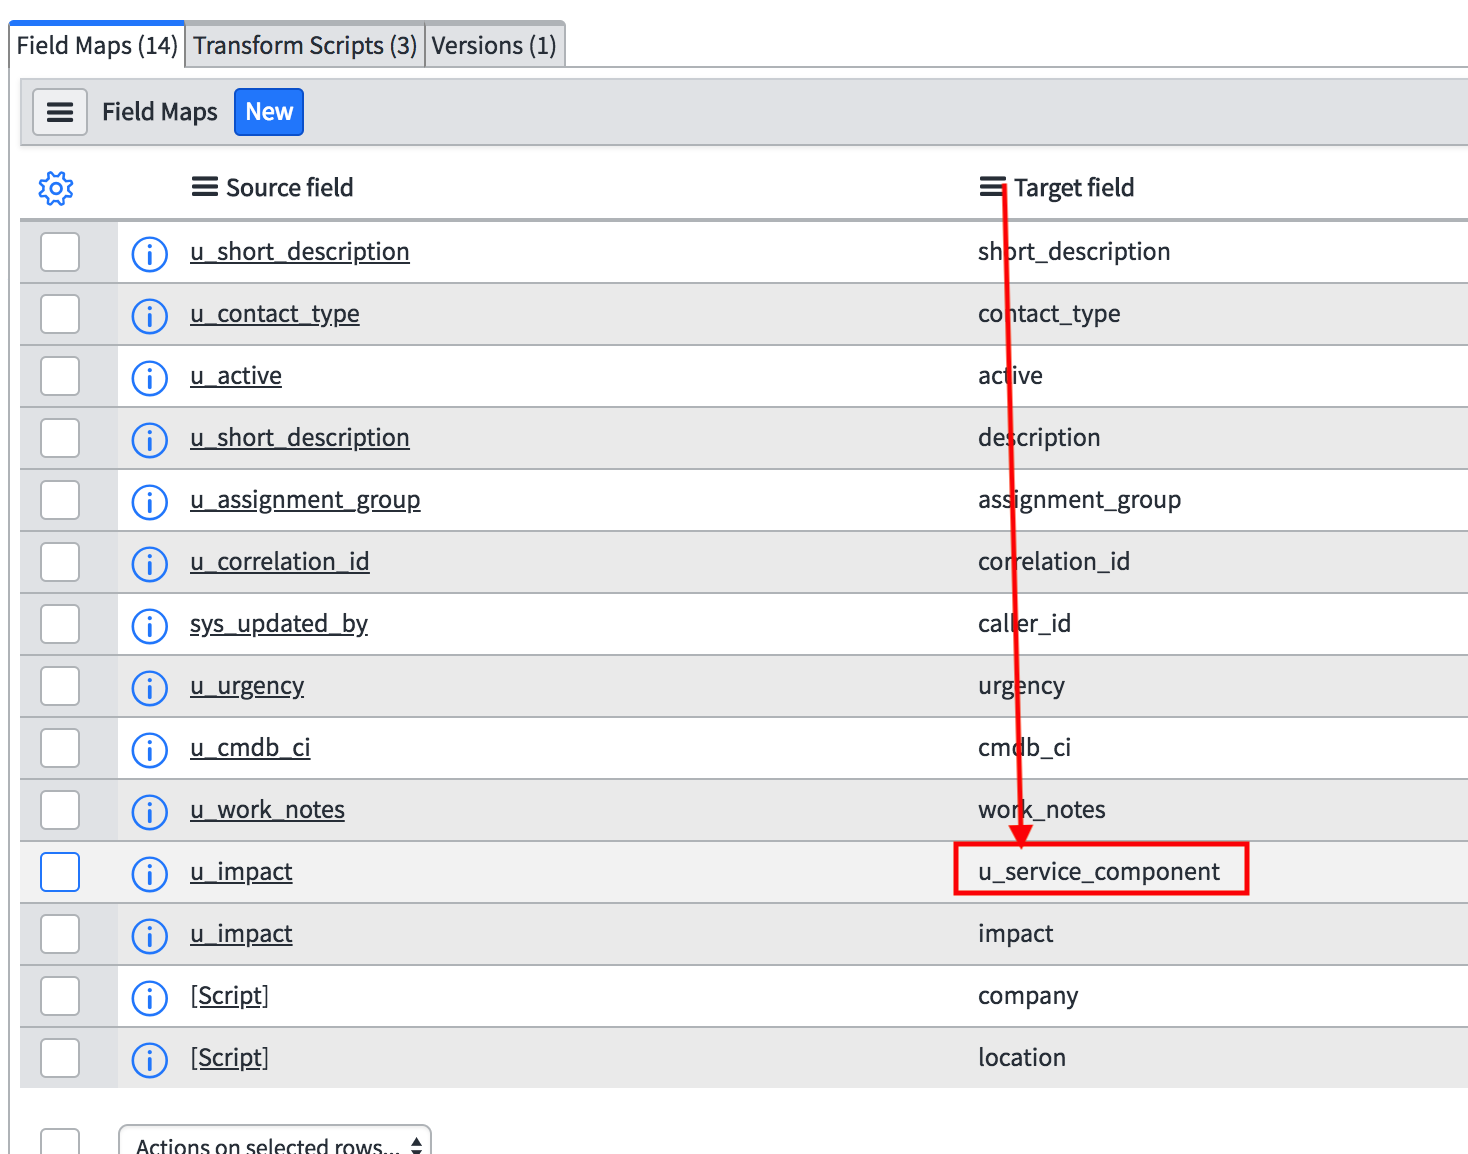
- Open the "ScienceLogic Incident" map:
![]()
- The Field Maps table at the bottom of the page allows you to edit or create mappings from the ScienceLogic Incident Import table to the ServiceNow Incident table. Click to create a new field mapping.
- The Source table field should contain the ScienceLogic Incident Import and the Target table should include the ServiceNow Incident table:
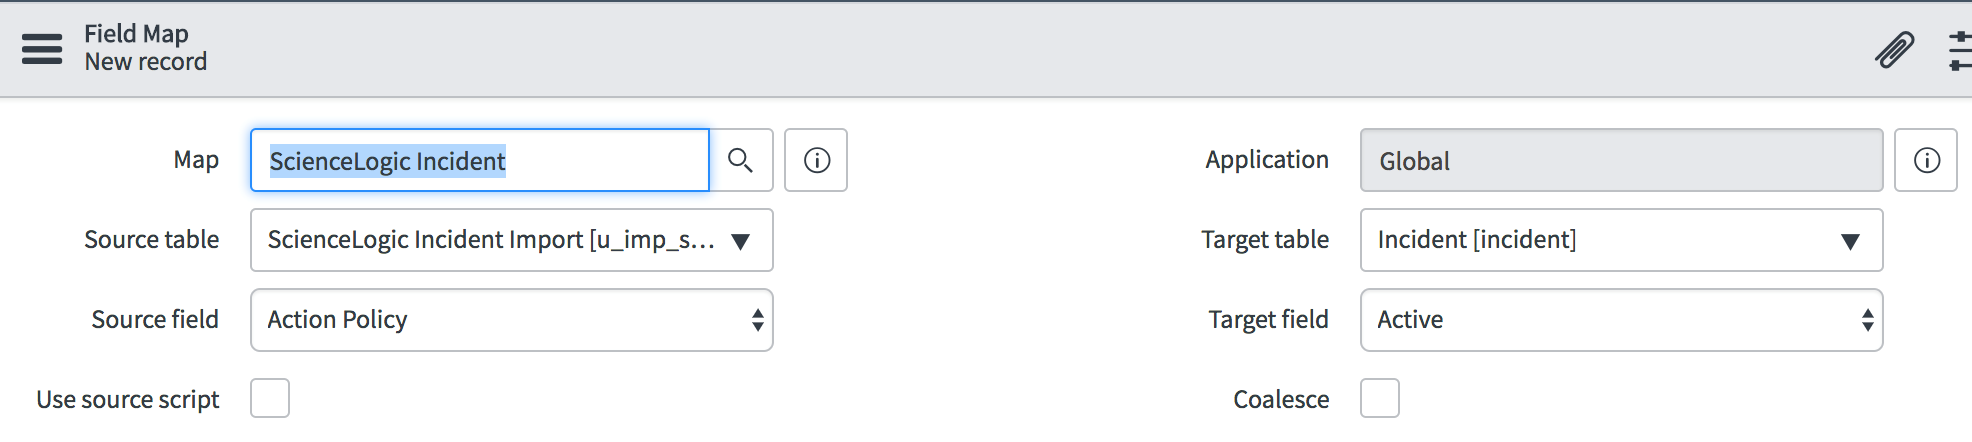
- To create a new mapping to copy the contents of the Short description field to the Description field, select Short description from the Source field drop-down menu.
- In the Target field drop-down menu, select Description.
- Click Update to save your changes.
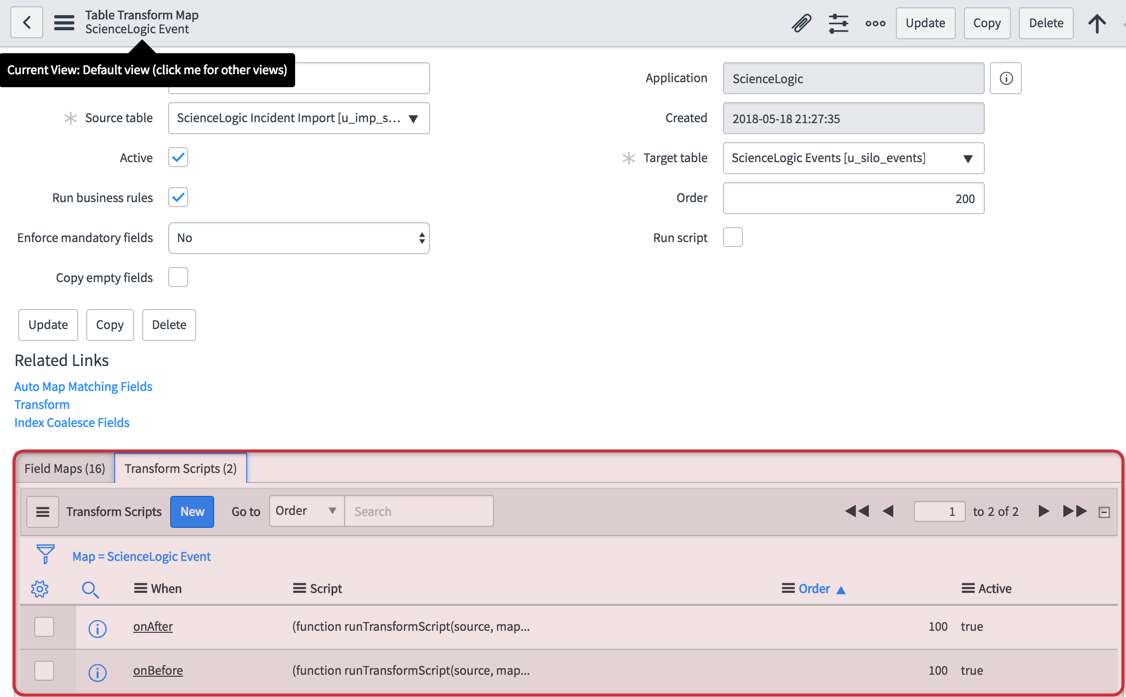
The IT Service and Service Component fields in our example are set in the Transform Script in the "ScienceLogic Event" transform map. To set the fields:
- In ServiceNow, make sure you have the sys_id value for the target fields. If a field contains a magnifying glass, it will require a sys_id. If a field has a drop-down, type in the field you wish to apply from the drop-down. In the case of our example, the sys_id values of the two fields are required.
- In your ServiceNow instance, navigate to the Transform Maps table and select "ScienceLogic Event".
- In the ScienceLogic Event transform map page, click the tab and open the "onAfter" script.
- Add the following under the "//Update target record when the Event was cleared from Sciencelogic" text:
sl_INT.(target field) = '[sys_id of the source field]'; //(IT service field)
sl_INT.(target field) = '[sys_id of the source field]'; //(Service component)
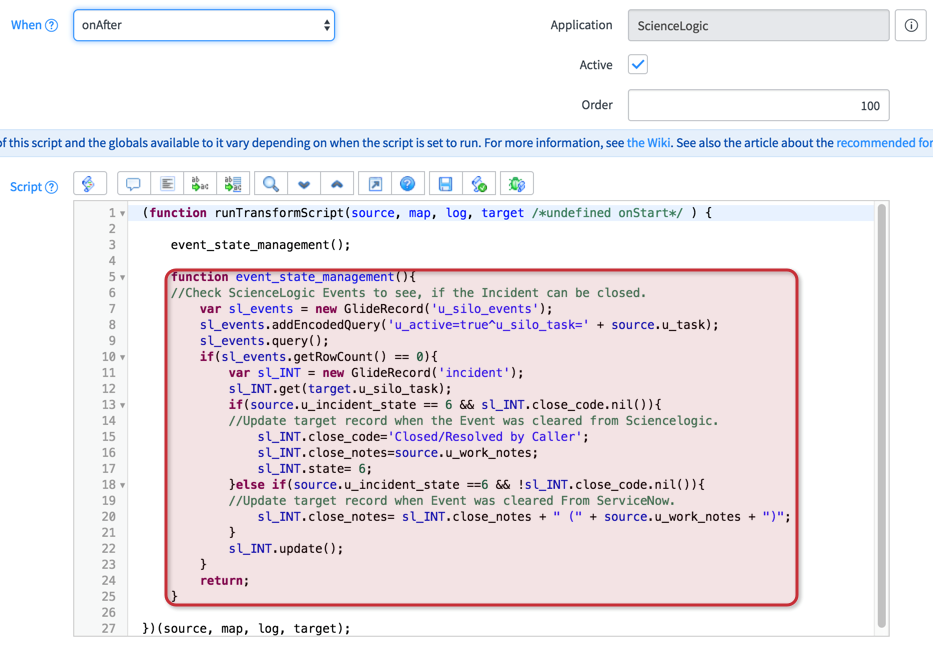
- To find the target field, make a temporary mapping to see what the target field is. This mapping can be deleted once you know the target field.
- Click to save your changes. The selected fields will be added into an Incident on closure.