In the Management section of the Reports page (Reports > Management), you can edit and create custom reports. The reports you create will appear in the list of Quick Reports when running a quick report or Report Definitions when creating a report job. You can edit an existing report to change the input options and the output of the report.
Use the following menu options to navigate the SL1 user interface:
- To view a pop-out list of menu options, click the menu icon (
).
- To view a page containing all the menu options, click the Advanced menu icon (
).
This
What is a Custom Report?
A custom report in SL1 provides you with a collection of data from one or more tables in the SL1 database. This information is populated and generated in different user-defined formats. You can select from default custom reports provided by ScienceLogic, edit these default reports, or create your own reports. You can also schedule reports, view a list of archived reports, and email reports to other users.
Custom reports include Quick Reports, which are custom report templates in SL1. Quick Reports are also called "ad hoc reports". You can access Quick Reports on the Reports page, in the Run Report category (Reports > Run Report).
A report includes three components:
- An input form where you select the options and data you want to include in the report.
- An .ods output template that specifies the format of the generated report.
- Gluecode, the code that specifies how to handle your input, which data to retrieve, and any processing that needs to be performed on the data.
SL1 includes predefined reports, with defined forms, output templates, and the gluecode. These predefined reports can be modified, and you can create your own custom reports.
Report Input Forms
An input form defines the user interface for a report. The user interface for a report allows the user to select options and data to include in the report. The Report Input Forms page (Reports > Management > Report Input Forms) displays a list of the input forms in your SL1 system. You can edit these input forms for your business needs, or you can create your own input forms for your reports.
An input form includes one or more components. You can include the following types of input components in an input form:
- Static Layout Component. Provides containers for laying out the user interface, labels, and text boxes. For example, you can use these components to keep fields together in a horizontal group.
- Form Input Component. Allows the user to specify inputs when generating an instance of the report. For example, checkboxes and drop-down fields.
- Data Component. Allows you to include dynamic elements in the user interface for a report. These dynamic elements can retrieve data from the database and alter input items based on criteria, including formulas and switch statements. For example, if you select the checkbox Select individual devices, the Devices by Organization field displays a list of devices. This behavior is defined with Data Components.
- Custom Report Components. Allows you to define a common combination of input elements and then use that combination of input elements in multiple report input forms, without having to construct each combination of input elements in each input form. For example, the Organization Selector (a default Custom Report Component included with SL1) provides options to select either the All Organization checkbox or to select from the list of Organizations.
Gluecode
Gluecode is PHP code that is executed by the report engine when the report is generated. The gluecode must:
- Process the inputs from the Input Form.
- Make queries to the database or use other methods to gather the required data.
- Format the data so it can be populated into the Output Template.
You can add and edit gluecode on the Report Management page (Reports > Management > Report Manager).
Report Output Templates
An Output Template is an Open Office Spreadsheet file (.ods file) that defines the formatting and table structure for the generated report. When developing a report, you can includes output directives in the report template to tell the report engine which data from the gluecode to include in the report and where to place each output in the final report.
Each default custom report has an associated output template that can be edited. You can also create your own output template and upload it to the Report Output Templates page (Reports > Management > Report Output Templates).
When creating or editing a report output template, do not use spaces in the template name.
The Report Management Page
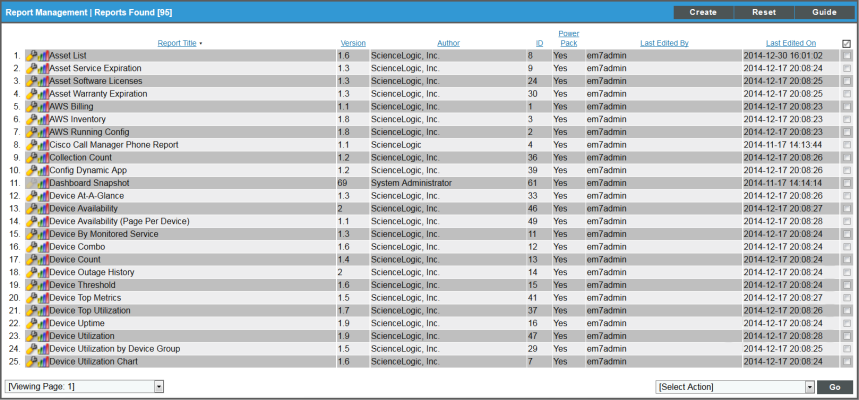
The Report Management page (Reports > Management > Report Manager) lists all custom reports that have been created or installed on your SL1 system:
The Report Management page displays the following columns:
To sort the list of reports, click on a column heading. The list will be sorted by the column value, in ascending order. To sort the list by descending order, click the column heading again.
- Report Title. The title of the report.
- Version. The version number of the report.
- Author. The author of the report.
- ID. The numeric ID assigned to the report by this SL1 system.
- PowerPack. Indicates whether the report is included in a PowerPack.
- Last Edited By. The user that last edited or installed this report.
- Last Edited On. The date and time that this report was last edited or installed.
Creating a Report Template
If you are developing a new report, you must create a report template. A report template allows you to define all the parts of a report. A report template specifies identifying information about a report, and the Report Input Form, Report Output Template, and gluecode that will be used to generate instances of a report.
To create a report template:
- On the Reports page (
 ), expand the Management section and select Report Manager (Reports > Management > Report Manager). The Report Management page appears.
-
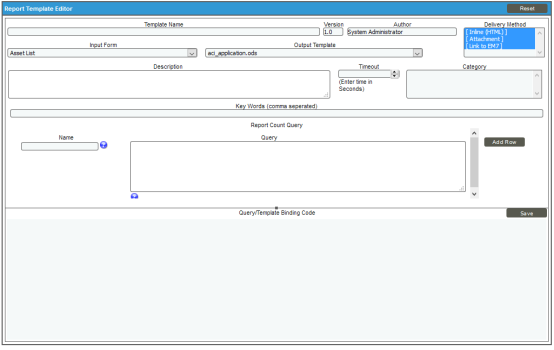
Click the button. The Report Template Editor page appears:
- Complete the following fields:
- Template Name. Type a name for the report. Do not use spaces in the template name. This name will appear in the left NavBar on the Reports page and in drop-down lists that display reports.
- Version. Type a version number for the report. ScienceLogic recommends changing the version number every time you edit a report.
- Author. Type the name of the person or company that developed the report. This field is automatically populated with the first and last name from your user account.
- Delivery Method. This option allows you to limit the options that are available when a user schedules this report. Select the methods by which scheduled instances of this report can be delivered.
- Input Form. Select the input form for the report. For information about input forms, see the Input Forms section.
- Output Template. Select the output template for the report. For information about output templates, see the Report Output section.
- Description. Type a description of the report. This field is optional.
- Category. Select one or more categories for the report. Categories are used to arrange the list of reports in the left NavBar and in drop-down lists that display reports. This field is optional.
- Key Words. Add a comma-separated list of keywords that describe the report. This field is optional.
- Report Count Query. This query populates the Row Count Estimate field for the report, and this query executes in the background with each input filter change made by the report user. The Row Count Estimate field informs users before they generate reports that are so large that SL1 cannot create them successfully. The query can include variables for the fields that a user selects in the report (Input Forms). The variables can be scalars or lists. As the user selects or de-selects Inputs, such as selecting Devices, then de-selecting Devices and selecting Assets instead, the query is re-run, and a new value appears in the Row Count Estimate field.
- Name. If the report requires multiple possible queries based on the inputs that the user selects, type a name for each query, such as "devices" and "assets". Based on the input selected by the user, one of the two queries will be used to get the row count estimate. If the report requires only a single query, type "default" in this field. Click the button to add additional queries. Do not use double quotes (") or the back slash character (\) in this field.
-
Query. Add an SQL query that returns the total possible number of data rows in the report using the inputs selected buy the user. The query includes variables for fields that a user selects from the Input Form. The query can include variables for scalar values (single values) and variables for list values (multiple values). For more information about the SQL query for this field, see Creating Queries for the Row Count Estimate Field. Do not use double quotes (") or the back slash character (\) in this field.
The goal of the SQL query in the Query field is to provide an estimate of the returned rows, but the query should be as lightweight as possible. Do not re-use the SQL query that populates the report.
- . Click this button to add another row containing the name and query code for an additional query for this template. You can add up to eight queries. Click the red cancel icon (
 ) to remove a query that you previously added.
To disable the Row Count Estimate feature, de-select the Report Size Estimation option on the Behavior Settings page (System > Settings > Behavior). This feature is enabled by default. If you disable this feature, SL1 retains the queries you created in the Query field, but SL1 will not run those queries when you create reports.
- Query/Template Binding Code. Enter the gluecode for the report. For information about how to write gluecode, see the Developing Gluecode section.
- Select the button.
Creating Queries for the Row Count Estimate Field
When you create or edit a report, you can include one or more SQL queries that enables SL1 to estimate the number of rows in the report before generating the report. You add the queries to the Query field on the Report Template Editor page (Reports > Management > Report Manager). The result of the additional query or queries appears in the Row Count Estimate field.
The query author will need to understand SL1 databases and SQL.
The queries for the Row Count Estimate field use variables that are replaced with the report input values selected by the report user. You can use any of the variables that are available in the existing reports on the Report Input Forms page (Reports > Management > Report Input Forms).
To help you build a query for a new report, locate a report with similar features to the report you want to create, and use that report and its variables as a template for the new query.
To locate the variables for your report query:
-
Go to the Report Input Forms page (Reports > Management > Report Input Forms) and click the wrench (
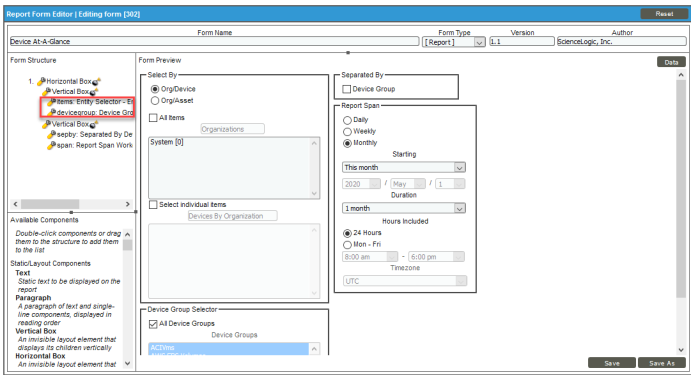
 ) for the report that contains the variables you want to use in your query. In this example, we are using the "Device-At-A-Glance" report. The Report Form Editor page appears:
 -
In the Form Structure section, click the wrench (
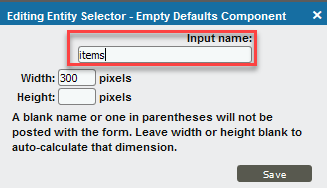
 ) for the form that you want to use with your query. An Editing Entity Selector modal page appears:
 - Make a note of the name used in the Input name field and close the modal page. This is the name of the query that is used by SL1 when it calls an AJAX request to update the Row Count Estimate field.
- Review any other forms from the Form Structure section as needed.
- Go to the list of reports (Reports > Run Report) and navigate to the report that contains the variables that you want to use in your query, such as the "Device-At-A-Glance" report.
-
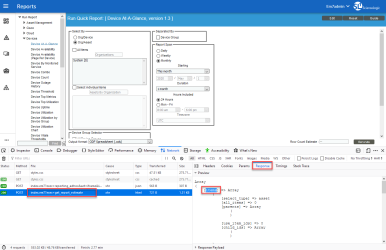
In your browser, press to open the Web Developer console panel and click the tab:
- In the File column of the Web Developer console panel, select index.em7?exec=get_report_estimate. This is the name of the AJAX call used by SL1.
-
Click the tab. Based on what button or field you have selected in the report, this tab displays the input filter array used in the AJAX call. For a complete example of an input filter array, see the Sample Input Filter Array, below.
If you click a different option in the report form in the SL1 user interface, another index.em7?exec=get_report_estimate line appears for that option. A new input filter array for that option appears on the tab.
- You can use the variables from the input filter array on the tab to build your query. For more information, see the two Query Examples, below.
- After you create your query or queries, go to the Report Management page (Reports > Management > Report Manager) and click the wrench (
 ) for the report template you are editing, or click to create a new report template if needed.
 - On the Report Template Editor page, add the query to the Query field in the Report Count Query section.
If you include multiple queries in a report, they are stored as a serialized object in the database, and the user-selected values from the input form replace the variables in the in the main query. As each input selection is made or changes, SL1 calls an AJAX request to update the count.
Types of Variables
You can use the following types of variables in the query:
- Scalar. These variables will be replaced by a single value, such as Report Span Start value and Report Span End value. Scalar variables should be defined between two "#" symbols, such as #is_admin#.
Scalar variables can be used in a query such as collection_date >= #span.start_ts#. span.start_ts can have a single value, and it will be replaced by the timestamp value.
- List. These variables will be replaced by multiple selected values, such as a list of organizations replaced inside an “IN” clause. Another example is the Device Groups selector, where users can select multiple device groups. List variables should be defined between two "@" symbols, such as @dev_ids@. List variables can be used in a query, such as did IN @dev_ids@. dev_ids can have multiple values to check against Device IDs, and it will be replaced by multiple values.
dev_ids and is_admin are SL1 report variables that you can use in report queries as needed.
Scalar and list variables names are based on input filter names. For example, if you want to use start_ts and end_ts values from the span Input Filters, the variable in the query should be formatted as #span.start_ts# and #span.end_ts# for scalar variables, or @span.start_ts@ and @span.end_ts@ for list variables.
Sample Input Filter Array
The following code is an example of an input filter array used in the AJAX call to generate a report:
Array
(
    [items] => Array
        (
            [select_type] => device
            [all_items] => 0
            [parents] => Array
                (
                )

            [use_item_ids] => 0
            [child_ids] => Array
                (
                )

        )

    [span] => Array
        (
            [interval] => 30
            [begin] => 0
            [beginyear] => 2020
            [beginmonth] => 4
            [beginday] => 1
            [duration] => 1
            [start_ts] => 1585699200
            [isDST] => 0
            [userTZ] => 19800
            [end_ts] => 1588291200
            [begindesc] => Apr 2020
            [spandesc] => 1 month
            [hours_included] => 1
            [workday_start] => 8
            [workday_end] => 18
            [timezone_offset] => 0
        )

)
Query Example 1
In this example #is_admin# is a scalar variable that will be replaced by a Boolean value 0 or 1. Also, @dev_ids@ is a list variable that will be replaced by one or multiple device IDs, based on the selections made by the user.
SELECT count(dev.id) FROM master_biz.organizations org
JOIN master_dev.legend_device dev ON (org.roa_id = dev.roa_id AND (#is_admin# OR))
JOIN master.definitions_dev_classes devclass ON dev.class_type=devclass.class_type
JOIN master.definitions_dev_cats cats ON devclass.family=cats.Fid
LEFT JOIN master_dev.device_hardware hw ON dev.id=hw.did AND hw.comp_type=1
WHERE (#items_all_items# OR (dev.roa_id in AND
(NOT #items_use_item_ids# OR dev.id in @dev_ids@)))
AND (#dg_all_device_groups# OR dev.id in @dev_ids@)
AND (#cats_all_cats# OR cats.Fid IN)
Query Example 2
SELECT count(log.log_id) FROM master_biz.organizations_log log
JOIN master_biz.organizations org ON (log.roa_id = org.roa_id AND (#is_admin# OR ))
WHERE log.date_edit >= FROM_UNIXTIME(#span_start_ts#)
AND log.date_edit < FROM_UNIXTIME(#span_end_ts#)
AND (#org_all_orgs# OR org.roa_id IN )
AND (#source_all_sources# OR log.source IN)
AND (log.message like #in_message_text#)
Best Practices
- The value that appears in the Row Count Estimate field is not an exact prediction, but an estimate. As a result, you should focus on getting the upper range of the report size instead of the exact count.
- To write a report size estimate query, you will need a good understanding of reports and how report input filters work in reports. This includes identifying the filters that do not impact the row count, such as Separated by Device Group, because using those filters in the query will not have any impact on the row count estimate.
- Identify the filters according to their replacement logic, such as scalars or lists.
- In general, JOIN commands perform better than sub-queries when you need to collect data from more than one table.
- To disable the Row Count Estimate feature, de-select the Report Size Estimation option on the Behavior Settings page (System > Settings > Behavior). This feature is enabled by default.
