![]()
The following sections describe how to configure and discover Aruba Central virtual controllers for monitoring by SL1 using the Aruba Central PowerPack:
Prerequisites for Monitoring Aruba Central
Before you can monitor Aruba Central virtual controllers and their component devices using the Aruba Central PowerPack, you must first have the following information:
- Aruba Central username and password
- Aruba Central customer ID
- Aruba Central client ID
- Aruba Central client secret key
You can request these items by registering with Aruba Technical Support.
Configuring Aruba Central Credentials
To use the Dynamic Applications in the Aruba Central PowerPack, you must configure a SOAP/XML credential for the Aruba Central web service.
SL1 includes an Aruba Central credential type that you can use to connect with the Aruba Central web service during guided discovery. This credential type uses field names and terminology that are specific to Aruba Central.
The PowerPack includes an example SOAP/XML credential (Aruba Central Example) that you can edit for your own use.
NOTE: If you are using an SL1 system prior to version 11.1.0, the new user interface does not include the Duplicate option for sample credential(s). ScienceLogic recommends that you use the classic user interface and the Save As button to create new credentials from sample credentials. This will prevent you from overwriting the sample credential(s).
To configure a SOAP/XML credential:
-
Go to the Credentials page (Manage > Credentials).
-
Locate the Aruba Central Example sample credential, then click its Actions icon (
 ) and select Duplicate. A copy of the credential, called Aruba Central Example copy appears.
 -
Click the icon for Aruba Central Example copy credential and select Edit. The Edit Credential modal appears:
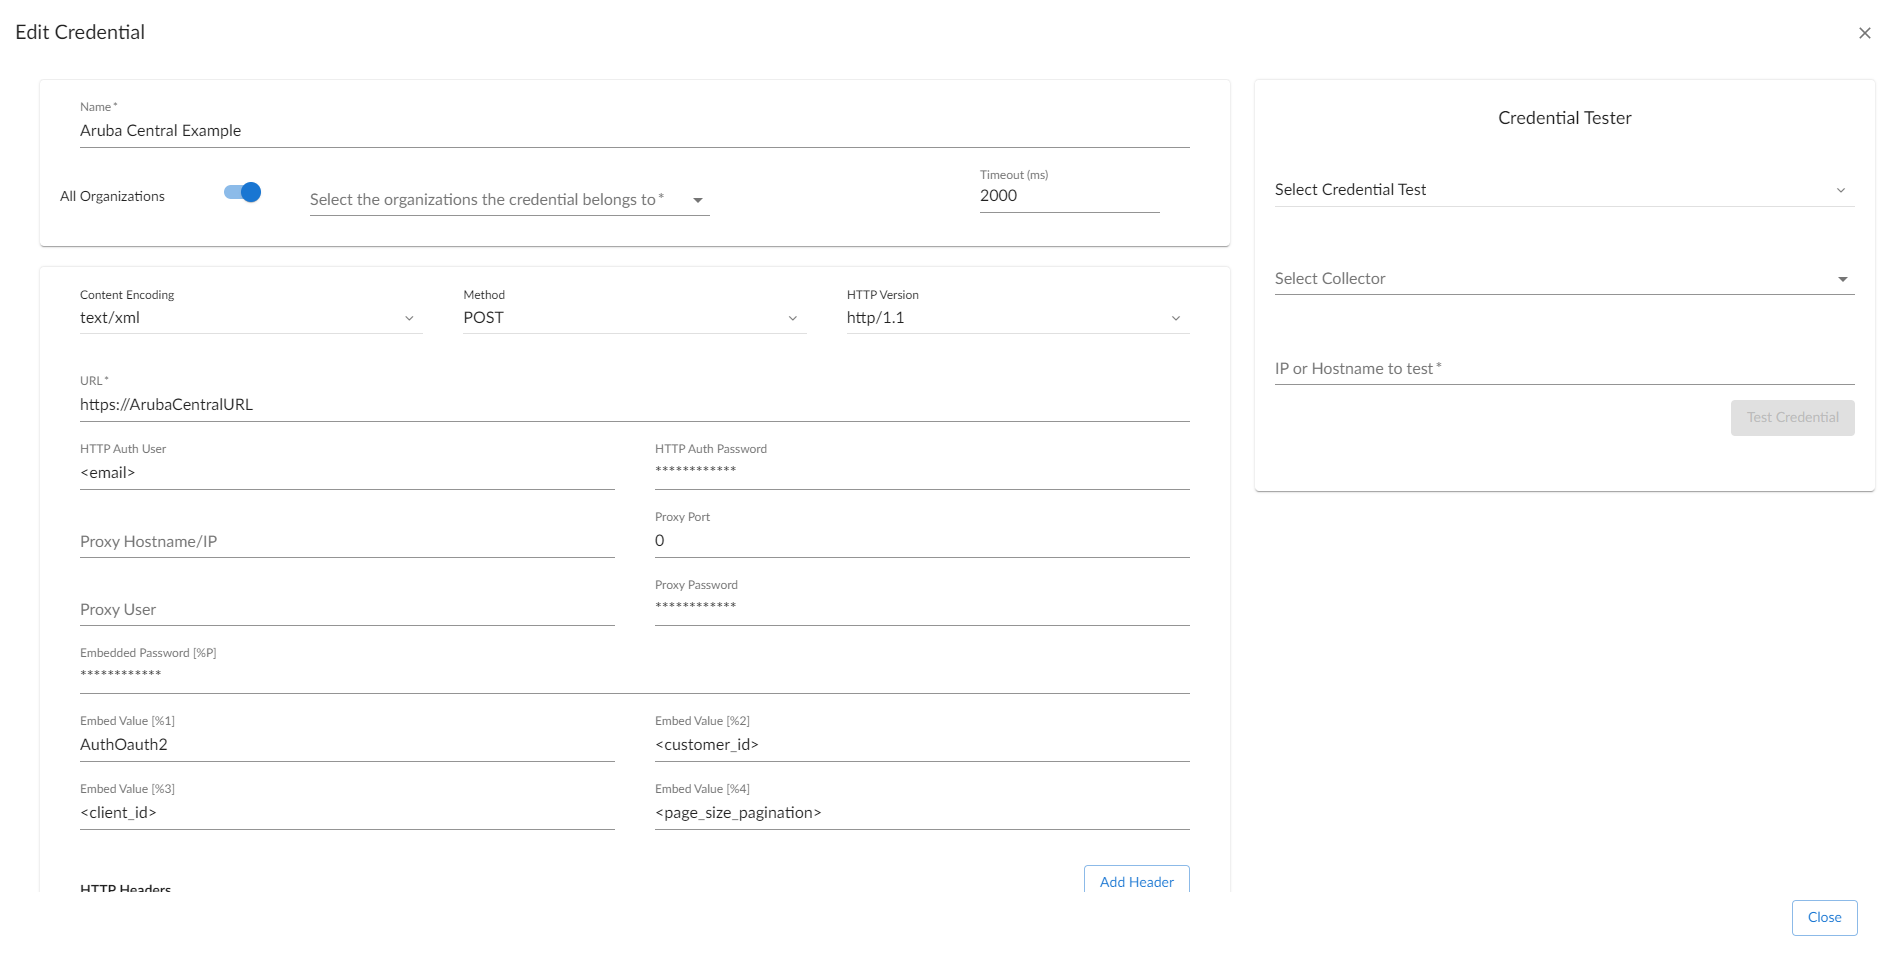
- Supply values in the following fields:
-
Name. Type a new name for your Aruba Central credential.
-
All Organizations. Toggle on (blue) to align the credential to all organizations, or toggle off (gray) and then select one or more specific organizations from the Select the organizations the credential belongs to* drop-down field to align the credential with those specific organizations.
- Timeout (ms). Type a timeout value of at least 5000.
ScienceLogic recommends setting the Timeout field to at least 5 seconds to account for the Aruba Central API being slow to respond. If collection fails, try increasing the timeout.
- Content Encoding. Keep the default value.
- Method. Keep the default value.
- HTTP Version. Keep the default value.
- URL. Type your Aruba Central URL.
- HTTP Auth User. Type your Aruba Central username email address.
- HTTP Auth Password. Type your Aruba Central password.
- Embedded Password [%P]. Type your Aruba Central client secret key.
-
Embed Value [%1]. Type "AuthOauth2".
-
Embed Value [%2]. Type your Aruba Central customer ID.
-
Embed Value [%3]. Type your Aruba Central client ID.
-
Embed Value [%4]. Type the page size for pagination between 1 and 1000.
ScienceLogic recommends setting the Embed Value [%4] field to a value close to 1,000 for large Aruba Central systems and only lowering this value if you see SIGTERMs. You cannot set the page size to 0 in this field. Aruba Central deployments of more than 5,000 devices need a dedicated collector.
-
CURL Options. Ensure that SSLVERIFYPEER is selected and set to 0. There should be no other CURL Options configured.
- Click .
The SOAP/XML credential tester is not supported by the Aruba Central PowerPack.
Configuring Aruba Central Credentials for SL1 in the Classic User Interface
To configure SL1 to monitor Aruba Central devices, you must first create a SOAP/XML credential. This credential allows the Dynamic Applications in the Aruba Central PowerPack to use your Aruba Central user account to retrieve information from the Aruba Central virtual controller and component devices.
The PowerPack includes an example SOAP/XML credential (Aruba Central Example) that you can edit for your own use.
To configure a SOAP/XML credential to access Aruba Central:
- Go to the Credential Management page (System > Manage > Credentials).
- Locate the Aruba Central Example credential, and then click its wrench icon (
 ). The Edit SOAP/XML Credential modal page appears:
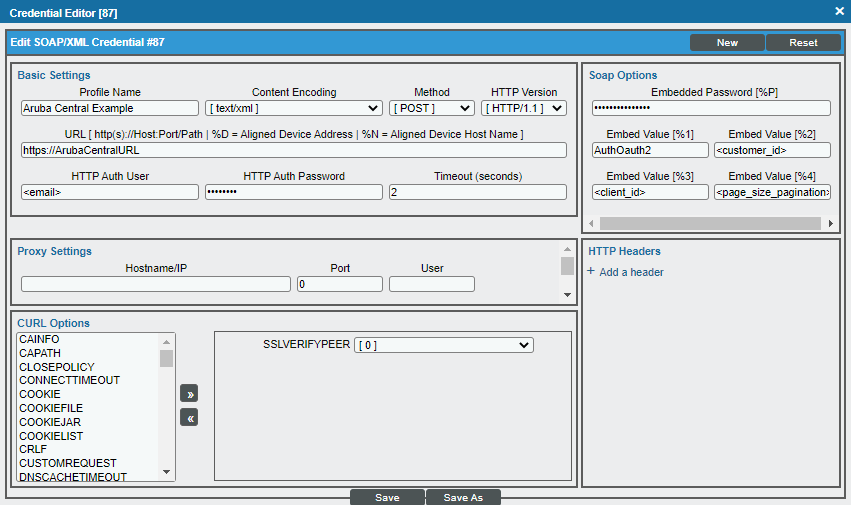
- Complete the following fields:
Basic Settings
- Profile Name. Type a new name for the Aruba Central credential.
- URL. Type your Aruba Central URL.
- HTTP Auth User. Type your Aruba Central username email address.
- HTTP Auth Password. Type your Aruba Central password.
- Timeout. Type a value of at least 5.
ScienceLogic recommends setting the Timeout field to at least 5 seconds to account for the Aruba Central API being slow to respond. If collection fails, try increasing the timeout.
SOAP Options
- Embedded Password [%P]. Type your Aruba Central client secret key.
-
Embed Value [%1]. Type "AuthOauth2".
-
Embed Value [%2]. Type your Aruba Central customer ID.
-
Embed Value [%3]. Type your Aruba Central client ID.
-
Embed Value [%4]. Type the page size for pagination between 1 and 1000.
ScienceLogic recommends setting the Embed Value [%4] field to a value close to 1,000 for large Aruba Central systems and only lowering this value if you see SIGTERMs. You cannot set the page size to 0 in the Embed Value [%1] field. Aruba Central deployments of more than 5,000 devices need a dedicated collector.
-
CURL Options. Ensure that SSLVERIFYPEER is selected and set to 0. There should be no other CURL Options configured.
- For the remaining fields, use the default values.
- Click the button.
Discovering Aruba Central Devices
To discover and monitor your Aruba Central virtual controller, you must do the following:
- Create a virtual device representing the virtual controller
- Configure the Aruba Central device template that is included in the Aruba Central PowerPack
- Align the device template to the Aruba Central virtual device
Each of these steps is documented in the following sections.
Creating an Aruba Central Virtual Device
Because the Aruba Central virtual controller does not have a static IP address, you cannot discover an Aruba Central device by running a discovery session. Instead, you must create a virtual device that represents the Aruba Central virtual controller. A virtual device is a user-defined container that represents a device or service that cannot be discovered by SL1. You can use the virtual device to store information gathered by policies or Dynamic Applications.
To create a virtual device that represents your Aruba Central virtual controller:
- Go to the Device Manager page (Devices > Device Manager, or Registry > Devices > Device Manager in the SL1 classic user interface).
- Click the button and select Create Virtual Device from the menu. The Virtual Device modal page appears:
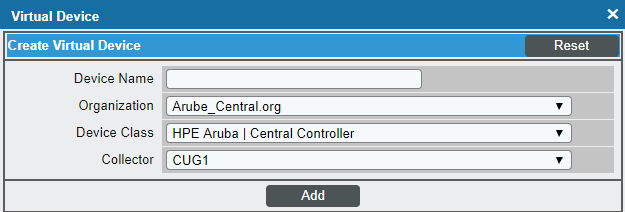
- Complete the following fields:
- Device Name. Type a name for the device.
- Organization. Select the organization for this device. The organization you associate with the device limits the users that will be able to view and edit the device. Typically, only members of the organization will be able to view and edit the device.
- Device Class. Select HPE Aruba | Central Controller.
- Collector. Select the collector group that will monitor the device.
- Click to create the virtual device.
Configuring the Aruba Central Device Template
A device template allows you to save a device configuration and apply it to multiple devices. The Aruba Central PowerPack includes the "Aruba Central Template," which enables SL1 to align all of the necessary Dynamic Applications to the virtual controller root component device.
Before you can use the "Aruba Central Template", you must configure the template so that each Dynamic Application in the template aligns with the credential you created earlier.
To configure the Aruba Central device template:
- Go to the Configuration Templates page (Devices > Templates, or Registry > Devices > Templates in the SL1 classic user interface).
- Locate the "Aruba Central Template" and click its wrench icon (). The Device Template Editor modal page appears.
- Click the tab. The Editing Dynamic Application Subtemplates page appears:
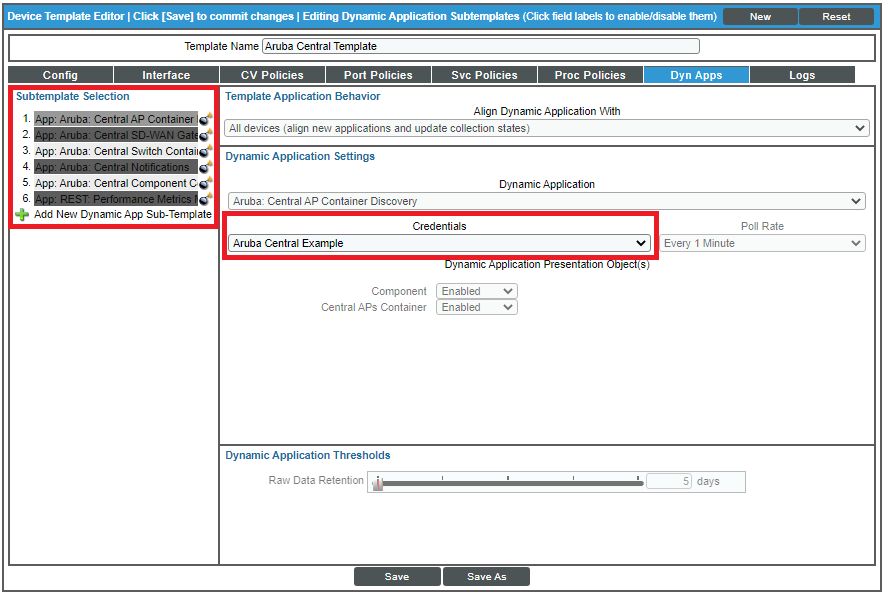
- In the Credentials drop-down list, select the credential that you created for Aruba Central.
- Click the next Dynamic Application listed in the Subtemplate Selection section on the left side of the page and then select the credential you created in the Credentials field.
- Repeat step 5 until you have selected your Aruba Central credential in the Credentials field for all of the Dynamic Applications listed in the Subtemplate Selection section.
- Click .
To maintain a "clean" version of the template, type a new name in the Template Name field and then click instead of .
Aligning the Device Template to Your Aruba Central Virtual Device
After you have configured the Aruba Central device template so that each Dynamic Application in the template aligns with your Aruba Central credential, you can use that template to align the Dynamic Applications to the virtual device that you created to act as the root device for your Aruba Central virtual controller. When you do so, SL1 discovers and models all of the components in your Aruba Central virtual controller.
To align the Aruba Central device template to the Aruba Central virtual device:
- Go to the Device Manager page (Registry > Devices > Device Manager).
- On the Device Manager page, select the checkbox for the Aruba Central virtual device.
- In the Select Action field, in the lower right corner of the page, select the option MODIFY by Template and then click the button. The Device Template Editor page appears.
- In the Template drop-down list, select your Aruba Central device template.
- Click the button, and then click to align the Dynamic Applications to the root component device.
After discovering your Aruba devices, ensure that Configuration and Performance Dynamic Applications for a device type run at the same interval or less often than the respective discovery Dynamic Application for that device. For example, if the "Aruba: Central AP Discovery" Dynamic Application runs every 15 minutes, then the "Aruba: Central AP Performance" Dynamic Application must run at 15 minutes or less.
Creating Log Policies for Dynamic Applications
Optionally, you can create dedicated log policies that enable deeper analysis of the Dynamic Applications in the Aruba Central PowerPack.
To do so:
- Either go to the console of the Data Collector or use SSH to access the Data Collector.
- At the shell prompt, enter the following command:
sudo -u s-em7-core /opt/em7/envs/E0615D35540C3FD3127A522A9F2BCBE9/bin/python -m silo.low_code.cli log-policy create --name=<name> --app_id=<app_id> --did=<device_id>--phase=<phase> --duration="<duration>"
You can insert the following phases:
- PHASE_PRE_ARG. Pre-snippet argument parsing.
- PHASE_ARG_PARSE. Snippet Argument Parsing.
- PHASE_PRE_REQUEST. Modify any requests prior to execution.
- PHASE_REQUEST. Data gathering.
- PHASE_PROCESSING. Process data gather into the consumable format.
- PHASE_BACKEND_CONVERSION. Perform the conversion to be consumed by the Dynamic Applications.
You can insert the following durations:
- #w. Week.
- #d . Day.
- #h . Hour.
- #m. Minute.
- #s. Second.
For more information, you can enter one of the following commands to access the help files:
sudo -u s-em7-core /opt/em7/envs/E0615D35540C3FD3127A522A9F2BCBE9/bin/python -m silo.low_code.cli log-policy --help
sudo -u s-em7-core /opt/em7/envs/E0615D35540C3FD3127A522A9F2BCBE9/bin/python -m silo.low_code.cli log-policy create --help
- The system will create the log file in the directory /var/log/em7 using the name you define.
Viewing Aruba Central Component Devices
In addition to the Devices page, you can view your Aruba Central devices in the following places in the user interface:
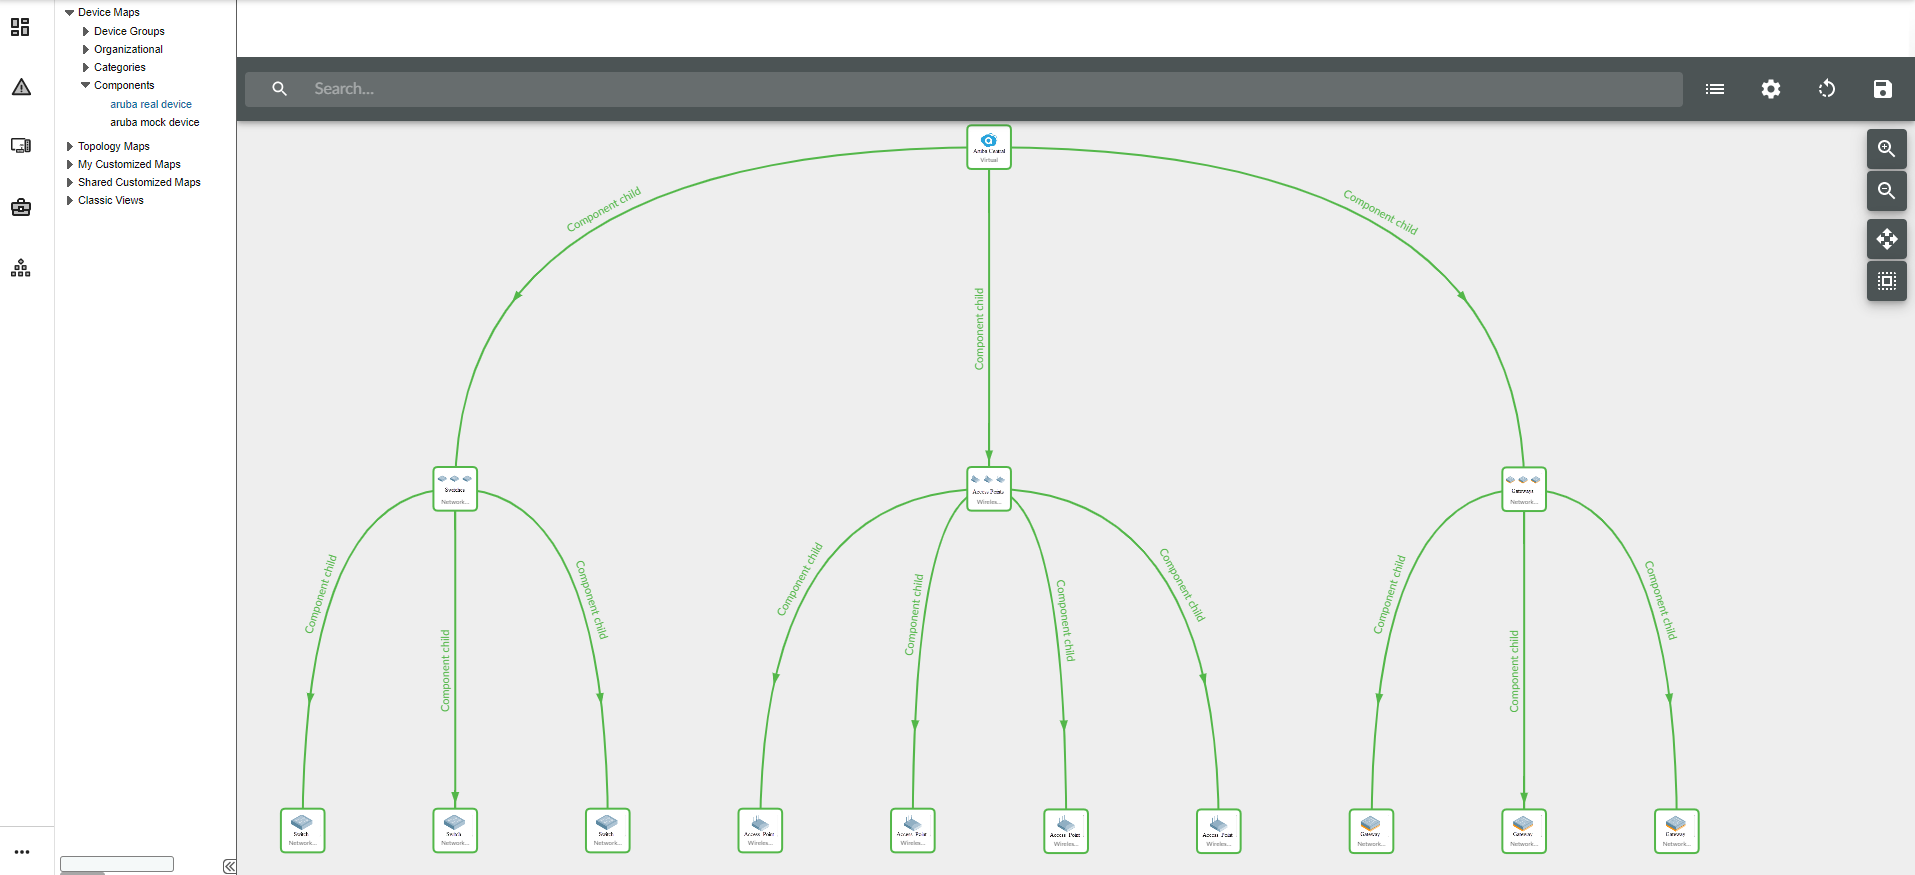
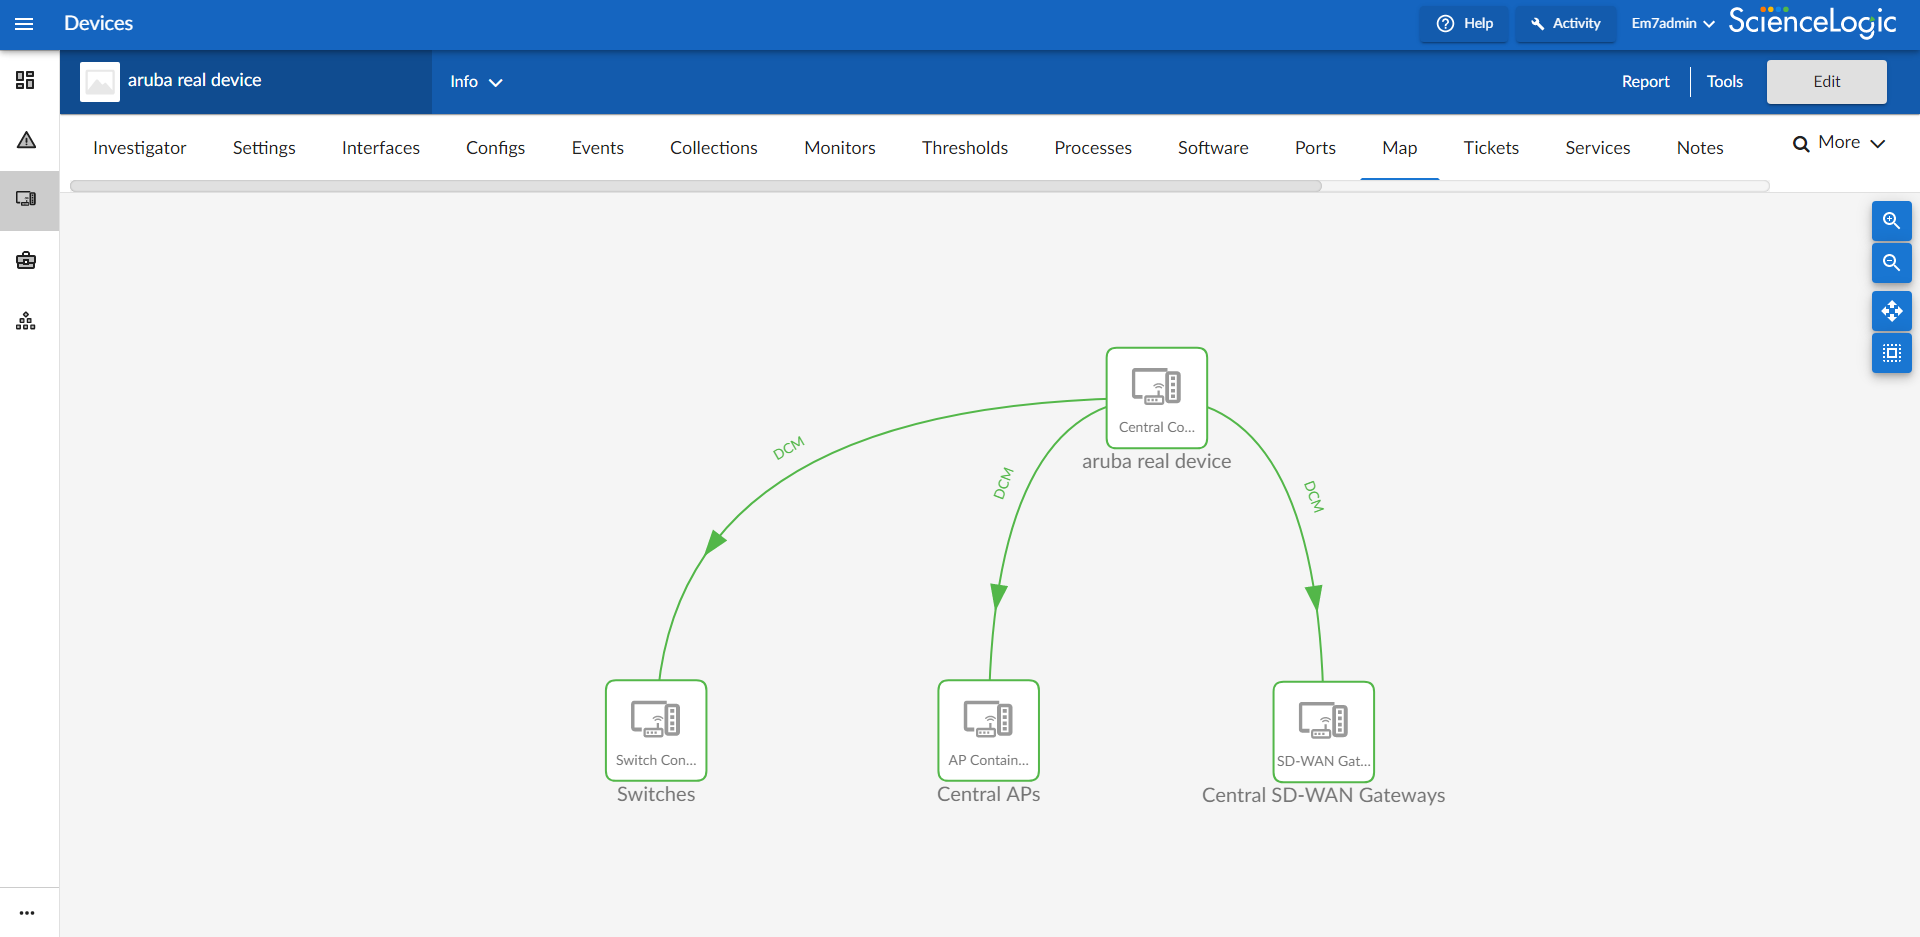
- The Device Investigator Map page (click Map in the Device Investigator page) displays a map of a particular device and all of the devices with which it has parent-child relationships. Double-clicking any of the listed devices reloads the page to make the selected device the primary device.
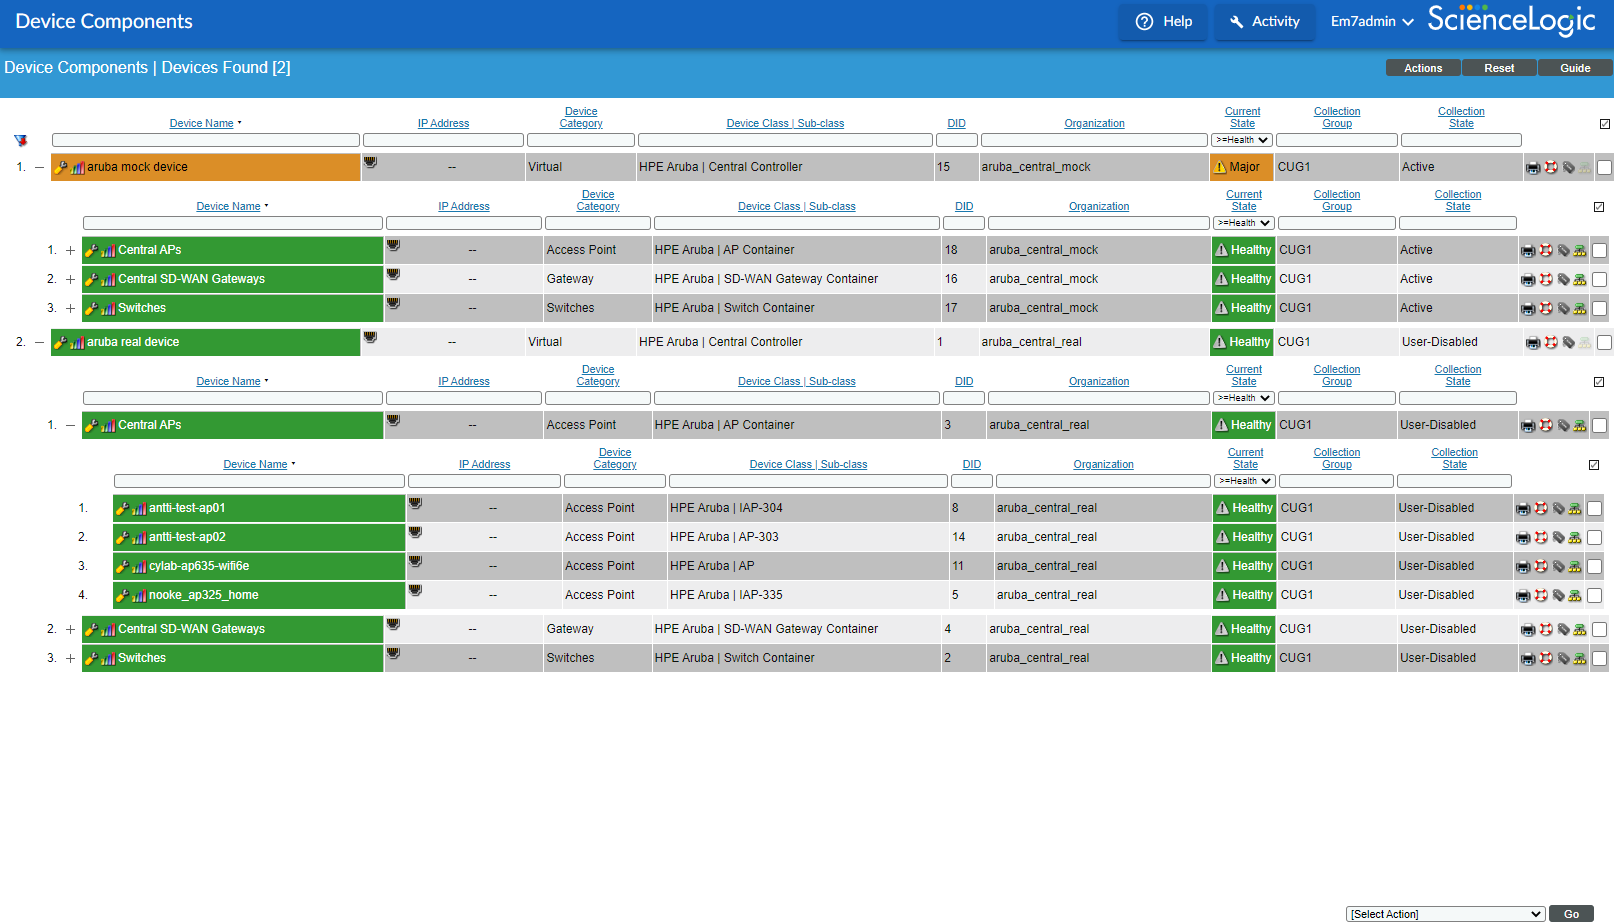
- The Device Components page (Devices > Device Components) displays a list of all root devices and component devices discovered by SL1. The Device Components page displays all root devices and component devices in an indented view, so you can easily view the hierarchy and relationships between child devices, parent devices, and root devices. To view the component devices associated with an Aruba Central device, find the device and click its plus icon (+).
- The Component Map page (Maps>Classic Maps>Device Maps>Components) allows you to view devices by root node and view the relationships between root nodes, parent components, and child components in a map. This makes it easy to visualize and manage root nodes and their components. SL1 automatically updates the Component Map as new component devices are discovered. The platform also updates each map with the latest status and event information. To view the map for an Aruba Central device, go to the Component Map page and select the map from the list in the left NavBar. To learn more about the Component Map page,