![]()
Use the following menu options to navigate the SL1 user interface:
- To view a pop-out list of menu options, click the menu icon (
 ).
). - To view a page containing all the menu options, click the Advanced menu icon (
 ).
).
The following sections describe how to configure and discover Dynatrace resources for monitoring by SL1 using the Dynatrace PowerPack:
Generating a Dynatrace API Token
To configure the SL1 system to monitor Dynatrace resources using the DynatracePowerPack, you must first generate a Dynatrace API token.
To do so:
- Log in to your Dynatrace portal. On the left menu, click Settings > Integration > Dynatrace API. The Dynatrace API page appears.
- Click the button.
- In the blank box that appears, type a token name, and then under the API v1 section activate (at a minimum) the "Access problem and event feed, metrics, topology, and Real User Monitoring JavaScript tag management" permission.
- Click to generate the API token.
You can click the button next to the generated token to copy the token to your computer's clipboard.
- The newly generated API token appears in your list of API tokens. Ensure that the Disable/enable switch is activated.
- Optionally, if you want to verify the token, you can use an API tool like Postman or cURL to send a GET request for your Dynatrace environment, and then attach the token to the Api-Token realm for the Authorization HTTP header. For example:
curl --request GET \
--url https://<Hostname>/e/<Environment-ID>.live.dynatrace.com/api/v1/time \
--header 'Authorization: Api-Token <generated API token>' \
Configuring Dynatrace Credentials
To configure SL1 to monitor Dynatrace devices, you must first create a SOAP/XML credential. This credential allows the Dynamic Applications in the Dynatrace PowerPack to use your Dynatrace user account to retrieve information from the Dynatrace environment and component devices.
The PowerPack includes an example SOAP/XML credential (Dynatrace Credential Example) that you can edit for your own use.
NOTE: If you are using an SL1 system prior to version 11.1.0, the new user interface does not include the Duplicate option for sample credential(s). ScienceLogic recommends that you use the classic user interface and the Save As button to create new credentials from sample credentials. This will prevent you from overwriting the sample credential(s).
To configure a SOAP/XML credential to access Dynatrace:
- Go to the Credentials page (Manage > Credentials).
- Locate the Dynatrace Credential Example credential, click the actions icon (
 ) and select Duplicate. A copy of the credential, called Dynatrace Credential Example copy appears.
 - Click the icon () for the Dynatrace Credential Example copy credential and select Edit. The Edit Credential modal page appears:
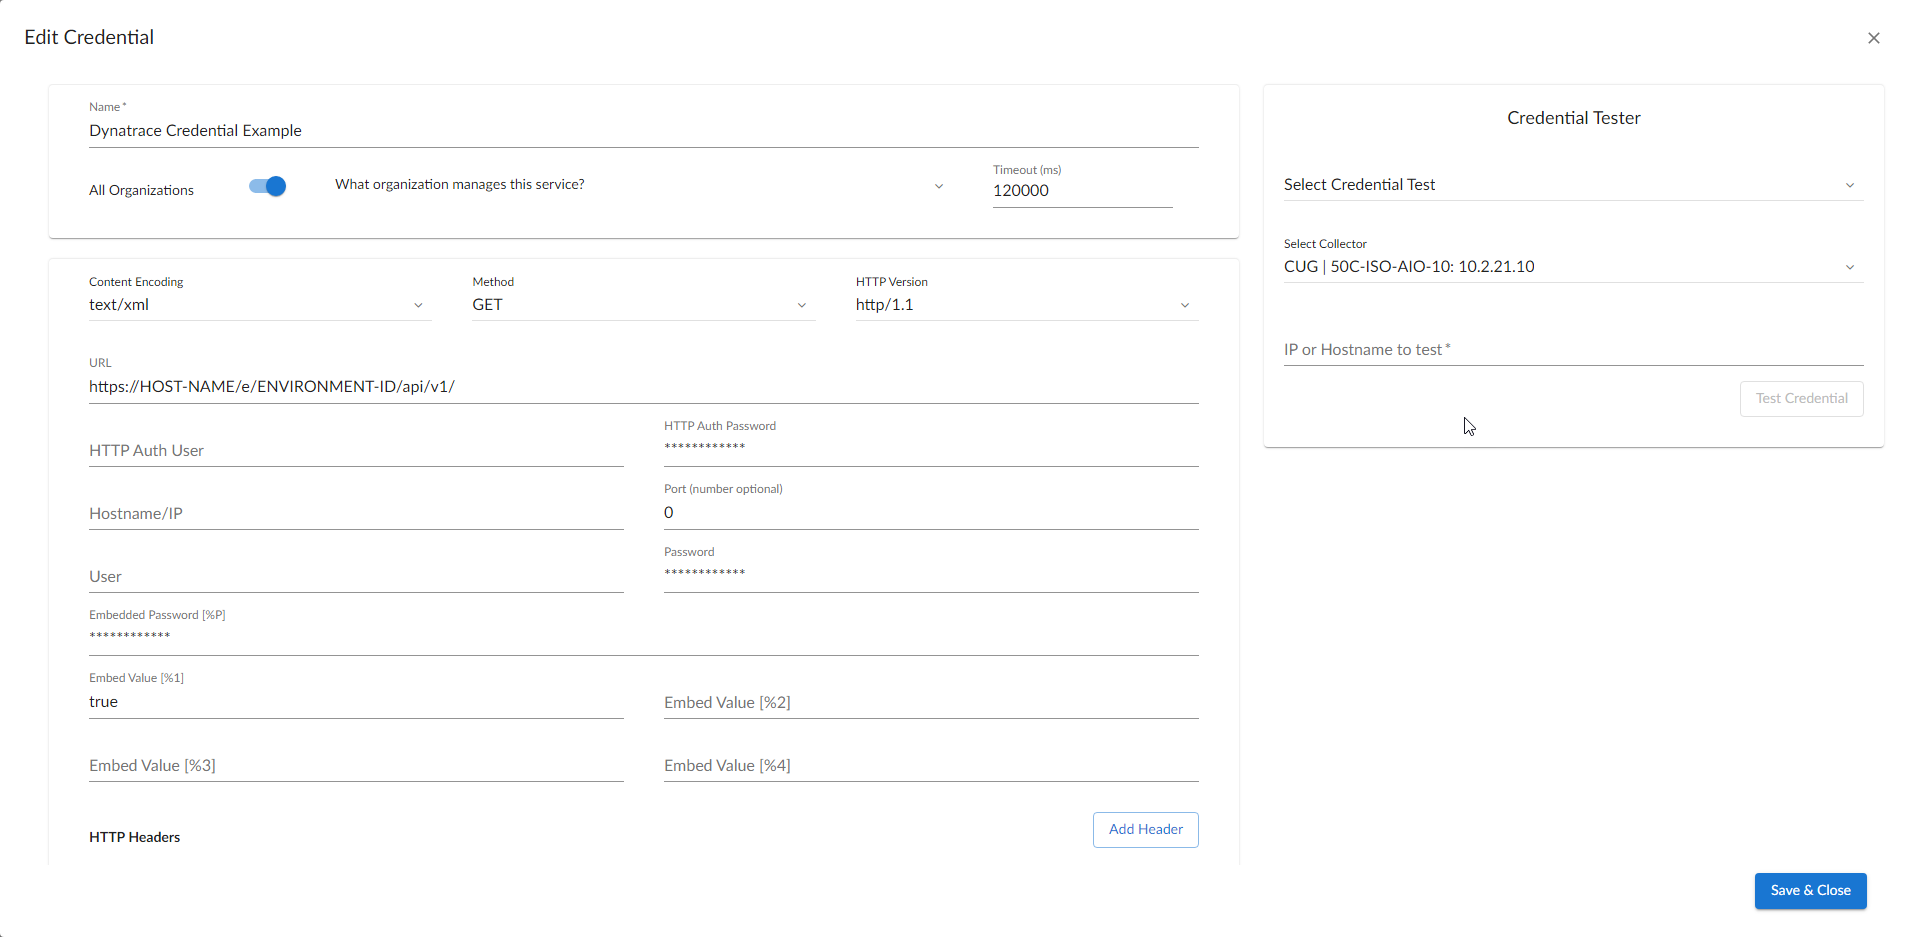
- Complete the following fields:
- Name. Type a new name for the Dynatrace credential.
- All Organizations. Toggle on (blue) to align the credential to all organizations, or toggle off (gray) and then select one or more specific organizations from the What organization manages this service? drop-down field to align the credential with those specific organizations.
- URL. Type your URL in the following format, replacing <Hostname> with your Dynatrace hostname and <Environment-ID> with your Dynatrace environment ID:
https://<Hostname>/e/<Environment-ID>/api/v1/
- HTTP Auth User. This field must be blank.
- HTTP Auth Password. This field must be blank.
- Embedded Password [%P]. Type your authorization API token in the following format, replacing <API-Token> with your actual API token: Authorization: Api-Token <API-Token>
HTTP Headers
- If you want to change the default page size, or change the page size for hosts, services, or applications, use the header in the "Dynatrace Credential Example" sample credential.
- PageSizeDefault: <int>. Setting this will replace the default pagination.
Update the header(s) in the following format(s):
- If you want to filter hosts and services by Management Zone or Tag Key, the HTTP headers for these filters will appear in the " Dynatrace Cred MZFilter Example" and "Dynatrace Cred TagFilter Example" credentials.
Update the headers in the following format:
ManagementZoneFilter: <Management_Zone_ID>
TagFilter: <TagKey>orTagFilter:<TagKey>:<TagValue>
NOTE: The tag must be exactly as you defined it in Dynatrace, so it could be the TagKey or the TagKey and the TagValue if the Value is defined.
NOTE: You can filter only one Management Zone or Tag Key at a time.
CURL Options
- SSLCERT. Keep the default value of "True".
- For the remaining fields, use the default values.
- Click the button.
Configuring the Dynatrace Credential in the Classic SL1 User Interface
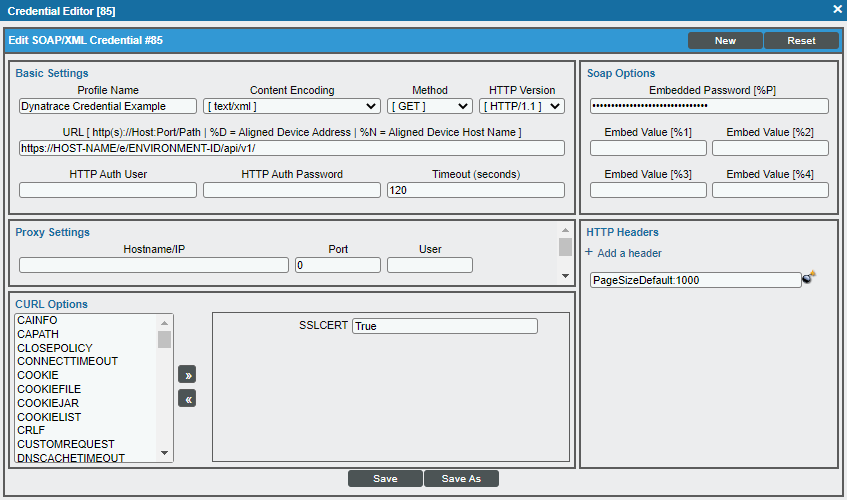
To configure SL1 to monitor Dynatrace devices, you must first create a SOAP/XML credential. This credential allows the Dynamic Applications in the Dynatrace PowerPack to use your Dynatrace user account to retrieve information from the Dynatrace environment and component devices.
The PowerPack includes example SOAP/XML credentials that you can edit for your own use:
- Dynatrace Credential Example. The standard credential for monitoring Dynatrace.
- Dynatrace Cred MZFilter Example. Use this credential for filtering hosts and services by Management Zone.
- Dynatrace Cred TagFilter Example. Use this credential for filtering hosts and services by Tag Key.
To configure a SOAP/XML credential to access Dynatrace:
- Go to the Credential Management page (System > Manage > Credentials).
- Locate the Dynatrace Credential Example credential, and then click its wrench icon (
 ). The Edit SOAP/XML Credential modal page appears:
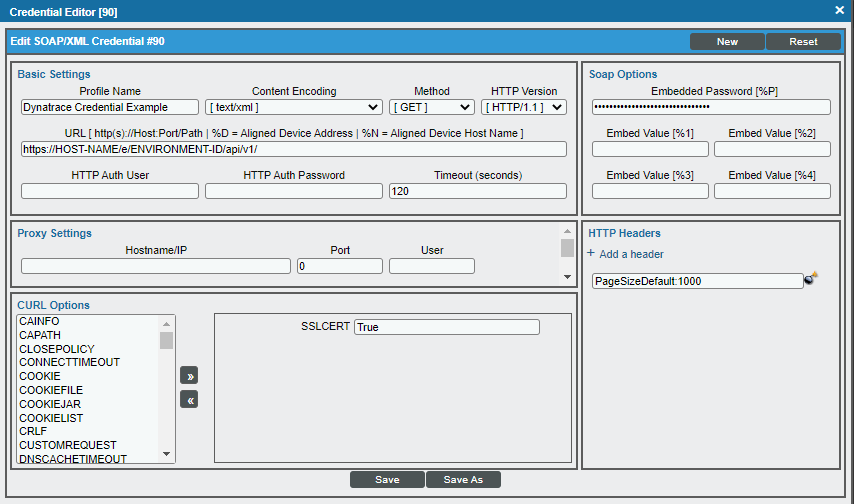
- Complete the following fields:
Basic Settings
- Profile Name. Type a new name for the Dynatrace credential.
- URL. Type your URL in the following format, replacing <Hostname> with your Dynatrace hostname and <Environment-ID> with your Dynatrace environment ID:
https://<Hostname>/e/<Environment-ID>/api/v1/
- HTTP Auth User. This field must be blank.
- HTTP Auth Password. This field must be blank.
SOAP Options
- Embedded Password [%P]. Type your authorization API token in the following format, replacing <API-Token> with your actual API token:
Authorization: Api-Token <API-Token>
HTTP Headers
- If you want to change the default page size, or change the page size for hosts, services, or applications, use the header in the "Dynatrace Credential Example" sample credential.
- PageSizeDefault: <int>. Setting this will replace the default pagination.
Update the header(s) in the following format(s):
- If you want to filter hosts and services by Management Zone or Tag Key, the HTTP headers for these filters will appear in the " Dynatrace Cred MZFilter Example" and "Dynatrace Cred TagFilter Example" credentials.

Update the headers in the following format:
ManagementZoneFilter: <Management_Zone_ID>
TagFilter: <TagKey> or TagFilter:<TagKey>:<TagValue>
NOTE: The tag must be exactly as you defined it in Dynatrace, so it could be the TagKey or the TagKey and the TagValue if the Value is defined.
NOTE: You can filter only one Management Zone or Tag Key at a time.
CURL Options
- SSLCERT. Keep the default value of "True".
NOTE: If you have any backwards compatibility issues with CURL options, set the Embed Value [%1] field to "false".
- For the remaining fields, use the default values.
- Click the button.
Configuring Dynamic Applications to Monitor Dynatrace Devices
If you are monitoring a large Dynatrace devices, the default polling frequency of 5 minutes will lead to SIGTERMs and gaps in data collection. Before discovering your devices, it is recommended that you update the poll frequency of your Dynamic Applications as follows:
- Between 1,000 and 3,000 devices. 10 minutes.
- Between 3,000 and 8,000 devices. 15 minutes.
- Over 8,000 devices. 30 minutes.
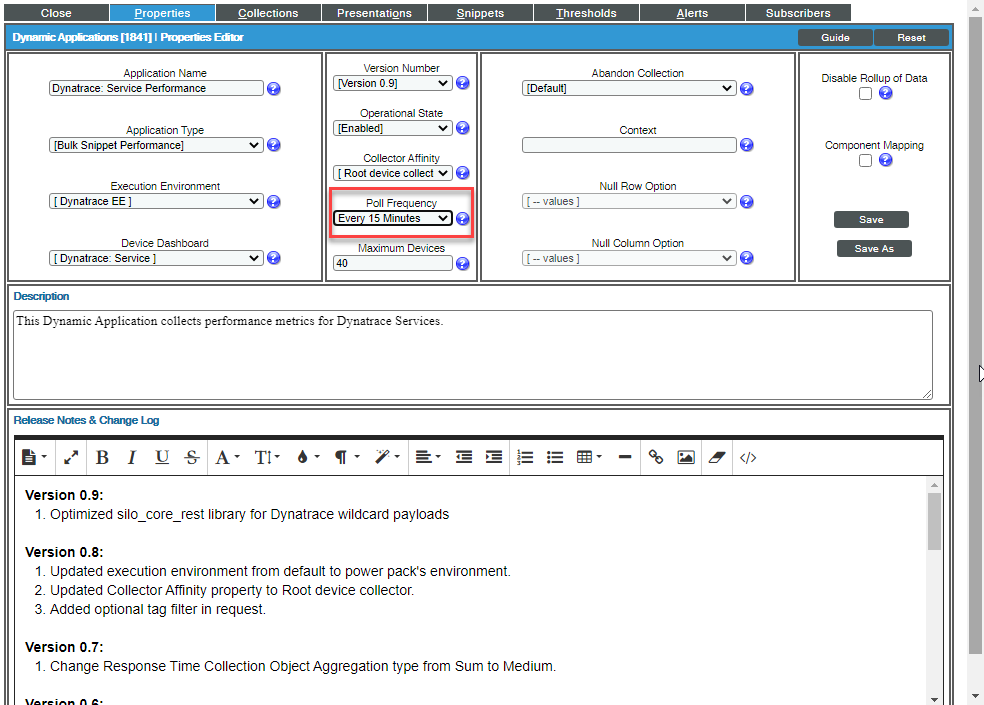
After changing the polling frequency, the relative time for collections objects in performance Dynamic Applications should be updated to match. To do this, run the following SQL query in the Database Tool (System > Tools > DB Tool):
UPDATE
master.dynamic_app_objects dao
INNER JOIN
master.dynamic_app da on dao.app_guid = da.app_guid
SET
oid = REPLACE(oid, '5mins', '15mins')
WHERE
da.ppguid = '85AD7CD29ADF5F3EADA62D98D8AB9972' and da.app_type = 24;
This example changes the polling time from 5 to 15 minutes. The accepted values are 5mins, 10mins, 15mins, and 30mins.
Discovering Dynatrace Devices
To discover and monitor your Dynatrace environment, you must do the following:
- Create a virtual device representing the environment
- Configure the Dynatrace device template that is included in the Dynatrace PowerPack
- Align the device template to the Dynatrace virtual device
Each of these steps is documented in the following sections.
Creating a Dynatrace Virtual Device
Because the Dynatrace environment does not have a static IP address, you cannot discover a Dynatrace device by running a discovery session. Instead, you must create a virtual device that represents the Dynatrace environment. A virtual device is a user-defined container that represents a device or service that cannot be discovered by SL1. You can use the virtual device to store information gathered by policies or Dynamic Applications.
To create a virtual device that represents your Dynatrace environment:
- Go to the Device Manager page (Devices > Device Manager or Registry > Devices > Device Manager in the SL1 classic user interface).
- Click the button and select Create Virtual Device from the menu. The Virtual Device modal page appears:
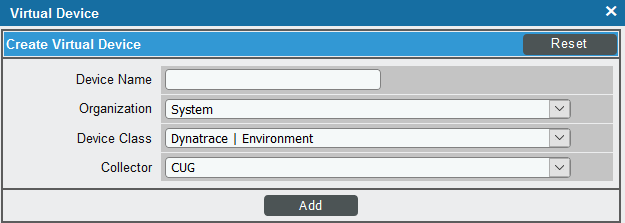
- Complete the following fields:
- Device Name. Type a name for the device.
- Organization. Select the organization for this device. The organization you associate with the device limits the users that will be able to view and edit the device. Typically, only members of the organization will be able to view and edit the device.
- Device Class. Select Dynatrace | Environment.
- Collector. Select the collector group that will monitor the device.
- Click to create the virtual device.
Configuring the Dynatrace Device Template
A device template allows you to save a device configuration and apply it to multiple devices. The Dynatrace PowerPack includes the "Dynatrace Template," which enables SL1 to align all of the necessary Dynamic Applications to the environment root component device.
Before you can use the "Dynatrace Template", you must configure the template so that each Dynamic Application in the template aligns with the credential you created earlier.
To configure the Dynatrace device template:
- Go to the Configuration Templates page (Devices > Templates or Registry > Devices > Templates in the SL1 classic user interface).
- Locate the "Dynatrace Template" and click its wrench icon (). The Device Template Editor modal page appears.
- Click the tab. The Editing Dynamic Application Subtemplates page appears:
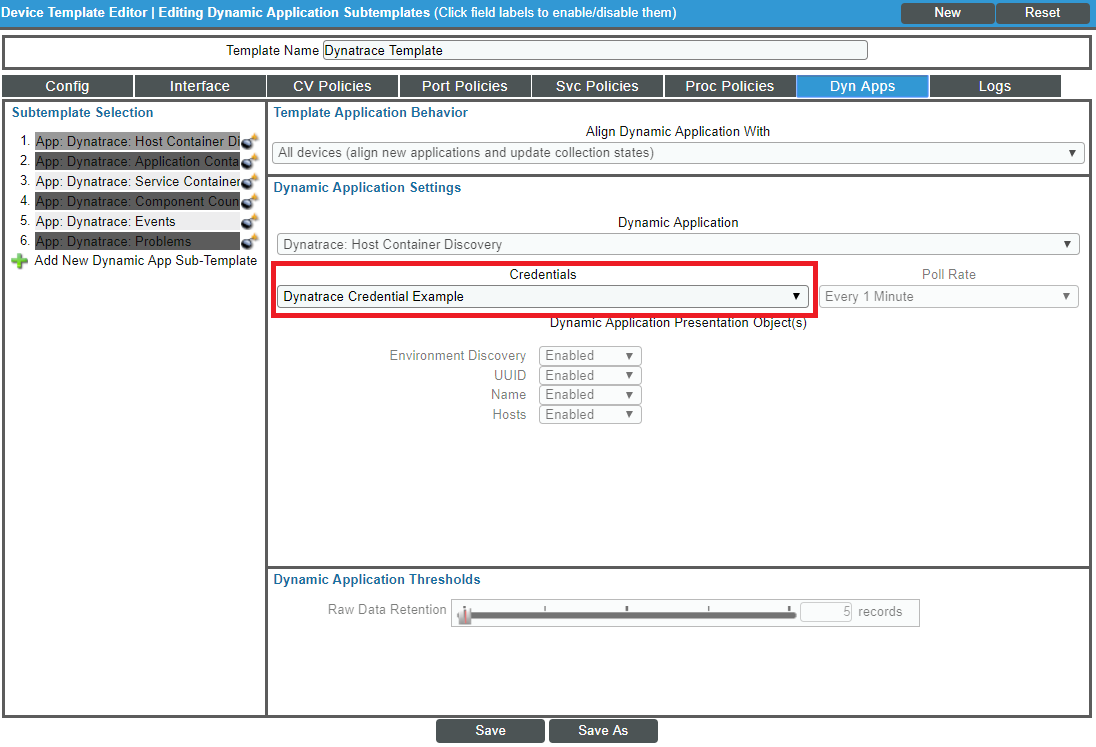
- In the Credentials drop-down list, select the credential that you created for Dynatrace.
- Click the next Dynamic Application listed in the Subtemplate Selection section on the left side of the page and then select the credential you created in the Credentials field.
- Repeat step 5 until you have selected your Dynatrace credential in the Credentials field for all of the Dynamic Applications listed in the Subtemplate Selection section.
- Click .
To maintain a "clean" version of the template, type a new name in the Template Name field and then click instead of .
The "Dynatrace: Events" Dynamic Application is disabled by default in the Dynatrace PowerPack. To collect Dynatrace events, you must enable it. To do so, go to the Dynamic Applications Manager page (System > Manage > Applications), locate the "Dynatrace: Events" Dynamic Application and click its wrench icon (![]() ), change the Operational State setting to Enabled, and then click .
), change the Operational State setting to Enabled, and then click .
Aligning the Device Template to Your Dynatrace Virtual Device
After you have configured the Dynatrace device template so that each Dynamic Application in the template aligns with your Dynatrace credential, you can use that template to align the Dynamic Applications to the virtual device that you created to act as the root device for your Dynatrace environment. When you do so, SL1 discovers and models all of the components in your Dynatrace environment.
To align the Dynatrace device template to the Dynatrace virtual device:
- Go to the Device Manager page (Devices > Device Manager or Registry > Devices > Device Manager in the SL1 classic user interface).
- On the Device Manager page, select the checkbox for the Dynatrace virtual device.
- In the Select Actions field, in the lower right corner of the page, select the option MODIFY by Template and then click the button. The Device Template Editor page appears.
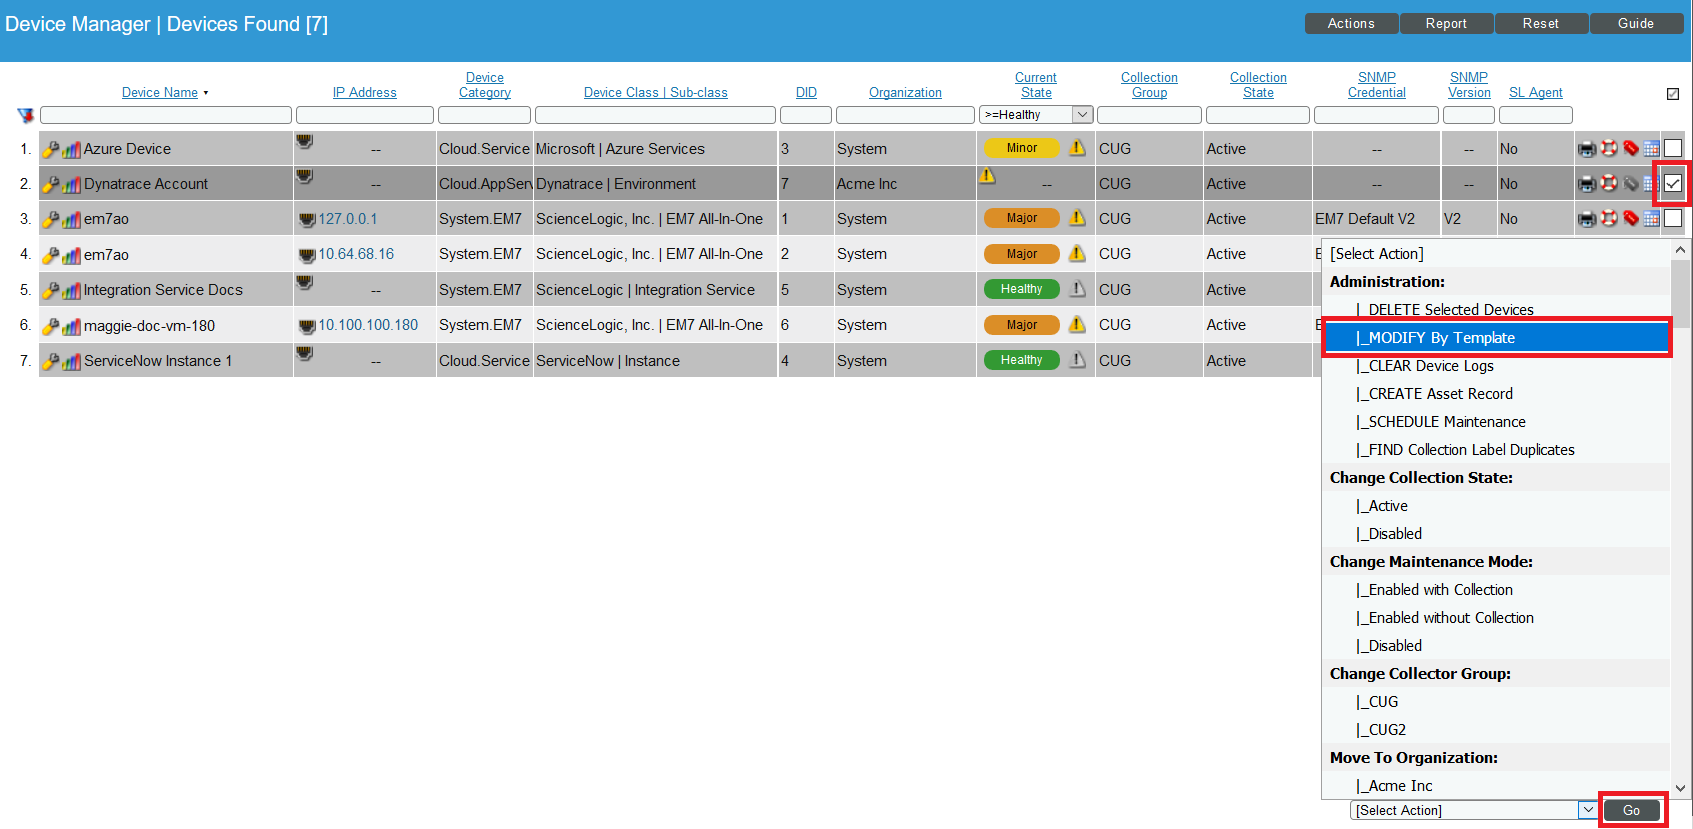
- In the Template drop-down list, select your Dynatrace device template.
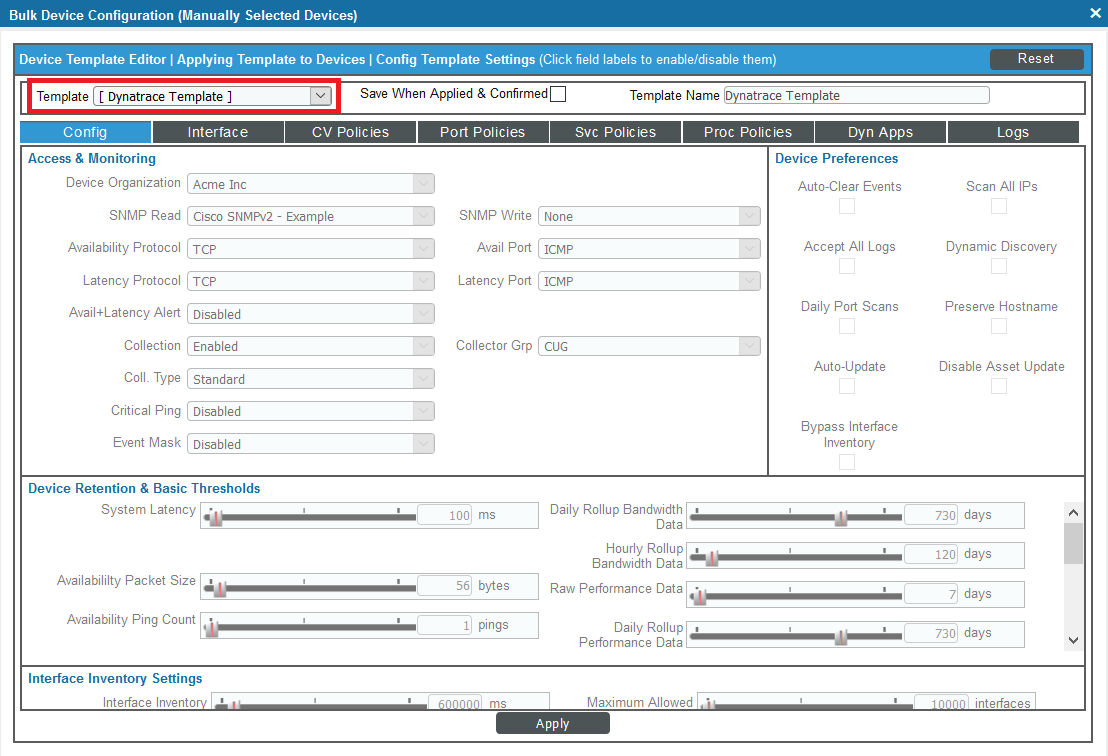
- Click the button, and then click to align the Dynamic Applications to the root component device.
Filtering Partitions from Host Components
You can filter out partitions from host components in the "Dynatrace: Host Disk Performance" Dynamic Application. To do this, perform the following steps:
- Go to the Dynamic Applications Manager page (System > Manage > Applications).
-
Locate the "Dynatrace: Host Disk Performance" Dynamic Application and click its wrench icon ().
- Click on the tab.
-
In the Snippet Editor & Registry page, click the wrench icon () for the "host_disk_performance" snippet.
- Edit the partitions=["/var/lib/docker"]) line to specify the partition(s) you want to filter out. You can specify more than one partition by separating them with commas and enclosing the partitions in quotation marks. Remove the partition if you want to collect data for it.
NOTE: When filtering Windows partitions, make sure you use "C:\\" when specifying the partition. Using "C:\" will cause issues and affect the collection of data from the partitions.

NOTE: The snippet will revert to default values each time the PowerPack is updated. You will need to update the snippet again each time you update the PowerPack.
Viewing Dynatrace Component Devices
In addition to the Device Manager page (Devices > Device Manager or Registry > Devices > Device Manager in the SL1 classic user interface), you can view Dynatrace environments and all associated component devices in the following places in the user interface:
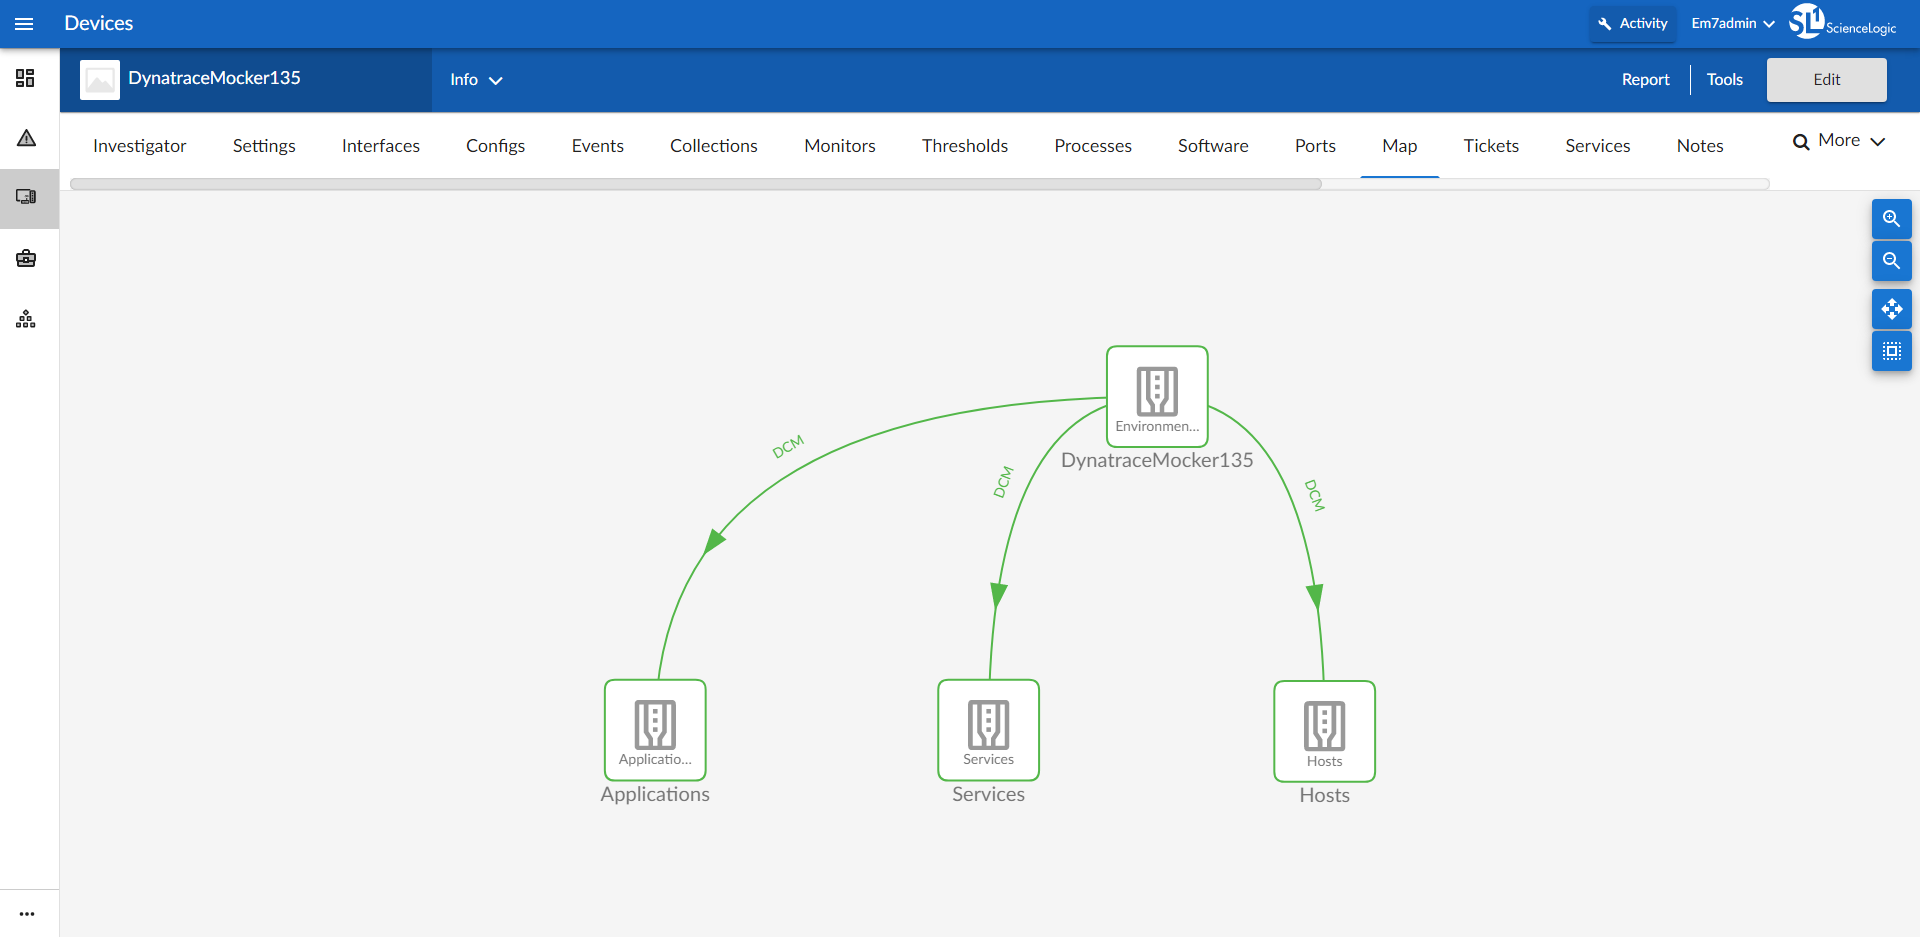
- The Device Investigator Map page (click Map in the Device Investigator page) displays a map of a particular device and all of the devices with which it has parent-child relationships. Double-clicking any of the devices listed reloads the page to make the selected device the primary device:
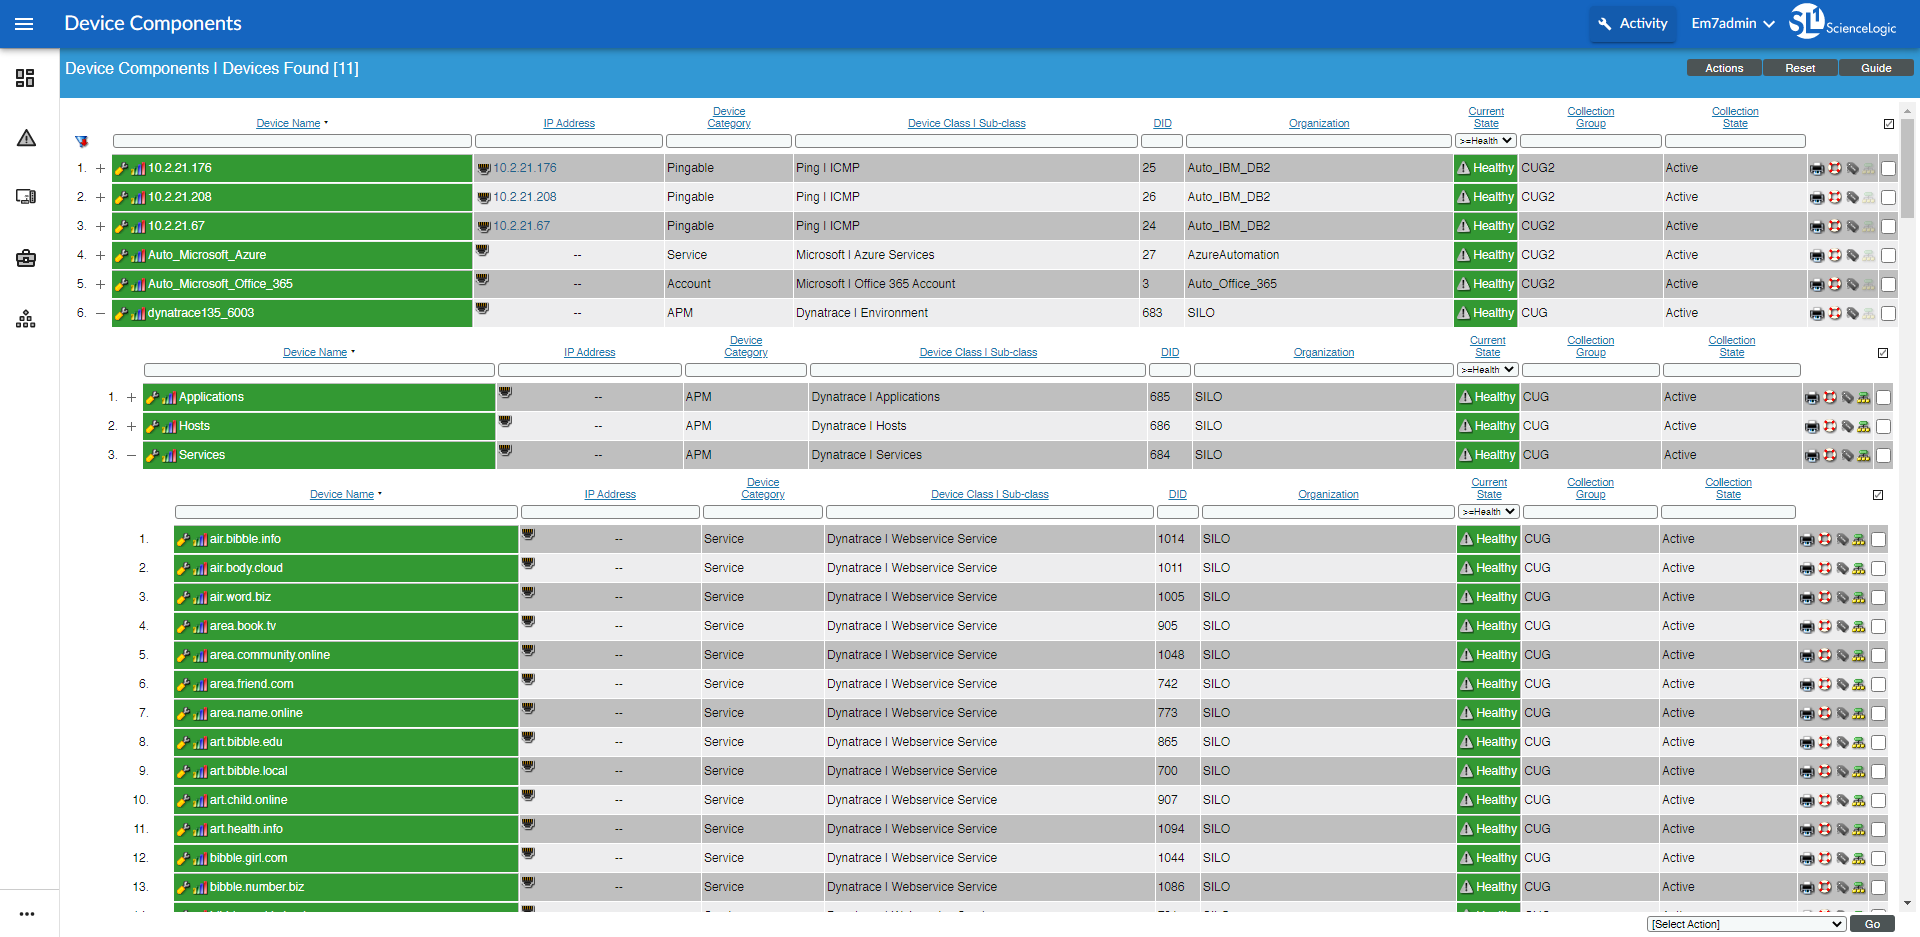
- The Device Components page (Devices > Device Components) displays a list of all root devices and component devices discovered by SL1 in an indented view, so you can easily view the hierarchy and relationships between child devices, parent devices, and root devices. To view the component devices associated with Dynatrace, find the Dynatrace root device and click its plus icon (+):
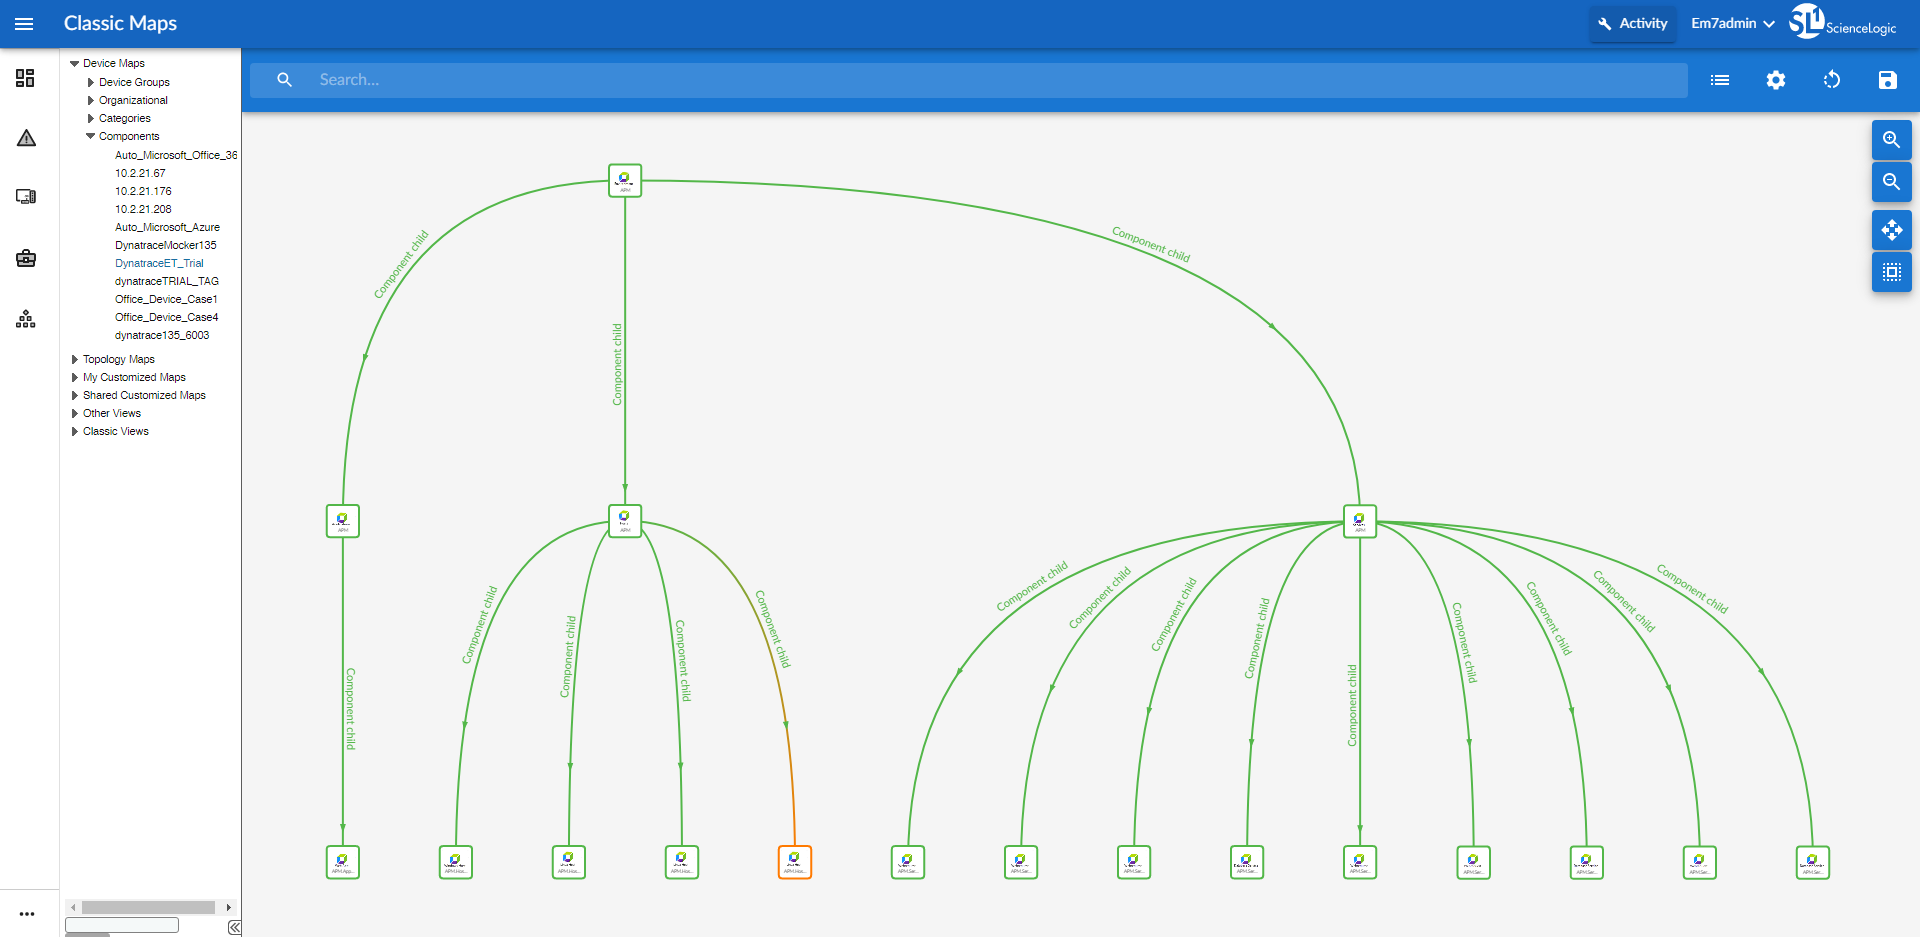
- The Device Component Map page (Classic Maps > Device Maps > Components) allows you to view devices by root node and view the relationships between root nodes, parent components, and child components in a map. This makes it easy to visualize and manage root nodes and their components. SL1 automatically updates the Component Map as new component devices are discovered. The platform also updates each map with the latest status and event information. To view the map for Dynatrace devices, go to the Component Map page and select the map from the list in the left NavBar. To learn more about the Component Map page,
Relationships Between Component Devices
In addition to parent/child relationships between component devices, SL1 also creates relationships between the following Dynatrace component devices:
- Hosts and Services
- Services and Applications
Additionally, the platform can automatically build relationships between Dynatrace component devices and other associated devices:
- If you discover Azure devices using the Dynamic Applications in the Microsoft: Azure PowerPack version 108 or later, SL1 will automatically create relationships between the following device types:
- Dynatrace Hosts and Azure Virtual Machines
- Dynatrace Hosts and Azure Virtual Machine Scale Sets
- If you discover Linux devices using the Dynamic Applications in the Linux Base Pack PowerPack version 102 or later, SL1 will automatically create relationships between Dynatrace Hosts and Linux Servers.
- If you discover VMware devices using the Dynamic Applications in the VMware: vSphere Base Pack PowerPack version 210 or later, SL1 will automatically create relationships between Dynatrace Hosts and VMware Virtual Machines.
- If you discover Windows devices using the Dynamic Applications in the Microsoft: Windows Server PowerPack version 107 or later or the Microsoft Base Pack PowerPack version 106 or later, SL1 will automatically create relationships between Dynatrace Hosts and Windows Servers.