![]()
The following workflow covers how to install and configure this Synchronization PowerPack:
- In PowerFlow, download, import, and install the ServiceNow CMDB Synchronization PowerPack.
- In ServiceNow, enable cross-scoped access and install the "ScienceLogic SL1: CMDB & Incident Automation" application (also called the "Scoped Application").
- In ServiceNow, install and activate the "ServiceNow Configuration Management for Scoped Apps (CMDB)" Plugin.
- In ServiceNow, enable the "ServiceNow Identification and Reconciliation Module".
- For domain-separated ServiceNow instances only, install the "ScienceLogic Domain Separation (Global)" update set in ServiceNow.
- In ServiceNow, create an update set with containment rules and hosting rules for Device Sync.
Downloading, Importing, and Installing the ServiceNow CMDB Synchronization PowerPack
A Synchronization PowerPack file has the .whl file extension type. You can download the Synchronization PowerPack file from the ScienceLogic Support site.
If you are upgrading to this version of the Synchronization PowerPack from a previous version, make a note of any settings you made on the Configuration pane of the various PowerFlow applications in this Synchronization PowerPack, as these settings are not retained when you upgrade. However, any mappings you added to the attribute_mappings section for the "Sync Devices from SL1 to ServiceNow" application are retained when you upgrade.
Using the Identification Update Sets
If your ServiceNow instance is domain-separated, installing the latest "ScienceLogic Domain Separation (Global)" update set in ServiceNow is required for version 3.5.0 or later of the ServiceNow CMDB Synchronization PowerPack.
ScienceLogic provides identification update sets that include identification rules for syncing certain technologies. You can access these update sets from the additional_materials.zip file included in the main .zip file for the Synchronization PowerPack, which you can find on the PowerPacks page at the ScienceLogic Support Site at https://support.sciencelogic.com/s/.
If version 3.2.0 is the first version of the ServiceNow CMDB Synchronization PowerPack you are installing on your PowerFlow system, you should use the new "ScienceLogic IdentificationEngine (pre-set (VMWare 3.2.0))" update set.
If you are upgrading to version 3.2.0 ServiceNow CMDB Synchronization PowerPack from a previous version of the Synchronization PowerPack, you should continue to use the VMware update set that was previously provided.
If you are upgrading from a previous version of this Synchronization PowerPack and you install the latest Identification Update Set, you will encounter errors in ServiceNow because of the change in how version 3.2.0 of this Synchronization PowerPack overrides relationships. These errors will continue until the identification rules are fixed in ServiceNow. For this reason, ScienceLogic recommends not installing the latest identification update set if you are upgrading from an existing Synchronization PowerPack version.
Downloading the Synchronization PowerPack
To locate and download the Synchronization PowerPack:
- Go to the ScienceLogic Support Site at https://support.sciencelogic.com/s/.
- Click the tab and select PowerPack.
- In the Search PowerPacks field, search for the Synchronization PowerPack and select it from the search results. The Release Version page appears.
- On the tab, click the name of the Synchronization PowerPack version that you want to install. The Release File Details page appears.
- Click the button to start downloading the file.
After you download the Synchronization PowerPack, you can import it to your PowerFlow system using the PowerFlow user interface.
If you are installing or upgrading to the latest version of this Synchronization PowerPack in an offline deployment, see "Installing or Upgrading in an Offline Environment" in the Synchronization PowerPack release notes to ensure you install any external dependencies.
Importing the Synchronization PowerPack
To import a Synchronization PowerPack in the PowerFlow user interface:
- On the SyncPacks page of the PowerFlow user interface, click . The Import SyncPack page appears.
-
Click and select the .whl file for the Synchronization PowerPack you want to install.
You can also drag and drop a .whl file to the Import SyncPack page.
- Click . PowerFlow registers and uploads the Synchronization PowerPack. The Synchronization PowerPack is added to the SyncPacks page.
You cannot edit the content package in a Synchronization PowerPack published by ScienceLogic. You must make a copy of a ScienceLogic Synchronization PowerPack and save your changes to the new Synchronization PowerPack to prevent overwriting any information in the original Synchronization PowerPack when upgrading.
Installing the Synchronization PowerPack
You must import and install the ServiceNow Base Synchronization PowerPack before uploading and installing any of the other ServiceNow Synchronization PowerPacks.
To activate and install a Synchronization PowerPack in the PowerFlow user interface:
-
On the SyncPacks page of the PowerFlow user interface, click the button (
 ) for the Synchronization PowerPack you want to install and select Activate & Install. The Activate & Install SyncPack modal appears.
If you try to activate and install a Synchronization PowerPack that is already activated and installed, you can choose to "force" installation across all the nodes in the PowerFlow system.
If you do not see the PowerPack that you want to install, click the Filter icon (
 ) on the SyncPacks page and select Toggle Inactive SyncPacks to see a list of the imported PowerPacks.
-
Click to confirm the activation and installation. When the Synchronization PowerPack is activated, the SyncPacks page displays a green check mark icon (
 ) for that Synchronization PowerPack. If the activation or installation failed, then a red exclamation mark icon (
 ) appears.
 -
For more information about the activation and installation process, click the check mark icon (
) or the exclamation mark icon () in the Activated column for that Synchronization PowerPack. For a successful installation, the "Activate & Install SyncPack" application appears, and you can view the Step Log for the steps. For a failed installation, the Error Logs window appears. -
If you have other versions of the same Synchronization PowerPack on your PowerFlow system, you can click the button (
) for that Synchronization PowerPack and select Change active version to activate a different version other than the version that is currently running.
Allowing Cross-Scoped Access in ServiceNow
When using custom tables, you might need to configure cross-scope access for the ScienceLogic plugin. The following examples contain errors that might occur when cross-scope access is required.
Example of an API response:
{"results":[{"error":{"message":"com.glide.script.fencing.access.ScopeAccessNotGrantedException: read access to ui_test_hardware not granted","detail":""},"status":"failure"}
Example of navigating to a URL directly from a web browser when cross-scope access is required:

In this example, the table requires that you grant access to the ScienceLogic Scope to allow the API call to run correctly. In the above example, the target table is u_test_hardware.
A ServiceNow account with System Administrator is required.
To grant access to the ScienceLogic Scope in ServiceNow:
-
Log in to your ServiceNow instance.
-
Click the Settings icon (
 ) and select the Developer tab. The Developer System Settings window appears:
- From the Application drop-down list, select ScienceLogic ServiceNow Integration.
-
Close the Developer System Settings window and navigate to the Cross scope privileges page (System Applications > Application Cross-Scope Access).
Make sure you are in the "ScienceLogic ServiceNow Application" scope and track these updates in an update set.
-
Click the button to create a new record on the Cross scope privileges page:

- Verify that the Source Scope and Application fields are set to ScienceLogic ServiceNow Integration. If they are not, repeats steps 2-3.
- Complete the following fields:


- Target Scope. Specify the scope of the target table, such as Global. Be sure to verify the application to which the table belongs, and use that value as the target scope in this field.
- Operation. Select Read.
- Target Name. Specify the name of the target table.
- Status. Select Allowed.
- Target Type. Select Table.
- Click the button.
For more information, see the Cross-scope privilege record topic in the ServiceNow documentation.
Installing the "ScienceLogic SL1: CMDB & Incident Automation" Application in ServiceNow
You must install the "ScienceLogic SL1: CMDB & Incident Automation" application on the ServiceNow instance to enable this Synchronization PowerPack. The "ScienceLogic SL1: CMDB & Incident Automation" application is also known as the "Certified" or "Scoped" application.
You must have a ServiceNow HI Service Account to request this application and download it onto your ServiceNow instance.
You must first request the "ScienceLogic SL1: CMDB & Incident Automation" application from the ServiceNow Store, and then you can install it.
To request and install the Certified Application:
- Go to the ServiceNow Store at https://store.servicenow.com and search for "ScienceLogic SL1".
- Select the "ScienceLogic SL1: CMDB & Incident Automation" application. The detail page for the application appears.
- Click the button and log in with your HI credentials.
- After the request is approved, log in to ServiceNow as an administrator and navigate to Application Manager (System Applications > Applications or My Company Applications).
- Click in the menu header or search for "ScienceLogic".
- Click the version drop-down for the "ScienceLogic SL1: CMDB & Incident Automation" application listing to make sure you are using the correct version of the application that is compatible with your version of this Synchronization PowerPack.
- Click the button for the application. The installation is complete when the button changes to .
-
In the filter navigator, search for "ScienceLogic" and locate the application in the left-hand navigation menu to verify that the application was installed.
You might need to log out of ServiceNow and log in again to see the updated left-hand navigation menu.
Creating a ServiceNow Group
For best practice and security, create a dedicated ServiceNow account that has restricted access to only the groups, access control lists (ACLs), and roles needed for ScienceLogic incident management.
To create a ServiceNow Account for ScienceLogic Incident management:
- In ServiceNow, search in the filter navigator for "groups".
- On the Groups page (System Security > Groups), click . A New record page appears.
-
In the New record page, type the group name and any additional information. Name is the only required field:


-
Right-click the gray header and click Save to save the record.


-
At the bottom of the Group form, select the tab and click


-
Search for x_sclo_scilogic.Admin and move it to the Roles List column using the arrow buttons:


-
Click . Your ServiceNow Group now has an assigned Role:


- Next, create a ServiceNow user to use with this Group. See the following procedure for the details.
Creating a ServiceNow User
NOTE: The ServiceNow user you create in this procedure will not be able to log into the ServiceNow user interface with the username and password you give this user. However, you will use the username and password in the relevant configuration objects in the PowerFlow user interface to run applications. For more information about configuration objects, see Creating and Aligning a Configuration Object.
To create a ServiceNow Account for ScienceLogic Incident management:
- In ServiceNow, search in the filter navigator for "users".
- On the Users page (System Security > Users), click . A New record page appears.
- Complete the following fields:
- User ID. Type a user ID. Required.
- First Name. Type the user's first name.
- Last Name. Type the user's last name.
- Password. Type a password. Required.
- Active. Select this checkbox. Required.
- Web Service Access Only. Select this checkbox. Required.
- Time Zone. Select GMT. Required.
- Date Format. Select System (yyyy-MM-dd).
- Right-click the gray header and click Save to save the user.
-
Select the tab at the bottom of the record and click the button:


-
Find the group you created previously and move the group to the right-hand column using the arrow buttons:


-
Click . After the user has been added to the group, you can see their Roles and Groups at bottom of the record:


NOTE: As a best practice, you should use a non-administrator ServiceNow user for the PowerFlow configuration object.
Installing and Activating ServiceNow Plugins
This Synchronization PowerPack requires the "ServiceNow Configuration Management for Scoped Apps (CMDB)" plugin (com.snc.cmdb.scoped), which gives the ScienceLogic scoped application access to the Identification Engine APIs. You will need to install this plugin on your ServiceNow instance.
In addition, ScienceLogic strongly recommends that you install the "CMDB CI Class Models " plugin (sn_cmdb_ci_class). This plugin contains all new class models provided by ServiceNow.
To install and activate plugins in ServiceNow, you must have ServiceNow Instance administrator rights.
To install one or both of the plugins in ServiceNow:
- In ServiceNow, log in and navigate to Plugins (System Definition > Plugins). This page is only available with administrative rights.
-
Search for a plugin by its name or its ID (such as sn_cmdb_ci_class) and select the plugin. The options to Install or Update appear, depending on the status of the plugin:
- Install. Installs the plugin in ServiceNow if it has not been installed before. After you install the plugin, the button is grayed out and the text changed to Installed.
- Update. Shows that newer versions of the plugin are available.
-
Click Install or Update to complete the installation.
Enabling the ServiceNow Identification and Reconciliation Module
This Synchronization PowerPack uses the "ServiceNow Identification and Reconciliation" module to create and de-duplicate CI records. PowerFlow builds a JSON-formatted string that is sent to the "ServiceNow Identification and Reconciliation" module. The following link provides additional detail about the formatting of the JSON-formatted string: IdentificationEngineScriptableApi.
Version 3.5.0 and later of this Synchronization PowerPack uses enhanced versions of the IdentificationEngine API: createOrUpdateCIEnhanced and identifyCIEnhanced.
The JSON-formatted string is sent directly to a custom-scripted API endpoint and run through the IdentificationEngineScriptable API. Identification (Insert or Update) of Configuration Items (CIs) is handled by the ServiceNow Identification and Reconciliation module.
For more information about how SL1 and ServiceNow work with the ServiceNow Identification and Reconciliation module to discover and module other applications, such as VMware, see Mappings between SL1, ServiceNow, and Other Applications.
For more information about the "ServiceNow Identification and Reconciliation" module, see CMDB Identify and Reconcile. See also Reconciliation Rules, CMDB Identification Rules, and Identification engine error messages.
As a best practice, do not use information for identification that is specific to only ScienceLogic. An example is the device ID (DID) | SL1 ID, which is a number that SL1 automatically assigns and is only unique to that specific SL1 system.
Configuring Service Rules for Device Sync
The ServiceNow CMDB Synchronization PowerPack utilizes class hierarchies to build relationships in ServiceNow. This requires building service rules (containment rules and hosting rules) in ServiceNow to correctly identify dependent CIs during the business discovery process and service mapping. Containment rules describe which CIs are contained by a given CI. Hosting rules describe the environment on which a CI runs.
ScienceLogic recommends packaging all of the service rules into a ServiceNow update set so that you can be easily package and deploy these changes across environments. For more information, see Creating a ServiceNow Update Set.
These rules or "mappings" are defined in the "Sync Devices from SL1 to ServiceNow" application in the PowerFlow user interface. These mappings connect an SL1 device class to a ServiceNow CI class, which determines the CI class that ServiceNow uses when creating the CI in ServiceNow.
For more information about the "ServiceNow Identification and Reconciliation" module, see CMDB dependent relationship rules and CMDB Identification Rules at the ServiceNow website.
For example, if you experience error messages about missing relationships in ServiceNow when you run the "Sync Devices from SL1 to ServiceNow" application in the PowerFlow user interface, you might be missing certain containment rules or mappings that are needed to complete the export process:

Containment Rules
Containment rules are chained to each other in a group, with a CI type that is the top-level (root) parent of the group.
To create containment rules:
-
In ServiceNow, type "cmdb_metadata_containment.list" in the filter navigator to access the CMDB Metadata Containment Rules page:

-
Click . A new CMDB Metadata Containment Rules record appears:

- Complete the following fields:


- Configuration item class. Specify the child CI class.
- Parent. Specify the parent CI class.
- Relation type. Specify the relationship type. The common relationship types used by the ServiceNow integration are "contained" or "contained by", depending on your CMDB. Click the magnifying glass icon to select the correct value.
- Click .
-
In the PowerFlow user interface, go to the Applications page and manually run the "Cache ServiceNow CIs and SL1 Device Classes" application.
-
Run the "Sync Devices from SL1 to ServiceNow" application and make sure that no errors exist due to missing CI relationships.
Hosting Rules
Hosting rules can only be one level, and they always involve resources such as physical or virtual hardware.
- In the ServiceNow filter navigator, type "cmdb_metadata_hosting.list" to view the CMDB Metadata Hosting Rules page.
-
Click . A new CMDB Metadata Hosting Rules record appears:


- In the New Metadata Hosting Rules record, complete the following fields:
- Child type. Specify the child CI class.
- Parent type. Specify the parent CI class.
- Relation type. Specify the relationship type. The common relationship types used by the ServiceNow integration are "Hosts" or "Hosted on", depending on your CMDB. Click the magnifying glass icon to select the correct value.
- Click .
- Add any additional containment and hosting rules that are needed to build the CI relationships in ServiceNow.
- In the PowerFlow user interface, go to the Applications page and manually run the "Cache ServiceNow CIs and SL1 Device Classes" application.
- Run the "Sync Devices from SL1 to ServiceNow" application and make sure that no errors exist due to missing CI relationships.
Creating a ServiceNow Update Set
ScienceLogic recommends packaging the service rules into a standalone ServiceNow update set that you can export if needed. An update set is an XML file containing a group of customizations that can be moved from one ServiceNow instance to another. This update set should include any changes or configurations to the service rules for the ServiceNow Identification and Reconciliation Module.
To create a standalone update set in ServiceNow:
-
In ServiceNow, enable the Developer Update set picker by clicking the Settings icon (
) and selecting the Developer tab. -
Select the Show update set picker in header toggle to enable it, and then close the System Settings page.
-
In the filter navigator, search for local update sets.
-
Under System Update Sets, select Local Update Sets and click . A new Update Set record appears:


- Complete the following fields:
- Name. Specify a name that describes the rules of this update set.
- Application. Set the application scope to Global.
- State. Set to In Progress.
- Complete the remaining fields as needed.
- Click or . If you selected , go to step 8.
- If you clicked , you can select the update set in the picker in the header or navigate to the update set and select Make This My Current Set in the Related links section. You are now ready to make changes in your ServiceNow Instances.
- When you are done with all updates in the update set, change the update set State field to Complete.
Adding Service Rules to an Update Set
If you submitted your new update set and made it "Current" in Creating a ServiceNow Update Set, skip this step and go to Exporting an Update Set.
If you did not make your update set current, you will need to identify your current update set and move all of the service rules you need into your update set. You can find this information in a drop-down located in the ServiceNow navigation bar:

All of the service rules that you defined are tracked in the update set record under the tab.
To add all created service rules to your update set:
-
In the ServiceNow filter navigator, type "local update sets" to view a list of update sets on the ServiceNow instance.
-
Identify your current update set, which should have all of the created service rules tracked.
-
Identify the self-created update set that you want to contain all the service rules. This is the update set that you want to export.
-
Select the current update set that has all of the already-created service rules.
-
On the tab, identify all of the records with a Type of either CMDB Metadata Containment Rules or CMDB Metadata Hosting Rules:


-
Select each of the relevant service rule records and set the Update set field to match the update set you want to export. Click the magnifying glass icon to select the correct value:


- Click .
- Repeat steps 6-7 until all relevant containment and hosting rules are in the new update set, and then go to Exporting an Update Set.
Exporting an Update Set
After you have created your update set and defined the service rules, mark your update set as Complete and export it to an XML file.
To export an update set:
-
In the ServiceNow filter navigator, type "Local Update Sets" to view a list of update sets in ServiceNow:


-
Select your update set from the list.
-
Set the State to Complete and click [Update].
-
From the Update Sets page, select your completed update set from the list.
-
Under the Related Links section, click Export to XML:


- Save the downloaded XML file.
Configuring Customer CI Relation Overrides
When you are mapping Device Classes and attributes, you might find that SL1 creates relationship mappings very differently than the way that ServiceNow creates relationships. As a result, ScienceLogic strongly recommends that you use the customer_ci_relation_overrides field instead of using ServiceNow to set up those relationships.
In the "Sync Devices from SL1 to ServiceNow" PowerFlow application, you can use the customer_ci_relation_overrides field to override the existing relationship linking and directly control the link between Device Classes and attributes. The customer_ci_relation_overrides field lets you build dynamic relationships rather than statically setting up relationships within ServiceNow.
ScienceLogic does not support using ServiceNow to control and set up your device relationships.
In addition, ScienceLogic strongly recommends that you use the default relationship overrides for VMware, which you can view by clicking from the Configuration pane for the "Sync Devices from SL1 to ServiceNow" PowerFlow application.
This mapping process is intended for advanced users that are familiar with how SL1 and ServiceNow construct device relationships.
In the following example, the relationship structure in SL1 is linear :
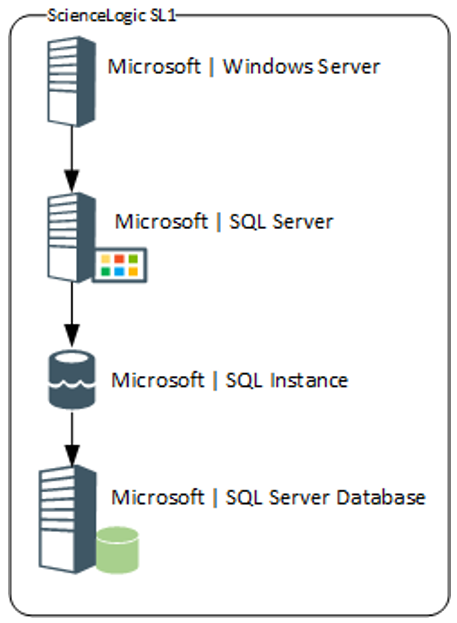
In ServiceNow, however, the structure is not as linear, and it requires an override (a manual link) between classes to make the relationship link required:

The following image shows the JSON structure formatting that is required for the customer_ci_relation_overrides field:

The values in the customer_ci_relation_overrides field supersede any of the values configured in the mappings section in the Configuration pane for the "Sync Device Classes from SL1 to ServiceNow" PowerFlow application.
You must ensure that all classes in the relationship chain in SL1 are mapped to classes in ServiceNow, or else the chain will break, and PowerFlow will not correctly apply the overrides.
In the customer_ci_relation_overrides field, you can string together multiple relationships as in the following example:
{
   "cmdb_ci_db_mssql_instance": {
       "relations": [
           {
               "parent": "cmdb_ci_win_server",
               "rel_type": "Runs on::Runs",
               "reverse": true
           }
       ],
       "values": {"sys_class_name": "snow_ci_class", "instance_name": "name"}
   },
   "cmdb_ci_db_mssql_database": {
       "relations": [
           {
               "parent": "cmdb_ci_db_mssql_instance",
               "rel_type": "Contains::Contained by",
               "reverse": false
           }
       ],
       "values": {"sys_class_name": "snow_ci_class", "database": "name"}
   },
   "cmdb_ci_db_mssql_server": {
       "relations": [
           {
               "parent": "cmdb_ci_win_server",
               "rel_type": "Runs on::Runs",
               "reverse": true
           }
       ],
       "values": {"sys_class_name": "snow_ci_class", "instance_name": "name"}
   }
}
Installing the ScienceLogic Domain Separation (Global) Update Set in ServiceNow
If your ServiceNow environment is domain-separated, where the data, processes, and administrative tasks have been organized into logical groupings called domains, you will need to install the latest version of the "ScienceLogic Domain Separation (Global)" update set in ServiceNow. This update set is not included in the "ScienceLogic SL1: CMDB & Incident Automation" application (also called the Certified application).
If your ServiceNow instance is domain-separated, installing the latest "ScienceLogic Domain Separation (Global)" update set in ServiceNow is required for version 3.5.0 of this Synchronization PowerPack.
You can download the latest version of the update set from the additional_materials.zip file included in the main .zip file for the Synchronization PowerPack, which you can find on the ServiceNow CMDB Synchronization PowerPack page on the ScienceLogic Support Site at https://support.sciencelogic.com/s/powerpacks.
If your ServiceNow environment does not use domain separation, you can skip this topic.
For more information about ServiceNow domain separation, see Using ServiceNow Domain Separation with PowerFlow.
Overview of the Update Set
The "ScienceLogic Domain Separation (Global)" update set contains the following items:
- Scripted REST API
- Scripted REST Resource
- Scripted REST Query Parameter
- Scripted REST Query Parameter Association
- Script Include
This update set completely separates the ServiceNow Identification Engine REST resource that is used in the "ScienceLogic ServiceNow Integration" application and all of the required resources and duplicates it in the Global scope.
A Scripted REST Service in the Global application is a direct copy of the application endpoint with a new name: api/10693/sciencelogic_domain_separation. This REST Service includes only one Resource: Device IdentificationEngine POST. This resource works exactly like the application version, but it points to the new Script Include "SciLoDomainSepUtil". This version of the REST resource takes the same formatted JSON as the Certified application.
The Script Include "SciLoDomainSepUtil" includes all of the functionality needed to run the ServiceNow Identification Engine API.
Additional resources for the ServiceNow API:
- CMDB Identification and Reconciliation
- identifyCI(String jsonString)
- createOrUpdateCI(String source, String input)
- Identification engine error messages
The only resource shared with this update set and the Certified application is the Device Properties page. These properties are located in the Certified application at ScienceLogic > Device > Device Properties.
Limitations of the Identification Engine
For more information about how the Identification Engine handles incoming payloads in domain-separated systems, see the following ServiceNow Knowledge Base article: KB0695949.
The payload and the user domain must match, or the ServiceNow Identification Engine (IDE) will by default insert the CMDB record. Safeguards within the PowerFlow Device Sync application were put in place for payloads that have relationships. The application will drop the payload if all Configuration Items do not share the same domain.
Installing the Update Set
To install the "ScienceLogic Domain Separation (Global)" update set:
-
Retrieve the latest version of the update set from the additional_materials.zip file included in the main .zip file for the Synchronization PowerPack, which you can find on the ServiceNow CMDB Synchronization PowerPack page on the ScienceLogic Support Site at https://support.sciencelogic.com/s/powerpacks..
- In ServiceNow, navigate to the Retrieved Update Sets page (System Update Sets > Retrieved Update Sets).
-
Click the Import Update Set from XML link under Related Links.
-
Click and navigate to the update set XML file you downloaded. Select the XML file and click .

- After the file is uploaded, the Retrieved Update Sets page appears. Click the link for the "ScienceLogic Domain Separation (Global)" update set. The Retrieved Update Set page appears.
- Click . After the preview set runs, a status page appears.
-
Ensure that "Success" appears in the Completion code field.
If "Success" does not appear in the Completion code field, contact ScienceLogic Support to assist with reviewing any conflicts that might exist. Do not proceed until those conflicts are resolved and "Success" appears in the Completion code field.
- Click to commit the fix script after running the preview set.
- Before you start to sync devices, you must select the Domain Separation option on the Configuration pane in the "Sync Devices from SL1 to ServiceNow" application. This option ensures that PowerFlow gets re-pointed to the API endpoint after you install the "ScienceLogic Domain Separation (Global)" update set. For more information, see Running a Device Sync.

Configuring Domain Separation without Using the Update Set
You can sync to a domain-separated ServiceNow CMDB without installing "ScienceLogic Domain Separation (Global)" update set, but you will need to manage multiple configuration objects and schedules in PowerFlow. You will need to create multiple schedules, and each schedule will reference a unique configuration object that is specific to a specific domain in ServiceNow.
Creating the Configuration Objects for the ServiceNow Domains
To create a configuration object for each ServiceNow domain:
-
In the PowerFlow user interface, go to the Configurations page and click :

-
Click to open the JSON viewer.
-
In the Configuration Data section, make sure that this object is configured with a ServiceNow domain-specific user. For example:
{ "encrypted": false, "name": "snow_user", "value": "domainA_user" }, { "encrypted": false, "name": "snow_password", "value": "domainA_password" }, -
Update the include_orgs value with a list of organizations that map to the domain to which you are syncing.
{ "encrypted": false, "name": "include_orgs", "value": [1,2,3] }, -
Define the class mapping for the configuration object. For example:
{ "encrypted": false, "name": "mapping", "value": { "cmdb_ci_computer": [ "IBM | IBM OS/400 V5R1M0", "IBM | Main Frame", "IBM | AIX RS/6000" ], "cmdb_ci_esx_resource_pool": [ "VMware | Resource Pool" ] } }, -
The region value should be unique to SL1 stack that is being synced. For example:
{ "encrypted": false, "name": "region", "value": "StackA" } - Repeat steps 1-6 for each ServiceNow domain you want to use.

Example JSON Code for a Configuration Object
The following JSON code is for an example configuration object:
[
  {
    "encrypted": false,
    "name": "sl1_host",
    "value": "SL1_StackA"
  },
  {
    "encrypted": false,
    "name": "sl1_db_host",
    "value": "${config.sl1_host}"
  },
  {
    "encrypted": false,
    "name": "sl1_password",
    "value": "password"
  },
  {
    "encrypted": false,
    "name": "sl1_user",
    "value": "StackA_user"
  },
  {
    "encrypted": false,
    "name": "sl1_db_user",
    "value": "root"
  },
  {
    "encrypted": false,
    "name": "sl1_db_password",
    "value": "StackA_password"
  },
  {
    "encrypted": false,
    "name": "snow_host",
    "value": "example.service-now.com"
  },
  {
    "encrypted": false,
    "name": "snow_user",
    "value": "domainA_user"
  },
  {
    "encrypted": false,
    "name": "snow_password",
    "value": "domainA_password"
  },
  {
    "encrypted": false,
    "name": "include_orgs",
    "value": [1,2,3]
  },
  {
    "encrypted": false,
    "name": "mapping",
    "value": {
              "cmdb_ci_computer": [
                "IBM | IBM OS/400 V5R1M0",
                "IBM | Main Frame",
                "IBM | AIX RS/6000"
              ],
              "cmdb_ci_esx_resource_pool": [
                "VMware | Resource Pool"
              ]
            }
  },
  {
    "encrypted": false,
    "name": "region",
    "value": "StackA"
  }

]
Aligning a Schedule with a ServiceNow Domain
After you have created the configuration objects, you can define multiple schedules, one schedule for each domain. When scheduling the application, you will need to create multiple schedules, where each schedule uses a domain-specific configuration object.
When specifying a configuration object to use in the custom parameters, use the ID of the configuration object.
The following image shows how you can create a schedule that uses a specific configuration object using the Custom Parameters field in the PowerFlow Scheduler:

The following image shows how you could schedule Device Syncs for multiple ServiceNow domains:

Using ServiceNow Domain Separation with PowerFlow
The following topics provide more information about ServiceNow domain separation and how it relates to PowerFlow. For more information, see Domain separation in the ServiceNow Documentation.
When either multiple SL1 stacks or multiple ServiceNow systems are involved with PowerFlow, you should create an individual configuration object for each SL1 stack or ServiceNow system. Next, create an individual schedule for each configuration object. Each schedule should use a configuration object that is specific to that single SL1 stack or ServiceNow system. Creating copies of a PowerFlow application from a Synchronization PowerPack for the purpose of distinguishing between domains is not supported, and will result in issues on upgrades.
User Setup
Company and domain setup is critical for the domain separation integration to work using the Identification Engine provided by ServiceNow. This solution requires only one user and will require proper setup depending on where the user is located within the domain tree.
Example 1
In the following example, ScienceLogic (1) is both the domain and the company. The ScienceLogic user service account is associated with ScienceLogic (2) company, and it will have access to all child domains. You do not need to set visibility to any domain. This is the best way to set up this user, because placing it in the top domain ensures that it always has access to all children:

Example 2
In the following example, Delos Inc. (1) is the company within the Delos Inc. domain. The PowerFlow service account is associated with the Delos Inc. (1) company. The Delos Inc. domain has no children domains, and if domain visibility is not assigned, PowerFlow will not properly update the CMDB. This setup works, but it requires that proper domain visibility is set up for the service account to work correctly.

Assigning visibility to MSP (3) will grant the service account access to all child domains. Assigning visibility to Weyland Corporation (4) will only allow access to the Delos Inc. domain and the Weyland domain; all other domains will not work.
Workflow
The API endpoint is based on the API query parameter “test” being true or not, which determines which Identification Engine API resource should be used. There are two primary avenues supplied with this REST resource: "createOrUpdateCI" or "identifyCI", and the only difference is that "identifyCI" does not commit the results:

The "getCreateOrUpdateCI" function uses the following workflow:
- Retrieves the current session Domain ID (sys_id).
- Sets the user Domain ID by creating an array of domain sys_id values and returning only the unique domains, or setting the domain if the array has only one unique domain.
- Submits the JSON formatted string to "createOrUpdateCI()" or "identifyCI()" API.
- Sets the user's Domain ID back to the original session ID.
The following image shows this workflow:
