The Administer Dashboards page allows you to manage dashboards that appear in the
This
A dashboard is a page that displays graphical reports. Each report is displayed in its own pane. To define a graphical report, you select from a list of pre-defined widgets and then customize the selected widgets by supplying values in the configuration fields. The customized widget then generates a graph, chart, table, or other information in a pane in the dashboard.
Use the following menu options to navigate the SL1 user interface:
- To view a pop-out list of menu options, click the menu icon (
 ).
). - To view a page containing all of the menu options, click the Advanced menu icon (
 ).
).
Viewing the List of Classic Dashboards
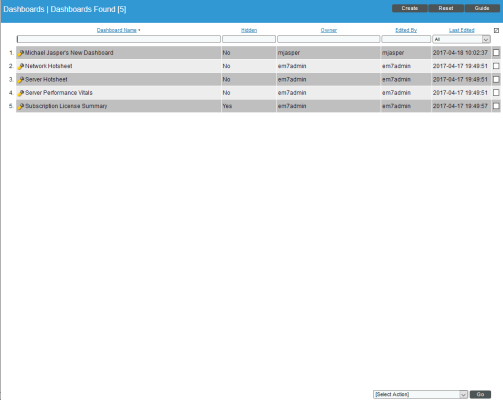
The Administer Dashboards page (System > Customize > Classic Dashboards) displays a list of existing dashboards. These dashboards include predefined dashboards (which are installed with SL1 or can be installed with a ScienceLogic PowerPack) and any user-defined dashboards.
For each dashboard, the Administer Dashboards page displays:
TIP: To sort the list of dashboards, click a column heading. The list will be sorted by the column value, in ascending order. To sort by descending order, click the column heading again. The Last Edited column sorts by descending order on the first click; to sort by ascending order, click the column heading again.
- Dashboard Name. Name of the dashboard.
- Hidden. Specifies whether or not the dashboard appears in the Select Dashboard field in the Dashboards tab page (in the tab).
- Owner. Specifies the owner of the dashboard. Usually, the creator of a dashboard is the owner. The owner of a dashboard defines which users of type User can view the dashboard. Shared dashboards can be viewed by other users who belong to the same organization as the owner. Private dashboards can be viewed only by the owner of the dashboard and other users of type Administrator.
- Edited By. User who created or last edited the dashboard.
- Last Edited. Date and time the dashboard was created or last edited.
NOTE: By default, the cursor is placed in the first Filter-While-You-Type field. You can use the <Tab> key or your mouse to move your cursor through the fields.
Creating a Classic Dashboard
To create a dashboard from the current page:
-
Go to the Administer Dashboards page (System > Customize > Classic Dashboards).
-
In the Administer Dashboards page, click the button. An empty Dashboard Editor page appears.
- Click the button and select Configure Dashboard. The Dashboard Settings page appears, where you can define the parameters for a dashboard. For information about the fields in the Dashboard Settings page, see the Creating and Editing Dashboards section.
Editing an Existing Classic Dashboard
To edit an existing dashboard:
- Go to the Administer Dashboards page (System > Customize > Classic Dashboards).
- In the Administer Dashboards page, find the dashboard you want to edit and click its wrench icon (
 ).
). - The Dashboard Editor page appears. You can view but not edit the dashboard layout from this page.
- Click the button and select Configure Dashboard.
- The Dashboard Settings page appears, where you can edit one or more parameters for a dashboard.
Scheduling a Classic Dashboard
SL1 allows you to export and email dashboards to users using the Schedule Dashboard option in the menu. SL1 will automatically export and email the dashboard to specified users at the specified date, time, and interval.
To schedule the export and email for a dashboard:
- Go to the Administer Dashboards page (System > Customize > Classic Dashboards).
- In the Administer Dashboards page, find the dashboard you want to edit. Click is wrench icon (
 ).
). - The Dashboard Editor page appears. You can view but not edit the dashboard layout from this page.
- Click the button. Select Schedule Dashboard.
- The Dashboard Delivery Schedule page appears, where you can specify that SL1 exports and emails the dashboard to specified users at the specified date, time, and interval. For information on scheduling a dashboard in the Dashboard Delivery Schedule page, see the Scheduling a Dashboard section.
Deleting One or More Classic Dashboards
To delete one or more dashboards:
- Go to the Administer Dashboards page (System > Customize > Classic Dashboards).
- In the Administer Dashboards page, find the dashboard you want to delete. Select its checkbox.
- Select the checkbox for each dashboard you want to delete.
- In the Select Action drop-down list, select Delete Dashboards.
- Click the button.
- The selected dashboard(s) will no longer appear in this page or in the Administer Dashboards page on the page.
NOTE: When you delete a dashboard from the Administer Dashboards page, any Dashboard that included the deleted dashboard will display an error message.
Hiding One or More Classic Dashboards
Some dashboards are nested within other dashboards and don't provide much useful information on their own. In these cases, you might want to prevent users from viewing the dashboard on its own. You can specify that you do not want one or more dashboards to appear in the Select Dashboard field in the Dashboards page.
- Go to the Administer Dashboards page (System > Customize > Classic Dashboards).
- In the Administer Dashboards page, find the dashboard that you do not want to appear in the Select Dashboard field in the Dashboards tab page (in the tab). Select its checkbox.
- Select the checkbox for each dashboard you want to hide.
- In the Select Action drop-down field, select Hide Dashboards.
- Click the button.
- The selected dashboard(s) will no longer appear in the Select Dashboard field on the Dashboards page.
Showing One or More Classic Dashboards
You can specify that you want one or more dashboards to appear in the Select Dashboard field on the Dashboards page.
- Go to the Administer Dashboards page (System > Customize > Classic Dashboards).
- In the Administer Dashboards page, find the dashboard that you want to appear in the Select Dashboard field on the Dashboards page. Select its checkbox.
- Select the checkbox for each dashboard you want to show.
- In the Select Action drop-down field, select Show Dashboards.
- Click the button.
- The selected dashboard(s) will appear in the Select Dashboard field in the Dashboards page.
Taking Ownership of One or More Classic Dashboards
Usually, the creator of a dashboard is the owner. The owner of a dashboard defines which users of type "User" can view the dashboard. Shared dashboards can be viewed by other users who belong to the same organization as the owner. Private dashboards can be viewed only by the owner of the dashboard and other users of type "Administrator".
- Go to the Administer Dashboards page (System > Customize > Classic Dashboards).
- In the Administer Dashboards page, find the dashboard for which you want to become the owner. Select its checkbox.
- Select the checkbox for each dashboard you want to own.
- In the Select Action drop-down field, select Take Ownership.
- Click the button. Your username will appear as the owner of the selected dashboard(s).
Creating a Widget Template for the Quick Add Menu
The button provides a set of pre-configured widgets that will work with the devices and policies on your SL1 system.
Users can create their own pre-configured widgets as templates that will appear in the menu for future use.
To create a widget template:
-
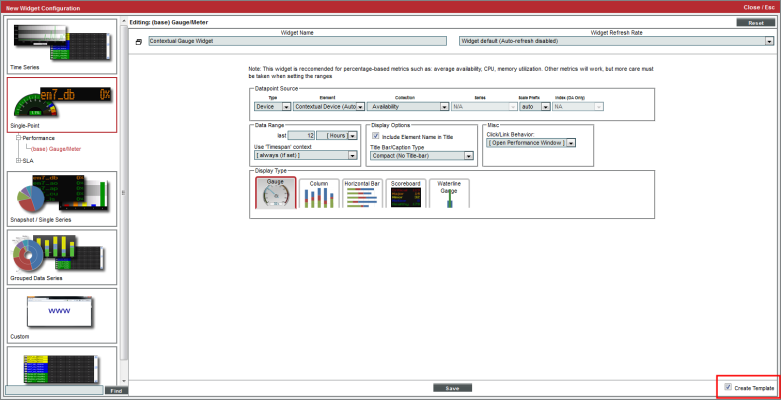
Configure your widget as desired, and select the Create Template checkbox at the bottom right of the configuration window:
-
Click the button and enter a name for the new template in the window that pops up, and click . The widget will appear in the dashboard.
-
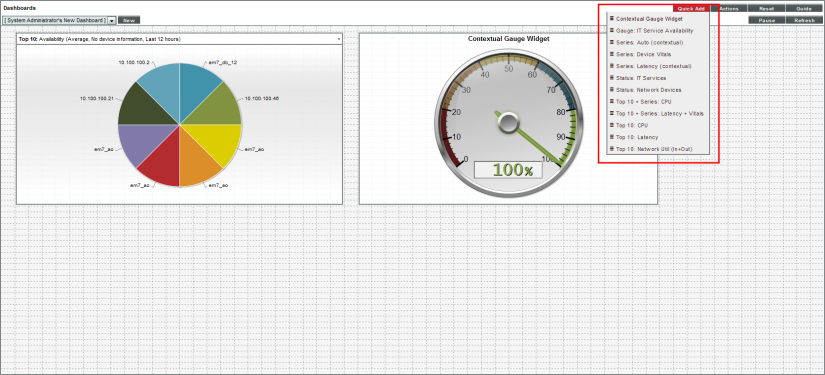
Click the button, and the widget template should now appear in the menu:
Deleting Widget Templates
You can remove widget templates in the Quick Add Widget Template Manager page. To delete a widget template:
- Go to the Quick Add Widget Template Manager page (System > Customize > Widget Templates).
- Find the widget template you want to delete, and click its bomb icon (
 ).
). - The widget template should no longer be listed in the menu.


