This
The information in this
Use the following menu options to navigate the SL1 user interface:
- To view a pop-out list of menu options, click the menu icon (
 ).
). - To view a page containing all of the menu options, click the Advanced menu icon (
 ).
).
Custom Navigation in the Classic User Interface
In the Device Administration panel you can access the modal page.
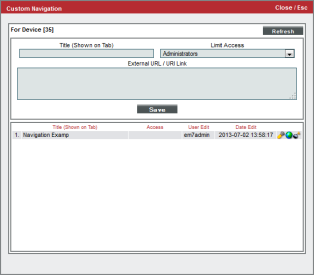
The modal page allows users to define custom tabs to include in the Device Administration panel for a specific device. Each custom tab includes one or more links. The links can be to internal pages in SL1 or external URLs and URIs.
To define a custom tab for a device:
- Go to the Device Manager page (Devices > Device Manager).
- In the Device Manager page, find the device for which you want to create a custom tab. Select its wrench icon (
 ).
).
- In any page in the Device Administration panel, select the menu and choose Custom Navigation. The modal page appears.
- To create a custom tab in the Device Administration panel for the device, enter values in the following fields:
- Title (Shown on Tab). Enter a name for the tab. This name will appear on a new tab in the Device Administration tools for this device.
- Limit Access. Users who will be allowed to access the custom tab, based on the type of user account. The choices are:
- Administrators. Only users with account type "Administrator" are allowed to access this tab.
- Users. Both users with account type "User" and users with account type "Administrator" are allowed to access this tab.
- External URL / URI Link. The URL of the page that is displayed when a user selects the tab. The page can be an internal page in SL1 or an external web page. This field can contain any combination of alphanumeric characters, with a maximum length of 128 characters. Forward slash ( / ), underscore ( _ ), and question mark ( ? ) are allowed.
Editing a Custom Navigation tab
After you have defined one or more custom tabs in the Device Administration panel, each tab appears as an entry in the Register pane in the bottom of the modal page.
To edit a custom tab:
- Go to the Device Manager page (Registry > Devices > Device Manager).
- In the Device Manager page, find the device for which you want to edit a custom tab. Select its wrench icon (
 ).
). - In any page in the Device Administration panel, select the menu and choose . The modal page appears:
- Go to the Register pane. Find the custom tab you want to edit. Select its wrench icon (
 ).
). - The fields in the top pane will be populated with values from the selected custom tab.
- You can edit the values in one or more fields. Select the button to save your changes to the custom tab.
- To delete the custom tab, go to the Register pane. Find the custom tab you want to edit. Select its bomb icon (
 ).
).
NOTE: for details on creating a custom Navigation Tab for all devices,


