This
Configuring the Google Cloud Platform
To configure the Google Cloud Platform to work with PowerFlow, you must do the following:
- Create a Project in Google Cloud. Give the project a name and location, and take note of the Project ID.
- Create a Service Account and Credentials. Give the service account a name and ID, and select Owner for the Role. In the newly-created service account, go to the Keys section and create a key with type JSON.
- Configure a Google Cloud Pubsub Topic and Subscription. In the Pubsub page, create a new topic with Add a default description selected.
- Enable the Cloud Tasks API. In the Cloud Tasks page, click the button.
- Create a Cloud Tasks Push Queue. In the Cloud Tasks page, click Create Push Queue. Give the queue a name, select a region from the drop-down menu, and then click .
- Enable the Error Reporting API. In the Error Reporting page, click Set Up Error Reporting to be directed to the Guides page. In the Guides page, in the Setup Guide section click Error Reporting REST API. In the Reference page, click .
Creating and Aligning a Configuration Object in PowerFlow
A configuration object supplies the login credentials and other required information needed to execute the steps for a PowerFlow application. The Configurations page () of the PowerFlow user interface lists all available configuration objects for that system.
You can create as many configuration objects as you need. A PowerFlow application can only use one configuration object at a time, but you can use (or "align") the same configuration object with multiple applications.
To use this SyncPack, you will need to use an existing configuration object in the PowerFlow user interface or create a new configuration object. Next, you need to align that configuration object to the relevant applications.
Creating a Configuration Object
For this SyncPack, you can make a copy of the "GCP Base Config" configuration object, which is the sample configuration file that was installed with the Google Cloud Platform SyncPack.
The "GCP Base Config" configuration object contains all of the required variables. Simply update the variables from that object to match your SL1 and Google Cloud Platform settings.
For more information about the Google Cloud Platform terms and concepts in this section, see the Google Cloud Platform documentation.
To create a configuration object based on the "GCP Base Config" configuration object:
- In the PowerFlow user interface, go to the Configurations page (
).
-
Click the button (
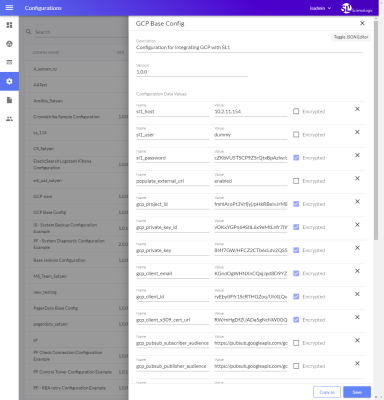
) for the "GCP Base Config" configuration object and select Edit. The Configuration pane appears:
-
Click . The Create Configuration pane appears.
-
Complete the following fields:
- Friendly Name. Type a name for the configuration object that will display on the Configurations page.
- Description. Type a brief description of the configuration object.
- Author. Type the user or organization that created the configuration object.
- Version. Type a version of the configuration object.
-
In the Configuration Data field, update the default variable definitions to match your PowerFlow configuration:
- sl1_host. Type the hostname or IP address of your SL1 system.
- sl1_user. Type the username for your SL1 system.
- sl1_password. Type the password for your SL1 system.
- populate_external_url. Type 'enabled' or 'disabled' to add a Google Cloud Platform URL to the corresponding SL1 event. The default value is 'enabled'.
- gcp_project_id. The unique ID associated with a Google Cloud Platform project. This value is filled in using the "project_id" parameter in the JSON credentials file.
- gcp_private_key_id. The unique key ID required for authenticating with Google Cloud. This value is filled in using the "private_key_id" parameter in the JSON credentials file.
- gcp_private_key. The unique key required for authenticating with Google Cloud. This value is filled in using the "private_key" parameter in the JSON credentials file.
- gcp_client_email. The generated email associated with the client in the Google Cloud Platform. This value is filled in using the "client_email" parameter in the JSON credentials file.
- gcp_client_id. The ID associated with the client in the Google Cloud Platform. This value is filled in using the "client_id" parameter in the JSON credential file.
- gcp_client_x509_cert_url. The client certificate URL associated with the client in the Google Cloud Platform. This value is filled in using the "client_x509_cert_url" parameter in the JSON credential file.
- gcp_pubsub_subscriber_audience. Type subscriber client URL for your Pub/Sub account.
- gcp_pubsub_publisher_audience. Type publisher client URL for your Pub/Sub account.
- gcp_pubsub_topic_id. Type the topic ID for Pub/Sub messages.
- gcp_pubsub_subscription_id. Type the subscription ID for your Pub/Sub account.
- gcp_pubsub_timeout. Type the number of seconds between retrying to communicate with Pub/Sub.
- gcp_pubsub_deadline. Type the number of seconds to retry Pub/Sub after execution. After the defined number of seconds, the SyncPack will stop attempting to communicate with Pub/Sub.
- gcp_pubsub_num_messages. Type the number of messages to pull from Pub/Sub.
- gcp_task_queue. Type the name of the queue for the Google Cloud Platform tasks.
- gcp_task_location. Type the default location for the Google Cloud Platform task.
- gcp_task_url. Type the URL for your Cloud Tasks account.
- gcp_task_seconds_from_now. Type the scheduled time in seconds to create a task in Google Cloud Platform.
- gcp_build_steps. Type the Google Cloud Platform build steps to execute when the build is successful in Cloud Build.
- add_template. Toggle the JSON editor to define the template to translate SL1 event information to a Google Cloud Platform task, error, or message.
- Click . You can now align this configuration object with one or more applications.
Aligning a Configuration Object and Configuring PowerFlow Applications
With this SyncPack, any status changes made to an SL1 event is sent to the Google Cloud Platform to update the corresponding task, error, or message. Any status changes to the Google Cloud Platform task or error are synchronized back to the corresponding SL1 event. You will need to align the Google Cloud Platform applications with the relevant configuration object in PowerFlow, and, if needed, update any other fields on the Configuration pane for the applications.
To align the configuration object with the relevant PowerFlow applications:
-
On the Applications page of the PowerFlow user interface, open one of the PowerFlow applications listed above and click (
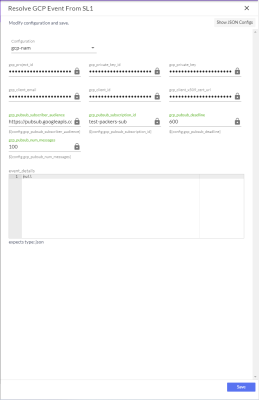
). The Configurations pane for that application appears:
-
From the Configurations drop-down, select the configuration object you want to use.
The values for sl1_hostname and the other parameters that appear in the Configuration pane with a padlock icon (
) are populated by the configuration object you aligned with the application. Do not modify these values. If you encounter an error, make sure your configuration object is configured properly.
- Click to align that configuration with the application.
- Repeat this process for the other PowerFlow applications.
Scheduling PowerFlow Applications
To trigger the applications in the SyncPack, you must schedule the applications included in the SyncPack.
You can create one or more schedules for a single application in the PowerFlow user interface. When creating each schedule, you can specify the queue and the configuration file for that application.
To schedule an application:
-
On the Applications page (
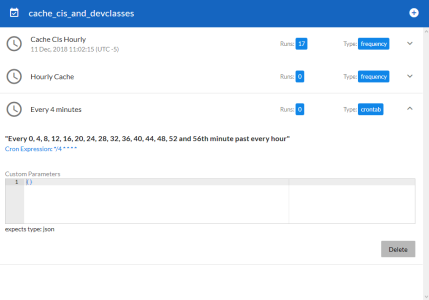
), click the button for the application you want to schedule. The Schedule window appears, displaying any existing schedules for that application:
If you set up a schedule using a cron expression, the details of that schedule display in a more readable format in this list. For example, if you set up a cron expression of */4 * * * *, the schedule on this window includes the cron expression along with an explanation of that expression: "Every 0, 4, 8, 12, 16, 20, 24, 28, 32, 36, 40, 44, 48, 52, and 56th minute past every hour".
- Select a schedule from the list to view the details for that schedule.
-
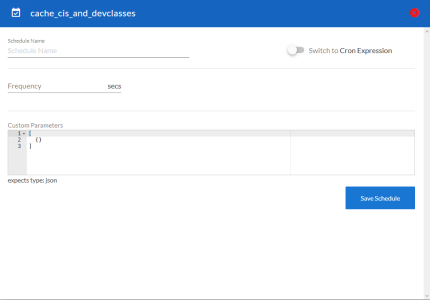
Click the + icon to create a schedule. A blank Schedule window appears:
- In the Schedule window, complete the following fields:
- Schedule Name. Type a name for the schedule.
- Switch to. Use this toggle to switch between a cron expression and setting the frequency in seconds.
- Cron expression. Select this option to schedule the application using a cron expression. If you select this option, you can create complicated schedules based on minutes, hours, the day of the month, the month, and the day of the week. As you update the cron expression, the Schedule window displays the results of the expression in more readable language, such as Expression: "Every 0 and 30th minute past every hour on the 1 and 31st of every month", based on */30 * * /30 * *.
- Frequency in seconds. Type the number of seconds per interval that you want to run the application.
- Custom Parameters. Type any JSON parameters you want to use for this schedule, such as information about a configuration file or mappings.
-
Click . The schedule is added to the list of schedules on the initial Schedule window. Also, on the Applications page, the word "Scheduled" appears in the Scheduled column for this application, and the button contains a check mark:

After you create a schedule, it continues to run until you delete it. Also, you cannot edit an existing schedule, but you can delete it and create a similar schedule if needed.
To view or delete an existing schedule:
- On the Applications page, click the button for the application that contains a schedule you want to delete. The Schedule window appears.
- To delete the selected schedule, click . The schedule is removed.
When either multiple SL1 instances or multiple Google Cloud Platform instances are involved with PowerFlow, you should create an individual configuration object for each SL1 or Google Cloud Platform instance. Next, create an individual schedule for each configuration object. Each schedule should use a configuration object that is specific to that single SL1 or Google Cloud instance. Creating copies of a PowerFlow application from a SyncPack for the purpose of distinguishing between domains is not supported, and will result in issues on upgrades.


