![]()
This
To explore and perform operations in the SL1 GraphQL API, you can use one of the following options, depending on which version of SL1 you are using:
- The GQL Browser page (System > Tools > GQL Browser) is a page built into SL1 versions 12.3.0 and later.
- GraphiQL is a browser-based user interface that is used in SL1 versions 12.2.x and earlier. To access the GraphiQL interface, type the URL or IP address for SL1 in a browser, add /gql to the end of the URL or IP address, and press .
GraphiQL is not maintained by ScienceLogic. You can access its documentation at https://github.com/graphql/graphiql.
Both of these methods use similar elements that enable you to interactively explore the capabilities of, and execute queries against, the SL1 GraphQL API. Unlike the SL1 REST API, all requests to the GraphQL API on a given SL1 system use the same URI.
GQL Browser and GraphiQL User Interface Elements
The GQL Browser page (System > Tools > GQL Browser) and GraphiQL user interface enable you to write and execute operations, define variables, view operation results, explore your schema, and more.
The following sections describe all of the elements you can interact with on these pages.
Query Pane
The query pane is where you write GraphQL queries and mutations. It includes several features to help you properly formulate your queries and mutations:
- As you type, the pane intuitively suggests potential fields, arguments, and syntax based on what you've already written and your defined schema.
- Additionally, the pane automatically validates your query or mutation as you type, highlighting any errors in syntax or other elements that would cause your query or mutation to fail.
- The pane highlights fields, arguments, syntax, and other important elements in the query pane to make the query or mutation easier to read.
- If you need to insert notes or comments in a query or mutation, add them on a line that starts with the # symbol above or below the query or mutation. The pane ignores any lines that start with # when executing an operation.
- As you edit a query or mutation, the browser automatically updates the URL that appears in the address bar to reflect what you have entered. It preserves every part of your entry in the URL, including whitespace, comments, and invalid syntax or elements. This feature enables you to share your query or mutation publicly or with colleagues for distribution or debugging purposes.
- You can use the following keyboard shortcuts in the query pane:
- Shift + Ctrl + P: Prettify the query or mutation
- Shift + Ctrl + M: Merge the query or mutation
- Shift + Ctrl + C: Copy the query or mutation
- Ctrl + Enter: Execute the query or mutation
- Ctrl + Space: Auto-complete the query or mutation
Variables Pane
You can use the Variables pane to define variables that you are using in your query or mutation. You should write variables in JSON format. This pane is at the bottom of the query pane and might be collapsed when you first access the page. You can click one of the following options to expand and use it, depending on which page you are using:
- On the GQL Browser page (System > Tools > GQL Browser), click Variables.
- In GraphiQL, click Query Variables.
For more information about using variables, see the section on Variables.
Headers Pane
You can use the Headers pane to define a request (or "run-as") header that allows you to run your query as another user when it is passed to the GraphQL API. This pane is at the bottom of the query pane and might be collapsed when you first access the page. To expand it on the GQL Browser page (System > Tools > GQL Browser), click Headers.
The Headers pane is not available in GraphiQL.
For more information about headers, see the section on Using Request Headers.
Results Pane
The right-hand pane is the results pane. This is where the results of the most recently executed query or mutation display in JSON format.
Alternatively, if your query or mutation is not properly formed, the results pane displays the errors that are causing the query or mutation to fail.
Fields, arguments, syntax, and other important elements are highlighted in the results pane to make the results easier to read.
The results that display in this pane are read-only, so you cannot accidentally edit or delete them.
Docs Pane
The Docs (or Documentation Explorer) pane enables you to search or browse through the GraphQL schema. This allows you to explore all of the possible queries, mutations, fields, types, arguments, and other schema elements that you can use. You can click one of the following options to expand and use it, depending on which page you are using:
- On the GQL Browser page (System > Tools > GQL Browser), click the Show Documentation Explorer icon (
 ) on the left side of the page.
 - In GraphiQL, click the button on the right side of the page.
For more information about using the Docs (or Documentation Explorer) pane to browse the GraphQL schema, see the section on The GraphQL Schema.
Additional Options
The GQL Browser page (System > Tools > GQL Browser) and GraphiQL user interface both include additional options that you can use when utilizing GQL.
- On the GQL Browser page, these options display as icons on either side of the query pane.
- In GraphiQL, these options display as toolbar buttons at the top of the browser.
A few of these options are unique to the GQL Browser page, but most of them are common to both pages:
- Click the execute query icon (
 ) to run the query or mutation in the main query pane.
- In GraphiQL, this appears as the execute query icon (
 ).
).
- In GraphiQL, this appears as the execute query icon (
- Click the prettify query icon (
 ) to re-format the text in the main query pane to make it easier to read. If your query or mutation is not properly formed, the prettify query icon turns pink when you click it and does not format the text. If there is only one unnamed query in the query pane, then clicking the prettify query icon also removes the query operation type from the query.
- In GraphiQL, this appears as the button.
- Click the merge fragments into query icon (
 ) to flatten a query that contains defined fragments.
 - In GraphiQL, this appears as the button.
- Click the copy query icon (
 ) to copy all of the text in the main query pane to your clipboard, which enables you to paste your query or mutation elsewhere.
- In GraphiQL, this appears as the button.
- Click the show history icon (
 ) to open a new pane on the left side of the page that contains a list of the previous queries you have run in the GQL browser. You can click a query to add it to the main query pane. You can also edit, favorite, or delete the query from your history, or clear your history altogether.
- In GraphiQL, this appears as the button.
- Click the show font size icon (
 ) to view and, if necessary, adjust the current font size for the browser. In the Font Size field, you can type a new numerical value or use the up and down arrows to adjust the font size.
 - Click the re-fetch GraphQL schema icon (
 ) to refresh the schema in the Docs pane with the latest changes.
 - Click the open short keys dialog icon (
 ) to open a dialog that lists the keyboard shortcuts that you can use in the browser.
 - Click the open settings dialog icon (
 ) to open a dialog where you can adjust the following GQL browser settings:
- Persist Headers. Toggle on if you want to save your headers upon reloading the browser, or toggle off if you do not. You should only toggle this setting on if you trust the device you are working on.
- Clear Storage. Click to remove all data that is locally stored on your GQL browser.
The GraphQL Schema
A common refrain you might hear when people discuss GraphQL is that it is "self-documenting". This is because of two key features in GraphQL:
- GraphQL's intuitive suggestions and validation capabilities as you type your query or mutation in the query pane
- The GraphQL schema, which explicitly defines all of the possible queries, mutations, fields, types, arguments, and other schema elements that you can use
In all, the GraphQL schema provides the following information:
- All of the possible queries you can make
- All of the possible mutations you can perform
- All of the types that you can query or mutate
- All of the fields within a given type
- All of the potential arguments for a given field
- The accepted value types for each argument
- The relationships between types
You can access the full schema in the Docs (or Documentation Explorer) pane. This pane is always synced with GraphQL, automatically adding new fields, types, and arguments as they are added to the schema. It also automatically removes deprecated fields from the schema.
In this pane, you can search for specific elements within the schema, or you can click one of the two root types—query or mutation—and drill down from there by clicking the fields, arguments, and types that display.
Exploring the GraphQL Schema in the Docs Pane
To get the most value out of the Docs pane, you must understand how to explore the SL1 GraphQL schema that it documents.
When using the Docs pane to explore the GraphQL schema, keep in mind this basic rule: Everything you click in the schema will result in either a definition or an additional set of fields or types that represent additional layers in the schema (and, by extension, your query or mutation).
This section and the examples that follow reference the Docs pane on the GQL Browser page (System > Tools > GQL Browser), which is available in SL1 versions 12.3.0 and later. However, the functionality works the same way in the Documentation Explorer in GraphiQL, which is used in SL1 versions 12.2.x and earlier.
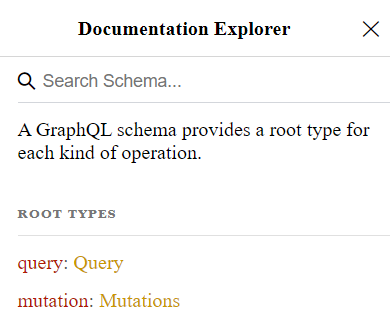
When you first open the Docs pane, you will see that the schema begins with the two root operation types: query and mutation:
When you click one of the root operation types, a list of objects that are available for that operation type displays. Each object lists the object name, the arguments that can be passed into that object, the object's return type, and a definition of that object.
In the following example, let's say you clicked Query and then scrolled down to the following section:
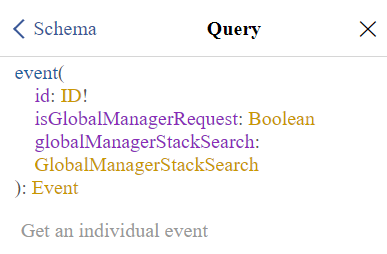
- event is a query object. It represents an object that can be queried from the SL1 API. As indicated by the definition below it, you can use this particular object to get information about an individual event.
- The next three lines, which are surrounded by parentheses, are all of the possible arguments that you can pass into the event query object. Each argument is displayed in a field name: value type pair, where the field name indicates an API field associated with the object and the value type indicates how you must define that field if you include that argument in your query. Arguments are used to define your query parameters. This example includes the following arguments:
- globalManagerStackSearch: GlobalManagerStackSearch. This argument has a "search" value type. If you include this argument, you must also include a nested set of search parameter fields below it. If you click GlobalManagerStackSearch in the schema, it displays all of the nested fields that you can include in the globalManagerStackSearch argument, along with their value types. If you click on their value types, the schema might display even more fields and their value types.
- id: ID!. When you use this argument, you must supply a unique identifier (as indicated by the ID value type) for the event id API field. The exclamation point indicates that you must include this argument in the query.
- isGlobalManagerRequest: Boolean. If you use this argument in the query, you must include true or false (as indicated by the Boolean value type) as a value for the event isGlobalManagerRequest API field.
- Event is the return type for the event query object. The return type consists of one or more fields related to the event that you specified in your argument; you are requesting that GraphQL return values for these fields when you execute the query. The schema lists all of the fields that belong to the Event return type, along with their value types.
Example 1: Using the Schema to Execute a Simple Query
This example describes how to use the Docs pane to explore the SL1 GraphQL schema and determine the specific objects, arguments, and return fields that we need to include in a query.
For this example, we are executing a simple query: We are asking GraphQL to return some basic information about a single user account in SL1.
To use the schema to execute this simple query:
-
On the GQL Browser page (System > Tools > GQL Browser), click the Show Documentation Explorer icon (
) on the left side of the page to expand the Docs pane. The main schema page displays: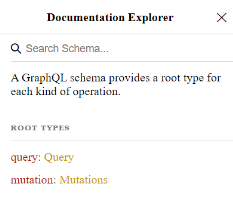
-
Because we are executing a query, click the Query type link. A list of all potential query objects displays in the Docs pane.
-
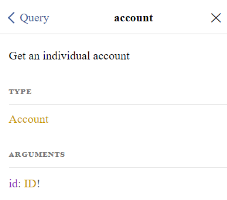
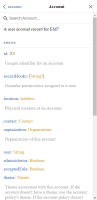
Because we want to query a specific user account, browse the list or use the search feature to locate the entry for the account query object:

-
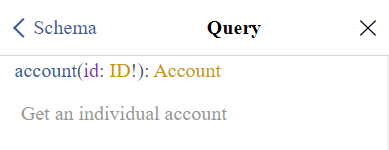
Click the account object link that displays in blue text. The schema displays a more readable version of the information that appeared for the account object in the list of query objects. The schema defines the object, shows that it has a return type of Account, and indicates that it has just a single argument (id: ID!):
-
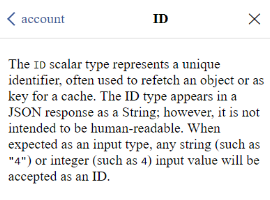
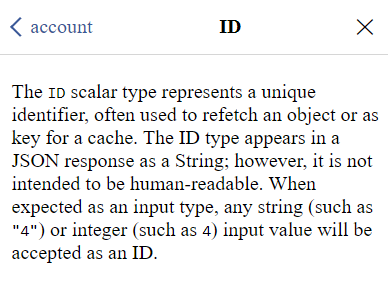
Click the ID! argument value type link. The schema displays a definition for the ID scalar type that specifies the type of value you must enter in the argument for the id field:
-
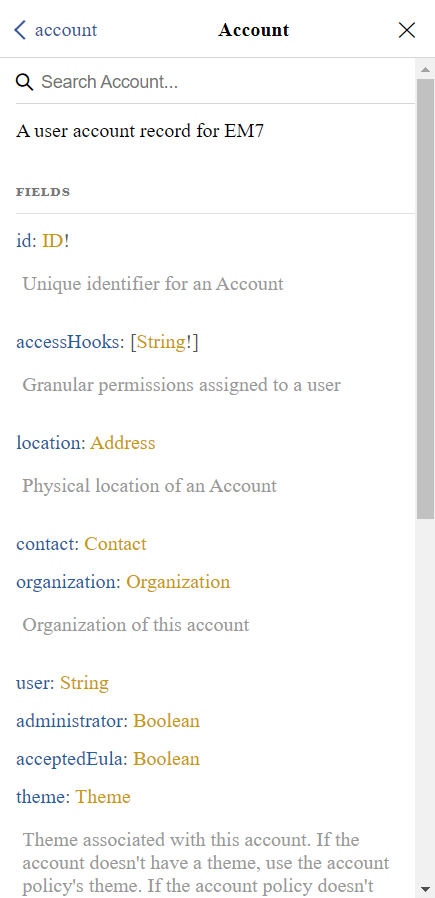
Click the account object link in the top-left corner of the pane to return to the account object definition, then click on the Account return type link. The schema displays a list of all the potential fields that you can ask GraphQL to return in your account query, along with their value types:
-
Click through the return fields and value types as needed to view their definitions. For this example, let's assume we clicked the definitions for id: ID!, user: String, and administrator: Boolean for additional information about those fields, if needed.
-
Having reviewed the schema in the Docs pane, type the query in the query pane. In this query, we are asking GraphQL to return the user ID number and username for the user account with the ID "25", and indicate whether that user account is an administrator:
query basicAccountInfo {
  account(id: 25) {
    id
    user
    administrator
  }
}
As you type your query, the query pane suggests potential fields, arguments, and syntax based on what you've already written and your defined schema; validates your query or mutation as you type; and uses different colors to highlight fields, arguments, syntax, and other important elements to make the query easier to read.
-
Click the execute query icon (
). The query results display in the results pane. Having reviewed the schema, we can expect GraphQL to return an ID number for the id field, a string for the user field, and a boolean value for the administrator field: { "data": { "account": { "id": "25", "user": "example", "administrator": false } } }

Example 2: Using the Schema to Execute a Complex Query
This example expands on the previous example to execute a more complex query about the same user account.
For this example, we are asking GraphQL to return additional information about the user account from Example 1, including information about the user's contact information, physical location, and organization membership. This example will require us to dig deeper into the schema in the Docs pane to successfully execute a more advanced query.
To use the schema to execute this more advanced query:
-
Complete the steps in Example 1.
-
In the Docs pane, click the Account return type link in the top-left corner of the pane to return to the Account return type definition and fields:
-
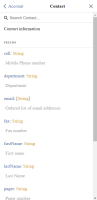
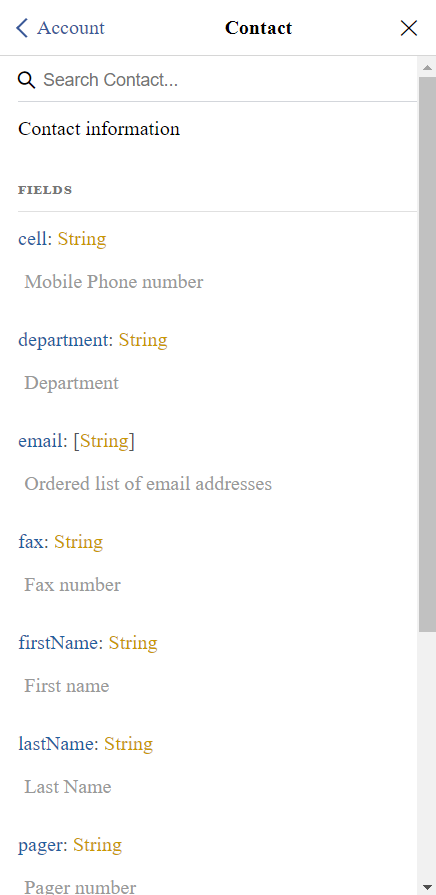
In this example, one of the things we want to add to the query is the user's contact information. From the list of Account return fields and value types, locate the contact: Contact field: value type pair, and then click the Contact type link. The schema displays a list of all the potential contact information fields that you can ask GraphQL to return in your account query, along with their value types:
-
Click through the return fields and value types as needed to view their definitions. For this example, let's assume that we do not want GraphQL to return values for every possible contact return field, but that instead we want GraphQL to return values for just a few of them: The user's first name, last name, and email address. Therefore, let's assume we clicked the definitions for firstName: String, lastName: String, and email: [String] for additional information about those fields, if needed.
Because the value type for the contact return field is the custom Contact type, which itself consists of these additional return fields, we will need to nest these additional return fields under the contact return field when we form the query. If we include only the contact return field in our query without specifying any nested return fields under it, GraphQL will return values for every possible contact field.
-
Click the Account return type link in the top-left corner of the pane to return to the Account return type definition and fields.
-
In this example, we also want to add information about the user's physical location to the query. From the list of Account return fields and value types, locate location: Address and then click the Address type link. This time, however, the schema does not display any fields for the Address type; instead, it indicates that the Address type itself has a possible type of USAddress:

-
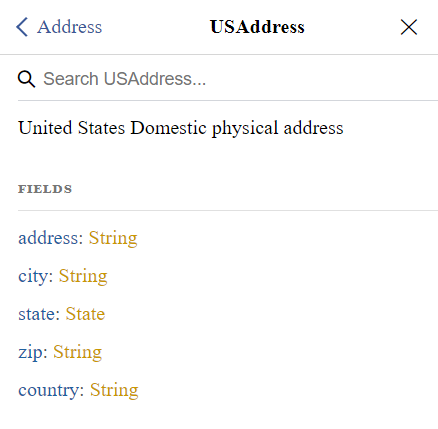
Click the USAddress type link. The schema displays a list of all the potential U.S. Address fields that you can ask GraphQL to return in your account query, along with their value types:

-
Click through the return fields and value types as needed to view their definitions. For this example, let's assume that we clicked the definitions for address: String, city: String, state: String, and zip: String for additional information about those fields, if needed.
Because the value type for the location return field is the custom Address type, which in turn has the possible custom USAddress type that consists of these additional return fields, we will need to nest these additional return fields under the location return field when we form the query. To do this, we will need to include an inline fragment that allows us to specify that the location return fields that we are including in the query belong to the USAddress type within the schema. We can do this using the format "... on USAddress" in our query.
-
Click the Address return type link in the top-left corner of the pane and then the Account return type link to return one final time to the Account return type definition and fields
-
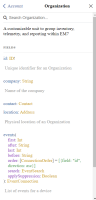
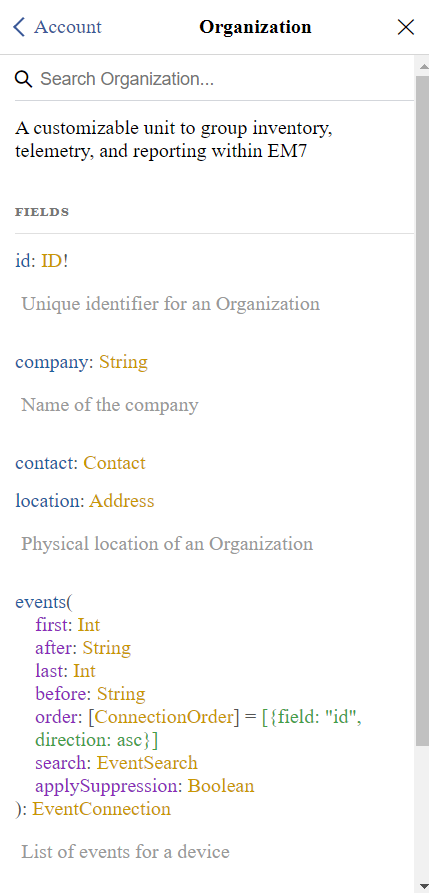
Lastly, in this example, we want to add information about the user's organization to the query. From the list of Account return fields and value types, locate organization: Organization and then click the Organization type link. The schema displays a list of all the potential organization fields that you can ask GraphQL to return in your account query, along with their value types:
-
Click through the return fields and value types as needed to view their definitions. For this example, let's assume that we clicked the definitions for id: ID!, company: String, and events for additional information about those fields, if needed. If you do so, you discover that those first two are field: value type pairs like we have encountered throughout this example, but the events return field includes its own list of arguments and a connection type, EventConnection:

-
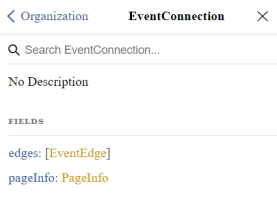
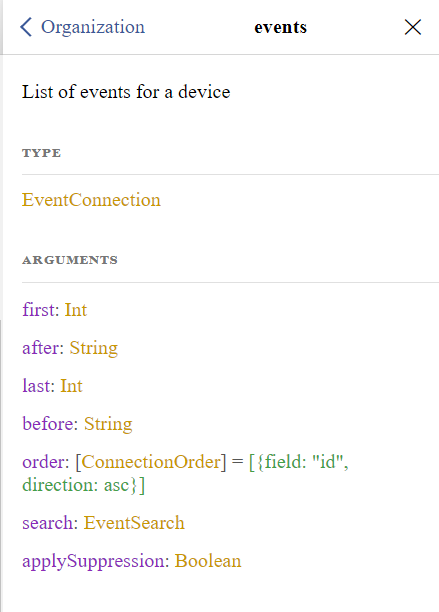
For this example, we want to query GraphQL to return some basic information about the first three events aligned to the user's organization. To do this, we will use the first: Int argument, and then we will query several fields under the EventConnection connection type. Click the EventConnection type link:
-
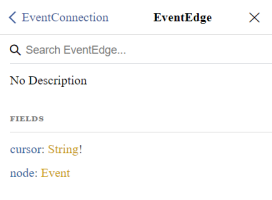
EventConnection is a connection type. Connection types consist of one or more edges that connect two nodes. The schema reflects this, so from EventConnection, click [EventEdge]:
-
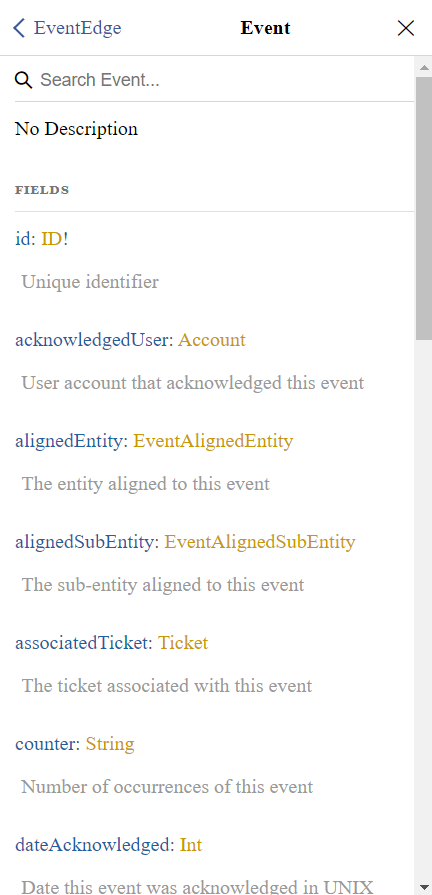
From EventEdge, click Event. The schema displays a list of all the potential event fields that you can ask GraphQL to return from the Event node in your account query, along with their value types:

-
Click through the return fields and value types as needed to view their definitions. For this example, let's assume that we clicked the definitions for id: ID!, severityLevel: SeverityLevel, message: String, and dateAcknowledged: Int for additional information about those fields, if needed. Let's assume that we also clicked the definition for source: EventSource, which we discovered had additional nested fields, including id: ID!.
-
Having reviewed the schema in the Docs pane, type the query in the query pane. In this query, in addition to the information we queried in Example 1, we are asking GraphQL to return:
- The user's contact information, including first name, last name, and email address
- Information about the user's physical location, including address, city, state, and ZIP code
- Information about the user's organization, including its organization ID and company name, along with the event ID, severity level, source ID, event message, and acknowledged date of the first 3 events aligned to that organization
query basicAccountInfo {
  account(id: 25) {
    id
    user
    administrator
    contact {
      firstName
      lastName
      email
    }
    location {
      ... on USAddress {
        address
        city
        state
        zip
      }
    }
    organization {
      id
      company
      events(first: 3) {
        edges {
          node {
            id
            severityLevel
            source {
              id
            }
            message
            dateAcknowledged
          }
        }
      }
    }
  }
}
As you type your query, the query pane automatically suggests potential fields, arguments, and syntax based on what you've already written and your defined schema; validates your query or mutation as you type; and uses different colors to highlight fields, arguments, syntax, and other important elements to make the query easier to read.
-
Click the execute query icon (
). The query results display in the results pane. Having reviewed the schema, we can expect GraphQL to return data for all of the fields in the format of their respective defined value types:{ "data": { "account": { "id": "25", "user": "example", "administrator": false, "contact": { "firstName": "Example", "lastName": "User", "email": [ "example@sciencelogic.com" ] }, "location": { "address": "10700 Parkridge Blvd", "city": "Reston", "state": "VA", "zip": "20191" }, "organization": { "id": "0", "company": "System", "events": { "edges": [ { "node": { "id": "154134", "severityLevel": "Minor", "source": { "id": "2" }, "message": "Ticket Created: 95", "dateAcknowledged": null } }, {... 2 more nodes } ] } } } } }The above result has been truncated to make it easier to read in this documentation. When you actually complete this example, information about the second and third events will display in the results in the place of {... 2 more nodes}.


Example 3: Using the Schema to Execute a Mutation
This example describes how to use the Docs pane to explore the SL1 GraphQL schema and determine the specific objects, arguments, and return fields we need to include in a mutation.
For this example, we are telling GraphQL to create a custom link to appear in the SL1 Action Runner.
To use the schema to execute this mutation:
-
On the GQL Browser page (System > Tools > GQL Browser), click the Show Documentation Explorer icon (
) on the left side of the page to expand the Docs pane. The main schema page displays:
-
Because we are executing a mutation, click the Mutations type link. A list of all potential mutation objects displays in the Docs pane.
-
Because we want to create a new custom link, browse the list or use the search feature to locate the entry for the createCustomLink mutation object:

-
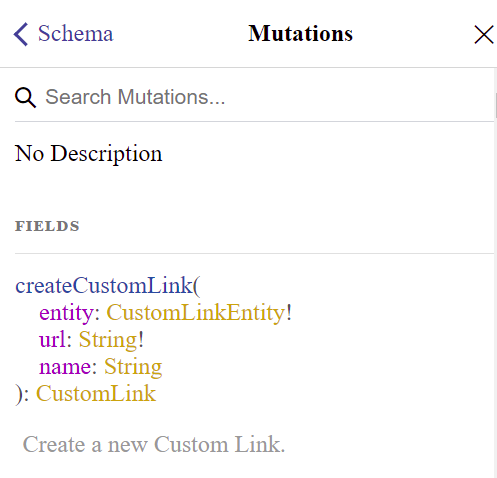
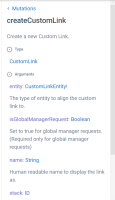
Click the createCustomLink mutation object. The schema displays a more readable version of the information that appeared for the createCustomLink object in the list of mutation objects. The schema defines the object, displays its potential arguments, and shows that it has a return type of CustomLink:
-
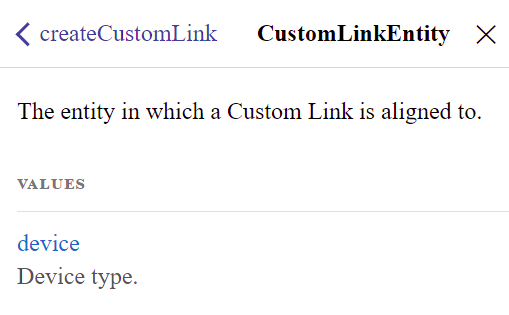
Click the CustomLinkEntity! argument value type link. The schema displays a definition that specifies the type of value you must enter in the argument for the entity field. According to the schema, the only acceptable value is device.

-
Use the navigation in the top-left corner of the pane to return to the createCustomLink object definition, then click through the other argument value types as needed to view their definitions.
-
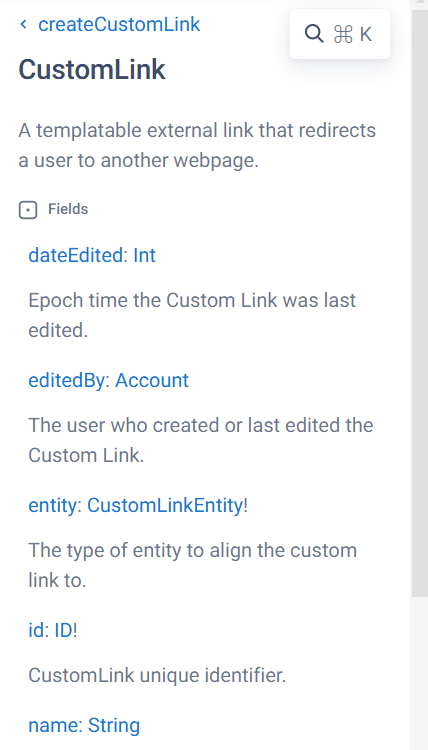
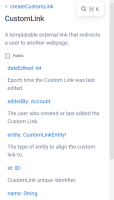
Click on the CustomLink return type link. The schema displays a list of all the potential fields that you can ask GraphQL to return when it executes your createCustomLink mutation, along with their value types:
-
Click through the return fields and value types as needed to view their definitions.
-
Having reviewed the schema in the Docs pane, type the mutation in the query pane. In this mutation:
- The custom link would display for all devices that used the custom attribute "Restorepoint ID". It would not display for devices that do not use that custom attribute.
- When creating the mutation, you would replace <Restorepoint Hostname or IP> in the url field with the Restorepoint hostname or IP address that you want the link to open.
- When clicked, the link would open the URL https://<Restorepoint Hostname or IP>/ui/devices/{attributeLabel.Restorepoint ID}, where <Restorepoint Hostname or IP> would already be defined, and SL1 would automatically replace {attributeLabel.Restorepoint ID} with the Restorepoint ID custom attribute value of the device from which the link was clicked.
- The custom link would display in the Action Runner as "Restorepoint".
This is the mutation we would type in the query pane:
mutation createCustomLink {
  createCustomLink(
    entity: device
    url: "https://<Restorepoint Hostname or IP>/ui/devices/{attributeLabel.Restorepoint ID}"
    name: "Restorepoint"
  ) {
    id
    entity
    url
    name
    editedBy {
     	user
    }
    dateEdited
  }
}
As you type your mutation, the query pane automatically suggests potential fields, arguments, and syntax based on what you've already written and your defined schema; validates your mutation as you type; and uses different colors to highlight fields, arguments, syntax, and other important elements to make the mutation easier to read.
-
Click the execute query icon (
). The mutation executes, and GraphQL displays the data you requested in the results pane.