![]()
This ![]() ) of the PowerFlow user interface to create or use a configuration object that contains a set of variables that all steps and applications can use.
) of the PowerFlow user interface to create or use a configuration object that contains a set of variables that all steps and applications can use.
What is a Configuration Object?
You can create and edit configuration objects on the Configurations page (![]() ) of the PowerFlow user interface. After you create the configuration object, it appears in the Configuration drop-down on the Configuration pane of an Application detail page.
) of the PowerFlow user interface. After you create the configuration object, it appears in the Configuration drop-down on the Configuration pane of an Application detail page.
A configuration object is a stand-alone JSON file that lives on the PowerFlow system. A configuration object supplies the login credentials and other global variables that can be used by all steps and applications in PowerFlow. Configuration objects allow the same application to be deployed in multiple PowerFlow instances, with different credentials and variables.
Configuration objects can map variables from SL1 to a third-party platform. For instance, SL1 has device classes, while various third-party platforms like ServiceNow have CI classes; the configuration object would map these two variables.
Before you can run a PowerFlow application, you must select a configuration object and "align" that configuration object with the application.
You can select none from the Configuration drop-down to clear or "un-align" the selected configuration object from an application. Also, if you did not select a configuration object when editing fields on the Configuration pane, the previously set configuration object will remain aligned (if there was a previously set configuration object).
Viewing the List of Configuration Objects
The Configurations page (![]() ) displays a list of available configuration objects. From this page you can create and edit configuration objects:
) displays a list of available configuration objects. From this page you can create and edit configuration objects:

You can search for a specific configuration object by typing the name of that configuration in the Search field at the top of the Configurations page. The user interface filters the list as you type. You can also sort by clicking the Configuration Object Name column header.
The Configurations page displays the following information about each configuration object:
- Config Name. The name of the configuration object.
- Ver. The version number of the configuration object.
- Author. The user or organization that created the configuration object.
- Modified. The date and time that the configuration object was last edited.
- Actions. Contains the following buttons:
- . Opens a pane where you can edit the contents of the configuration object.
- . Lets you download the JSON file for the configuration object. If you have multiple PowerFlow systems, you can download a configuration object from one system and then use the Import Configuration option (under the button) to upload that object to the second PowerFlow system.
- . Removed the configuration object from the PowerFlow system. Any PowerFlow applications that were aligned with that configuration object are no longer aligned with that object.
Click the down arrow icon (![]() ) for a configuration object to view a section that lists the applications that are currently aligned with that configuration object. Click the up arrow icon (
) for a configuration object to view a section that lists the applications that are currently aligned with that configuration object. Click the up arrow icon (![]() ) to close the section.
) to close the section.
Creating a Configuration Object
When creating or editing a configuration object on the Configurations page, the name-value pairs in the Configuration Data section display in fields by default instead of a block of JSON code.
For more complex configuration objects, you can click to switch between text fields and JSON code for the configuration data. In the Configuration Data section, you can press to search for code. Also, a red warning icon (![]() ) appears in the first column of the Configuration Data section for a row where the JSON is not valid.
) appears in the first column of the Configuration Data section for a row where the JSON is not valid.
If you set 'null' as a value for a JSON parameter in a configuration object, the value reverts to its default value, if a default value exists. You can clear JSON parameters by specifying an empty dictionary {} as the value. Also, upgrading or downgrading a SyncPack will not overwrite a user configuration.
Many SyncPacks for PowerFlow contain an "example" configuration object that you can use as a template. You should do a Save As with the example configuration objects so you can make a copy of the example configuration that you can customize for your specific PowerFlow system. Do not use the example configuration objects to run PowerFlow applications.
To create a new configuration object:
-
From the Configurations page (
 ), click . The Create Configuration pane appears.
Instead of creating a completely new configuration object, you can also edit an existing configuration object that has some of the configuration data that you want to use and click from the Configuration pane to create a copy of that configuration object.
- Complete the following fields:
-
Friendly Name. Name of the configuration object that will display in the user interface.
-
Description. A brief description of the configuration object.
-
Author. User or organization that created the configuration object.
-
Version. Version of the configuration object.
-
Configuration Data Values. To add configuration values in the form of name-value pairs, click . Complete the Name and Value fields, and select Encrypted if needed.
Click to view the JSON configuration data for the configuration object at the bottom of the pane. Click again to return to the original view.
-
In the Configuration Data section, include the required block of code to ensure that the applications aligned to this configuration object do not fail:
  {
    "encrypted": false,
    "name": "sl1_db_host",
    "value": "${config.sl1_host}"
  },
For example:
  {
    "encrypted": false,
    "name": "sl1_db_host",
    "value": "10.2.11.42"
  },
If you are using IPv6 for IP addresses, wrap the IP string in brackets, such as https://[2001:db8:3333:4444:5555:6666:7777:8888]
Click to show the JSON code. Click the button again to see the fields. You can also click and add a new name-value pair in the Configuration Data Values section.
If you are using SL1 with an External Database (SL1 Extended architecture or a cloud-based architecture), update the "value" of that block of code to be the host of your database. This field accepts IP addresses. For example: "value": "db.sciencelogic.com". If you are not using the SL1 Extended architecture or a cloud-based architecture, you do not need to make any changes to the block of code other than pasting the code into the configuration object.
- To create a configuration variable, define the following keys:
- encrypted. Specifies whether the value will appear in plain text or encrypted in this JSON file. If you set this to "true", when the value is uploaded, PowerFlow encrypts the value of the variable. The plain text value cannot be retrieved again by an end user. The encryption key is unique to each PowerFlow system. The value is followed by a comma.
- name. Specifies the name of the configuration file, without the JSON suffix. This value appears in the user interface. The value is surrounded by double-quotes and followed by a comma.
- value. Specifies the value to assign to the variable. The value is surrounded by double-quotes and followed by a comma.
- Click to save the new configuration object, or click to save the configuration object as a new configuration object with a different name.
- Align this configuration object with the PowerFlow applications that you want to run by clicking the Configure button from the detail page for each application and selecting this configuration object from the Configuration drop-down.
Working with Application Variables for Configuration Objects
Starting with version 2.5.0 of the PowerFlow Platform, you can perform a number of new processes with the application variables for configuration objects and the Configuration pane for PowerFlow applications. This section summarizes these new features.
Edit Configuration Button
If you have a configuration object already selected on the Configuration pane for a PowerFlow application, you can edit it by clicking the button:
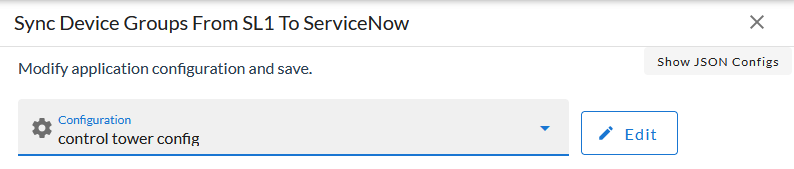
The Configuration pane for that configuration object displays to the left of the application Configuration pane. Add or edit the values on that new pane and click the button.
Available Configuration Values Pop-up
For any of the application variables with a gear icon (![]() ) in the right-hand corner, you can click that icon to open the Available Configuration Values pop-up:
) in the right-hand corner, you can click that icon to open the Available Configuration Values pop-up:
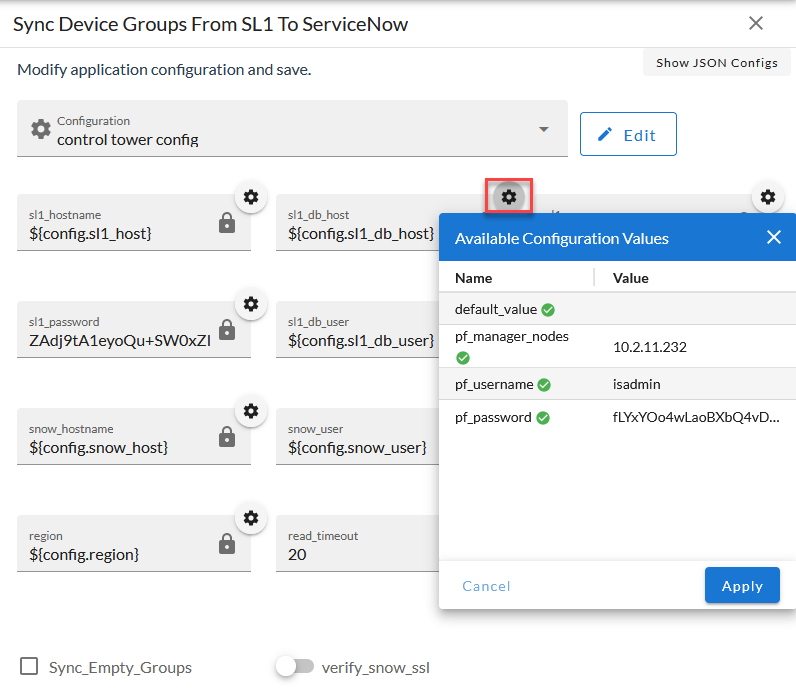
This pop-up contains a list of all of the available configuration variable values in the configuration object that you selected in the Configurations field.
In the Available Configuration Values pop-up, you can:
-
Select a value from the list to replace the value in the existing application variable.
If an application variable is using a value stored in the configuration object, the corresponding code for that variable displays underneath the box for that value, such as ${config.pf_username}.
- Click the button to set a changed application variable value back to its original value.
- Click the button to clear the selected value.
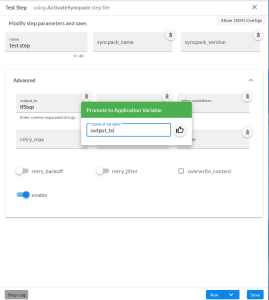
Promote Step Variable Option
You can use the "Promote to Application Variable" icon (![]() ) on the Configuration pane for a step variable to make that value available in a configuration object. This is also called "promoting" a step variable.
) on the Configuration pane for a step variable to make that value available in a configuration object. This is also called "promoting" a step variable.
The step promotion option is only available for steps that are not part of a ScienceLogicSyncPack.
Previously you could add a step variable to a configuration object, but you would need to type the encoded variable name, such as ${appvar.snow_hostname}, to promote that step variable to an application variable.
To promote a step variable to a configuration variable:
-
In the PowerFlow user interface, open the application that you want to update and click the button. The Steps Registry of the PowerFlow builder appears.
-
Select the step that has the variable you want to promote and drag it to the main pane or canvas. The Configuration pane for that step appears automatically:
-
Click the "Promote to Application Variable" icon (
 ) for the step variable you want to promote. A Promote to Application Variable modal appears.
 -
Use the existing name of the variable, or type a new name, and then click the thumbs-up icon (
 ).
). -
Click the button for the step, and then click the button for the application. This step variable is now available on the Configuration pane for applications.

Editing a Configuration Object
To edit an existing configuration object:
- In the PowerFlow user interface, go to the Configurations page, click the Actions icon (
 ), and select Editfor the configuration object you want to edit. The Configuration pane appears for that object.
 - Edit the values in the following fields as needed:
-
Description. A brief description of the configuration object.
-
Version. Version of the configuration object.
-
Configuration Data Values. To add configuration values in the form of name-value pairs, click . Complete the Name and Value fields, and select Encrypted if needed.
Click to view the JSON configuration data for the configuration object at the bottom of the pane. Click again to view the Configuration Data Values section with the button instead.
- If you want to make a copy of this configuration object, click and update the relevant fields in the Create Configuration pane.
- Click to save your changes.
Downloading and Importing a Configuration Object
If you have multiple PowerFlow systems that use similar environments, you can download the JSON file for a configuration object from one PowerFlow system and then upload that object to the second PowerFlow system.
To download and import a configuration object:
- In the PowerFlow user interface, go to the Configurations page and click the button for the configuration object you want to download.
- Save the file to a local computer.
- Log in to the second PowerFlow system and go to the Configurations page.
- Click the down arrow icon (
 ) next to the button and select Import Configuration. The Import Configuration page appears.
 - Click the button and locate the file you saved in step 2, or drag the file onto the Import Configuration page.
- Click the button. The configuration object is added to the Configurations page.