![]()
This
If you are configuring multiple SL1 servers to sync with a single ServiceNow instance, see Additional Considerations for Multiple SL1 Systems.
Workflow for Configuring the SyncPack
The following workflows cover how to configure ServiceNow, SL1, and PowerFlow to work with Event Sync.
Configuring ServiceNow
- Install the ServiceNow Event Management plugin
- Install the "ScienceLogic SL1: Event Integration" (Scoped) application
Configuring the ServiceNow MID Server (if needed)
Starting with version 1.1.0 of this SyncPack, you can configure Event Sync without a ServiceNow MID Server. If you are not using a MID Server, skip the following section and go to Configuring SL1, below.
- Install the MID Server
- Configure the Connector Definitions
- Configure the Connector Instance
- Configure the MID Web Server
- Configure the MID WebService Event Collector
- Start the MID Web Server and the Event Collector
- Run an external test of the MID Server configuration
- Review the MID Server Script Include (ScienceLogic_JS)
Configuring SL1
- Create a ServiceNow credential in SL1
- Enable and customize the following run book automation policies:
- ServiceNow: [Events] - Add/Update
- ServiceNow: [Events] - Event Acknowledged
- ServiceNow: [Events] - Event Cleared
- Enable the "ServiceNow: Add/Update/Clear Event" run book action
- Optionally, send custom data to ServiceNow using the pass-through option
- Optionally, enable the "ServiceNow: [Events] - Click to Create" automation policy
- Optionally, enable run book automation queue retries
Configuring PowerFlow
- Create a configuration object in the PowerFlow user interface
- Align the new configuration file with the PowerFlow applications
- Configure the PowerFlow applications, depending on your ServiceNow setup:
- Configure the applications for ServiceNow with a MID Server
- Configure the applications for ServiceNow without a MID Server
Configuring ServiceNow
As a prerequisite for running Event Sync, you will need to install the ServiceNow Event Management plugin (com.glideapp.itom.snac). You can request this plugin directly from ServiceNow.
If you are not using a MID Server in ServiceNow, you will need to add the x_sclo_powerflow.user and evt_mgmt_admin roles to the ServiceNow user account or Integration user.
Installing the "ScienceLogic SL1: Event Integration" (Scoped) Application in ServiceNow
The "ServiceNow Events" SyncPack uses the "ScienceLogic SL1: Event Integration" application (also called the Scoped or Certified application) to sync event status updates from ServiceNow back to SL1. You must install the "ScienceLogic SL1: Event Integration" application on your ServiceNow instance to enable this SyncPack.
The "ScienceLogic SL1: Event Integration" application requires that you have already installed the ServiceNow Event Management plugin on the target ServiceNow instance. You can request this plugin directly from ServiceNow. Also, the MID Server must be configured.
You need to have a ServiceNow HI Service Account to request this application and download it onto your ServiceNow instance.
You first request the "ScienceLogic SL1: Event Integration" application from the ServiceNow Store, and then you can install it.
To request and install the "ScienceLogic SL1: Event Integration" application:
- Go to the ServiceNow Store at https://store.servicenow.com and search for "ScienceLogic SL1".
- Select the "ScienceLogic SL1: Event Integration" application. The detail page for the application appears.
- Click the button and log in with your HI credentials.
- After the request is approved, log in to ServiceNow as an administrator and navigate to Application Manager (System Applications > Applications or My Company Applications).
- Click in the menu header or search for "ScienceLogic".
- Click the version drop-down for the "ScienceLogic SL1: Event Integration" application listing to make sure you are using the correct version of the application that is compatible with your version of this SyncPack.
- Click the button for the "ScienceLogic SL1: Event Integration" application. The installation is complete when the button changes to .
- In the filter navigator, search for "ScienceLogic" and locate the application in the left-hand navigation menu to verify that the application was installed. You might need to log out of ServiceNow and log back in to see the updated left-hand navigation menu.
Configuring the ServiceNow MID Server
Starting with version 1.1.0 of this SyncPack, you can configure Event Sync without a ServiceNow MID Server. If you are not using a MID Server, skip this topic and go to Configuring SL1.
See the following link for instructions on installing and configuring the MID Server for your ServiceNow instance: MID Server installation.
After you set up the MID Server, you can use the following procedures to configure the ServiceNow MID Server to work with the ServiceNow Events SyncPack.
Configuring the MID Web Server
To configure the MID Web Server (a MID Server is required for this step):
- In ServiceNow, install the Event Management plugin. You can request this plugin directly from ServiceNow.
- Navigate to Mid Server > Extensions > MID Web Server. The Mid Web Server Contexts page appears.
- Click and complete the following fields on the new record:
- Name. Type a unique name. Required.
- HTTP/HTTPS Port: Specify a port number to listen on. The port number must be unique.
- Authentication Type: Select Basic. Currently Basic is the only supported Authentication method. Complete the Basic Auth User and Basic Auth User Password fields with the relevant credentials.
- Execute on: Select a specific MID Server or Cluster of MID Servers.
- MID Server: Specify the MID Server or Mid Server Cluster you will use.
- Click to save the new record.
In the Related Links section, the Test parameters option is not a valid test to confirm your setup.
Configuring the Connector Definitions in ServiceNow
If you are not using a MID Server, skip this topic and go to Configuring SL1.
To configure the Connector Definitions used by the Update Sender transaction:
-
Navigate to Event Management > Event Connectors (Pull) > Connector Definitions. The Connector Definitions page appears.
-
Click to create a new Connector Definition.
When you create a Connector Definition, ServiceNow creates a template MID Server Script Include with the same name and "_JS" appended at the end of the name. This item is automatically attached to the new record in the JavaScript to run field after you click .
-
In the Name field, type a unique name and click to save the new Connector Definition record. The Connector Definitions page appears.
-
Open the Connector Definition you just created and complete the following fields:
- Javascript to run. Attach the JavaScript file provided by the Certified application: ScienceLogic SL1: Event Integration.
- Default schedule (seconds). Specify the time in seconds between retrieval of events, such as "120". This field is not required for this integration specifically, but it is a required field. Events will not be pulled when this is triggered.
- Bi-Directional. Select this option to enable ServiceNow to send Alert changes back to the source instance. Enabling this allows SL1 as an external monitoring system to receive changes made in ServiceNow that are specific to Alerts.
- Alert field identifier. Set to "Message Key". The field causes the source monitoring system to be updated.
-
In the Connector Parameters section, double-click to add one or more rows using the following parameters to enable correct formatting and communication with the source event system:
Name Example Required application_path /api/v1/applications/update_sl1_event_from_snow_trigger No configuration_path /api/v1/configurations/ + Configuration Name Yes log_level 30 (Default Log level) No run_path /api/v1/applications/run No sl1_userid 1 (Default user_id in SL1) No The entries that are marked as not required are supplied by default.
-
Click to save the updated Connector Definition.
Configuring the Connector Instance in ServiceNow
If you are not using a MID Server, skip this topic and go to Configuring SL1.
Before you can set up a Connector Instance in ServiceNow, you need to create a ServiceNow credential that will be used by the Connector Instance.
Creating a ServiceNow Credential
To configure the ServiceNow credential that will be used by the Connector Instance:
- Navigate to Connections & Credentials > Credentials. The Credentials page appears.
- Click .
- Select Basic Auth Credentials. A new Basic Auth Credentials record appears.
- Complete the following fields on the new record:
-
Name. Type a unique name for the credential. Required.
- User name. Type the ServiceNow user name.
- Password: Type the ServiceNow password.
- Click to save the new record.
-
After the record is saved, open it again and check the Active field on the record.
- Click .
Configuring the Connector Instance
To configure the Connector Instance:
-
Navigate to Event Management > Event Connectors (Pull) > Connector Instances.
-
Click and complete the following fields on the new record:
-
Name. Type a unique name. Required.
The value of the Connector Instance Name must be the same case-sensitive value used in the Source Instance (event_class) field. If the values do not match exactly, the bi-directional connection will not work. In the example below, "ScienceLogic" is the Connector Instance Name. For more information, see External Testing of the MID Server Configuration.
- Connector definition. Confirm that the Connector Definition you created is associated with this Connector Instance record.
- Host IP: Specify the host IP address for PowerFlow.
- Credential. Select the credential for connection to PowerFlow. For more information, see Configuring the ServiceNow Credential.
- Bi-directional. Select this option.
-
-
In the Connector Instance Values section, ensure that the values have been configured:
Name Example Required application_path /api/v1/applications/update_sl1_event_from_snow_trigger No configuration_path /api/v1/configurations/ + Configuration Name Yes log_level 30 (Default Log level) No run_path /api/v1/applications/run No sl1_userid 1 (Default user_id in SL1) No -
In the MID Servers for Connectors section, select the MID Server.
-
Click to save the new record.
-
After the record is saved, open it again and click to confirm the correct configuration. This option is only available after you submit the record.
-
If you have a successful test connection, check the Active field on the record.
-
Click .
Configuring the MID WebService Event Collector
If you are not using a MID Server, skip this topic and go to Configuring the ServiceNow Instance.
To configure the MID WebService Event Collector:
-
In ServiceNow, navigate to Mid Server > Extensions > MID WebService Event Listener.
-
Click and complete the following fields on the new record:
-
Name. Type a unique name. Required.
-
MID Web Server Extension : Select the MID Web Server you created in Configuring the MID Web Server.
-
-
Click to save the new record.
Starting the MID Web Server and the Event Collector
If you are not using a MID Server, skip this topic and go to Configuring SL1.
To start the MID Web Server and the Event Listener:
- Navigate the MID Server > Extensions > Mid Web Server and select the MID Web Server you set up in Configuring the MID Web Server.
- In the Related Links section, click the Start link.
- Navigate to the MID Server > Extensions > MID WebService Event Listener and select the MID WebService Event Listener you set up in Configuring the MID WebService Event Collector.
- In the Related Links section, click the Start link.
- Confirm that the MID Web Server and the MID WebService Event Listener has a Status of "Started".
External Testing of the MID Server Configuration
If you are not using a MID Server, skip this topic and go to Configuring SL1.
ScienceLogic recommends that you test the MID Server connection by using an external testing source outside of ServiceNow, PowerFlow, and SL1.
- Post a message to http://{MID_SERVER_IP}:{MID_Web_Server_port}/api/mid/em/jsonv2
-
Example body:
{
    "records":
    [
    	{
        "source" : "Simulated",
        "event_class": "ScienceLogic",
        "node" : "Postman",
        "type" : "High Virtual Memory",
        "resource" : "C:",
        "severity" : "2",
        "description" : "Test Event",
        "ci_type":"cmdb_ci_app_server_tomcat",
        "message_key": "Postman_109843242",
        "additional_info":{"name":"Create an event in snow"}
    	}
   ]
}
IMPORTANT: The value of the Source Instance (event_class) field must be the same case-sensitive value used in the Connector Instance Name. If the values do not match exactly, the bi-directional connection will not work. In the example above, "ScienceLogic" is the Source Instance (event_class) name. For more information, see Configuring the Connector Instances.
- Verify that the Send resulted in an HTTPS Status 200.
Using the MID Server Script Include (ScienceLogic_JS) in ServiceNow
If you are not using a MID Server, skip this topic and go to Configuring SL1.
The MID Server Script Include is provided with the "ScienceLogic SL1: Event Automation" application (also called the Certified Application), and it requires the ServiceNow Event Management plugin (com.glideapp.itom.snac). You can request the ServiceNow Event Management plugin directly from ServiceNow.
For information about installing the Certified application, see Installing the "ScienceLogic SL1: Event Integration Application" in ServiceNow.
The MID Server Script Include contains the following main parts:
- Test Connection
- Execute
- Update Source
Test Connection is for validating that setup is complete for returning delta changes back to the source instance.
The Test Connection process includes the following steps:
-
The Initialize step pulls in the required functions and defines default variables.
-
The Test Connection is a two-part requirement that checks for the application and configuration availability:
- Validates Application is available via GET HTTP request to PowerFlow.
-
Validates Configuration is available via Get HTTP request to PowerFlow.
-
For the Logs step, because the script is run on the MID Server, all logs are submitted to ms.log().
Execute: The part of the Script is currently is not in use, but it runs the same process as test Connection step. At this time the execute step does not pull down events from ScienceLogic with the MID Server Script Include. Events are delivered using a push methodology to the MID Server Listener.
Update Source: Picks up pending updates on the Connector Update Queues (em_connector_update_queue) table and sends them back to the configured source instance.
The Update Source process includes the following steps:
-
The Initialize step pulls in the required functions and defines default variables.
-
Builds the URL.
-
Validates the URL.
-
Pulls all Records matching even_class, source instance and connector Instance name sitting in pending.
-
For each record, checks to see if the record matches the following criteria:
-
New: Checks the Number field being null and a value being assigned.
-
Open: Checks for field change on the State field from Closed to a new value of Reopen or Open.
-
Closed: Checks for field change on the State field from Open or Reopen to a new value of Closed.
-
Acknowledge: Due the difference in how acknowledgments are handled in the two platforms, the Acknowledged criteria tracks the boolean value flipping to true and will return either the default ScienceLogic user_id of 1 or a defined user id.
-
-
Matching values are written to new JSON code.
-
Matching JSON code is validated to ensure that it has information that needs to be sent back to source.
-
Posts the Request back to PowerFlow.
-
For the Logs step, because the script is run on the MID Server, all logs are submitted to ms.log().
Event and Alert Alignment in ServiceNow
PowerFlow posts cached events to ServiceNow with an unique message Key. Events are created in ServiceNow with the payload data from PowerFlow. Based on the event rule conditions, the alert gets created automatically within ServiceNow, and events align to an alert based on the message Key unique identifier. All of the events that are aligned to an alert should have the same message Key.
A New Event Reopens a Closed Alert or Creates a New Alert Based on the Time of the Incoming Event
In ServiceNow, go to the Event Management Properties module under the Event Management application. On this page, you can access the Active interval (in seconds) within which a new event reopens a closed alert field (evt_mgmt.active_interval). In this field, you can set a time period in seconds within which an incoming event can either re-open a closed alert or create a new alert event with same message Key.
In the following image, this field has a value of 14400 seconds (4 hours):

You can configure these properties for each customer instance. You can have two different alerts with the same message Key. Consider the following scenarios:
- When an event clear occurs to close the alert associated to it, and the next open event occurs within 4 hours (based on the setting in the image above), then this event would re-open the same alert.
- When an event clear occurs to close the alert associated to it, and the next open event occurs after 4 hrs, then this event would not re-open the same alert. Instead, a new alert is created with the same message Key.
The following image shows an example of the second scenario:

In the above example, a clear event came in and closed the corresponding alert, Alert1901706 at 2023-01-01 12:00:42. The next open event that triggered with the same message Key was at 2023-01-01 21:24:16. The time difference was more than 4 hours, so as a result, this event created a different alert , Alert1905924 and did not re-open Alert1901706.
Fix Scripts to Validate the Above Scenarios in ServiceNow
When you have large-scale data in event and alert tables in ServiceNow, it can be difficult to manually test the alignment of events and alerts, as well as alerts re-opening or creating a new alert, as mentioned in the scenarios, above.
To address this issue, ScienceLogic created Fix Scripts that you can use to validate the output and see if there are any misconfigured event/alert alignment or any mismatched alert re-openings.
To validate the event alert data, the following Fix Script checks to see if events that are aligned to alerts have the same message Key; if not, the script it pulls misconfigured alert numbers and Event sysIDs and creates a .CSV file with this data and attaches it to the same fix script. You can look at the .CSV file to check if there are any misconfigurations.

To validate alert re-openings, the following Fix Script checks for the date/time differences between alerts with same message Key. The Script pulls out any misconfigured alerts, creates a .CSV file with this data, and attaches it to the same Fix Script. You can look at the .CSV file to check if there are any misconfigurations for the alert re-opening/new alert scenario.

Configuring SL1
The following topics cover how to set up your SL1 instance for Event Sync.
You must install the latest "ServiceNow Base Pack" PowerPack before you can perform the following procedures. For more information, see Installing the ServiceNow Base Pack PowerPack.
Creating a ServiceNow Credential in SL1
To configure SL1 to communicate with ServiceNow, you must first create a SOAP/XML credential. This credential allows the run book automations in the "ServiceNow Base Pack" PowerPack to connect with your ServiceNow instance. These run book automations are responsible for sending the SL1 event data to PowerFlow, which ultimately sends the data to ServiceNow.
The ServiceNow RBA - Example credential from the "ServiceNow Base Pack" PowerPack is an example SOAP/XML credential that you can configure for your own use.
To configure the ServiceNow RBA - Example credential:
- In SL1, go to the Credential Management page (System > Manage > Credentials).
-
Locate the ServiceNow RBA - Example credential and click its wrench icon (
 ). The Edit SOAP/XML Credential page appears.
- Complete the following fields:
- Profile Name. Type a new name for the ServiceNow credential.
- Timeout. Leave as the default of "5000" ms.
- Content Encoding. Make sure text/xml is selected.
- Method. Make sure POST is selected.
- HTTP Version. Select http/1.1.
- URL. Type the URL for your PowerFlow instance.
- HTTP Auth User. Type the username of your PowerFlow instance.
- HTTP Auth Password. Type the password of your PowerFlow instance.
-
Click . The credential is added to the Credentials page
-
On the Credentials page, make a note of the value in the ID column for the credential you just created. You will use this value with the sl1_credential_id parameter when you enable the snippet code of the "ServiceNow: Add/Update/Clear (Case/Event/Incident)" run book action policy.
Enabling the Run Book Automation Policies in SL1
Versions 104 and later of the "ServiceNow Base Pack" PowerPack separated these run book action policies by Cases, Events, and Incident, such as "ServiceNow: [Events] - Add/Update".
Before you can run the "ServiceNow: Add/Update/Clear Event" run book action, you must enable the three event-specific run book automation policies in SL1:
- ServiceNow: [Events] - Add/Update
- ServiceNow: [Events] - Event Acknowledged
- ServiceNow: [Events] - Event Cleared
These run book automation policies could use considerable SL1 resources if you configure the policies to trigger the "ServiceNow: Add/Update/Clear Event" Action for every single SL1 event. To avoid this, you will need to manage your event policies and ensure that your SL1 instance is sized appropriately to handle the resources required for syncing events to ServiceNow. ScienceLogic recommends only forwarding actionable events from SL1 to ServiceNow through PowerFlow. Non-actionable events, including "Notice" and certain "Minor" events should be filtered depending on the needs of your organization.
To enable the three ServiceNow run book automation policies:
-
In SL1, go to the Automation Policy Manager page (Registry > Run Book > Automation).
-
Locate the "ServiceNow: [Events] Add/Update" automation policy and click its wrench icon (
 ). The Automation Policy Editor page appears.
- Update the following fields:
- Policy State. Select Enabled.
- Policy Priority. Select High to ensure that this PowerFlow automation policy is added to the top of the queue.
-
Available Actions. If it is not already selected, select the corresponding ServiceNow run book action policy and add it to the Aligned Actions column.
ScienceLogic highly recommends that you do not make changes to the Policy Type, Repeat Time, or Align With fields or the And event is NOT acknowledged setting.
- Click .
- Repeat steps 2-4 for the "ServiceNow: Event Acknowledged" and "ServiceNow: Event Cleared" run book automation policies.
Enabling and Customizing the Run Book Action Policy
The "ServiceNow: Add/Update/Clear Event" run book action policy contains several default values in the snippet code for the policy that you can customize to use with the "ServiceNow Events" SyncPack.
You can edit these values in the Input Parameters pane of the Actions page for this policy.
Make sure you are using the most recent version of the run book action policy. If there are two policies with the same name, always use the policy with the higher number in the ID column of the Actions page.
To enable and customize the Event run book action policy:
-
In SL1, go to the Actions page (Registry > Run Book > Actions).
-
Locate the ServiceNow: Add/Update/Clear Event policy and click its wrench icon (
). The Action Policy Editor page appears:

-
For the Action State filed select Enabled.
-
For the sl1_credential_id field in the Input Parameters pane, specify the credential ID form the ID column on the Credential Management page (System > Manage > Credentials). For example: "sl1_credential_id": "107"
-
In the Input Parameters pane, edit the snippet code as necessary, using the information in the Customizing the Snippet Code in the Input Parameters Pane section, below.
-
When you are finished, click .
Customizing the Snippet Code in the Input Parameters Pane
SL1 run book action snippets are written in Python. In the event of a syntax error, the policies will no longer run. As a result, you must ensure that all edits adhere to Python standards. True and False options are case-sensitive and must not contain quotes.
Make sure you are using the most recent version of the run book action policy. If there are two policies with the same name, always use the policy with the higher number in the ID column of the Actions page.
You can customize the following values in the "ServiceNow: Add/Update/Clear Event" run book action snippet code:
-
sl1_credential_id. Specifies the ID of the credential object. You can find this value in the ID column of the Credentials page (System > Manage > Credentials of SL1. For example: "sl1_credential_id": "101"
-
debug. A true/false value that determines if the action is logged in SL1 and if the application is run in Debug Mode on PowerFlow. Troubleshooting logs are written to /data/tmp/servicenow_rba.log.
-
configuration. Specifies the ID of the configuration object used on PowerFlow. The configuration ID is all lower-case, with spaces in the configuration object "friendly" name replaced by underscores. For example: "configuration": "docs_configs".
NOTE: To find the configuration ID with the PowerFlow API, make a GET request on this endpoint: https://<PowerFlow_service_hostname>/api/v1/configurations.
- queue. Specifies the worker queue on which the application runs. Leave this as default.
- discard_if_no_ci. Deprecated. Previous versions let you specify whether PowerFlow should create cases, events, or incidents in ServiceNow for devices that do not have a matching CI record.
- cmdb_integration. Specifies which CMDB SyncPack you are using to ensure that PowerFlow sends the correct identifiers to ServiceNow.
- If you are using the "ServiceNow CMDB" SyncPack version 3.5.0 or later, use "SGC" to allow CIs to attach to incidents. For example: "cmdb_integration":"SGC"
- If you are using versions of the "ServiceNow CMDB" SyncPack before version 3.5.0, use "CMDB".
- If you are using the "ServiceNow Service Graph Connector" SyncPack, use "SGC".
-
integration. Specifies the SyncPack you are using for this run book action. For example: "integration": "events".
- events_mid_server. Set this field to true if you are using a ServiceNow MID Server with the Event Sync, or set it to false if you are not using a MID Server.
- message_key_template. This field lets you customize the message key used by PowerFlow to correlate SL1 events with ServiceNow alerts. This field is used with the Event Sync.
- By default the value is "{{'{}'.format(event.event_id)}}", which creates a ServiceNow alert for each SL1 event; this is the existing MID Server flow behavior.
- A suggested alternative value is "{{'{}+EVENT+{}'.format(event.node_id,event.event_policy_id)}}", which groups the events by parent entity, such as device or interface, and event policy ID. The SL1 region used in the aligned configuration object in PowerFlow will be prepended to this value to ensure it is unique across stacks.
If you are using the MID Server and you use the message_key_template field to configure a message key with a one-to-many correlation between a single ServiceNow alert and multiple SL1 events, you should schedule the "Sync Alert Details from ServiceNow to SL1 Events" PowerFlow application to run, with the events_mid_server parameter selected on the Configuration pane for the "Sync Alert Details" application. These settings ensure that the ext_ticket_ref is populated when the ServiceNow alert re-opens. If you are using a message key with a one-to-one relationship between alerts and events, you do not need to schedule the "Sync Alert Details from ServiceNow to SL1 Events" application.
Customizing Logging in the Run Book Action
You can customize the following logging-related items in the "ServiceNow: Add/Update/Clear Event" run book action snippet code:
- logfile = /data/tmp/ServiceNow_add_update_clear_incident.log
- Location for logging output.
- Will be created if it does not exist.
- Will be appended with each run book job.
- Is case-sensitive.
- do_debug_logging = True
- True is on, False is off.
- Is case-sensitive.
- For troubleshooting, these can be enabled or changed.
- Writes logs to /data/tmp/servicenow_rba.log.
Sending Custom Data to ServiceNow Using the Passthrough Option (Optional)
Passing Custom Data to ServiceNow
You can use the "ServiceNow: [(Cases/Events/Incidents)] Add/Update" run book automation and the "ServiceNow: Add/Update/Clear (Case/Event/Incident)" run book action to "pass through" custom data about SL1 cases, events, or incidents to ServiceNow (depending on the SyncPack you are using with PowerFlow).
For example, you might want to use the passthrough functionality to overwrite the impact and urgency of a ServiceNow incident, which is the only way to change the priority of the incident.
To pass custom data to ServiceNow:
- Create a new run book action that pulls the relevant data and adds it to a dictionary called EM7_RESULT.
- Add the new run book action to the "ServiceNow: [(Cases, Events, or Incident)] Add/Update " run book automation Policy, ahead of the "ServiceNow: Add/Update/Clear (Case/Event/Incident)" run book action so that the new action runs first, and then is consumed by the ServiceNow action.
Passing Custom Data to ServiceNow
The following procedure describes how to configure the passthrough functionality, using the "ServiceNow: [Incident] Add/Update" run book automation and the "ServiceNow: Add/Update/Clear Incident" run book action as examples.
To pass custom data to ServiceNow:
-
In SL1, go to the Actions page (Registry > Run Book > Actions) and click to create a new run book action policy.
- Complete the following fields:
- Action Name. Type a unique name for the action.
- Action State. Select Enabled.
- Action Type. Select Run a Snippet.
- Execution Environment. Select ServiceNow Base Pack.
- Complete the other fields as needed, or leave them at their default settings.
-
In the Snippet Code pane, add the snippet code you want to include for the EM7_RESULT dictionary. For example, the following snippet code lets you override the ServiceNow Incident work notes with a hardcoded note:
EM7_RESULT = {"work_notes": "This is a new note"}
Additional notes about the structure of the EM7_RESULT dictionary:
- EM7_RESULT = is required for the dictionary, and the formatting of the keys should match the example above.
- All keys defined in the EM7_RESULT dictionary need to map to field IDs on the ScienceLogic Events table in ServiceNow.
- You can hard-code the values in the EM7_RESULT dictionary, or you can use variables and functions, like the "Snippet Code Example", below.
- As a best practice, avoid sending null passthrough values to ServiceNow. If you must send 'null' or 'NULL' values to ServiceNow, pass through that value as an empty string, such as
"location":"". Also, only pass through values that you need. For example, instead of sending{"location": "", "work_notes": "stuff"}, simply send{"work_notes": "stuff"}. -
A long snippet might delay the ticket being created
- Click .
- Go to the Automation Policy Manager page (Registry > Run Book > Automation) and open the "ServiceNow: Add/Update Incident" run book automation Policy.
-
In the Available Actions section, add the new run book action before the "ServiceNow: Create, Update, Clear Incident" run book action:

The output of this new run book action will be consumed by the "ServiceNow: Create, Update, Clear Incident" run book action, ensuring that the EM7_RESULT dictionary is passed through to ServiceNow. The "ServiceNow: Create, Update, Clear Incident" run book action automatically populates the passthrough values with any values from EM7_LAST_RESULT. The passthrough overwrites any other previously defined fields, such as assignment group.

- You can add additional run book actions to the run book automation Policy for any additional workflows that you might want to run. The Automation Policy execute these Actions in a sequential, top-down order. However, the "ServiceNow: Create, Update, Clear Incident" run book action only consumes the EM7_RESULT dictionary from the run book action directly above it.
Passthrough Example
For the Dictionary Entry of the ServiceNow field on the import table, you can reference the XML of the record. You will need to copy the <sys_name> value so you can use that as the key for the passthrough.
In this example, you want to bring in an additional field called sl1 category.
-
Create the new sl1 category field on the import table in ServiceNow. You can right-click on the header of the form to view the XML:

-
Look for the <sys_name> value.
-
Copy that value directly out and use that in your EM7_RESULT for the passthrough value (in the Snippet Code pane):
EM7_RESULT = {'sl1 Category': 'test'}

Snippet Code Example
The following snippet code example shows how to pull additional information and make it available for passthrough. All of the additional information that is going to be sent is contained in a dictionary variable called EM7_RESULT. You can pass through multiple items through in a single run book action by adding additional keys to the EM7_RESULT dictionary.
This example lets you assign assignment groups to an Incident based on certain criteria, such as event policy IDs:
from future.utils import iteritems

def invert_mappings(mappings):
    """
    Invert received one-to-many mappings and converts it into a one-to-one
    mapping.

    Args:
        mappings (dict): Dictionary of mapped values

    Returns:
        dict: inverted dictionary.

    """
    inverted_mappings = dict()
    for key, values in iteritems(mappings):
        for sub_value in values:
            invert_mappings[sub_value] = key
    return inverted_mappings


# Example of assignment group to list of event policy ids mapping.
assignment_groups_to_event_policies = {
    "sys_id_1": [1, 2, 3, 4, 5],
    "sys_id_2": [6, 7, 8, 9, 10],
}
# which sys_id to use if the current event_policy_id isn't mapped
default_sys_id = "sys_id_3"

# invert the mappings
event_policy_to_assignment_group = invert_mappings(assignment_groups_to_event_policies)

# Send assignment group sys_id to IS RBA
EM7_RESULT = {
    "assignment_group": event_policy_to_assignment_group.get(
        EM7_VALUES["%3"], default_sys_id
    )
}
Enabling the "ServiceNow: [Events] - Click to Create" Automation Policy (Optional)
The "ServiceNow: [(Cases/Events/Incident)] - Click to Create" automation policy lets you manually create a case, event, or incident in ServiceNow by clicking the Actions button (![]() ) in SL1 for an event and selecting "Create External Ticket" (or by clicking the life-preserver icon (
) in SL1 for an event and selecting "Create External Ticket" (or by clicking the life-preserver icon (![]() ) for an event in the classic user interface).
) for an event in the classic user interface).
This run book action policy is available in the "ServiceNow Base Pack" PowerPack.
To configure the "ServiceNow: Click to Create" run book action policy:
-
In SL1, go to the Behavior Settings page (System > Settings > Behavior) and set the Event Console Ticket Life Ring Button Behavior option to Create/View External Ticket.
-
Click to save your changes. You might need to log out of SL1 and log back into SL1 for the changes to update.
-
Go to the Automation page (Registry > Run Book > Automation).
-
Locate the "ServiceNow: (Cases/Events/Incident) - Click to Create" policy and click its wrench icon (
). The Automation Policy Editor page appears: -
Update the following fields:
- Policy State. Select Enabled.
- In the Criteria Logic section, select and external ticket IS requested in the fifth drop-down. Leave the other values in this section at their default settings.
- Repeat Time. Specify the frequency at which SL1 should execute the automation policy while the conditions are still met. The choices range from "every 30 seconds until satisfied" to "every 2 hours until satisfied", or "only once". By default, the policy only runs once.
- Available Actions. If it is not already selected, select ServiceNow: Send to PowerFlow: ServiceNow: Add/Update/Clear Incident and add it to the Aligned Actions field.
- Click . The "Click to Create" feature is now available on the Events and Event Investigator pages.
Enabling Run Book Automation Queue Retries
You can enable run book action (RBA) queue retries to keep from losing any data if PowerFlow is unavailable. Those pending PowerFlow applications are added to an RBA queue that you can access to retry the applications that failed.
For more information, see Enabling Run Book Automation Queue Retries.
Configuring PowerFlow
The following topics cover how to set up your PowerFlow instance for Event Sync.
You must install the ServiceNow Events SyncPack before you can perform the following procedures. For more information, see Installing the ServiceNow Events SyncPack.
Creating and Aligning a Configuration Object in PowerFlow
A configuration object supplies the login credentials and other required information needed to execute the steps for a PowerFlow application. The Configurations page (![]() ) of the PowerFlow user interface lists all available configuration objects for that system.
) of the PowerFlow user interface lists all available configuration objects for that system.
You can create as many configuration objects as you need. A PowerFlow application can only use one configuration object at a time, but you can use (or "align") the same configuration object with multiple applications.
To use this SyncPack, you will need to use an existing configuration object in the PowerFlow user interface or create a new configuration object. Next, you need to align that configuration object to the relevant applications that are triggered by the Run Book Actions in SL1.
Depending on your SL1 environment and the third-party environment with which you are syncing data, you might be able to use the same configuration object with more than one SyncPack.
Creating a Configuration Object for Event Sync
For the ServiceNow Events SyncPack, you will need to make a copy of the "ServiceNow SyncPack" configuration object, which is the sample configuration file that was installed with the "ServiceNow Base" SyncPack. After you create the new configuration object, you will need to add specific name-value pairs as variables for this SyncPack. These variables are listed in the following procedure.
If you have already set up a configuration object that you are using for other ServiceNow SyncPacks, you can use that configuration object for Event Sync. Go to step 7 in the following procedure to add the variables needed for this SyncPack.
To create a configuration object for the Events SyncPack:
- In the PowerFlow user interface, go to the Configurations page (
 ).
). - Click the button (
 ) for the "ServiceNow SyncPack" configuration object and select Edit. The Configuration pane appears.
 - Click . The Create Configuration pane appears.
- Complete the following fields:
- Friendly Name. Name of the configuration object that will display on the Configurations page.
- Description. A brief description of the configuration object.
- Author. User or organization that created the configuration object.
- Version. Version of the configuration object.
-
Click to show the JSON code.
-
In the Configuration Data field, be sure to include the required block of code to ensure that the applications aligned to this configuration object do not fail:
{
  "encrypted": false,
  "name": "sl1_db_host",
  "value": "${config.sl1_host}"
}
For example:
{
  "encrypted": false,
  "name": "sl1_db_host",
  "value": "10.2.11.42"
}
If you are using SL1 with an External Database (SL1 Extended architecture or a cloud-based architecture), update the "value" of that block of code to be the host of your database. This field accepts IP addresses. For example: "value": "db.sciencelogic.com". If you are not using the SL1 Extended architecture or a cloud-based architecture, you do not need to make any changes to the block of code other than pasting the code into the configuration object.
-
In the Configuration Data field, update the default name-value pairs or add your own to match your PowerFlow configuration. The Events SyncPack requires the following name-value pairs as variables:
The mid_server name-value pairs are not needed in the configuration object if your ServiceNow configuration does not include a MID Server.
- mid_server_api_protocol. The protocol used by the API of your MID Server. The default is http.
- mid_server_host. The IP address of the ServiceNow MID Server, along with the port number of the listener. In ServiceNow, go to the MID Web Server Contexts page (MID Server > Extensions > MID Web Server) and select the record you are using for Event Sync. The port number is defined in the HTTP/HTTPS Port field (port_number) on the MID Web Server Context record form. For example: 192.168.1.1:1773.
- mid_server_user. The MID Server user account. In ServiceNow, go to the MID Web Server Contexts page (MID Server > Extensions > MID Web Server) and select the record you are using for Event Sync. The user is defined in the Basic Auth User field (basic_auth_user) on the MID Web Server Context record form.
- mid_server_password. The MID Server account password. In ServiceNow, go to the MID Web Server Contexts page (MID Server > Extensions > MID Web Server) and select the record you are using for Event Sync. The password is defined in the Basic Auth User Password field (basic_auth_user_password) on the MID Web Server Context record form. This is not a User on the sys_user table.
- region. Unique identifier that identifies your SL1 instance within ServiceNow.
- sl1_host. The URL or IP address for the target SL1 system.
- sl1_user. User id of the user account the PowerFlow will use to log in to SL1.
- sl1_password. Password for the user account that PowerFlow will use to log in to SL1.
- snow_host. The URL for the target ServiceNow instance. For example: sciencelogic.service-now.com.
- snow_user. User id of the user account that PowerFlow will use to log in to ServiceNow.
- snow_password. Password of the user account that PowerFlow will use to log in to ServiceNow.
- snow_event_class. Unique identifier for the PowerFlow host that specifies which PowerFlow host should receive updates from ServiceNow. For bi-directional functionality to work, the connector instance name needs to match the source instance (snow_event_class) field exactly. These fields are case-sensitive.
- mid_rel_url. The relative URL for the Events Endpoint on the MID Server. Set this value to the following: /api/mid/em/inbound_event?Transform=jsonv2.
- If you want to use OAuth2 for authentication with ServiceNow, complete the following Configuration Data Values fields:
- snow_oauth_client_id. Enter the OAuth2 Client ID from ServiceNow.
- snow_oauth_client_secret. Enter the OAuth2 Client secret from ServiceNow.
- snow_oauth_token_url. Enter the full authentication URL, including host and protocol from ServiceNow. For example, "https://<test-instance-name>.service-now.com/oauth_token.do"
- snow_auth_method: Enter oauth or http_basic. If no value is provided, http_basic will be used for connection.
The configuration options listed above are included by default with the sample configuration object provided in the "ServiceNow Base" SyncPack. The configuration options are only required in the configuration object if you plan to use OAuth2 to authenticate. If the values are not present in the configuration object, normal "http_basic" authentication will be used.
- Click . You can now align the new configuration object with the relevant PowerFlow applications:
The following code is an example of the JSON configuration data for this configuration object:
[
{
"name": "mid_server_api_protocol",
"value": "http"
},
{
"name": "mid_server_host",
"value": "10.2.2.150"
},
{
"name": "mid_server_user",
"value": "midserveruserexample"
},
{
"name": "region",
"value": "example_region"
},
{
"name": "mid_server_password",
"value": "example_password",
"encrypted": true
},
{
"name": "sl1_host",
"value": "10.2.2.89"
},
{
"name": "sl1_password",
"value": "example_password",
"encrypted": true
},
{
"name": "sl1_user",
"value": "em7admin"
},
{
"name": "snow_host",
"value": "example.service-now.com"
},
{
"name": "snow_event_class",
"value": "example_val"
},
{
"name": "mid_rel_url",
"value": "/api/mid/em/inbound_event?Transform=jsonv2"
},
{
"name": "snow_password",
"value": "snowpassword",
"encrypted": true
},
{
"name": "snow_user",
"value": "snowadmin"
}
Creating an OAuth2 Credential Record in ServiceNow
In order to use OAuth2 for authentication with ServiceNow, you must create an OAuth2 credential record in ServiceNow. To configure the ServiceNow credential that will be used by the Connector Instance:
- Navigate to System OAuth > Application Registry. The Application Registries page appears.
- Click .
- Select Create an OAuth API endpoint for external clients. A new record appears.
- Complete the following fields on the new record:
- Name. Type a unique name for the credential. Required.
- Client ID. The Client ID is automatically generated by the ServiceNow OAuth server.
- Client Secret. Leave this empty. ServiceNow will auto-generate this when the record is saved.
- Refresh Token Lifespan. Enter the length of time in seconds the Refresh Token will be valid.
- Access Token Lifespan. Type the length of time in seconds that the Access Token will be valid. ScienceLogic recommends setting this to 3,600 seconds to avoid known issues for longer ServiceNow REST interactions.
In a scenario where the value is shorter than the duration of a PowerFlow step that makes multiple REST interactions with ServiceNow, the access token will expire and need to be refreshed. As a result, retries were added to several PowerFlow steps where this issue may occur. This issue will hopefully be addressed in future versions of the Base Steps SyncPack.
- Under the Auth Scope section at the bottom of the page, double click Insert a new row.
- In the search box that appears, click the magnifying glass icon, select the useraccount record, and click the checkmark icon to save.
- Click to save the new record.

Configuring the PowerFlow Applications for Event Sync
The workflows for configuring PowerFlow applications for Event Sync are different based on whether your ServiceNow environment uses a MID Server. Both workflows are included in the following sections.
Configuring PowerFlow Applications for ServiceNow with a MID Server
To run Event Sync, you must "align" the configuration object to run with the following PowerFlow applications:
- Cache SL1 Users
- Create Event in ServiceNow from SL1 Event
- Update SL1 Event from ServiceNow Trigger
- Sync Alert Details from ServiceNow to SL1 Events
You only need to run the "Sync Alert Details from ServiceNow to SL1 Events" application if you use a message key in the "ServiceNow: Add/Update/Clear Event" Run Book Action that has a one-to-many correlation between a single ServiceNow alert and multiple SL1 events. See the following procedure for more information.
If you want to link events with ServiceNow Configuration Items (CIs), you will need to run the "Sync Devices from SL1 to ServiceNow" application from the "ServiceNow CMDB" SyncPack. For more information, see Running a Device Sync.
To configure PowerFlow applications for ServiceNow with a MID Server:
- On the Applications page of the PowerFlow user interface, open the "Create Event in ServiceNow from SL1 Event" application and click . The Configuration pane for that application appears.
- From the Configurations drop-down, select the configuration object you want to use.
- Click to align that configuration with the application.
- Repeat this process for the "Update SL1 Event from ServiceNow Trigger" application and the "Cache SL1 Users" application. The "Cache SL1 Users" application is in the "System Utils" SyncPack. ScienceLogic recommends that you schedule the "Cache SL1 Users" application to run at least once a week.
-
If you use a message key that does not have a one-to-one correlation between SL1 events and ServiceNow alerts, you will need to open the "Sync Alert Details from ServiceNow to SL1 Events" application and edit the following parameters on the Configuration pane:
- events_mid_server parameter for this application should be selected.
- user_note_template field that accepts a Jinja2 template to generate custom user notes.
- Click .
- ScienceLogic recommends that you schedule the following PowerFlow applications:
- Cache SL1 Users: at least once a week
- Sync Alert Details from ServiceNow to SL1 Events: every 60 seconds
For more information about scheduling applications, see Scheduling a PowerFlow Application.
Configuring PowerFlow Applications for ServiceNow without a MID Server
To run Event Sync for ServiceNow without a MID Server, you must "align" the configuration object to run with the following PowerFlow applications:
- Cache SL1 Users (from the ServiceNow Base SyncPack)
- Sync Alert Details from ServiceNow to SL1 Events
- Sync Cached SL1 Events to ServiceNow
- Process and Cache SL1 Events
To configure PowerFlow applications for ServiceNow without a MID Server:
- On the Applications page of the PowerFlow user interface, open the "Sync Alert Details from ServiceNow to SL1 Events" application and click . The Configuration pane for that application appears.
- From the Configurations drop-down, select the configuration object you want to use.
- For only the "Sync Alert Details from ServiceNow to SL1 Events" application, make sure that the events_mid_server parameter selected is not selected.
- Click to save the configuration settings.
- Repeat steps 1-4 for the "Cache SL1 Users" application, the "Sync Cached SL1 Events to ServiceNow" application and the "Process and Cache SL1 Events" application. The "Cache SL1 Users" application is in the "System Utils" SyncPack.
- ScienceLogic recommends that you schedule the following PowerFlow applications:
-
Cache SL1 Users: at least once a week
-
Sync Alert Details from ServiceNow to SL1 Events: every 60 seconds
-
Sync Cached SL1 Events to ServiceNow: every 60 seconds
For more information about scheduling applications, see Scheduling a PowerFlow Application.
You do not need to schedule or run the "Process and Cache SL1 Events" application, as that is triggered by the "ServiceNow: Add/Update/Clear Event" Run Book Action in SL1.
Removing Lock Documents
The "Remove Lock Documents" application lets you remove the stale lock documents in Couchbase that were created by the "Process and Cache SL1 Events" application. ScienceLogic recommends that you schedule the application every five minutes with the default configurations. Fifty thousand lock documents are removed in every application run. This could take, for example, an hour and 30 minutes when removing one million lock documents. Running this application will not impact other applications running in PowerFlow.
Does this application needs to be run in all systems?
The previous versions of the "Process and Cache SL1 Events" application generated stale lock documents, so you might need to schedule this application to clean up those stale documents. To confirm that they are present in your system, navigate to the Couchbase user interface (https://<powerflow_IP>:Port 8091), go to the tab, and check the Items column for the content bucket. This value should be around 3,000 or less if no stale lock documents are present. If the number is higher and keeps growing,you should run the the "Process and Cache SL1 Events"application.
Will the stale lock documents still be created?
No. The "Process and Cache SL1 Events" application uses a Redis lock as of version 1.2.1 of the ServiceNow Events SyncPack, which cleans the locks that have been set. As of version 1.2.1, PowerFlow will not create any more stale lock documents in Couchbase or Redis.
Configuring the Remove Lock Documents Application
To configure the "Remove Lock Documents" application:
- On the Applications page of the PowerFlow user interface, click the Filter icon (
 ) at the top right of the SyncPacks page and select Show Hidden Applications to show all of the applications.
 - Open the "Remove Lock Documents" application and click . The Configuration pane for that application appears.
- From the Configurations drop-down, select the same configuration object you aligned to the "Process and Cache SL1 Events" application.
If for some reason the lock documents need to be deleted in less runs, you can increase the high_limit parameter, but be advised that the application can take longer than ~4 minutes(50K) to run, since more documents will be marked for deletion in one run. This can also cause more overhead in the database.
- Click to align that configuration object with the "Remove Lock Documents" application. You do not need to edit any other fields for that application.
- Schedule the application to run every five minutes, if the default parameters were not changed. For more information about scheduling applications, see Scheduling a PowerFlow Application.
After all of the stale lock documents are removed, you need to remove the schedule. You can check the application logs to see if any more lock documents are deleted, and the message "0 documents were deleted successfully" will display in the logs when no more lock documents exist. You can also check in the Couchbase user interface (https://<powerflow_IP>:Port 8091) to confirm that the number of lock documents is correct.
Additional Considerations for Multiple SL1 Systems
If you are using this SyncPack with multipleSL1 systems to monitor events from a single ServiceNow instance, you will need to review this section to ensure your systems are properly configured.
Using Multiple PowerFlow Configuration Objects
The "ServiceNow: Add/Update/Clear Event" run book action requires you to create a unique configuration object for each SL1 system. Each SL1 system must have a unique region value in their corresponding configuration object.
For more information, see Creating a Configuration Object for Event Sync.
Configuring PowerFlow Applications
The following PowerFlow applications were updated to prevent multiple SL1 systems from editing the same ServiceNow event at the same time.
Process and Cache SL1 Events
The "ServiceNow: Add/Update/Clear Event" run book action triggers this application whenever an SL1 event is created. In the case where multiple SL1 systems are syncing an event with a single ServiceNow event, the application will be "locked" to protect against unwanted behavior in ServiceNow caused by constantly posting events.
The lock in this application is unique to the event's message key, with the region prepended. The message key is set in the message_key_template parameter in the Input Parameters section of the "ServiceNow: Add/Update/Clear Event" run book action. For more information, see Customizing the Snippet Code in the Input Parameters Pane.
The "Process and Cache SL1 Event" step will fail if an event with a matching message key is trying to be written to the cache at the same time as another event. In other words, two events with the same message key cannot be processed and put into the cache at the exact same time.
The length of the lock is tied to the lock_timeout parameter on the Configuration tab for this application, which specifies how long PowerFlow should wait if the application has not completed before running again. The default is lock timeout is 25 seconds, and you can edit this value on the Configuration tab if needed. The lock timeout gives ServiceNow time to process the data from the event.
To retrieve the number of events in the cache, run the following command:
select count(*) from logs where meta().id like "SL1_EVENT%"
To delete all events from the cache, run the following command:
delete from logs where meta().id like "SL1_EVENT%"
Sync Cached SL1 Events to ServiceNow
The lock created in this application is tied the ServiceNow hostname to protect against unwanted behavior in ServiceNow caused by constantly posting events. This spacing gives ServiceNow time to process the events. The lock is released when PowerFlow gets a response from ServiceNow on the post, or the timeout is reached.
The length of the lock is tied to the lock_timeout parameter on the Configuration tab for this application, which specifies how long PowerFlow should wait if the application has not completed before running again. The default is lock timeout is 25 seconds, and you can edit this value on the Configuration tab if needed. The lock timeout gives ServiceNow time to process the data from the event.
"save_key": "SL1_EVENT+${appvar.region}+%"
Sync Alert Details from ServiceNow to SL1 Events
The lock created in this application is tied the ServiceNow hostname to protect multiple API calls from ServiceNow, as this call will increase in time as the number of events grows. The alerts are pulled by region from ServiceNow. The lock is released when PowerFlow gets a response from ServiceNow on the GET API call, or the timeout is hit. This is a redis lock with no upper limit.
Scheduling Considerations and Options
Limitations
Event Sync relies on receiving a response from ServiceNow to update back to SL1. Sending multiple payloads at the same time, such as in Option 2, below, causes inconsistency and long completion times in ServiceNow processing.
The processing put in between writing directly to the target table, such as large table lookups, or other custom actions, will impact the number of records that PowerFlow is able to send over.
Also, when sending a batch of 200 events, some customers' custom ServiceNow endpoint can take 108 seconds to complete processing. This means that if PowerFlow sends more than 200 events in a minute, ServiceNow will become backlogged, becauase the processing time takes longer than how often PowerFlow is posting.
As a result, if the overall throughput of events from SL1 is more than 200 a minute, events could potentially continue to get backlogged and may never get processed by ServiceNow until throughput is reduced.
Option 1: Staggered Schedules
In a multiple-stack setup using an "out-of-the-box" version of the "ServiceNow Events" SyncPack, if all the events are going to the same ServiceNow instance, then you cannot run each stack every minute, because the lock is not region-specific.
One option is to run the stacks with separate queues, staggered every minute, meaning that each stack gets posted every 5 minutes.
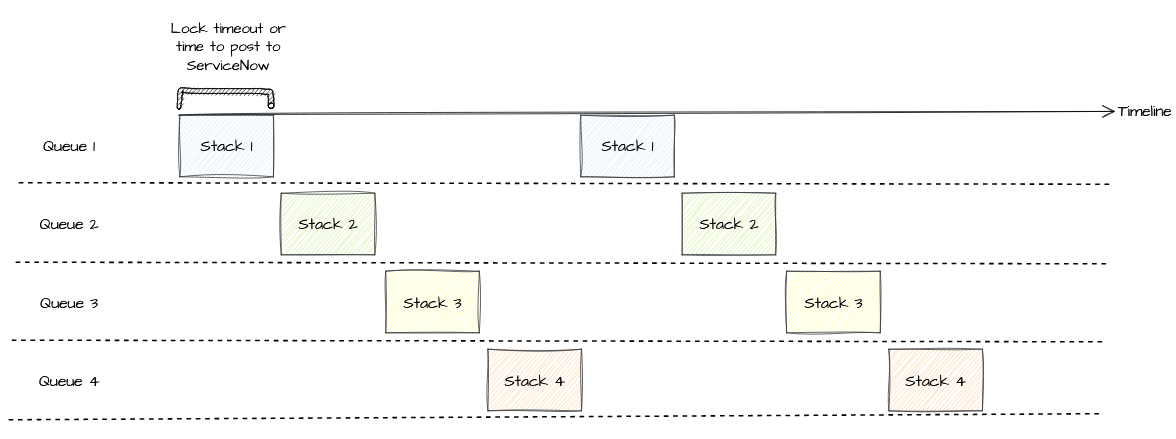
Pros:
- Optimized process that ensures no possibility of SNOW ever being overloaded.
- Ensures complete separation of event queues between SL1 stacks. An event flood from one SL1 will not affect or delay eventing from any other stack
Con:
- Events are sent only every 5 minutes per stack.
Option 2: Separate Queues, Send All Events Every Minute
This option involves modifying the lock of the "Sync Cached SL1 Events to ServiceNow" application to be the region instead of the ServiceNow hostname.
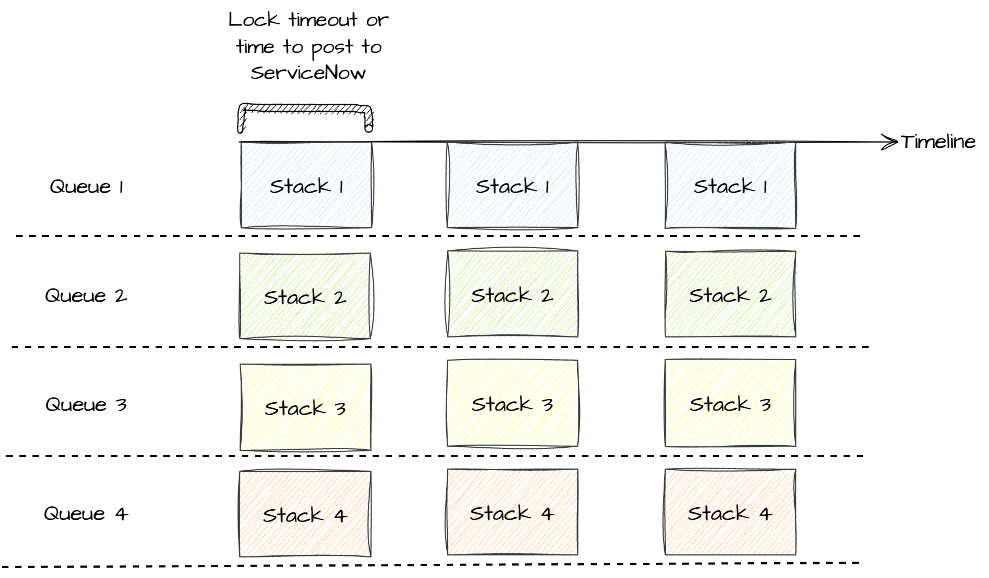
Pros:
- Events are sent every minute.
- Due to the separation of queues between SL1s, an event flood from one SL1 will not affect or delay eventing from other stacks.
Cons:
- Sending multiple payloads of events to ServiceNow at the same time is known to cause performance delays, and inconsistencies.
- Might cause ServiceNow to not complete processing before the next minute run, creating a backlog.
- Might also cause invalid data.
Option 3: One Queue, Send All Events Every Minute
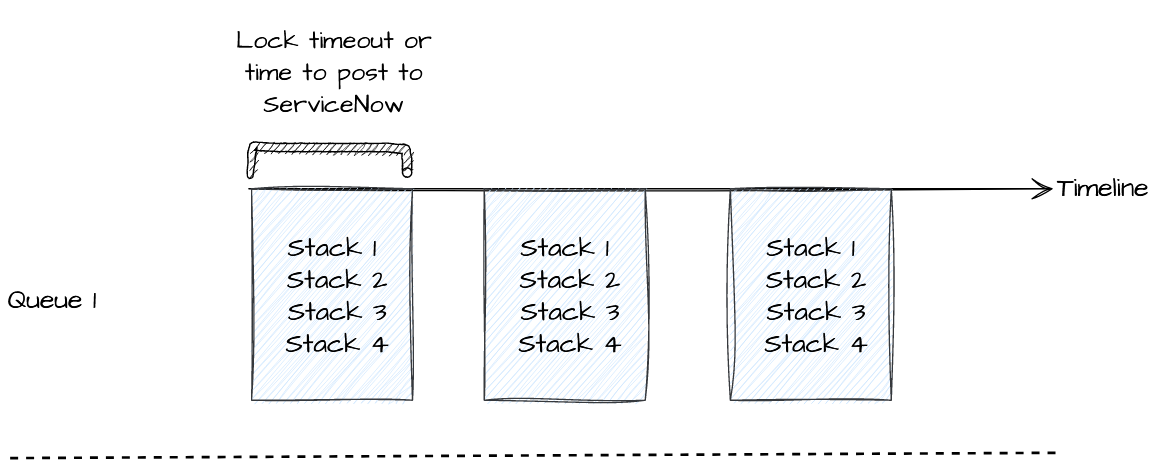
Pros:
- Events sent every minute
Cons:
- Possibility of an event flood from one SL1 to impact other SL1s.
- If there are in total more than 200 events from all stacks, ServiceNow will take more than one minute to respond, meaning that the next payload will not be received until after that or the lock timeout expires.
- A backlog of events from one SL1 might cause events from other SL1s to be delayed in processing.
Summary of Options and Benefits
With the consideration of the current custom ServiceNow API endpoint, the following table presents options and considerations:
| Implementation + scheduling | Event Frequency | Possibility for increased ServiceNow race condition/delay | Possibility for one stack event flood to impact another |
| Option 1: Staggered runs, SL-recommended timing | 4 minutes per stack (1 stack worth of events every minute) | No | No |
| Option 2: Separate queue runs every minute) | 1 minute per stack (all events every minute) | Yes | No |
| Option3: Single queue consolidated event pushing | 1 minute per stack (all events every minute) | No | Yes |