![]()
Device maps allow you to view devices by organization, device group, category, and component devices. This makes it easy to visualize and manage devices. You can view and customize these maps, including adding images and text, and can move individual or multiple devices to display the map for your needs. However, you cannot add or delete devices from the device maps. To add or remove devices from the device maps, you must change the organization for a device, change the device group for a device, change the device category for a device, or delete or discover a component device.
Some topics in this chapter are relevant to the classic user interface of Skylar One only. For more information about using Classic Maps in the Skylar One user interface, see
Use the following menu options to navigate the Skylar One user interface:
- To view a pop-out list of menu options, click the menu icon (
 ).
). - To view a page containing all of the menu options, click the Advanced menu icon (
 ).
).
Device Group Maps
A device group is a user defined group of devices. Device groups make it easy to configure and manage multiple devices. You can define and edit the configuration of device groups using templates. Skylar One will automatically update each view in the Device Group Map page (Maps > Classic Maps > Device Maps > Device Groups) as new devices are added to device groups, and as new device groups are defined. Skylar One also updates each view with the latest status and event information.
The Device Group Map page allows you to view the member devices in each device group and also view the relationships between device groups and their sub-groups.
The Device Group Map page contains buttons, tools, and icons to help view and manage the maps.
Viewing a Device Group Map
You can view a device group map from the Device Group Map page. To view an device group map:
- Go to the Classic Maps page (Maps > Classic Maps).
- Expand the sections for Device Maps > Device Groups, and then select a device group. The Device Group Map page appears and displays a map of the organization and its member devices:

- The allows you to find one or more devices in the map. You can enter a string, and Skylar One will highlight only the devices that have a device name that matches the string.
- Each device group and each member device appears as an icon.
- Each view contains a parent device group, represented by an icon with a cloud image. All devices and sub-groups radiate from this device group.
- Each member device is connected to its device group with a line. The color of the line specifies the device's current state. The state reflects the event of the highest severity for the device.
- When the view appears, you can view and reposition the components. The view can be edited and rearranged using drag-and-drop features. Devices and sub-groups can be repositioned for easier reading, if necessary.
- Mousing over a device displays its name, IP address, device type, and device category.
- Mousing over a device group displays its name.
- To toggle between the view of the parent device group and the view of a sub-group, you can select a view from the drop-down menu in the upper right.
Organizational Maps
The Organizational Map page allows you to view devices by organization. This makes it easy to visualize and manage devices in organizations. If devices in the organization include relationships created by Dynamic Applications, these relationships are displayed in the map. If devices in this organization include CDP, LLDP, layer-2, or layer-3 relationships, they are included in the map.
All elements, policies, events, tickets, and users in Skylar One are associated with an organization. An organization is a group for managing elements and user accounts. You can define organizations by geographic area, departments, types of devices, or any structure that works best for your needs. The minimum characteristics of an organization consist of:
- A unique name
- Users who are members of the organization
- Elements, such as devices, associated with the organization
Skylar One automatically updates the Organizational Maps as new devices are added to organizations and as new organizations are defined. Skylar One also updates each map with the latest status and event information.
To select an Organizational Map, go to the Classic Maps page (Maps > Classic Maps), expand the links for Device Maps > Organizational, and then select an organization. The Organizational Map page appears and displays a map of the selected organization and its devices.
Viewing an Organizational Map
You can view an organizational map from the Organizational Map page. To view an organizational map:
- Go to the Classic Maps page (Maps > Classic Maps).
- Expand the sections for Device Maps > Organizational, and then select an organization. The Organizational Map page appears and displays a map of the organization and its member devices:

- The search field at the top allows you to find one or more devices in the map. You can enter a string, and Skylar One will highlight only the devices that have a device name that matches the string.
- Each member device appears as an icon in the map.
- The Organizational Map page for an organization also displays the relationships between devices in the organization. This includes:
- Layer-2 devices and their clients
- Layer-3 devices and layer-2 devices
- Component devices and their parents, e.g. virtual machines and their hypervisors
- Network devices that use CDP (Cisco Discovery Protocol) and devices that are specified as neighbors in the CDP tables
- Network devices that use LLDP (Link Layer Discovery Protocol) and devices that are specified as neighbors in the CDP tables
- Device relationships created with Dynamic Applications
- Manually created parent-child relationships that affect event correlation
- When the map appears, you can view and reposition the components. The map can be edited and rearranged using drag-and-drop features. Devices can be repositioned for easier reading, if necessary.
- Mousing over a device displays its name, IP address, device type, and device category.
The Device Category Map page allows you to view devices by device category. This makes it easy to visualize and manage devices.
A device category is a logical categorization of devices by primary function. Skylar One uses device categories to group related devices in reports and views.
Device categories are paired with device classes to organize and describe discovered devices. Device class usually describes the manufacturer. Device category describes the function of the hardware. For example, a device might have a device class of "Microsoft Windows 2000 Server" and a device category of "servers".
To select a Device Category map, go to the Classic Maps page (Maps > Classic Maps), expand the links for Device Maps > Categories, and then select a device category. The Device Category Map page appears and displays a map of the selected device category and its devices.
Viewing a Device Category Map
You can view a device category map from the Device Category Map page. To view a device category map:
- Go to the Classic Maps page (Maps > Classic Maps).
- Expand the links for Device Maps > Categories and then select a device category. The Device Category Map page appears and displays a map of the device category and its member devices:

- The allows you to find one or more devices in the map. You can enter a string, and Skylar One will highlight only the devices that have a device name that matches the string.
- Each member device appears as an icon in the map.
- When the map appears, you can view and reposition the components. The map can be edited and re-arranged using drag-and-drop features. Devices can be repositioned for easier reading, if necessary.
- Mousing over a device displays its name, IP address, device type, and device category.
Component Maps
The Component Map page allows you to view devices by root node and also view the relationships between root nodes, parent components, and child components. This map makes it easy to visualize and manage root nodes and their components.
NOTE: User accounts of type "user" can view only root nodes and device components that belong to their organization(s).
Skylar One uses Dynamic Applications to retrieve data from a management device and discover each entity managed by that management device. Skylar One then uses that retrieved data to create a device for each managed entity. In some cases, the managed entities are nested.
- In Skylar One, a managed entity is called a component device. A component device is an entity that runs under the control of a physical management device.
- In Skylar One, the root device is the physical device that manages one or more component devices.
- In Skylar One, a parent device is a device that has associated entities modeled as component devices. A parent device can be either a root device or another component device.
For example, in a Cisco UCS system, Skylar One might discover a physical server that hosts the UCS manager. Skylar One might discover a chassis as a component device. The chassis is a child device to the physical server; the physical server is the root device. Skylar One might also discover a blade as a component device that is part of the chassis. The blade is a child device to the chassis. The chassis is the parent device.
Skylar One automatically updates the Component Map as new component devices are discovered. Skylar One also updates each map with the latest status and event information.
Viewing a Component Map
You can view a component map from the Component Map page. To view a Component Map:
- Go to the Classic Maps page (Maps > Classic Maps).
- Expand the links for Device Maps > Components and then select a root node. The Device Component Map page appears and displays the map of the root node and its component devices.
- The allows you to find one or more devices in the map. You can enter a string, and Skylar One will highlight only the devices that have a device name that matches the string.
- Each root node and component device appears as an icon.
- Each map contains a root node. All parent and child devices radiate from this root node.
- Each component device is connected to its parent with a line. The color of the line specifies the device's current state. The state reflects the event of the highest severity for the device.
- When the map appears, you can view and reposition the icons.The view can be edited and rearranged using drag-and-drop features. Root devices and components can be repositioned for easier reading, if necessary.
- Mousing over a device displays its name, IP address (for physical devices), device type, and device category.
NOTE: For a user of type User, you can view only root nodes and device components that belong to your organization(s).
Adding Devices from Another Component Tree to the Component Map
You can add a device from another component tree to the map of the current component device.
For example, suppose you have a UCS system. Suppose you are running an ESX server and VMs on one of the blades of the UCS system:
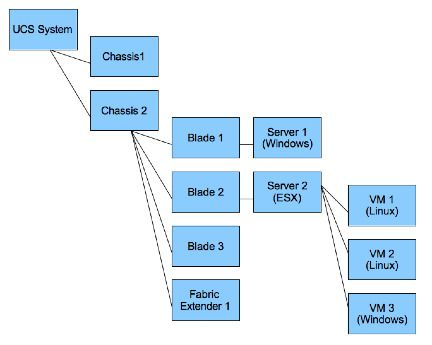
You can add the device where the ESX server resides to the map of the UCS system. To do this:
- Go to the Component Map page (Maps > Classic Maps > Device Maps > Components).
- Expand the list of maps. Find the component map to which you want to add a device.
- Select the button. Select the Add Dev icon (in the upper left).
- In the Device Browser modal page, select the root node you want to add to the component map. Select the button.
NOTE: When you complete these steps, the Skylar One system will automatically add all the child devices for the newly added node to the map.
- Select the button. Click on the parent device and then click on the newly added child device.
- The link you created is an Event Correlation Override link. If you want to manually define a parent device and child device for two devices that do not share a Layer-2 link, a Layer-3 link, a CDP link, an LLDP link, or a VMware relationship, you can create an Event Correlation Override link between the devices. Additionally, you can then define an event hierarchy for these devices.
- Select the button.
- Select the button to view the changes to the map.