This
Creating the SOAP/XML Credential for AWS
To discover AWS using the manual discovery method, you must first define an AWS credential in SL1.
NOTE: If you are using an SL1 system prior to version 11.1.0, the new user interface does not include the Duplicate option for sample credential(s). ScienceLogic recommends that you use the classic user interface and the Save As button to create new credentials from sample credentials. This will prevent you from overwriting the sample credential(s).
To define an AWS credential:
- Go to the Credentials page (Manage > Credentials).
- Locate the AWS Credential sample credential, click its icon (
) and select Duplicate. A copy of the credential, called AWS Credential copy appears.
- Click the icon (
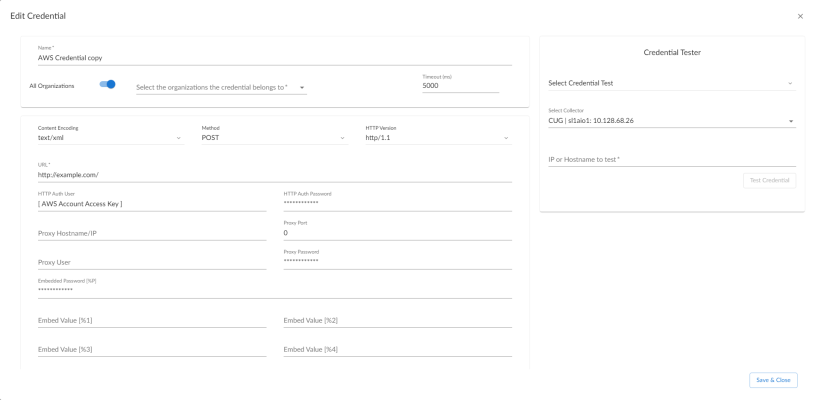
) for the AWS Credential copy credential and select Edit. The Edit Credential modal page appears:
- Supply values in the following fields:
- Name. Type a new name for your AWS credential.
- All Organizations. Toggle on (blue) to align the credential to all organizations, or toggle off (gray) and then select one or more specific organizations from the What organization manages this service? drop-down field to align the credential with those specific organizations.
- Timeout (ms). Keep the default value.
- URL. Enter a valid URL. This field is not used for this discovery method but must be populated with a valid URL for discovery to complete.
- HTTP Auth User. Type your Access Key ID.
- HTTP Auth Password. Type your Secret Access Key. The characters appear as asterisks to protect your password privacy.
- Proxy Hostname/IP. Type the host name or IP address of the proxy server.
The proxy fields are required only if you are discovering AWS services through a proxy server. Otherwise, leave these fields blank.
- Proxy Port. Type the port on the proxy server to which you will connect.
- Proxy User. Type the username used to access the proxy server.
- Proxy Password. Type the password used to access the proxy server.
If you are creating a credential from the AWS Credential - Proxy example and the proxy server does not require a username and password, then the Proxy User and Proxy Password fields must both be blank. In that scenario, if you leave the "<Proxy_User>" text in the Proxy User field, SL1 cannot properly discover your AWS services.
- Embed Value [%1]. To monitor a GovCloud account, type "us-gov-west-1" or "us-gov-east-1". Otherwise, leave this field blank.
- Click the button.
Creating the SOAP/XML Credential for AWS in the SL1 Classic User Interface
To discover AWS using the manual discovery method, you must first define an AWS credential in SL1.
To define an AWS credential:
- Go to the Credential Management page (System > Manage > Credentials).
- Locate the AWS Credential sample credential and click its wrench icon (
 ). The Credential Editor modal page appears.
- Enter values in the following fields:
Basic Settings
- Profile Name. Type a new name for your AWS credential.
- URL. Enter a valid URL. This field is not used for this discovery method but must be populated with a valid URL for discovery to complete.
- HTTP Auth User. Type your Access Key ID.
- HTTP Auth Password. Type your Secret Access Key. The characters appear as asterisks to protect your password privacy.
Proxy Settings
The Proxy Settings fields are required only if you are discovering AWS services through a proxy server. Otherwise, leave these fields blank.
- Hostname/IP. Type the host name or IP address of the proxy server.
- Port. Type the port on the proxy server to which you will connect.
- User. Type the username used to access the proxy server.
- Password. Type the password used to access the proxy server.
If you are creating a credential from the AWS Credential - Proxy example and the proxy server does not require a username and password, then the User and Password fields must both be blank. In that scenario, if you leave the "<Proxy_User>" text in the User field, SL1 cannot properly discover your AWS services.
SOAP Options
- Embed Value [%1]. To monitor a GovCloud account, type "us-gov-west-1" or "us-gov-east-1". Otherwise, leave this field blank.
- Click the button, and then click .
Creating an AWS Virtual Device for Discovery in the SL1 Classic User Interface
Because the Amazon Web Service does not have a specific IP address, you cannot discover an AWS device using discovery. Instead, you must create a virtual device that represents the Amazon Web Service. A virtual device is a user-defined container that represents a device or service that cannot be discovered by SL1. You can use the virtual device to store information gathered by policies or Dynamic Applications.
To create a virtual device that represents your Amazon service:
- Go to the Device Manager page (Devices > Device Manager or Devices > Classic Devices, or Registry > Devices > Device Manager in the classic SL1 user interface in the SL1 classic user interface).
- Click the button, then select Create Virtual Device. The Virtual Device modal page appears.
- Enter values in the following fields:
- Device Name. Enter a name for the device. For example, you could enter "Amazon Cloud" in this field.
- Organization. Select the organization for this device. The organization the device is associated with limits the users that will be able to view and edit the device.
- Device Class. Select Service | AWS Service.
- Collector. Select the collector group that will monitor the device.
- Click the button to create the virtual device.
Aligning the Discovery Dynamic Application
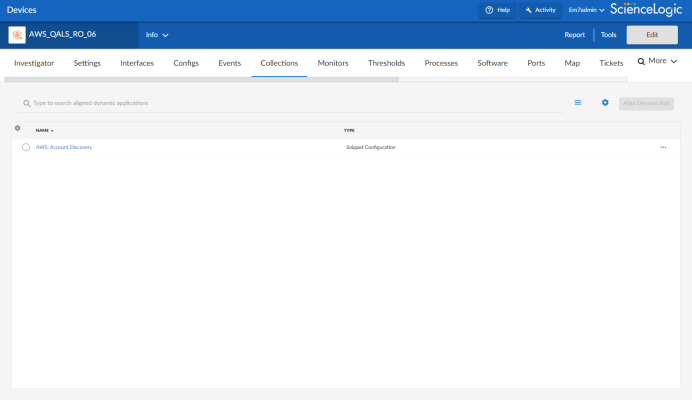
To discover your AWS account, you must manually align the "AWS: Account Discovery" Dynamic Application with the AWS virtual device. After you do so, the other Dynamic Applications in the Amazon Web Services PowerPack will automatically align to discover and monitor all of the components in your AWS account.
If your AWS account includes API Gateways or Lambda services to be monitored and you want SL1 to put those component devices in a "vanished" state if the platform cannot retrieve data about them for a specified period of time, ScienceLogic recommends setting the Component Vanish Timeout Mins. field to at least 120 minutes. For more information, see
To align the "AWS: Account Discovery" Dynamic Application to your virtual device:
- Go to the Devices page.
- Click the AWS virtual device and click on it to open the Device Investigator.
- In the Device Investigator, click the tab. The Dynamic Application Collections page appears.
- Click the button and then click the button.
- In the Align Dynamic Application page, click Choose Dynamic Application.
- In the Choose Dynamic Application page, locate the credential you created for your AWS service and select it.
- Click the button and then click the button.
Aligning the Discovery Dynamic Application in the SL1 Classic User Interface
To discover your AWS account, you must manually align the "AWS: Account Discovery" Dynamic Application with the AWS virtual device. After you do so, the other Dynamic Applications in the Amazon Web Services PowerPack will automatically align to discover and monitor all of the components in your AWS account.
If your AWS account includes API Gateways or Lambda services to be monitored and you want SL1 to put those component devices in a "vanished" state if the platform cannot retrieve data about them for a specified period of time, ScienceLogic recommends setting the Component Vanish Timeout Mins. field to at least 120 minutes. For more information, see
To align the "AWS: Account Discovery" Dynamic Application to your virtual device:
- Go to the Device Manager page (Devices > Classic Devices, or Registry > Devices > Device Manager in the classic SL1 user interface).
- Click the wrench icon (
 ) for your virtual device.
 - In the Device Administration panel, click the tab. The Dynamic Application Collections page appears.
- Click the button, and then select Add Dynamic Application from the menu.
- In the Dynamic Application Alignment modal page, select AWS: Account Discovery in the Dynamic Applications field.
- In the Credentials field, select the credential you created for your AWS service.
- Click the button to align the Dynamic Application.

