This
Prerequisites
Before you can build a VPN between a Skylar One Software-as-a-Service (SaaS) environment and AWS, you must have the following prerequisites:
- An existing AWS account with an AWS region
- A connection to data centers in which you are planning to deploy Skylar One Data Collectors
- A list of prefixes and subnets in which you are planning to deploy Skylar One Data Collectors
Creating Private Connectivity for SaaS in AWS
To set up a VPN for SaaS on an existing AWS Transit Gateway or AWS Direct Connect account:
You might need to enable resource sharing within your AWS Organizations from your AWS management account.
- Log in to your AWS account as a Cloud Administrator.
- Select the AWS account on which your AWS Transit Gateway is running.
- Select the AWS Management Console associated with the role allowing administrative access.
- Select the appropriate AWS region.
- Navigate to Resource Access Manager.
- Click the button.
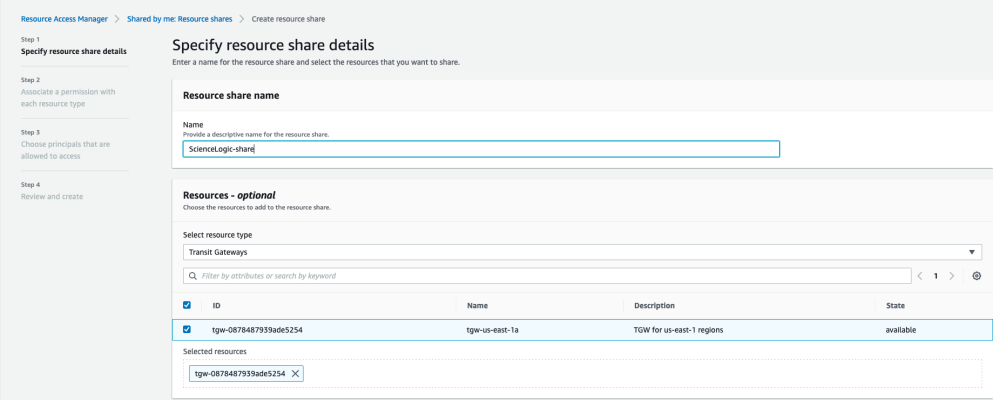
- In the Specify resource share details page, type a name for your resource share in the Name field.
- In the Select resource type drop-down, select Transit Gateways. A list of available Transit Gateways will appear. Select the checkbox for the Transit Gateway you want to share with ScienceLogic.
- Click to go to the Associate permissions page. Permissions are not modified for Transit Gateways, so click again.
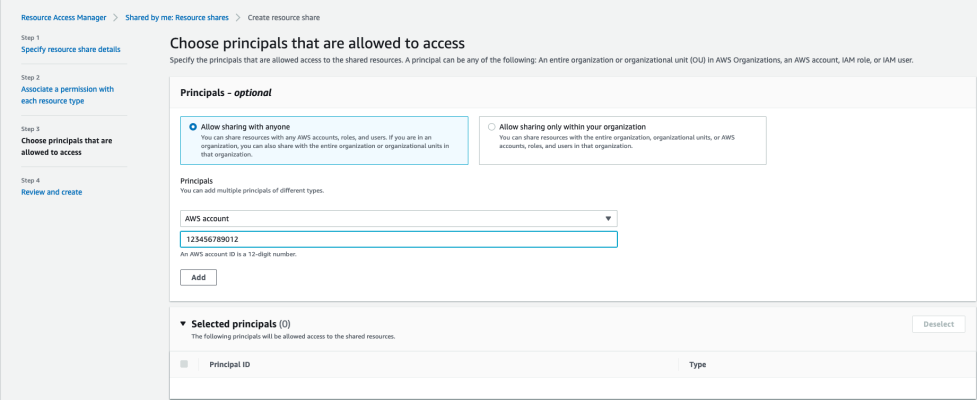
- In the Choose principals that are allowed to access page, select Allow sharing with anyone.
- In the Principals drop-down, select AWS account and type the ScienceLogic-provided 12-digit number in the AWS account ID field.
- Click . Repeat these steps if ScienceLogic has provided multiple account numbers.
- Click to go to the Review and create page. Review the information you entered and then click the button.
When you have completed sharing your AWS resource, ScienceLogic will attach a single virtual private cloud (VPC) or multiple VPCs to your Transit Gateway.
If your Transit Gateway is not configured to automatically accept sharing requests, you must approve the request in your account.
To approve the request:
- Log in to your AWS account as a Cloud Administrator.
- Select the AWS account on which your AWS Transit Gateway is running.
- Select the AWS Management Console associated with the Role allowing administrative access.
- Select the appropriate AWS region.
- Navigate to VPC.
- In the left navigation panel, click Transit Gateway Attachments.
- In the Transit gateway attachments page, you will see a list of your Transit Gateway attachments that are "pending acceptance".
- Select the checkbox for your Transit Gateway attachment, and then click the drop-down and select Accept.
Next, you must create the Transit Gateway route table for your VPC attachment:
- From your AWS Management Console, click VPC.
- In the left navigation panel, click Transit Gateway Route Tables.
- In the Transit gateway route tables page, click the button.
- Type a name for your Transit Gateway table in the Name tag field.
- In the Transit gateway ID drop-down, select your Transit Gateway.
- Click the button.
After creating your Transit Gateway route table, you must associate the route table with your VPC attachment:
- From your AWS Management Console, click VPC.
- In the left navigation panel, click Transit Gateway Route Tables.
- In the Transit gateway route tables page, when the State of the route table transitions to Available, select the Associations tab. You might have to refresh the Transit gateway route tables page to see the State change.
- Click Create association.
- Select the Transit Gateway attachment you want to associate with your VPC, and then click .
Finally, to allow traffic from your site-to-site VPN connection to be routed to the ScienceLogic workload VPC, you must add a propagation for the VPC attachment to the network services route table:
- From your AWS Management Console, click VPC.
- In the left navigation panel, click Transit Gateway Route Tables.
- In the Transit gateway route tables page, select the route table you use for routing traffic outside of AWS.
- Click the Actions drop-down and select Create propagation.
- Select the Transit Gateway attachment to propagate.

