This section describes how to configure AWS component devices in ELK stacks for monitoring by Skylar One using the "ELK: AWS CloudTrail" PowerPack.
Prerequisites for Monitoring AWS ELK Stacks
To configure Skylar One to monitor AWS component devices in ELK stacks using the "ELK: AWS CloudTrail" PowerPack, you must first:
- Install the "Amazon Web Services" PowerPack.
- Create a virtual device in Skylar One to represent your AWS service.
- Discover AWS component devices by manually aligning the "AWS Account Discovery" Dynamic Application to the virtual device.
- Ensure that your AWS CloudTrail bucket is properly configured for all read/write events.
For more information about the "Amazon Web Services" PowerPack, including how to install the PowerPack and discover AWS devices, see
Creating a Basic/Snippet Credential
To configure Skylar One to monitor an ELK: AWS CloudTrailsystem, you must first create a Basic/Snippet credential. This credential allows the Dynamic Applications in the "ELK: AWS CloudTrail" PowerPack to communicate with your ELK: AWS CloudTrail system.
The PowerPack includes an example Basic/Snippet credential that you can edit and save for your own use.
To create a Basic/Snippet credential:
- Go to the Credentials page (Manage > Credentials).
- Locate the "ELK: AWS Example" credential, then click its icon (
 ) and select Duplicate from the drop-down field. The "ELK: AWS Example copy" credential appears.
 - Click the icon (
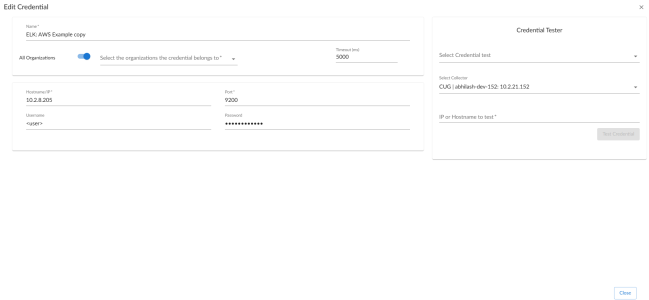
 ) for the "ELK: AWS Example copy" credential, then select Edit. The Edit Credential page appears.
 - Enter values in the following fields:
- Name. Enter a new name for the credential. This field is required.
- All Organizations. Toggle on (blue) to align the credential to all organizations, or toggle off (gray) and then select one or more specific organizations from the Select the organizations the credential belongs to drop-down field to align the credential with those specific organizations.
- Timeout. Enter the time, in milliseconds, after which Skylar One will stop trying to communicate with the ELK: AWS CloudTrail device. The default value is 5000. This field is required.
- Hostname/IP. Keep the default IP address. The default is 10.2.8.205.
- Port. Keep the default. The default value is "9200".
- Username. Enter the username associated with the ELK: AWS CloudTrail administrator account.
- Password. Enter the password associated with the ELK: AWS CloudTrail administrator account.
- Click .
Creating an Basic/Snippet Credential in the Skylar One Classic User Interface
To use the Dynamic Applications in the "ELK: AWS CloudTrail" PowerPack, you must first define a credential in Skylar One. This credential enables the Dynamic Applications in the "ELK: AWS CloudTrail" PowerPack to monitor your AWS component devices in ELK stacks. The PowerPack includes a sample Basic/Snippet credential (ELK: AWS Example) that you can use as a template.
To define an AWS ELK credential:
- Go to the Credential Management page (System > Manage > Credentials).
- Click the wrench icon (
 ) for the ELK: AWS Example credential. The Credential Editor modal page appears.
 - Enter values in the following fields:
- Credential Name. Type a new name for your AWS ELK credential.
- Hostname/IP. Type the IP address or hostname for the Logstash server that collects data for the AWS components in your ELK stack.
- Port. Type "9200".
Use the default values for the remaining fields.
The Basic/Snippet credential requires values in the Username and Password fields, but the values themselves do not matter.
- Click the button, and then click .
Discovering the AWS ELK Devices
To monitor your ELK: AWS CloudTrail system, you must run a discovery session to discover the server on which ELK: AWS CloudTrail is installed.
To create and run a discovery session that will discover an ELK: AWS CloudTrail appliance:
- Go to the Devices page (
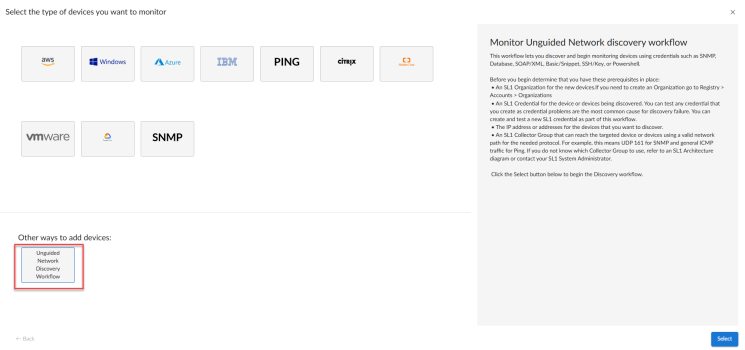
) or the Discovery Sessions page (Devices > Discovery Sessions) and click the button.
- Click the button. Additional information about that requirements for discovery appears in the General Information pane to the right.
- Click . The three-step wizard appears starting with the tab.
- Complete the following fields:
- Discovery Session Name. Type a unique name for this discovery session. This name is displayed in the list of discovery sessions on the tab.
- Description.Optional. Type a short description of the discovery session. You can use the text in this description to search for the discovery session on the tab.
- Select the organization to add discovered devices to. Select the name of the organization to which you want to add the discovered devices.
- Click . The tab of the wizard appears.
- On the tab, locate and select the Basic/Snippet credential you created for ELK: AWS CloudTrail appliances.
- Click . The tab of the wizard appears.
- Complete the following fields:
- List of IP/Hostnames. Type the IP address for the ELK: AWS CloudTrail appliance.
- Which collector will discover these devices?. Required. Select an existing collector to monitor the discovered devices.
- Run after save. Toggle on (blue) to run this discovery session as soon as you save the session.
- Advanced options. Click the down arrow (
 ) to complete the following fields:
- Discover Non-SNMP. Toggle on (blue) to enable this setting.
- Model Devices. Toggle on (blue) to enable this setting.
- Select Device Template. If you configured an ELK: AWS CloudTrail device template, select it here. Otherwise, leave the default selection.
- If you enabled the Run after save option, click the button. The discovery session will run and the Discovery Logs page will display any relevant log messages. If the discovery session locates and adds any devices, the Discovery Logs page will include a link to the Device Investigator page for the discovered device.
- If you did not enable the Run after save option, click the button. The Discovery Sessions page (Devices > Discovery Sessions) will display the new discovery session.
Aligning the AWS ELK Dynamic Applications in the Skylar One Classic User Interface
To monitor your AWS component devices in ELK stacks, you must manually align the "ELK: AWS Alignment" Dynamic Application with the AWS virtual device. When you do so, the remaining Dynamic Applications from the "ELK: AWS CloudTrail" PowerPack automatically align to the appropriate AWS component devices.
To manually align the "ELK: AWS Alignment" Dynamic Application to your virtual device:
- Go to the Device Manager page (Devices > Classic Devices, or Registry > Devices > Device Manager in the classic SL1 user interface).
- Locate your AWS virtual device and click its wrench icon (
 ).
). - In the Device Administration panel, click the tab. The Dynamic Application Collections page appears.
- Click the button, and then select Add Dynamic Application from the menu.
- In the Dynamic Application Alignment modal page, select ELK: AWS Alignment in the Dynamic Applications field.
- In the Credentials field, select the credential you created for your AWS ELK components.
- Click .
By default, the "ELK: AWS Alignment" Dynamic Application begins collecting data after 60 minutes. If you want to begin collecting data immediately, click the lightning bolt icon (![]() ) for the "ELK: AWS Alignment" Dynamic Application on the Dynamic Application Collections page.
) for the "ELK: AWS Alignment" Dynamic Application on the Dynamic Application Collections page.
When you align the "ELK: AWS Alignment" Dynamic Application to the AWS root device, Skylar One then aligns the following Dynamic Application from the "ELK: AWS CloudTrail" PowerPack to the appropriate component devices:
- ELK: AWS CloudTrail
- ELK: AWS CloudTrail EC2 Stats
To view the data collected by the "ELK: AWS CloudTrail" Dynamic Application, navigate to the Journal View page (Devices > Classic Devices > graph icon > Journals, Registry > Devices > Device Manager > graph icon > Journals in the classic SL1 user interface) and click ELK: AWS CloudTrail on the left menu.
To view the data collected by the "ELK: AWS CloudTrail EC2 Stats" Dynamic Application, navigate to the Device Performance page (Devices > Classic Devices > bar-graph icon > Performance, or Registry > Devices > Device Manager > bar-graph icon > Performance in the classic SL1 user interface) and click ELK: AWS CloudTrail on the left menu.

