![]()
The following sections describe how to configure and discover Cisco wireless LAN controllers for monitoring by Skylar One using the "Cisco: Wireless" PowerPack:
Prerequisites for Monitoring Cisco Wireless LAN Controllers
Before you can monitor Cisco wireless LAN controllers using the "Cisco: Wireless" PowerPack, you must have the following information:
- The IP address of the WLC that you want to monitor with Skylar One
- The settings for an SNMP V2 or SNMP V3 credential that can be used to communicate with the WLC
Configuring a Cisco WLC SNMP Credential
To configure Skylar One to monitor a Cisco WLC, you must first create a SNMP V2 or SNMP V3 credential. This credential allows the Dynamic Applications in the "Cisco: Wireless" PowerPack to communicate with the WLC.
To create an SNMP credential for monitoring a WLC:
- Go to the Credential Manager page (Manage > Credentials).
- Click , and then select SNMP Credential. The Create Credential page appears:

- Supply values in the following fields:
- Name. Type a new name for the credential.
- All Organizations. Toggle on (blue) to align the credential to all organizations, or toggle off (gray) and then select one or more specific organizations from the What organization manages this service? drop-down field to align the credential with those specific organizations.
- Timeout (ms). Time, in milliseconds, after which Skylar One will stop trying to communicate with the device from which you want to retrieve data.
- SNMP Version. Select SNMP V2 (default) or SNMP V3 for enhanced security.
NOTE: Do not use an SNMP V1 credential for monitoring a WLC. Using an SNMP V1 credential will decrease the performance of the data collection process.
- If you selected SNMP V2, type the community string for the WLC in the SNMP Community (Read Only) field.
- If you selected SNMP V3, supply values in the following fields:
- Security Name. Type the SNMP username for the WLC.
- Security Passphrase. Type the passphrase for the SNMP user.
- Authentication Protocol. If applicable, select the authentication protocol for the SNMP user.
- Security Level. If applicable, select the security level that is applicable to the SNMP user.
- Engine ID. If applicable, type the SNMP V3 Engine ID for the SNMP user.
- Context. If applicable, type the SNMP Context.
- Privacy Protocol. If applicable, select the privacy protocol for the SNMP user.
- Privacy Protocol Pass Phrase. If applicable, type the privacy protocol passphrase for the SNMP user.
- Port. Leave this field by default.
- SNMP Retries. Leave this field by default.
- Click .
Configuring a Cisco WLC SNMP Credential in the Skylar One Classic User Interface
To configure Skylar One to monitor a Cisco WLC, you must first create a SNMP V2 or SNMP V3 credential. This credential allows the Dynamic Applications in the "Cisco: Wireless" PowerPack to communicate with the WLC.
To create an SNMP credential for monitoring a WLC:
- Go to the Credential Management page (System > Manage > Credentials).
- Click , and then select Create SNMP Credential. The Credential Editor page appears.
- Supply values for the following fields:
- Profile Name. Type a name for the credential.
- Timeout (ms). Time, in milliseconds, after which Skylar One will stop trying to communicate with the device from which you want to retrieve data.
- SNMP Version. Select SNMP V2 (default) or SNMP V3 for enhanced security.
NOTE: Do not use an SNMP V1 credential for monitoring a WLC. Using an SNMP V1 credential will decrease the performance of the data collection process.
- If you selected SNMP V2, type the community string for the WLC in the SNMP Community (Read Only) field.
- If you selected SNMP V3, supply values in the following fields:
- Security Name. Type the SNMP username for the WLC.
- Security Passphrase. Type the passphrase for the SNMP user.
- Authentication Protocol. If applicable, select the authentication protocol for the SNMP user.
- Security Level. If applicable, select the security level that is applicable to the SNMP user.
- SNMP v3 Engine ID. If applicable, type the SNMP V3 Engine ID for the SNMP user.
- Context Name. If applicable, type the SNMP Context.
- Privacy Protocol. If applicable, select the privacy protocol for the SNMP user.
- Privacy Protocol Pass Phrase. If applicable, type the privacy protocol passphrase for the SNMP user.
- Port. Leave this field by default.
- Retries. Leave this field by default.
- Click the button.
Discovering Cisco WLC Devices
To discover Cisco WLC devices:
- On the Devices page (
 ) or the Discovery Sessions page (Devices > Discovery Sessions), click the button. The Select page appears:
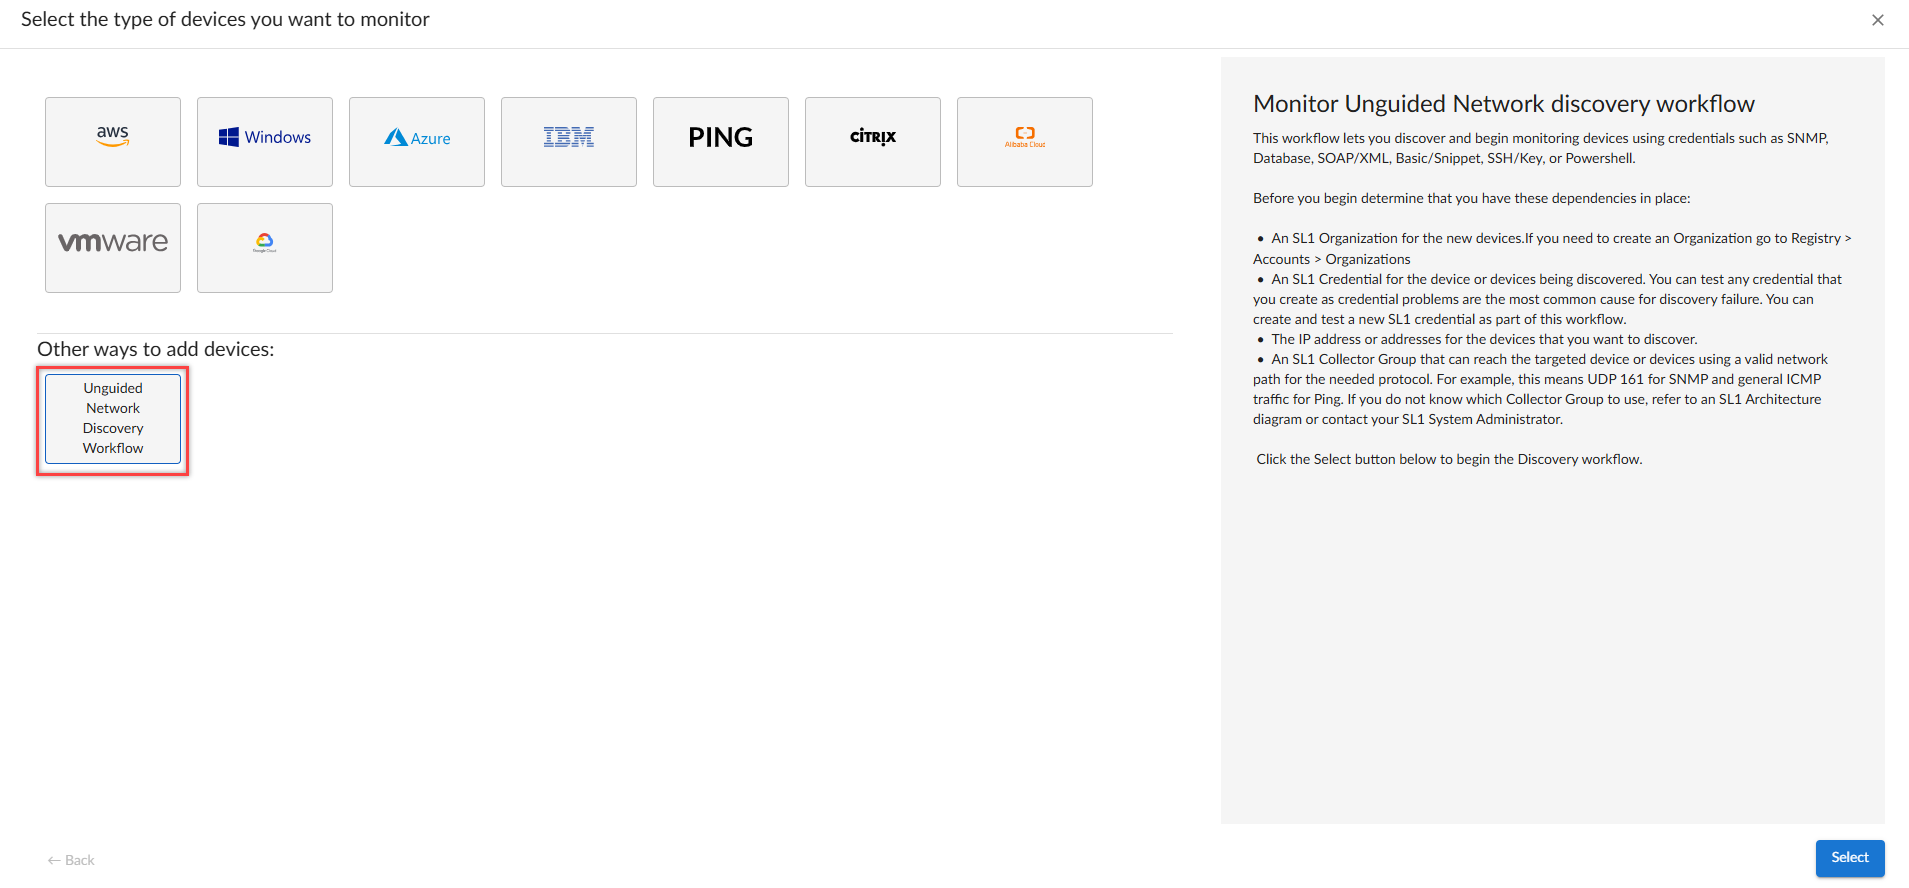
- Click the Unguided Network discovery workflow button. Additional information about the requirements for discovery appear in the General Information pane to the right.
- Click . The Add Devices page appears:
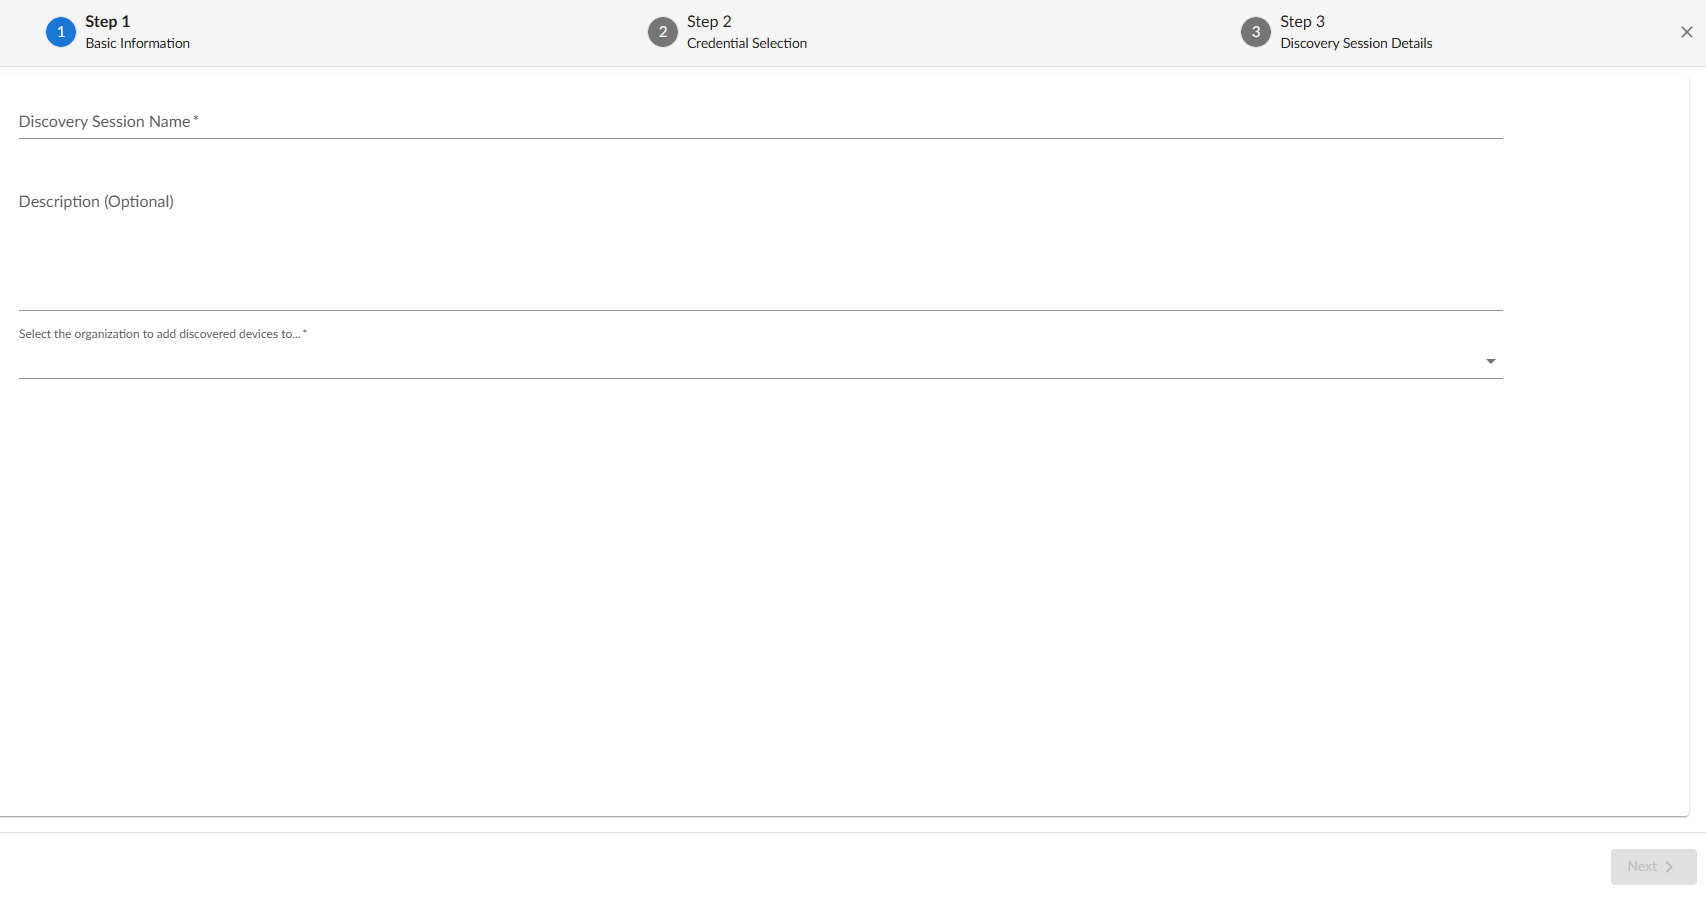
- Complete the following fields:
- Name. Type a unique name for this discovery session. This name is displayed in the list of discovery sessions on the tab.
- Description. Optional. Type a short description of the discovery session. You can use the text in this description to search for the discovery session on the tab.
- Select the organization to add discovered devices to. Select the name of the organization to which you want to add the discovered devices.
- Click . The Credentials page of the wizard appears:
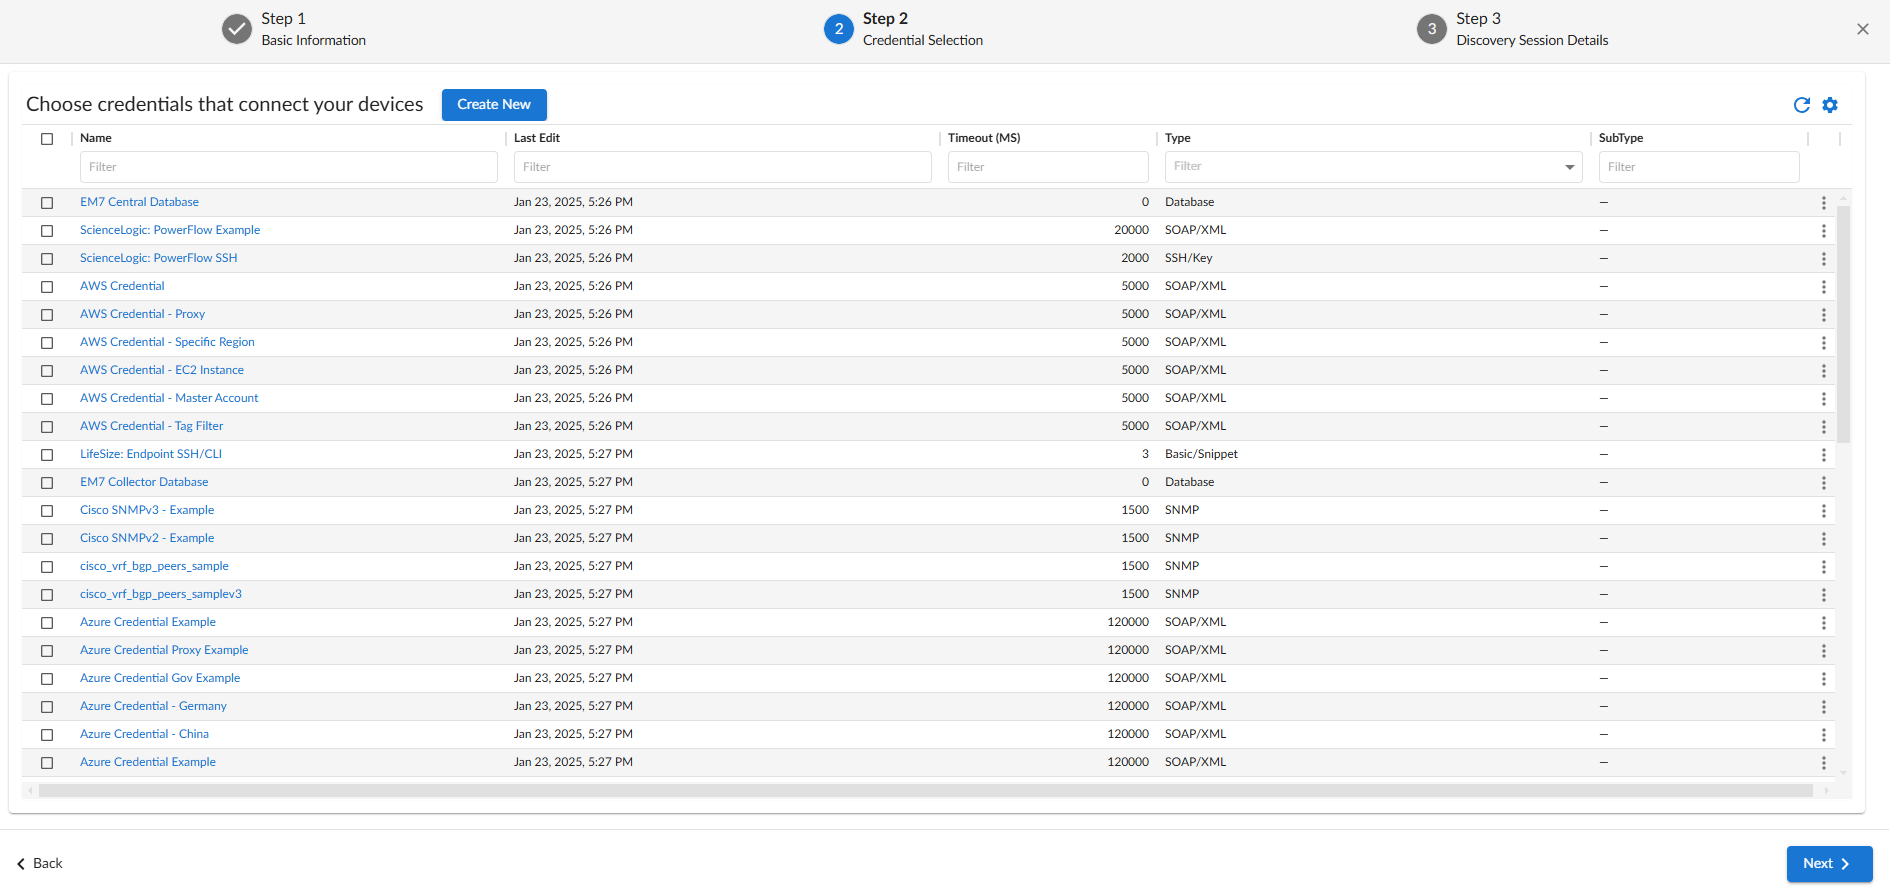
- On the Credentials page, locate and select the SNMP credential you created.
- Click . The Discovery Session Details page of the wizard appears:
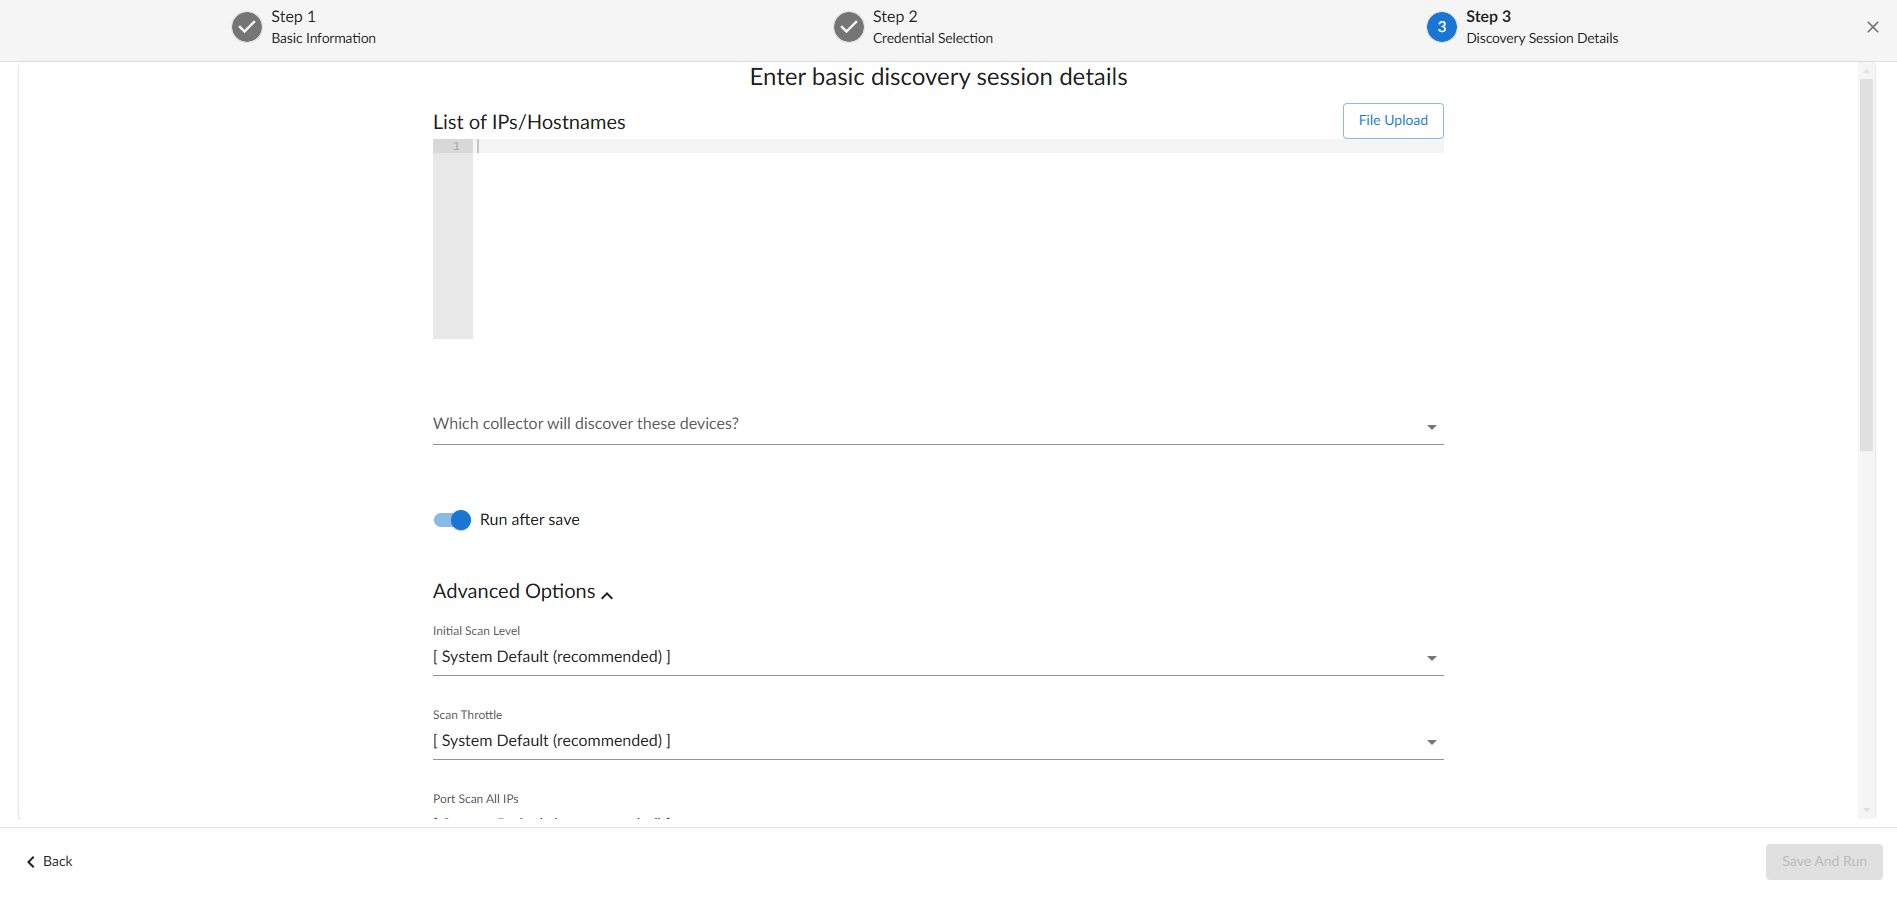
- Complete the following fields:
- List of IPs/Hostnames. Type the IP address for the WLC.
- Which collector will monitor these devices?. Required. Select an existing collector to monitor the discovered devices.
- Run after save. Select this option to run this discovery session as soon as you click .
- In the Advanced options section, click the down arrow icon (
 ) to complete the following fields:
- Model Devices. Enable this setting.
- Click to save the discovery session. The Discovery Sessions page (Devices > Discovery Session ) displays the new discovery session.
- If you selected the Run after save option on this page, the discovery session runs, and the Discovery Logs page displays any relevant log messages. If the discovery session locates and adds any devices, the Discovery Logs page includes a link to the Device Investigator page for the discovered device.
Discovering Cisco WLC Devices in the Skylar One Classic User Interface
To discover Cisco WLC devices in the classic user interface:
- Go to the Discovery Control Panel page (System > Manage > Classic Discovery or System > Manage > Discovery in the classic user interface).
- Click the button. The Discovery Session Editor page appears.
- Supply values in the following fields:
- Name. Type a name for the discovery session.
- IP Address/Hostname Discovery List. Type the IP address for the WLC.
- SNMP Credentials. Select the SNMP credential you created for the WLC.
- Optionally, supply values in the other fields in this page. In most cases, you can use the default values for the other fields. For a description of the fields in this page, see
- Click , then close theDiscovery Session Editor page.
- The Discovery Control Panel page will refresh. Click the lightning bolt icon (
 ) for the discovery session you created.
 - In the pop-up window that appears, click . The Discovery Session page displays the progress of the discovery session.
Verifying Discovery and Dynamic Application Alignment
To verify that Skylar One has automatically aligned the correct Dynamic Applications during discovery:
- In the Discovery Session page, click the device icon (
 ) for the newly discovered Cisco WLC device to view its Device Properties page.
 - From the Device Properties page for the Cisco WLC device, click the tab. The Dynamic Application Collections page appears.
- The following Dynamic Applications should appear on the Dynamic Application Collections page for the WLC device:
- Cisco: WLC CPU
- Cisco: WLC CPU and Memory Performance
- Cisco: WLC Memory
- Cisco: WLC System Counts
- Cisco: WLC Configuration
- Cisco: WLC Interface Performance Average
- Cisco: WLC Interface Average
- Cisco: WLC Noise Average
- Cisco: WLC AP Discovery
NOTE: It can take several minutes after discovery for Dynamic Applications to be automatically aligned to the controller device. If the listed Dynamic Applications do not display on this page, try clicking the button.
Manually Aligning Dynamic Applications
If the Dynamic Applications have not been automatically aligned, you can align them manually.
NOTE: The "Cisco: WLC Rogue AP" Dynamic Application, which can be used to collect information about rogue access points, is not automatically aligned during discovery. To use the "Cisco: WLC Rogue AP" Dynamic Application, follow the instructions in this section.
To manually align Dynamic Applications:
- From the Device Properties page for the Cisco WLC device, click the tab.
- Click the button and then select Add Dynamic Applications. The Dynamic Application Alignment page appears.
- In the Dynamic Applications field, select the Dynamic Application you want to align.
- In the Credentials field, select the Cisco WLC SNMP credential.
- Repeat steps 2-4 for the remaining Dynamic Applications you want to align with the device.
- After aligning the Dynamic Applications, click the button and then click the plus icon (+) for the Dynamic Application. If collection for the Dynamic Application was successful, the graph icons (
 ) for the Dynamic Application are enabled.
Handling Device Failover
If you want to enable failover support of component devices between root-level Wireless controllers (or re-enable your own previously implemented custom support), you must follow the steps below:
-
Set the GUID (Globally Unique Identifier) for a collection object that is expected to be unique across the component devices. For the “Cisco: WLC AP Discovery” Dynamic Application, this is often the MAC address or Serial Number. For the “Cisco: WLC AP Interface Discovery” Dynamic Application, this is often the Interface Index.
- Go to the Dynamic Applications Manager page (System > Manage > Applications).
-
Type "Cisco: WLC AP Discovery" in the Dynamic Application Name column.
-
Click the wrench icon (
 ) and then select the tab. The Collection Objects page appears.
 -
Click the wrench icon (
) next to the collection object you want to set the GUID for. -
Under Component Identifiers, select GUID (%G).
-
Click .
For failover support, the GUID component identifier must be set for both the “Cisco: WLC AP Discovery" and “Cisco: WLC AP Interface Discovery” Dynamic Applications, if both applications are enabled. If the “Cisco: WLC AP Interface Discovery” Dynamic Application is disabled, you only need to set the component identifier in the “Cisco: WLC AP Discovery" Dynamic Application.
-
Enable collection for the selected collection object. Many of the collection objects for the “Cisco: WLC AP Discovery” Dynamic Application do not collect data by default. To enable collection, the “Cisco: WLC AP Discovery” snippet code must be modified:
No additional collections need to be enabled in the "Cisco: WLC AP Discovery" Dynamic Application unless you are using one of those disabled collections as the GUID component identifier described in step 1.
- Go to the Dynamic Applications Manager page (System > Manage > Applications).
-
Type "Cisco: WLC AP Discovery" in the Dynamic Application Name column.
-
Click the wrench icon (
) and then select the tab. The Snippet Editor & Registry page appears. -
Click the wrench icon (
) next to Cisco: WLC AP Discovery. -
Add the final index of the collection object’s SNMP OID to the COLLECTED_OIDS list at the top of the snippet. For example, to add the "Serial Number" collection object (which has an SNMP OID of ‘.1.3.6.1.4.1.14179.2.2.1.1.17’, and a final index of ’17’), the “COLLECTED_OIDS” list will go from * COLLECTED_OIDS = ['6', '16', '3'] to * COLLECTED_OIDS = ['6', '16', ‘3’, ’17']
-
Click .
ScienceLogic does not recommend enabling the "Cisco: WLC AP Interface Discovery" Dynamic Application in order to prevent potentially overloading the collector.
These Dynamic Application run every 2 hours by default. As a result, an access point that fails over to another controller may show as unavailable for up to that amount of time before moving to the new controller. This wait time can be reduced by decreasing the polling interval, however, these Dynamic Applications are resource intensive and should only be run at a higher rate if the collector is appropriately sized and has sufficient resources. The WLC controllers should be able to handle the additional SNMP walks as well before making such a change.
Troubleshooting Duplicate Device Issues
If the GUID (Globally Unique Identifier) Component Identifier is already set to a different collection object (For example, “Serial Number”) in the "Cisco: WLC AP Discovery" Dynamic Application before upgrading to version 105 of the Cisco: Wireless" PowerPack, it will be removed upon upgrading to version 105.
If no GUID (Globally Unique Identifier) is set, components can be duplicated in a failover scenario where the component device moves from one Skylar One root device to another. If the GUID is set, the components should not be duplicated in a failover scenario.
If duplicate components are created, the original devices may be automatically vanished, depending on the device settings and the global settings in the Skylar One System.
If components are discovered with the GUID component identifier set in a previous version, and the PowerPack is upgraded to 105, duplicate component devices should not be immediately created. However, if the GUID component identifier setting is not restored after the upgrade, you will see duplicate devices created in the event of a failover to another root device. If the GUID setting is restored after the upgrade, no duplicate components should be created upon a failover.
If a controller and its components are discovered with a GUID component identifier set, and the GUID component identifier is subsequently changed to a different collection object, Skylar One will model the existing devices as new duplicate components using the new GUID value.
Viewing Cisco WLC Component Devices
In addition to the Device Manager page (Devices > Classic Devices, or Registry > Devices > Device Manager in the classic user interface), you can view the Cisco WLC device and all associated component devices in the following places in the user interface:
- The Device View page displays a map of a particular device and all of the devices with which it has parent-child relationships. Double-clicking any of the devices listed reloads the page to make the selected device the primary device:

- The Device Components page (Devices > Device Components) displays a list of all root devices and component devices discovered by Skylar One in an indented view, so you can easily view the hierarchy and relationships between child devices, parent devices, and root devices. To view the component devices associated with a Cisco WLC, click its plus icon (+):

- The Component Map page (Classic Maps > Device Maps > Components) allows you to view devices by root node and view the relationships between root nodes, parent components, and child components in a map. This makes it easy to visualize and manage root nodes and their components. Skylar One automatically updates the Component Map as new component devices are discovered. The platform also updates each map with the latest status and event information. To view the map for a Cisco WLC, go to the Component Map page and select the map from the list in the left NavBar. To learn more about the Component Map page,
