![]()
The following sections describe how to configure Couchbase servers for monitoring by Skylar One using the "CouchBase" PowerPack:
Prerequisites for Monitoring Couchbase
To configure Skylar One to monitor Couchbase servers and component devices using the "CouchBase" PowerPack, you must have the login credentials for a user with administrative access to the Couchbase server.
Creating a Couchbase Credential
To configure Skylar One to monitor a Couchbase system, you must first create a SOAP/XML credential. This credential allows the Dynamic Applications in the "CouchBase" PowerPack to communicate with your Couchbase system.
The PowerPack includes an example SOAP/XML credential that you can edit and save for your own use.
To create a SOAP/XML credential:
- Go to the Credentials page (Manage > Credentials).
- Locate the "Couchbase Sample Credential", then click its icon (
 ) and select Duplicate from the drop-down field. The "Couchbase Sample Credential copy" credential appears.
 - Click the icon () for the "Couchbase Sample Credential copy" credential, then select Edit. The Edit Credential page appears.
- Enter values in the following fields:

- Name. Enter a new name for the credential. This field is required.
- All Organizations. Toggle on (blue) to align the credential to all organizations, or toggle off (gray) and then select one or more specific organizations from the Select the organizations the credential belongs to drop-down field to align the credential with those specific organizations.
- Timeout. Enter the time, in milliseconds, after which Skylar One will stop trying to communicate with the Couchbase device. The default value is 20000. This field is required.
- URL. Keep the default url. The default url is https://192.168.1.1:8091.
- HTTP Auth User. Enter the Couchbase username associated with the administrator account.
- HTTP Auth Password. Enter the password associated with the Couchbase administrator account.
- Embedded Password [%P]. Enter the embedded password associated with the Couchbase administrator account.
- Embed Value [%1]. Keep the default.
- Click .
Creating a Couchbase Credential in the Skylar One Classic User Interface
To use the Dynamic Applications in the "CouchBase" PowerPack, you must first define a credential in Skylar One. This credential enables the Dynamic Applications in the "CouchBase" PowerPack to monitor your Couchbase component devices. The PowerPack includes a sample SOAP/XML credential (Couchbase Sample Credential) that you can use as a template.
To define a Couchbase credential:
- Go to the Credential Management page (System > Manage > Credentials).
- Click the wrench icon (
 ) for the Couchbase Sample Credential. The Credential Editor modal page appears:
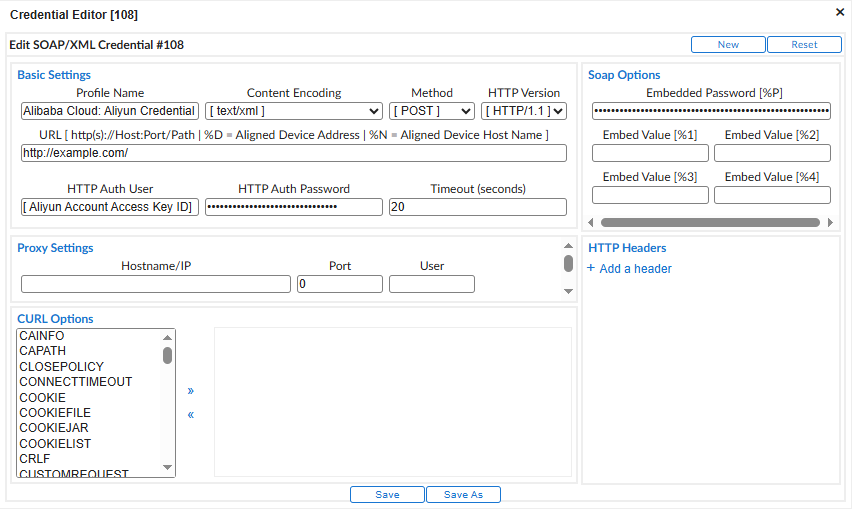
- Enter values in the following fields:
- Profile Name. Type a new name for your Couchbase credential.
- URL. Type the IP address of the Couchbase system.
- HTTP Auth User. Type the username for a user with administrative access to the Couchbase server.
- HTTP Auth Password. Type the Couchbase administrator user's password.
In the URL field, the %D variable is not supported, and the IP address or hostname of the server must be in this field.
Use the default values for the remaining fields.
- Click the button, and then click .
Discovering Couchbase Devices
To monitor your Couchbase system, you must run a discovery session to discover the server on which Couchbase is installed.
To create and run a discovery session that will discover a Couchbase appliance:
- Go to the Devices page (
 ) or the Discovery Sessions page (Devices > Discovery Sessions) and click the button.
 - Click the button. Additional information about that requirements for discovery appears in the General Information pane to the right.
- Click . The three-step wizard appears starting with the tab.
- Complete the following fields:

- Discovery Session Name. Type a unique name for this discovery session. This name is displayed in the list of discovery sessions on the tab.
- Description.Optional. Type a short description of the discovery session. You can use the text in this description to search for the discovery session on the tab.
- Select the organization to add discovered devices to. Select the name of the organization to which you want to add the discovered devices.
- Click . The tab of the wizard appears.
- On the tab, locate and select the SOAP/XML credential you created for Couchbase appliances.
- Click . The tab of the wizard appears.
- Complete the following fields:
- List of IP/Hostnames. Type the IP address for the Couchbase appliance.
- Which collector will discover these devices?. Required. Select an existing collector to monitor the discovered devices.
- Run after save. Toggle on (blue) to run this discovery session as soon as you save the session.
- Advanced options. Click the down arrow (
 ) to complete the following fields:
- Discover Non-SNMP. Toggle on (blue) to enable this setting.
- Model Devices. Toggle on (blue) to enable this setting.
- Select Device Template. If you configured a Couchbase device template, select it here. Otherwise, leave the default selection.
- If you enabled the Run after save option, click the button. The discovery session will run and the Discovery Logs page will display any relevant log messages. If the discovery session locates and adds any devices, the Discovery Logs page will include a link to the Device Investigator page for the discovered device.
- If you did not enable the Run after save option, click the button. The Discovery Sessions page (Devices > Discovery Sessions) will display the new discovery session.
Discovering Couchbase Devices in the Skylar One Classic User Interface
To discover Couchbase devices in the Skylar One classic user interface, you must create and run a discovery session that will discover the Couchbase server. You must then manually align the "Couchbase: Pool Discovery" Dynamic Application to the Couchbase server device.
Before aligning the "Couchbase: Pool Discovery" Dynamic Application, you must first align the "Couchbase: Component Count" Dynamic Application. If the number of components is reasonable, then you can proceed to align the "Couchbase: Pool Discovery" Dynamic Application.
To discover Couchbase devices in the classic user interface:
- Go to the Discovery Control Panel page (System > Manage > Classic Discovery or System > Manage > Discovery in the classic user interface).
- Click the button to create a new discovery session. The Discovery Session Editor window appears:
- Edit the following fields in the Discovery Session Editor window:
- Name. Type a name for the discovery session.
- IP Address/Hostname Discovery List. Type the IP address for the Couchbase server.
- Other Credentials. Select the SOAP/XML credential you created for Couchbase.
- Discover Non-SNMP. Select this checkbox.
- Optionally, you can enter values in the other fields on this page. For more information about the other fields on this page,
- Click the button and then close the Discovery Session Editor window.
- The discovery session you created appears at the top of the Discovery Control Panel page. Click its lightning-bolt icon (
 ) to run the discovery session.
 - The Discovery Session window appears. When Couchbase is discovered, click its device icon (
 ) to view the Device Properties page for the Couchbase server.
 - From the Device Properties page, click the tab. The Dynamic Application Collections page appears.
- On the Dynamic Application Collections page, click the button and then select Add Dynamic Application. The Dynamic Application Alignment pane appears.
- In the Dynamic Applications field, select Couchbase: Pool Discovery.
- In the Credentials field, select the SOAP/XML credential you created for Couchbase.
- Click . The Dynamic Application appears on the Dynamic Application Collections page.
- To run the "Couchbase: Pool Discovery" Dynamic Application immediately, click its lightning bolt icon ().
Viewing Couchbase Component Devices
In addition to the Device Manager page (Devices > Classic Devices, or Registry > Devices > Device Manager in the classic user interface), you can view Couchbase component devices in the following places in the user interface:
- The Device View modal page displays a map of a particular device and all of the devices with which it has parent-child relationships. Double-clicking any of the devices listed reloads the page to make the selected device the primary device.
- The Device Components page (Devices > Device Components) displays a list of all root devices and component devices discovered by Skylar One in an indented view, so you can easily view the hierarchy and relationships between child devices, parent devices, and root devices. To view the component devices associated with Couchbase, find the Couchbase device and click its plus icon (+).
- The Component Map page (Classic Maps > Device Maps > Components) allows you to view devices by root node and view the relationships between root nodes, parent components, and child components in a map. This makes it easy to visualize and manage root nodes and their components. Skylar One automatically updates the Component Map as new component devices are discovered. The platform also updates each map with the latest status and event information. To view the map for Couchbase, go to the Component Map page and select the map from the list in the left NavBar. To learn more about the Component Map page,