This section describes how to configure and discover Dell EMC XtremIO storage devices for monitoring by Skylar One using the "Dell EMC: XtremIO" PowerPack.
Prerequisites for Monitoring Dell EMC XtremIO
Before you can monitor Dell EMC XtremIO storage devices in Skylar One using the "Dell EMC: XtremIO" PowerPack, you must have already properly installed and configured the XtremIO storage devices that you want to monitor.
In addition, you must create a read-only user in the XtremIO Management Server (XMS) with the following user permissions:
- User Name: Type the XMS user's name.
- Authentication. Select the By Password checkbox.
- Password: Type and then confirm the XMS user's password.
You can also configure LDAP authentication for this account.
Finally, take note of the SNMP community string used by the XtremIO storage devices you want to monitor.
For more information about these configuration processes, see the Dell EMC XtremIO documentation.
Configuring Traps with Dell EMC XtremIO
To send alerts to Skylar One, SNMP traps must be enabled and configured on the Dell EMC XtremIO storage array. When configuring these traps, use the IP address of the ScienceLogic Message Collector, Data Collector, or All-In-One Appliance responsible for monitoring the system as the destination IP.
For more information, see the Dell EMC XtremIO documentation.
Creating a SOAP/XML Credential for Dell EMC XtremIO
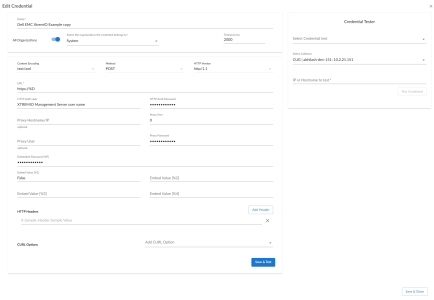
To configure Skylar One to monitor Dell EMC XtremIO storage devices, you must create a credential that allows the Dynamic Applications in the "Dell EMC: XtremIO" PowerPack to communicate with your XtremIO storage devices. The PowerPack includes an example SOAP/XML credential that you can edit for your own use.
To create a SOAP/XML credential:
- Go to the Credentials page (Manage > Credentials).
- Locate the "Dell: EMC XtremIO Example" credential, then click its icon (
 ). Select Duplicate from the drop-down field. The "Dell EMC: XtremIO Example copy" credential appears.
 - Click the icon (
 ) for the "Dell EMC: XtremIO Example copy" credential. Select Edit and the Edit Credential page appears.
 - Enter values in the following fields:
- Name. Type a new name for the credential. This field is required.
- All Organizations. Toggle on (blue) to align the credential to all organizations, or toggle off (gray) and then select one or more specific organizations from the Select the organizations the credential belongs to drop-down field to align the credential with those specific organizations.
- Timeout. Time, in milliseconds, after which Skylar One will stop trying to communicate with the Dell EMC XtremIO device. The default value is 2000. This field is required.
- URL. Type the Dell EMC XtremIO url. The default is http://%D/api/json/types.
- HTTP Auth User. Type the Dell EMC XtremIO username associated with the administrator account.
- HTTP Auth Password. Type the Dell EMC XtremIO password associated with the administrator account.
- For all remaining fields, use the default values.
- Click .
Creating a SOAP/XML Credential for Dell EMC XtremIO in the Skylar One Classic User Interface
To configure Skylar One to monitor Dell EMC XtremIO storage devices in the classic user interface, you must create a credential that allows the Dynamic Applications in the "Dell EMC: XtremIO" PowerPack to communicate with your XtremIO storage devices. The PowerPack includes an example SOAP/XML credential that you can edit for your own use.
To configure the SOAP/XML credential to access Dell EMC XtremIO devices:
- Go to the Credential Management page (System > Manage > Credentials).
- Locate the "Dell XtremIO Example - SOAP/XML" credential, and then click its wrench icon (
 ). The Edit SOAP/XML Credential modal page appears.
 - Update the values in the following fields:
Basic Settings
- Profile Name. Type a name for the credential.
- Content Encoding. Select text/xml.
- Method. Select POST.
- HTTP Version. Select HTTP/1.1.
- URL. Type the device IP address or the host name for your XtremIO devices.
- HTTP Auth User. Type the XtremIO administrator username.
- HTTP Auth Password. Type the XtremIO administrator password.
- Timeout (seconds). Type "2".
Proxy Settings
- Hostname/IP. Leave this field blank.
- Port. Type "0".
- User. Leave this field blank.
CURL Options
- CURL Options. Do not make any selections in this field.
SOAP Options
- Embedded Password [%P]. Leave this field blank.
- Embed Value [%1]. Type "True" to enable verification of the storage array's self-signed certificate. Since the certificate is self-signed, you will need to determine if you trust the certificate and, if so, add it to a file. Append the applicable XMS root certificates to the file located at /var/lib/em7/content/silo_rest/root_cert/xms_root_ca.crt for any XMS being monitored. Type "False" or leave this field blank to disable SSL verification. This field is not case-sensitive.
- Embed Value [%2]. Leave this field blank.
- Embed Value [%3]. Leave this field blank.
- Embed Value [%4]. Leave this field blank.
HTTP Headers
- HTTP Headers. Do not make any selections in this field.
- Click the button.

