![]()
The following sections describe how to configure and discover your Nutanix system for monitoring by Skylar One using the "Nutanix: Base Pack" PowerPack in Skylar One:
Prerequisites for Monitoring Nutanix
Before discovering your Nutanix system in Skylar One, consider the configuration of the Nutanix system you want to discover.
The PowerPack utilizes both the Prism Central (PC) and the Prism Element (PE) APIs for data collection, so it’s essential that user credentials match across both systems. To use Discovery and Collection as a Nutanix user, the permissions for that user must have identical credentials created in both the PE and PC systems.
- For PE, you will need the "role_cluster_viewer" credential.
- For PC, you will need the "role_cluster_admin", "role_multicluster_admin", "role_user_ admin", and "role_cluster_viewer" credentials.
You can monitor Prism Elements or Prism Central. You must choose between monitoring Prism Elements or Prism Central as the root device, and then run discovery accordingly. It is recommended that you monitor Prism Central in all cases, unless you have only Prism Elements instances with no Prism Central instances.
Configuring a Basic/Snippet Credential for Nutanix
To use the Dynamic Applications in the "Nutanix: Base Pack"PowerPack, you must first define a Basic/Snippet credential in Skylar One. This credential allows Skylar One to collect data from your Nutanix system.
To configure a Basic/Snippet credential for Nutanix: Base Pack, perform the following steps:
- Go to the Credentials page (Manage > Credentials).
- Locate the "Nutanix API ⏐ Example" sample credential, click its icon (
 ) and select Duplicate. A copy of the credential appears.
 - Click the icon () for the "Nutanix API ⏐ Example copy" credential copy and select Edit. The Edit Credential modal page appears.
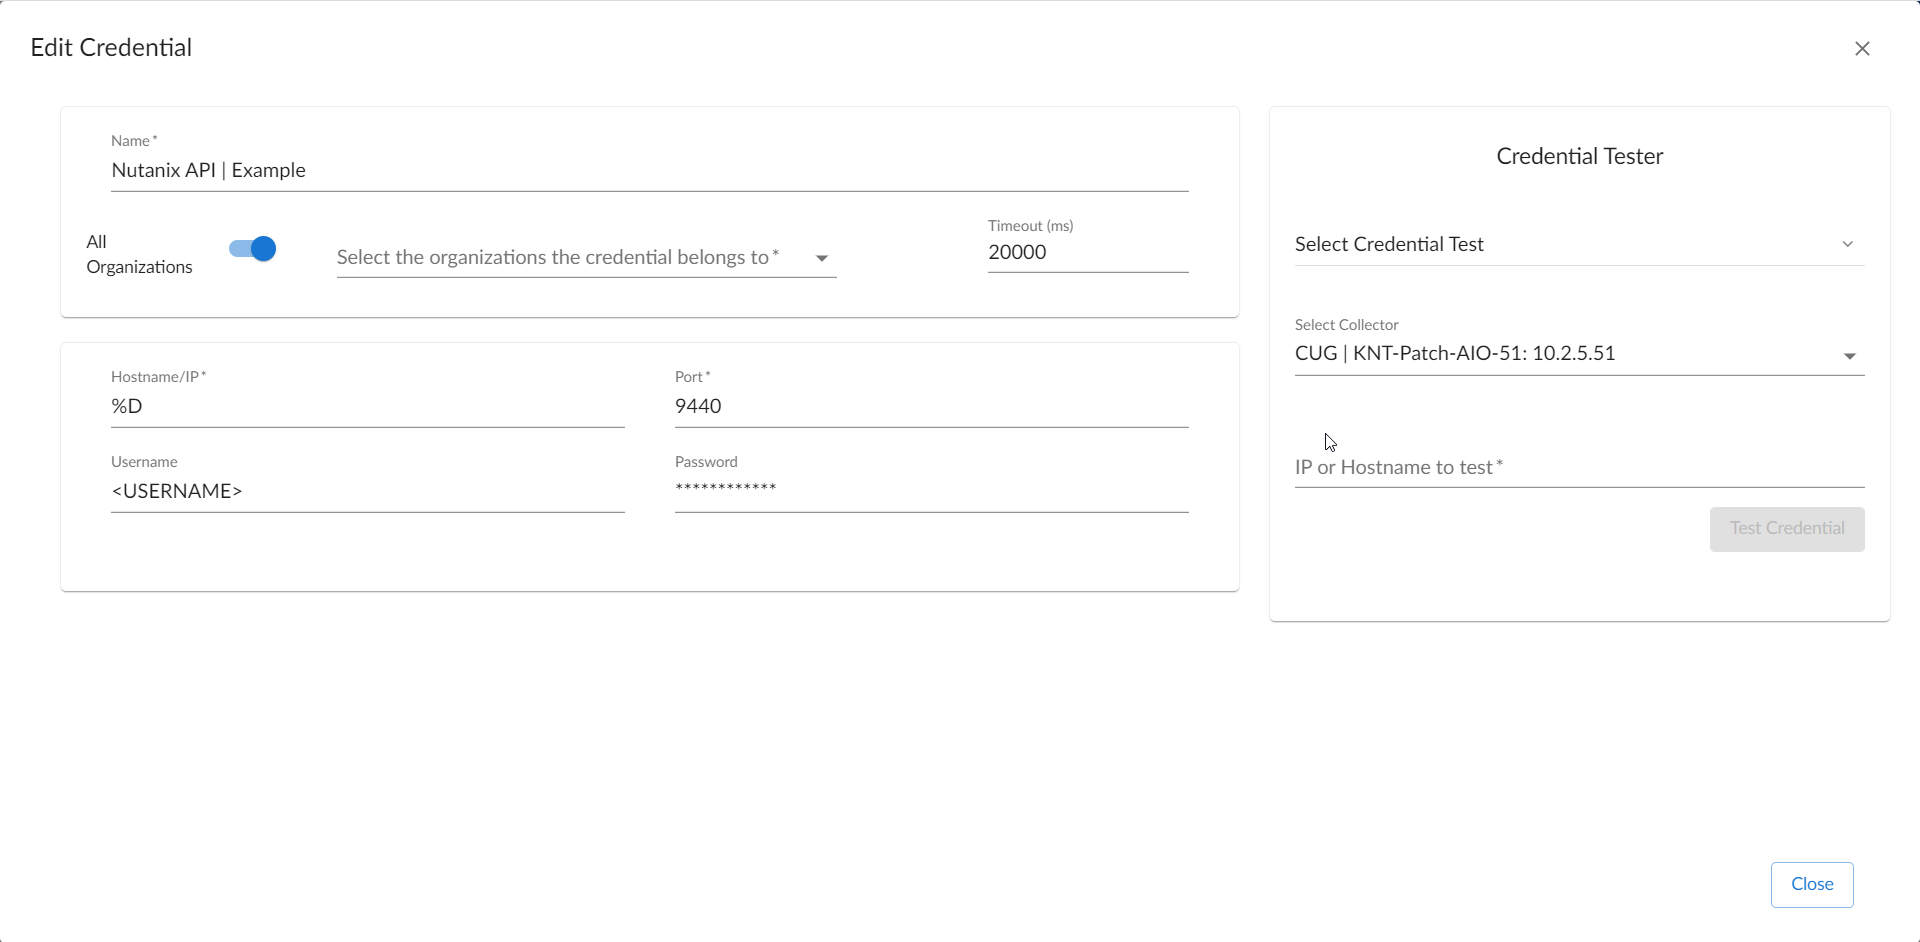
- Enter values in the following fields:
- Name. Type a name for the credential.
- All Organizations. Toggle on (blue) to align the credential to all organizations, or toggle off (gray) and then select one or more specific organizations from the Select the organizations the credential belongs to drop-down field to align the credential with those specific organizations.
- Timeout. Keep the default.
- Hostname/IP. Type "%D".
- Port. Keep the default.
- Username. Type the username that Skylar One will use to connect to the Nutanix system.
- Password. Type the password for the username you entered.
- Click .
Configuring a Basic/Snippet Credential for Nutanix in the Skylar One Classic Interface
To use the Dynamic Applications in the "Nutanix: Base Pack" PowerPack, you must first configure the credential in Skylar One. This credential allows Skylar One to communicate with the Nutanix API. The PowerPack includes the "Nutanix API | Example" credential that you can use as a template.
To configure the Nutanix credential:
- Go to the Credential Management page (System > Manage > Credentials).
- Locate the "Nutanix API | Example" credential and click its wrench icon (
 ). The Credential Editor modal page appears:
 - Enter values in the following fields:
- Credential Name. Type a new name for your Nutanix credential.
- Hostname/IP. Type %D.
- Username. Type the username that Skylar One will use to connect to the Nutanix system.
- Password. Type the password for the username you entered.
You can use the default values for the remaining fields.
- Click the button, and then click .
Discovering Nutanix Systems
To monitor your Nutanix system, you must run a discovery session to discover the server on which Nutanix is installed.
To create and run a discovery session that will discover a Nutanix appliance:
- Go to the Devices page (
 ) or the Discovery Sessions page (Devices > Discovery Sessions) and click the button.
 - Click the button. Additional information about that requirements for discovery appears in the General Information pane to the right.
- Click . The three-step wizard appears starting with the tab.
- Complete the following fields:

- Discovery Session Name. Type a unique name for this discovery session. This name is displayed in the list of discovery sessions on the tab.
- Description.Optional. Type a short description of the discovery session. You can use the text in this description to search for the discovery session on the tab.
- Select the organization to add discovered devices to. Select the name of the organization to which you want to add the discovered devices.
- Click . The tab of the wizard appears.
- On the tab, locate and select the Basic/Snippet credential you created for Nutanix appliances.
- Click . The tab of the wizard appears.
- Complete the following fields:
- List of IP/Hostnames. Type the IP address for the Nutanix appliance.
- Which collector will discover these devices?. Required. Select an existing collector to monitor the discovered devices.
- Run after save. Toggle on (blue) to run this discovery session as soon as you save the session.
- Advanced options. Click the down arrow (
 ) to complete the following fields:
- Discover Non-SNMP. Toggle on (blue) to enable this setting.
- Model Devices. Toggle on (blue) to enable this setting.
- Select Device Template. If you configured a Nutanix device template, select it here. Otherwise, leave the default selection.
- If you enabled the Run after save option, click the button. The discovery session will run and the Discovery Logs page will display any relevant log messages. If the discovery session locates and adds any devices, the Discovery Logs page will include a link to the Device Investigator page for the discovered device.
- If you did not enable the Run after save option, click the button. The Discovery Sessions page (Devices > Discovery Sessions) will display the new discovery session.
Discovering Nutanix Systems in the Skylar One Classic User Interface
To create and run a discovery session that will discover your Nutanix system in the classic user interface, perform the following steps:
- Go to the Discovery Control Panel page (System > Manage > Classic Discovery or System > Manage > Discovery in the classic user interface).
- Click the button to create a new discovery session. The Discovery Session Editor window appears.
- Enter values in the following fields:
- IP Address Discovery List. Type the IP addresses for the Nutanix systems you want to discover.
NOTE: Do not include both Prism Element and Prism Central devices in the IP Address Discovery List field. The "Nutanix: Base Pack" PowerPack supports discovery of individual Prism Element clusters OR a Prism Central device with multiple Prism Element clusters. It is recommended that customers use only one of these options.
- SNMP Credentials. Select SNMP Public V2 if applicable.
- Other Credentials. Select the credential that you configured in the previous section.
- Discover Non-SNMP. If you are not using an SNMP credential, ensure that this checkbox is selected.
- Organization. Select your organization.
- You can enter values in the other fields on this page, but are not required to and can simply accept the default values. For more information about the other fields on this page,
- Click the button and then close the Discovery Session Editor window.
- The discovery session you created will appear at the top of the Discovery Control Panel page. Click its lightning-bolt icon (
 ) to run the discovery session.
 - The Discovery Session window will be displayed.
- When the Nutanix system is discovered, click its device icon (
 ) to view the Device Properties page for the Nutanix system.
 - After the Nutanix system is discovered, the child components and devices associated with that system will also appear in the Device Manager page.
Verifying Discovery and Dynamic Application Alignment
Verifying Prism Elements Discovery and Dynamic Application Alignment
To verify that Skylar One has automatically aligned the correct Prism Elements Dynamic Applications during discovery:
- From the Device Properties page for the Nutanix system, click the tab. The Dynamic Application Collections page appears.
- The "Nutanix: Prism Element Config & Discovery" Dynamic Application should be displayed in the list of Dynamic Applications aligned to the Nutanix system.
In addition, the "Nutanix: Prism Element Classify Root Device Class" Run Book Action will be triggered to automatically align the correct device class to the discovered root device.
Verifying Prism Central Discovery and Dynamic Application Alignment
To verify that Skylar One has automatically aligned the correct Prism Central Dynamic Applications during discovery:
- From the Device Properties page for the Nutanix system, click the tab. The Dynamic Application Collections page appears.
- The following Dynamic Applications should be displayed in the list of Dynamic Applications aligned to the Nutanix system:
- Nutanix: Prism Central Config
- Nutanix: Prism Central LCM Config
- Nutanix: Prism Central Events
- Nutanix: Prism Elements Discovery
In addition, the "Nutanix: Prism Central Classify Root Device Class" Run Book Action will be triggered to automatically align the correct device class to the discovered root device.
Switching from Monitoring Prism Elements to Monitoring Prism Central
If you are monitoring Prism Elements (PE) and want to monitor Prism Central (PC), follow the instructions below, depending on whether you need to keep historical data.
You can monitor Prism Elements or Prism Central. You must choose between monitoring Prism Elements or Prism Central as the root device, and then run discovery accordingly. It is recommended that you monitor Prism Central in all cases, unless you have only Prism Elements instances with no Prism Central instances.
Preserve Historical Data
If you need to preserve historical data, follow the steps below:
- Go to the Device Components page (Devices > Device Components) and select the Prism Element Component checkbox.
- In the Select Action drop-down field, under Change Collection State, select Disabled (recursive).
- Discover your Prism Central device. Once discovered, all Prism Element devices that are part of Prism Central will be listed as component devices under the root device.
- If you discover a Prism Central containing Prism Element devices that have been previously discovered and disabled, the Prism Element devices will need to be enabled so that standard Dynamic Application alignment and data collection can proceed.
- Go to the Device Components page (Devices > Device Components) and select the checkbox fields for the Prism Element devices that have been disabled in that tree.
- In the Select Action drop-down field, under Change Collection State, select Active (recursive).
Do Not Preserve Historical Data
If you do not need to preserve historical data, follow the steps below:
- Go to the Device Components page (Devices > Device Components) and select the Prism Element Component checkbox.
- In the Select Action drop-down field, under Change Collection State, select Disabled (recursive).
- After disabling the components, in the Select Action drop-down field, select DELETE Select Devices (recursive).
- After deleting the Prism Element components, discover your Prism Central device.
Configuring Virtual Device Alerts for Prism Central Devices
If you have chosen not to model virtual devices, but want to see alerts for those devices, you can configure virtual device alerts to appear on Prism Central devices.
To configure your Prism Central devices to display alerts for virtual devices:
- Go to the Dynamic Applications Manager (System > Manage > Dynamic Applications) page.
- Find the "Nutanix: Prism Central Events" Dynamic Application and click its wrench icon ().
- Click the tab, and click the wrench icon () for the "Display Workload VM Alerts" Threshold Object.
- In the Threshold Value field, type "1" and then click . Alerts for virtual devices will now appear on your Prism Central devices. By default, the Threshold Value is set to 0, and alerts will appear on the VM.
Viewing Nutanix Component Devices
In addition to the Device Manager page (Devices > Classic Devices, or Registry > Devices > Device Manager in the classic user interface), you can view the Nutanix system and all associated component devices in the following places in the user interface:
- The Device View modal page (click the bar-graph icon [
 ] for a device, then click the Topology tab) displays a map of a particular device and all of the devices with which it has parent-child relationships. Double-clicking any of the devices listed reloads the page to make the selected device the primary device.
 - The Device Components page (Devices > Device Components) displays a list of all root devices and component devices discovered by Skylar One in an indented view, so you can easily view the hierarchy and relationships between child devices, parent devices, and root devices. To view the component devices associated with a Nutanix system, find the Nutanix device and click its plus icon (+).
- The Component Map page (Classic Maps > Device Maps > Components) allows you to view devices by root node and view the relationships between root nodes, parent components, and child components in a map. This makes it easy to visualize and manage root nodes and their components. Skylar One automatically updates the Component Map as new component devices are discovered. The platform also updates each map with the latest status and event information. To view the map for a Nutanix system, go to the Component Map page and select the map from the list in the left NavBar. To learn more about the Component Map page,