![]()
The following sections describe how to configure Microsoft Office 365 services for monitoring by SL1 using the Microsoft: Office 365 PowerPack:
Configuring Office 365 Monitoring
To create a SOAP/XML credential that allows SL1 to access Microsoft Office 365, you must provide the following information about an Office 365 application that is already registered with an Active Directory tenant in Microsoft Azure:
- Application ID
- Tenant ID
- Secret Key
To capture the above information, you must first create or use an existing an Office 365 application that is registered with Azure Active Directory. The application must have access permissions for Office 365 Management APIs and Microsoft Graph APIs. You can then enter the required information about the application when configuring the SOAP/XML credential in SL1. The registered application and the ScienceLogic credential allow SL1 to retrieve information from Office 365.
The following sections describe how to create a registered application, add the appropriate API permissions, and capture the application ID, tenant ID, and secret key.
Creating an Office 365 Active Directory Application in the Azure Portal
When configuring a SOAP/XML credential in SL1, you must provide the application ID, tenant ID, and secret key of an Office 365 application that is registered with Azure Active Directory. You use this registered application to authenticate your Office 365 account.
You must have Service Administrator rights to create an Active Directory application.
To create an Office 365 application on the Azure portal and register it with Azure Active Directory:
- Log in to the Azure portal at https://portal.azure.com and type "App registrations" in the Search field at the top of the window.
- From the search results, select App registrations. The App registrations page appears.
- Click the button.

- When the Register an application page appears, enter your application's registration information:
- Name. Type a name for the application.
- Supported account types. Select the account types that you want to be supported in your application.
- Redirect URI (optional). Select Web in the drop-down menu and type a valid URL. For example: https://localhost.com.

- Click the button. The Overview page for your new application appears.
- On the Overview page for your new application, copy and save the values in the Application (client) ID and Directory (tenant) ID fields. You will need these values when creating your Office 365 credential in SL1.

Adding API Permissions to the Application
Your Office 365 application must have access permissions for Microsoft Graph APIs and Office 365 Management APIs to be monitored in SL1.
To add API permissions to application:
- From the page for your new application, click .
- Click , then click the Microsoft Graph option.

- In the Request API permissions pane, click Application permissions.
- Click the arrow next to Directory to open the sub-menu, and then select the checkbox for the Directory.Read.All permission.

- Click the arrow next to ServiceHealth to open the sub-menu, and then select the checkbox for the ServiceHealth.Read.All permission.

- On the API permissions page, click .
- A pop-up window appears asking if you grant consent for the required permissions for all accounts in your directory. Click .
Generating the Secret Key
When configuring a SOAP/XML credential for Office 365 in SL1, you need to provide a secret key for the Office 365 Active Directory application that you will use to authenticate your account.
To generate a secret key:
- From the Azure portal, type "Active Directory" in the Search field at the top of the window.
- From the search results, select Azure Active Directory, and then click App registrations on the left pane.
- Select your Office 365 app from the list.
- Click on the left pane.
- In the Client secrets pane, click .

- In the Add a client secret pane, type a name in the Description field and select a duration in the Expires field.
- Click to generate the secret key. A new key value displays in the Client secrets pane.
- Copy and save the key value.
Granting Admin Consent on Enterprise Applications
Your Office 365 Enterprise application must have tenant-wide admin consent to be monitored and pass the credential test by SL1. For more information on granting admin consent, see the Microsoft documentation on granting admin consent in Enterprise apps.
Creating a SOAP/XML Credential for Microsoft Office 365
To configure SL1 to monitor Microsoft Office 365, you must create a SOAP/XML credential. This credential allows the Dynamic Applications in the Microsoft: Office 365 PowerPack to communicate with your Office 365 account.
NOTE: If you are using an SL1 system prior to version 11.1.0, the new user interface does not include the Duplicate option for sample credential(s). ScienceLogic recommends that you use the classic user interface and the Save As button to create new credentials from sample credentials. This will prevent you from overwriting the sample credential(s).
If you want to connect to your Office 365 account through a third-party proxy server, you must also add the proxy information in the credential.
The Microsoft: Office 365 PowerPack includes two example SOAP/XML credentials that you can use as templates for creating SOAP/XML credentials for Office 365. They are:
- Office 365 Cred Proxy Example, for users who connect to Office 365 through a third-party proxy server
- Office 365 Credential Example, for all other users
To configure a SOAP/XML credential to access Microsoft Office 365:
- Go to the Credentials page (Manage > Credentials).
- Locate the sample credential you want to use, click its icon (
 ) and select Duplicate. A copy of the credential appears.
 - Click the icon () for the copied credential and select Edit. The Edit Credential modal page appears.
- Enter values in the following fields:

- Name. Type a new name for the Microsoft Office 365 credential.
- All Organizations. Toggle on (blue) to align the credential to all organizations, or toggle off (gray) and then select one or more specific organizations from the What organization manages this service? drop-down field to align the credential with those specific organizations.
- URL. Type "https://%D".
- HTTP Auth User. Leave this field blank.
- HTTP Auth Password. Leave this field blank.
- Proxy Hostname/IP. If you are connecting to Office 365 via a proxy server, type the server's hostname or IP address. Otherwise, leave this field blank.
- Proxy Port. If you are connecting to Office 365 via a proxy server, type the port number you opened when setting up the proxy server. Otherwise, leave this field blank.
- Proxy User. If you are connecting to Office 365 via a proxy server using basic authentication, type the server's administrator username. Otherwise, leave this field blank.
- Proxy Password. If you are connecting to Office 365 via a proxy server using basic authentication, type the server's administrator password. Otherwise, leave this field blank.
- Embedded Password [%P]. Type the secret key for the Office 365 Active Directory application.
- Embed Value [%1]. Type the Application ID for the Office 365 Active Directory application.
- Embed Value [%2]. Type the Tenant ID for the Office 365 Active Directory application.
- Embed Value [%3]. Leave this field blank.
- Embed Value [%4]. Leave this field blank.
- HTTP Headers. The following headers are added by default:
- Content-Type: application/json. Leave the default value that appears in this field.
- %silo_token-Authorization:Bearer. Leave the default value that appears in this field.
- Logging:False/True. The default value of this field is "Logging:False". If you would like your credential to gather event information and errors to display in the /var/log/em7/snippet_framework.log log file, set the value of this field to "Logging:True".
- SSL Cert. The default value of this field is "True". You can also replace this value with your SSL certificate path. If your SSL certificate is expired or if you do not want extra security, set the value of this field to "False".
- For all other fields, use the default values.
- Click the button.
If you would like to test your credential using the Credential Tester panel, click . For detailed instructions on using the Credential Tester panel, see the Testing Your Office 365 Credential section.
Creating a SOAP/XML Credential for Microsoft Office 365 in the SL1 Classic User Interface
To configure SL1 to monitor Microsoft Office 365, you must create a SOAP/XML credential. This credential allows the Dynamic Applications in the Microsoft: Office 365 PowerPack to communicate with your Office 365 account.
If you want to connect to your Office 365 account through a third-party proxy server, you must also add the proxy information in the credential.
The Microsoft: Office 365 PowerPack includes two example SOAP/XML credentials that you can use as templates for creating SOAP/XML credentials for Office 365. They are:
- Office 365 Cred Proxy Example, for users who connect to Office 365 through a third-party proxy server
- Office 365 Credential Example, for all other users
To configure a SOAP/XML credential to access Microsoft Office 365:
- Go to the Credential Management page (System > Manage > Credentials).
- Locate the sample credential you want to use and then click its wrench icon (
 ). The Edit SOAP/XML Credential modal page appears.
- Enter values in the following fields:
Basic Settings
- Profile Name. Type a new name for the Microsoft Office 365 credential.
- URL. Type "https://%D".
- HTTP Auth User. Leave this field blank.
- HTTP Auth Password. Leave this field blank.
Proxy Settings
- Hostname/IP. If you are connecting to Office 365 via a proxy server, type the server's hostname or IP address. Otherwise, leave this field blank.
- Port. If you are connecting to Office 365 via a proxy server, type the port number you opened when setting up the proxy server. Otherwise, leave this field blank.
- User. If you are connecting to Office 365 via a proxy server using basic authentication, type the server's administrator username. Otherwise, leave this field blank.
- Password. If you are connecting to Office 365 via a proxy server using basic authentication, type the server's administrator password. Otherwise, leave this field blank.
CURL Options
- SSL Cert. The default value of this field is "True". You can also replace this value with your SSL certificate path. If your SSL certificate is expired or if you do not want extra security, set the value of this field to "False".
SOAP Options
- Embedded Password [%P].Type the secret key for the Office 365 Active Directory application.
- Embed Value [%1]. Type the Application ID for the Office 365 Active Directory application.
- Embed Value [%2]. Type the Tenant ID for the Office 365 Active Directory application.
- Embed Value [%3]. Leave this field blank.
- Embed Value [%4]. Leave this field blank.
HTTP Headers
- HTTP Headers. The following headers are added by default:
- Content-Type: application/json. Leave the default value that appears in this field.
- %silo_token-Authorization:Bearer. Leave the default value that appears in this field.
- Logging:False/True. The default value of this field is "Logging:False". If you would like your credential to gather event information and errors to display in the /var/log/em7/snippet_framework.log log file, set the value of this field to "Logging:True".
- For all other fields, use the default values.
- Click the button.
Creating a REST Snippet Framework Credential for Office 365
If you are using the REST snippet framework, you must also configure a REST snippet framework credential.
If you want to connect to your Office 365 account through a third-party proxy server, you must also add the proxy information in the credential.
To configure a REST snippet framework credential to access Microsoft Office 365:
- Go to the Credentials page (Manage > Credentials).
- Click the button.
- Click Create Rest snippet framework Credential.
- Enter values in the following fields:
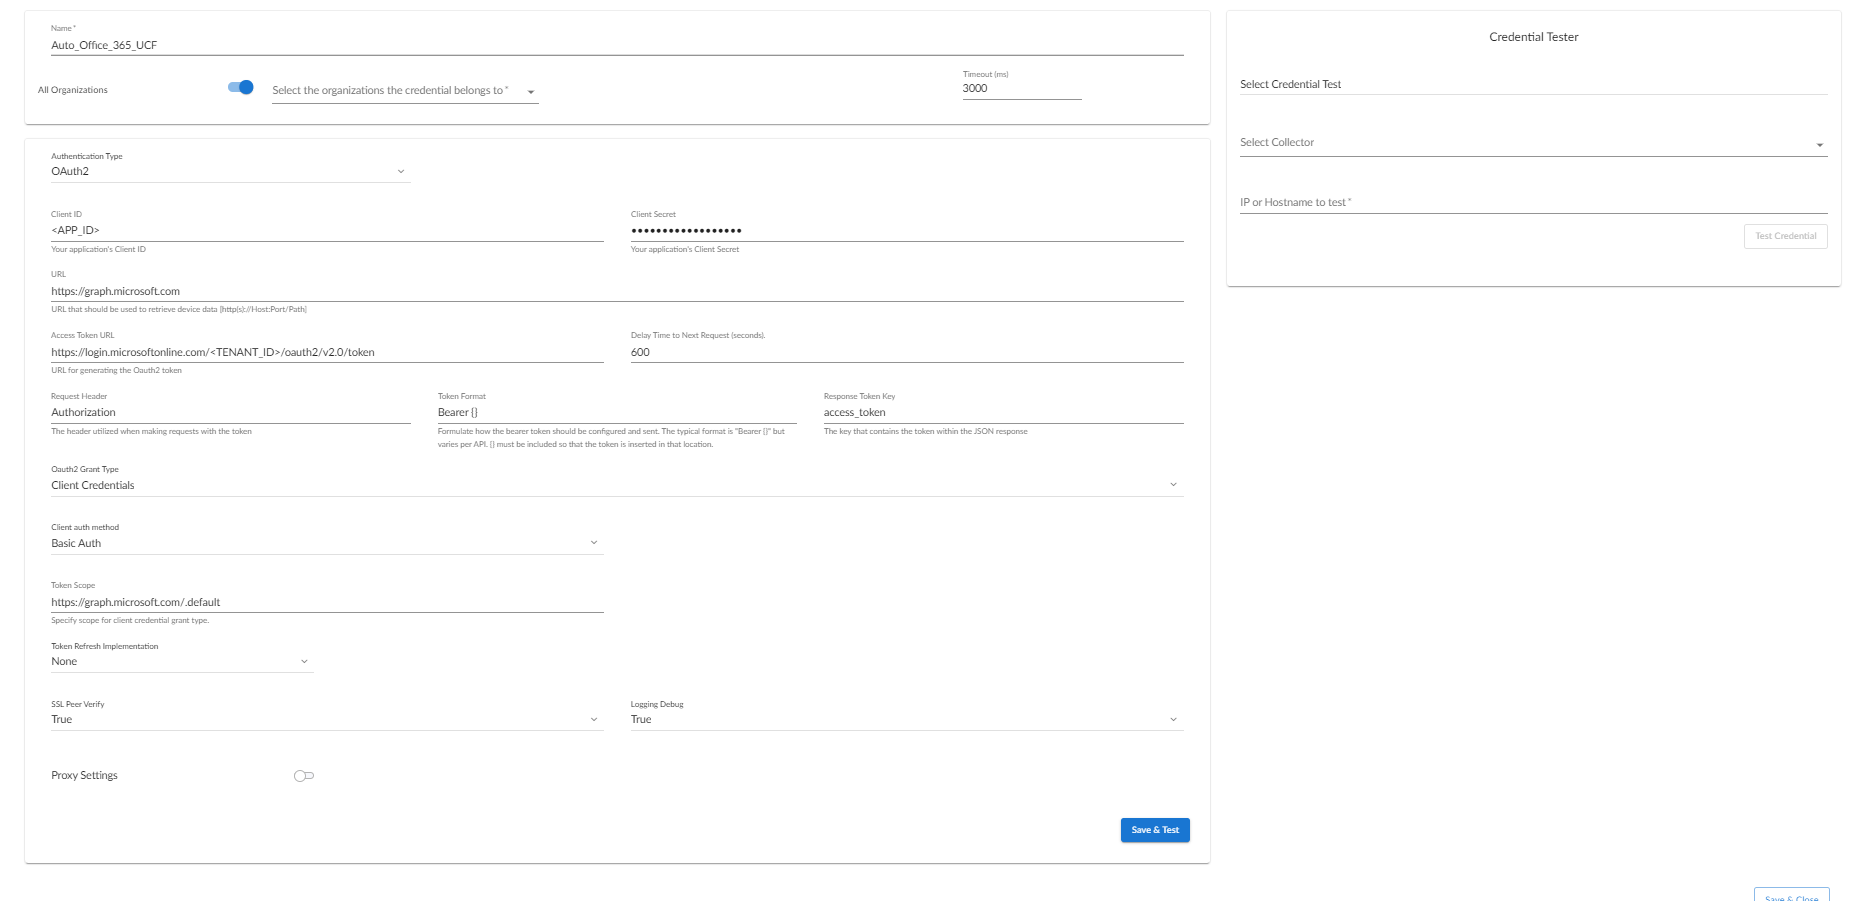
- Name. Type a new name for the Microsoft Office 365 credential.
- All Organizations. Toggle on (blue) to align the credential to all organizations, or toggle off (gray) and then select one or more specific organizations from the What organization manages this service? drop-down field to align the credential with those specific organizations.
- Authentication Type. Select OAuth2.
- Client ID. Enter the Application ID for the Office 365 Active Directory application.
- Client Secret. Enter the secret key for the Office 365 Active Directory application.
- URL. Enter "https://graph.microsoft.com".
- Access Token URL. Enter the following URL with your Tenant ID included where indicated: https://login.microsoftonline.com/<TENANT_ID>/oauth2/v2.0/token
- Request Header. Enter "Authorization".
- Token Format. Enter "Bearer {}".
- Response Token Key. Enter "Access Token".
- Oauth2 Grant Type. Select Client Credentials.
- Client auth method. Leave the default value that appears in this field.
- Token Scope. Enter "https://graph.microsoft.com/default".
- Token Refresh Implementation. Leave the default value that appears in this field.
- SSL Peer Verify. The default value of this field is "True". If you do not want extra security, set the value of this field to "False".
- Logging Debugging. The default value of this field is False. If you would like your credential to gather event information and errors to display in the /var/log/em7/snippet_framework.log log file, set the value of this field to True.
- Proxy Hostname/IP. If you are connecting to Office 365 via a proxy server, type the server's hostname or IP address. Otherwise, leave this field blank.
- Proxy Port. If you are connecting to Office 365 via a proxy server, type the port number you opened when setting up the proxy server. Otherwise, leave this field blank.
- Proxy User. If you are connecting to Office 365 via a proxy server using basic authentication, type the server's administrator username. Otherwise, leave this field blank.
- Proxy Password. If you are connecting to Office 365 via a proxy server using basic authentication, type the server's administrator password. Otherwise, leave this field blank.
- Click the button.
Testing Your Office 365 Credential
The Microsoft: Office 365PowerPack includes a Credential Test for Office 365. Credential Tests define a series of steps that SL1 can execute on demand to validate whether a credential works as expected.
The "Office 365 Credential Test" can be used to test a SOAP/XML credential for monitoring Office 365 using the Dynamic Applications in the Microsoft: Office 365PowerPack.
The "Office 365 Credential Test" performs the following steps:
- Test Port Availability. Performs an NMAP request to test the availability of the Office 365 endpoint HTTPS port.
- Test Name Resolution. Performs an nslookup request on the Office 365 endpoint.
- Make connection to Office 365 Graph API. Attempts to connect to the Office 365 Graph API using the account information specified in the credential.
The Office 365 credential test may fail on the last step in versions 106 and earlier of the PowerPack. If the credential fields are correct, you may go ahead and attempt discovery of the Office 365 account.
To test the Office 365 credential:
- Go to the Credentials page (Manage > Credentials).
- Locate the SOAP/XML credential that you created, click the Actions button (), and then select Test.
- The Credential Test Form modal page appears. Fill out the following fields on this page:
- Credential Select. This field is pre-populated with the credential you selected
- Select Credential Test. Select the Office 365 Credential Test.
- Collector. Select the All-In-One Appliance or Data Collector that will run the test.
- IP or Hostname to Test. Type "graph.microsoft.com".
- Click button to run the credential test. The Testing Credential window appears.
- Step. The name of the step.
- Description. A description of the action performed during the step.
- Log Message. The result of the step for this execution of the credential test.
- Status. Whether the result of this step indicates the credential and/or the network environment is configured correctly (Passed) or incorrectly (Failed).
- Step Tip. Mouse over the question mark icon (
 ) to display the tip text. The tip text recommends what to do to change the credential and/or the network environment if the step has a status of "Failed".
The Testing Credential window displays a log entry for each step in the credential test. The steps performed are different for each credential test. The log entry for each step includes the following information:
Testing Your Office 365 Credential in the SL1 Classic User Interface
The Microsoft: Office 365 PowerPack includes a Credential Test for Office 365. Credential Tests define a series of steps that SL1 can execute on demand to validate whether a credential works as expected.
The "Office 365 Credential Test" can be used to test a SOAP/XML credential for monitoring Office 365 using the Dynamic Applications in the Microsoft: Office 365 PowerPack.
The "Office 365 Credential Test" performs the following steps:
- Test Port Availability. Performs an NMAP request to test the availability of the Office 365 endpoint HTTPS port.
- Test Name Resolution. Performs an nslookup request on the Office 365 endpoint.
- Make connection to Office 365 Graph API. Attempts to connect to the Office 365 Graph API using the account information specified in the credential.
The Office 365 credential test may fail on the last step in versions 106 and earlier of the PowerPack. If the credential fields are correct, you may go ahead and attempt discovery of the Office 365 account.
To test the Office 365 credential:
- Go to the Credential Test Management page (System > Customize > Credential Tests).
- Locate the Office 365 Credential Test and click its lightning bolt icon (
 ). The Credential Tester modal page appears:
- Supply values in the following fields:
- Test Type. This field is pre-populated with the credential test you selected.
- Credential. Select the credential to test. This drop-down list includes only credentials that you have access to that can be tested using the selected credential test.
- Hostname/IP. Leave this field blank.
- Collector. Select the All-In-One Appliance or Data Collector that will run the test.
- Click the button. The Test Credential window appears, displaying a log entry for each step in the credential test. The steps performed are different for each credential test. The log entry for each step includes the following information:
- Step. The name of the step.
- Description. A description of the action performed during the step.
- Log Message. The result of the step for this credential test.
- Status. Whether the result of this step indicates the credential or the network environment is configured correctly (Passed) or incorrectly (Failed).
- Step Tip. Mouse over the question mark icon (
 ) to display the tip text. The tip text recommends what to do to change the credential or the network environment if the step has a status of "Failed".
Discovering Office 365 Devices
To discover and monitor your Office 365 devices, you must do the following:
- Create a virtual device representing the Office 365 service
- Configure the device template that is included in the Microsoft: Office 365 PowerPack
- Align the device template to the Office 365 virtual device
Each of these steps is documented in the following sections.
If you have multiple Office 365 subscriptions you want to monitor, you should create a separate virtual device, credential, and device template for each root device. You can also create different organizations for each Office 365 subscription.
Creating a Microsoft Office 365 Virtual Device
Because the Microsoft Office 365 service does not have an IP address, you cannot discover an Office 365 device using discovery. Instead, you must create a virtual device that represents the root device for the Office 365 service. A virtual device is a user-defined container that represents a device or service that cannot be discovered by SL1. You can use the virtual device to store information gathered by policies or Dynamic Applications.
To create a virtual device that represents your Office 365 service:
- Go to the Device Manager page (Devices > Device Manager, or Devices > Classic Devices, or Registry > Devices > Device Manager in the classic SL1 user interface).
- Click the button and select Create Virtual Device from the menu. The Virtual Device modal page appears.
- Enter values in the following fields:
- Device Name. Enter a name for the device. For example, you could enter "Microsoft Office 365 Service" in this field.
- Organization. Select the organization for this device. The organization you associate with the device limits the users that will be able to view and edit the device. Typically, only members of the organization will be able to view and edit the device.
- Device Class. Select Microsoft | Office 365 Account.
- Collector. Select the collector group that will monitor the device.
- Click the button to create the virtual device.
Configuring the Office 365 Device Template
The Microsoft: Office 365 PowerPack includes the "Microsoft: Office 365 Template", which you can use to create a device template for your own Office 365 account. This device template enables SL1 to align all of the necessary Dynamic Applications to the Office 365 root component device.
Before you can use the "Microsoft: Office 365 Template", you must give the template a new name and configure it so that each Dynamic Application in the template aligns with the credential you created earlier.
To configure the Office 365 device template:
- Go to the Configuration Templates page (Devices > Templates, or Registry > Devices > Templates in the classic SL1 user interface, or Devices > Templates, or Registry > Devices > Templates in the classic SL1 user interface).
- Locate the "Microsoft: Office 365 Template" and click its wrench icon (). The Device Template Editor modal page appears.
- In the Template Name field, type a new name for the device template.
- Click the tab. The Editing Dynamic Application Subtemplates page appears.
- In the Subtemplate Selection pane, click the first Dynamic Application name, then select your Office 365 credential in the Credentials field in the Dynamic Application Settings pane.
- Repeat step 5 for each of the Dynamic Applications listed in the Subtemplate Selection pane.

- When you are finished, click .
Aligning the Device Template to Your Office 365 Virtual Device
After you have configured the Office 365 device template so that each Dynamic Application in the template aligns with your Office 365 credential, you can use that template to align the Dynamic Applications to the virtual device that you created to act as the root device for your Office 365 environment. When you do so, SL1 discovers and models all of the components in your Office 365 service.
To align the Office 365 device template to the Office 365 virtual device:
- Go to the Device Manager page (Devices > Device Manager, or Devices > Classic Devices, or Registry > Devices > Device Manager in the classic SL1 user interface).
- On the Device Manager page, select the checkbox for the Office 365 virtual device.
- In the Select Actions field, in the lower right corner of the page, select the option MODIFY by Template and then click the button. The Device Template Editor page appears.
- In the Template drop-down list, select your Office 365 device template.
- Click the button, and then click to align the Dynamic Applications to the root component device.
Viewing Microsoft Office 365 Component Devices
When SL1 performs collection for the Microsoft Office 365 virtual device, SL1 will create component devices that represent each application in your Office 365 service.
Most Office 365 applications, such as Exchange Online, have their own designated Device Classes and icons in SL1. If a service does not have its own specific Device Class, it will have a Device Class of "Office 365 Generic Service" and an icon for generic Office 365 Service component devices.
In addition to the Devices page, you can view the Office 365 service and all associated component devices in the following places in the user interface:
- The Device Investigator Map page (click Map in the Device Investigator page) displays a map of a particular device and all of the devices with which it has parent-child relationships. Double-clicking any of the listed devices reloads the page to make the selected device the primary device.

- The Device Components page (Devices > Device Components) displays a list of all root devices and component devices discovered by SL1. The Device Components page displays all root devices and component devices in an indented view, so you can easily view the hierarchy and relationships between child devices, parent devices, and root devices. To view the component devices associated with your Office 365 service, find the Office 365 virtual device and click its plus icon (+).

- The Component Map page (Classic Maps > Device Maps > Components) allows you to view devices by root node and view the relationships between root nodes, parent components, and child components in a map. This makes it easy to visualize and manage root nodes and their components. SL1 automatically updates the Component Map as new component devices are discovered. The platform also updates each map with the latest status and event information. To view the map for your Office 365 service, go to the Component Map page and select the map from the list in the left NavBar. To learn

Relationships Between Component Devices
In addition to parent/child relationships between component devices, SL1 also creates relationships between Office 365 component devices and other associated devices:
- If you discover Azure devices using the Dynamic Applications in the Microsoft: Azure PowerPack version 110 or later, SL1 will automatically create relationships between Office 365 Active Directory tenants and Azure Active Directory tenants.