The following sections describe how to configure VMware vCenter resources for monitoring by Skylar One using the "VMware: vSphere Base Pack" PowerPack:
Use the following menu options to navigate the Skylar One user interface:
- To view a pop-out list of menu options, click the menu icon (
 ).
). - To view a page containing all of the menu options, click the Advanced menu icon (
 ).
).
Prerequisites for Monitoring VMware vCenter Servers
Before performing the steps for configuring a vCenter server, you must:
- Have access to a VMware vCenter server that monitors your ESXi and ESX servers.
- Have access to the vCenter server using the vSphere web client.
If the Windows Server that hosts the vCenter server is SNMP-enabled, you must also configure your ESXi or ESX servers for communication using SNMP. To do so, you must:
- Configure SNMP community strings, traps, and polling on the ESXi or ESX server. Assign the server at least one SNMP community string. For more information, see VMware's documentation for Configuring SNMP for ESXi 6.5 or Configuring SNMP for ESXi 6.7.
Creating a Read-Only User Account for Monitoring
Administrative users are the only default user type that have the level of access Skylar One requires to collect data from the VMware vCenter web service. If you do not want to use the username and password of an administrative user in the SOAP/XML credential, you can set up a custom user role with the specific read-only access Skylar One requires to the VMware vCenter web service.
To create a custom user role that grants the read-only access Skylar One requires, perform the following steps:
- Open your vCenter client at https://<vcenterservername>/ui
- Select Menu > Administration from the drop-down.
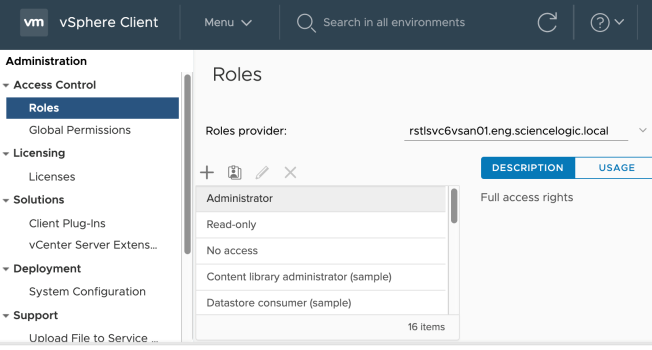
- In the menu at the left of the page, click Access Control > Roles. The Roles page appears:
- Click the plus sign (
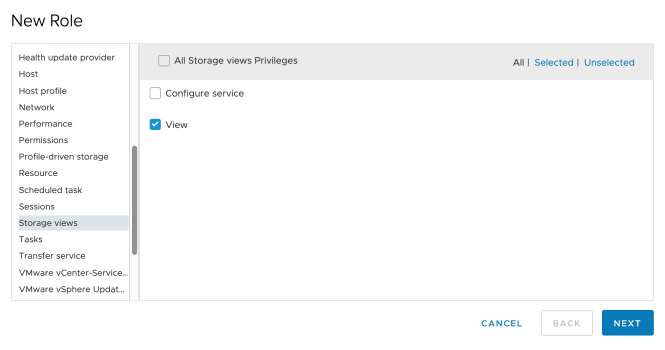
 ) to add a new Role. The New Role page appears:
- In the pane on the left, select Storage views and select the View checkbox. Click .
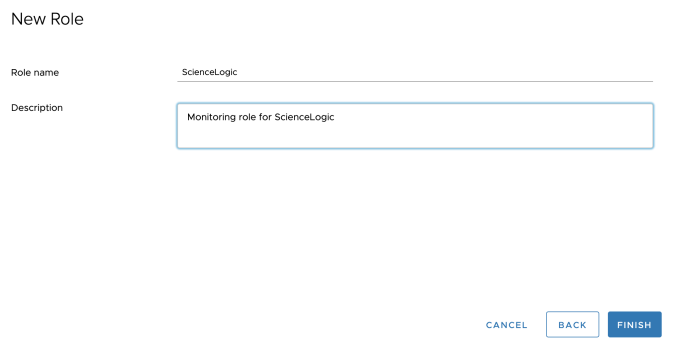
- In the next screen, enter a name for the role in the Role name field. Optionally, you can enter a description in the Description field.
- Click the button.
To assign the custom role to a user account, perform the following steps:
- In the vCenter client, select your vCenter server containing the hosts and clusters you are monitoring and click the tab.
- Click the plus sign (
 ) to add permissions.
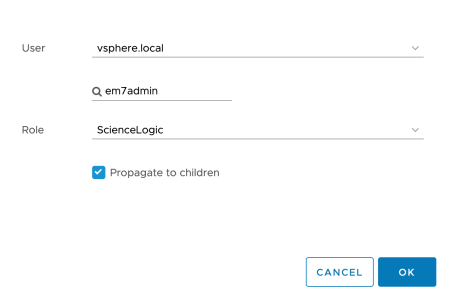
- Enter values in the following fields:
- User. Select your domain and add the user in the field below.
- Role. Select the role that you just created.
- Propagate to children. Select this checkbox.
- Click the button.
Installing a Certificate Authority on the Skylar One Collector
To enable testing verified SSL connections, you must install a certificate authority on the Skylar One collector:
-
Navigate to the vCenter "Getting Started" page.
-
Select Download trusted root CA certificates to download the necessary Certificate Authority certificates.
-
Unzip the files and locate the files in the certs/lin directory:
% ls certs/lin/
5c2283f7.0 5c2283f7.r1 8e392efa.0 8e392efa.r0
-
Upload these files to the Skylar One collector(s) and put them in /etc/pki/ca-trust/source/anchors/. You must use a sudo command to copy the files into that directory.
-
Execute the sudo update-ca-trust command. This will install the necessary trusted root certificate authority required to connect to the vCenter.
Configuring a Credential
To use the Dynamic Applications in the "VMware: vSphere Base Pack" PowerPack, you must configure a credential for the VMware web service. You can create a VMware specific credential for use with guided discovery, or a generic SOAP/XML credential.
Configuring a SOAP/XML Credential
To define a SOAP/XML credential:
- Go to the Credentials page (Manage > Credentials).
-
Locate the "VMware Server Example" sample credential. Click its icon (
 ) and select Duplicate. A copy of the credential, called VMware Server Example copy appears.
 - Click the icon (
 ) for the VMware Server Example copy credential and select Edit. The Edit Credential page appears:
- Supply values in the following fields:
-
Name. Name of the credential. Can be any combination of alphanumeric characters, up to 64 characters.
-
All Organizations. Toggle on (blue) to align the credential to all organizations, or toggle off (gray) and then select one or more specific organizations from the What organization manages this service? drop-down field to align the credential with those specific organizations.
To learn more about aligning credentials and organizations, see Aligning Organizations With a Credential.
-
Timeout (ms). Time, in milliseconds, after which Skylar One will stop trying to communicate with the device from which you want to retrieve data.
-
URL. In most cases, you can use the default setting.
-
Embedded Password [%P]. Enter the password Skylar One will use to connect to the VMware web service.
-
Embed Value [%1]. Enter the username Skylar One will use to connect to the VMware web service in the format <domain>/<username>. For example, silo_domain\john_user
-
CURL Options. Select SSLVERIFYPEER from the drop-down field. Then, select one of the options below from the Select Option drop-down field:
-
0. Select this option to direct the PowerPack to skip certificate verification.
-
1. Select this option to direct the PowerPack to use SSL certificate verification.
-
In order to use SSL certificate verification, you must install a certificate authority on the collector. For more information, see the section on Installing a Certificate Authority on the Collector.
- Click .
NOTE: If you would like to test your credential using the Credential Tester panel, click . For detailed instructions on using the Credential Tester, see the Testing the VMware Credential section.
Configuring a SOAP/XML Credential in the Skylar One Classic User Interface
To modify either of the VMware credential templates in the Skylar One classic user interface, perform the following steps:
- Go to the Credential Management page (System > Manage > Credentials).
- Click the wrench icon (
 ) for the "VMware Server Example" credential. The Credential Editor modal page appears:
- Supply values in the following fields:
- Profile Name. Enter a new name for the credential.
- URL. In most cases, you can use the default setting.
- Embed Value [%1]. Enter the username Skylar One will use to connect to the VMware web service in the format <domain>/<username>. For example, silo_domain\john_user
- Embedded Password [%P]. Enter the password Skylar One will use to connect to the VMware web service.
- CURL Options. Select SSLVERIFYPEER and then select the right-arrow icon. Select one of the options from the drop-down field:
0. Select this option to direct the PowerPack to skip certificate verification.
1. Select this option to direct the PowerPack to use certificate verification.
In order to use SSL certificate verification, you must install a certificate authority on the collector. For more information, see the section on Installing a Certificate Authority on the Collector.
- Click the button to save your changes as a new credential.
Do not click the button, as it will save over the example credential, which you may need for future use.
Configuring a VMware vSphere Credential for Guided Discovery
Skylar One includes a VMware credential type that you can use to connect with the VMware web service during guided discovery. This credential type uses field names and terminology that are specific to VMware vSphere.
Alternatively, you could monitor VMware using a generic SOAP/XML credential that does not include VMware-specific fields. For more information, see
To define a VMware-specific credential:
-
Go to the Credentials page (Manage > Credentials).
-
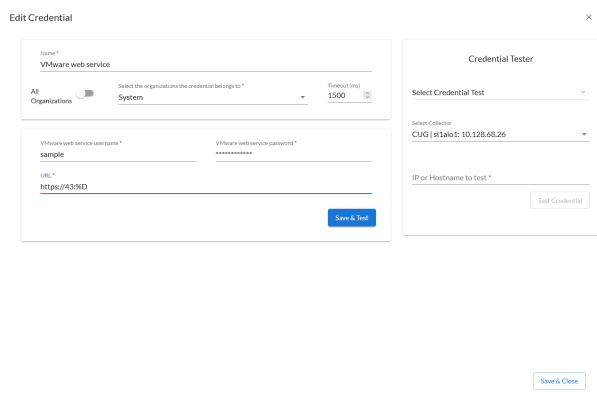
Click the button and then select Create VMware Credential. The Create Credential modal page appears:
- Supply values in the following fields:
-
Name. Name of the credential. Can be any combination of alphanumeric characters, up to 64 characters. This field is required.
-
All Organizations. Toggle on (blue) to align the credential to all organizations, or toggle off (gray) and then select one or more specific organizations from the What organization manages this service? drop-down field to align the credential with those specific organizations. This field is required.
To learn more about aligning credentials and organizations, see Aligning Organizations With a Credential.
- Timeout (ms). Time, in milliseconds, after which Skylar One will stop trying to communicate with the device from which you want to retrieve data.
- VMware web service username. The VMware username for the VMware web service account. This field is required.
- VMware web service password. The VMware password for the VMware web service account. This field is required.
- URL. The URL of the VMware web service that you want to monitor. This field is required.
- You can include the variable %D in this field. Skylar One will replace the variable with the IP address of the device that is currently using the credential. For component devices, Skylar One will replace %D with the IP address of the root device.
- You can include the variable %N in this field. Skylar One will replace the variable with the hostname of the device that is currently using the credential. If Skylar One cannot determine the hostname, Skylar One will replace the variable with the primary management IP address for the current device.
Click the URL field for a set of options for formatting the URL: http(s)://Host:Port/Path | %D = Aligned Device IP | %N = Aligned Device Name. For example: https://%D:433/<sample path>.
- Click .
If you would like to test your credential using the Credential Tester panel, click . For detailed instructions on using the Credential Tester panel, see the Using the Credential Tester Panel section.
Testing the VMware Credential
Skylar One includes a Credential Test for VMware. Credential Tests define a series of steps that Skylar One can execute on demand to validate whether a credential works as expected. For more information about creating and managing credential tests,
The VMware Credential Test can be used to test a SOAP/XML credential for monitoring VMware using the Dynamic Applications in the "VMware: vSphere Base Pack" PowerPack. The VMware Credential Test performs the following steps:
- Test Reachability. Attempts to reach the vCenter server using ICMP.
- Attempt VMware Connection. Attempts to connect to the VMware service using the account specified in the credential.
- Check Certificate Verification Setting. Reports on the option the credential is set to for certificate verification.
To test the VMware using the Credential Tester panel:
- Go to the Credentials page (Manage > Credentials).
- Locate the VMware credential that you created, click the Actions button (
 ), and then select Test.
- The Credential Test Form modal page appears. Fill out the following fields on this page:
- Select Credential Test. Select the "VMware Credential Test".
- Collector. Select the All-In-One Appliance or Data Collector that will run the test.
- IP or Hostname to Test. Type the IP address of the vCenter server.
The credential tester could fail if used on an ipv6 address. ScienceLogic recommends inserting square brackets ( [ ] ) around the address ([<ipv6-address>]) in the test to resolve the issue.
- Click button to run the credential test. The Testing Credential window appears.
- Step. The name of the step.
- Description. A description of the action performed during the step.
- Log Message. The result of the step for this execution of the credential test.
- Status. Whether the result of this step indicates the credential and/or the network environment is configured correctly (Passed) or incorrectly (Failed).
- Step Tip. Mouse over the question mark icon (
 ) to display the tip text. The tip text recommends what to do to change the credential and/or the network environment if the step has a status of "Failed".
The Testing Credential window displays a log entry for each step in the credential test. The steps performed are different for each credential test. The log entry for each step includes the following information:
Testing the VMware Credential in the Skylar One Classic User Interface
Skylar One includes a Credential Test for VMware. Credential Tests define a series of steps that Skylar One can execute on demand to validate whether a credential works as expected.
The VMware Credential Test can be used to test a SOAP/XML credential for monitoring VMware using the Dynamic Applications in the "VMware: vSphere Base Pack" PowerPack. The VMware Credential Test performs the following steps:
- Test Reachability. Attempts to reach the vCenter server using ICMP.
- Attempt VMware Connection. Attempts to connect to the VMware service using the account specified in the credential.
- Check Certificate Verification Setting. Reports on the option the credential is set to for certificate verification.
To test the VMware credential:
- Go to the Credential Test Management page (System > Customize > Credential Tests).
- Locate the VMware Credential Test and click its lightning bolt icon (
 ). The Credential Tester modal page appears.
- Supply values in the following fields:
- Test Type. This field is pre-populated with the credential test you selected.
- Credential. Select the credential to test. This drop-down list includes only credentials that you have access to that can be tested using the selected credential test.
- Hostname/IP. Type the IP address for the vCenter server.
- Collector. Select the All-In-One Appliance or Data Collector that will run the test.
- Click the button. The Test Credential window appears, displaying a log entry for each step in the credential test. The steps performed are different for each credential test. The log entry for each step includes the following information:
- Step. The name of the step.
- Description. A description of the action performed during the step.
- Log Message. The result of the step for this credential test.
- Status. Whether the result of this step indicates the credential or the network environment is configured correctly (Passed) or incorrectly (Failed).
- Step Tip. Hover over the question mark icon (
 ) with your mouse to display the tip text. The tip text recommends what to do to change the credential or the network environment if the step has a status of "Failed".
Configuring a VMware Device Template
A device template allows you to save a device configuration and apply it to multiple devices. The "VMware: vSphere Base Pack" PowerPack includes the "VMware vSphere Template." If you configure and apply this device template when you discover your vCenter server, Skylar One aligns the appropriate Dynamic Applications to the discovered vCenter server device.
To configure the VMware device template:
- Go to the Configuration Templates page (Devices > Templates, or Registry > Devices > Templates in the classic user interface).
- Locate the "VMware vSphere Template" and click its wrench icon (
 ). The Device Template Editor page appears.
- Click the tab. The Editing Dynamic Application Subtemplates page appears.
- Complete the following fields:
- Template Name. Type a new name for the device template.
- Credentials. Select the SOAP/XML credential that you created for VMware.
- Click the next Dynamic Application listed in the Subtemplate Selection section on the left side of the page and then select the VMware SOAP/XML credential in the Credentials field.
- Repeat step 5 until the you have selected the VMware SOAP/XML credential in the Credentials field for all of the Dynamic Applications listed in the Subtemplate Selection section.
- Click .
Do not click the button, as it will save over the "VMware vSphere Template Example", which you may need for future use.
Generating a List of vCenter Server Events
You can use PowerShell to generate a .csv report of all vCenter events that are available for your specific vCenter server. This can be helpful when trying to determine which events to configure collection for in the "VMware: Events" Dynamic Application.
To generate a list of vCenter Server events, enter the following snippet code in PowerShell:
$vcenterVersion = ($global:DefaultVIServer.ExtensionData.Content.About.ApiVersion)
$eventMgr = Get-View $global:DefaultVIServer.ExtensionData.Content.EventManager
$results = @()
foreach ($event in $eventMgr.Description.EventInfo) {
if($event.key -eq "EventEx" -or $event.key -eq "ExtendedEvent") {
$eventId = ($event.FullFormat.toString()) -replace "\|.*",""
$eventType = $event.key
} else {
$eventId = $event.key
$eventType = "Standard"
}
$eventDescription = $event.Description
$tmp = [PSCustomObject] @{
EventId = $eventId;
EventType = $eventType;
EventDescription = $($eventDescription.Replace("<","").Replace(">",""));
}
$results += $tmp
}
Write-Host "Number of Events: $($results.count)"
$results | Sort-Object -Property EventId | ConvertTo-Csv | Out-File -FilePath vcenter-$vcenterVersion-events.csv
Removing the VMware Performance Cache Dynamic Application
As of version 308 of the VMware PowerPack, the "VMware Performance Cache" Dynamic Application has been removed. This Dynamic Application needs to be removed before upgrading to version 308 or it will still run.
To remove the "VMware Performance Cache" Dynamic Application:
- Go to the Dynamic Applications Manager page (System > Manage > Applications).
- Search for the "VMware Performance Cache" Dynamic Application and select the checkbox next to it.
- In the Select Action drop-down menu in the bottom right, select DELETE Application, and then select the button. The Dynamic Application will be deleted.
Resetting the VMware vSphere Session
In the event that you want to reset your VMware session, you can use the "VMware: Reset Sessions" Dynamic Application. ScienceLogic recommends that you wait for the poll frequency to be completed so the Dynamic Application thresholds options appear. The default poll frequency is set to run every 24 hours.
You should only rest the VMware session if needed. Doing so unnecessarily may cause problems in your Skylar One system.
To reset your VMware session:
- Go to Device Manager page (Devices > Device Manager).
-
Navigate to the vCenter Root Device and click the wrench icon (
 ) to edit the device properties.
 - Click the tab. Scroll down to the Dynamic Application| VMware: Reset Sessions section.
- Use the slider to set the thresholds to "1" for each desired session.
- Click .
ScienceLogic recommends waiting 1 minute after changing the thresholds before running the Dynamic Application to ensure that the updates have been pushed to the collector.
- Click the Collections tab.
- Click the lightning bolt icon (
 ) to run the "VMware: Reset Sessions" Dynamic Application.
 - Return to the tab and reset the thresholds back to "0".
- Click .
In the results displayed after running the "VMware: Reset Sessions" Dynamic Application, the Session Type value will show what was run. If this value is blank, no sessions were reset. The value will list which sessions were reset.
ScienceLogic recommends that you disable the "VMware: Reset Sessions" Dynamic Application after use and re-enable it when desired to prevent it from running unnecessarily.
Purging Inventory Cache for a VMware vCenter Device
You can purge the inventory cache for a VMware vCenter device if there are significant discrepancies between the inventory being reported by Skylar One and the inventory actually on the vCenter, or in cases where there is missing configuration data across multiple devices.
You should only purge the inventory cache for a vCenter device if needed. Doing so unnecessarily may cause problems in your Skylar One system.
If you want to clear the cached inventory and reset the inventory sessions, perform the following steps:
- Go to the Devices page and search for the VMware vCenter device you want to purge.
- Click on the device to open the Device Investigator.
- Click on the tab.
- Go to Dynamic App Thresholds | VMware: Reset Sessions and verify that all thresholds are set to 0 except Raw Data Retention.
- Set the Purge Inventory threshold to 1 and click Save.
- Click on the tab and then click the button.
- Select VMware: Inventory Cache. In the VMware: Inventory Cache panel, change the Poll Frequency to 24 hours, and click Save. Wait for 2-3 minutes.
- Click the Actions icon (
 ) next to VMware: Reset Sessions and select Run Now.
 - Click on the tab and then click the button.
- Select VMware: Inventory Cache. In the VMware: Inventory Cache panel, change the Poll Frequency back to Default (1 minute), and click Save.
- Click on the tab, go to Dynamic App Thresholds | VMware: Reset Sessions, and change the Purge Inventory threshold back to 0.
- Click Save.
Purging Inventory Cache for a VMware vCenter Device in the Skylar One Classic User Interface
You can purge the inventory cache for a VMware vCenter device if there are significant discrepancies between the inventory being reported by Skylar One and the inventory actually on the vCenter, or in cases where there is missing configuration data across multiple devices.
You should only purge the inventory cache for a vCenter device if needed. Doing so unnecessarily may cause problems in your Skylar One system.
If you would like to clear the cached inventory and reset the inventory sessions, perform the following steps:
- Go to the Device Manager page and search for the VMware vCenter device you want to purge.
- Click the wrench icon (
 ) to edit the device properties.
 - Click on the tab.
- Go to Dynamic App Thresholds | VMware: Reset Sessions and verify that all thresholds are set to 0 except Raw Data Retention.
- Set the Purge Inventory threshold to 1 and click Save.
- Click on the tab.
- Select VMware: Inventory Cache. In the Select Action drop-down menu, change the Poll Frequency to 24 hours, and click Go.
- Click the button and wait for 2-3 minutes.
- Click the lightning bolt icon (
 ) to run the "VMware: Reset Sessions" Dynamic Application.
 - Click on the tab.
- Select VMware: Inventory Cache. In the Select Action drop-down menu, change the Poll Frequency back to Default (1 minute), and click Go.
- Click the button.
- Click on the tab, go to Dynamic App Thresholds | VMware: Reset Sessions, and change the Purge Inventory threshold back to 0.
- Click the button.
Configuring the VMware: Bulk Purge Config Dynamic Application
The "VMware: Bulk Purge Config" Dynamic Application allows you to purge the inventory cache for many vCenters at once, instead of one at a time.
You should only purge the inventory cache for a vCenter device if needed. Doing so unnecessarily may cause problems in your Skylar One system.
If you want to execute a bulk purge of your VMware inventory cache, you can configure the "VMware: Bulk Purge Config" Dynamic Application to run the purge.
- Go to the Dynamic Applications Manager page (System > Manage > Applications).
- Search for the "VMware: Bulk Purge Config" Dynamic Application and click on its wrench icon (
 ).
). - Click on the tab, locate "Bulk Purge Inventory" and click on its wrench icon (
 ).
). - In the Threshold Value field, change the value to 1.
- Click the button.
- Each root device will produce an alert indicating that the purge has been completed. Once all purges have completed, reset the value of the Threshold Value field to 0.
- Click the button.
Managing Site Recovery Manager Placeholder Virtual Machines
As of version 307 of the "VMware: vSphere Base Pack", SRM (Site Recovery Manager) placeholder virtual machines will not be discovered or modeled on a new discovery. In order to model them, you need to adjust the "Hide PlaceHolder VMs" threshold in the following Dynamic Applications:
-
VMware: ClusterComputeResource VM Discovery
-
VMware: HostSystem VM Discovery
-
VMware: ResourcePool VM Discovery
To configure the "Hide Placeholder VMs" threshold:
- Navigate to the Dynamic Applications Manager page and search for the appropriate Dynamic Application.
- Click the wrench icon (
 ) to edit the Dynamic Application properties.
 - Click on the tab.
- Click the wrench icon (
 ) next to "Hide PlaceHolder VMs".
 -
The Threshold Value field is set to 1 ("true") by default. This means that on a new discovery, SRM (Site Recovery Manager) placeholder virtual machines will not be discovered or modeled. To model them, change the value to 0 ("false").
-
Click Save.
-
Repeat this process with the other Dynamic Applications listed above if needed.
This will not affect existing placeholder virtual machines that have already been modeled. If you are updating from an earlier version and wish to hide the placeholders, any that already exist should be deleted after upgrading.
After a failover, any new placeholder virtual machines will remain modeled, and must be either manually deleted or allowed to vanish.
Any future updates to the "VMware: vSphere Base Pack" PowerPack will reset the "Hide PlaceHolder VMs" threshold to the default value. You will need to configure the threshold again after upgrading.
Configuring the Hide Placeholder VMs Threshold for a Parent Device
After an SRM placeholder parent device has been discovered, you can configure the threshold for the parent device to affect any virtual machines under that device. For example, if you want to view placeholders for a specific host, but not others, you can configure the threshold to show or hide them.
-
Navigate to the Device Manager page (Devices>Device Manager) and search for the SRM (Site Recovery Manager) parent device you want to configure.
-
Click the wrench icon (
 ) to edit the device properties.
 -
Click on the tab.
-
Search for the appropriate Dynamic Application that discovered the parent device. It will be one of the options listed below, depending on the device:
- VMware: ClusterComputeResource VM Discovery
-
VMware: HostSystem VM Discovery
-
VMware: ResourcePool VM Discovery
-
The Hide Placeholder VMs threshold is set to 1 ("true") by default. This means that on a new discovery, SRM (Site Recovery Manager) placeholder virtual machines will not be discovered or modeled. To model them, change the value to 0 ("false").
-
Click Save.
