Use the following menu options to navigate the SL1 user interface:
- To view a pop-out list of menu options, click the menu icon (
 ).
). - To view a page containing all of the menu options, click the Advanced menu icon (
 ).
).
The following sections describe how to monitor a Windows Cluster using SL1:
Monitoring Windows Clusters in the ScienceLogic Platform
The general approach for monitoring a Windows Cluster is to discover each cluster node and then discover the shared IP address as an additional, separate, device:
- For each cluster node, configure SL1 to monitor the non-cluster related aspects of the devices. For example, the CPU, memory, and interface utilization for each node. When you configure monitoring for each cluster node, you will ensure that the cluster services are not monitored on each cluster node.
- For the additional device that represents the cluster itself, configure SL1 to monitor the clustered services. For example, you would align the performance Dynamic Applications that collect data about a Windows device to this device record. When you configure monitoring for the device record that represents the clustered services, you will ensure that node-specific data, for example, CPU, memory, and interface utilization, is not monitored through the shared IP.
Version 101 of the Microsoft: SQL Server Enhanced PowerPack does not support the ability to monitor SQL Server clusters. The SQL Servers that you monitor must not be using Windows Server Failover Clustering (WSFC) or SQL Server Failover Cluster Instances (FCI) for high-availability.
By monitoring the shared IP address separately, SL1 will always poll the active cluster node for information about the clustered service.
Discovering Cluster Nodes
The steps to discover the individual cluster nodes depend on the types of Dynamic Application you will use to monitor the cluster services, i.e. the Dynamic Applications that will be aligned with the device record for the shared IP address. When you discover each cluster node, you must configure SL1 to ensure that the Dynamic Applications for the clustered service are not aligned automatically.
There are several approaches to preventing the Dynamic Applications for the clustered service from being automatically aligned to each cluster node:
- In the discovery session for a cluster node, do not include any credentials that can be used to collect the Dynamic Applications for the clustered service. For example, if you will use WMI Dynamic Applications to monitor the clustered service, do not include a credential that can be used to successfully make WMI requests in the discovery session. By using this method, you might prevent the automatic alignment of Dynamic Applications that you would like to align with the cluster nodes; in this case, you would have to align those Dynamic Applications manually.
- In some cases, you might need or want to include credentials that can be used to collect Dynamic Applications for the clustered service in the discovery session for a cluster node. This typically occurs when the Dynamic Applications for the clustered service use the SNMP protocol. If you need to include any credential that can be used to collect Dynamic Applications for the clustered service in the discovery session for a cluster node, you can allow the Dynamic Applications for the clustered service to align with the device records for the cluster nodes, then manually disable collection for those Dynamic Applications on those devices. SL1 will not re-enable collection for those Dynamic Applications.
The following sub-sections describe how to manually align a Dynamic Application with a cluster node and how to disable collection of a Dynamic Application on a device. If you are configuring SL1 to monitor multiple clusters that provide the same service, you can speed up both of these tasks by creating and applying device templates.
Aligning a Dynamic Application with a Cluster Node
If you need to manually align a Dynamic Application to a cluster node, perform the following steps:
- Go to the Device Manager page (Registry > Devices > Device Manager).
- Select the wrench icon (
 ) for the cluster node. The Device Properties page is displayed.
 - Select the tab. The Dynamic Application Collections page is displayed.
- Select the button.
- Select Add Dynamic Application. The Dynamic Application Alignment page appears.
- In the Dynamic Application Alignment page, select the Dynamic Application you want to align in the Dynamic Applications field.
- In the Credentials field, select the credential for the Dynamic Application.
- Select the button.
Disabling Collection of a Dynamic Application on a Device
If you need to manually disable collection for a Dynamic Application on a device, perform the following steps:
- Go to the Device Manager page (Registry > Devices > Device Manager).
- Select the wrench icon (
 ) for the device record for the cluster. The Device Properties page is displayed.
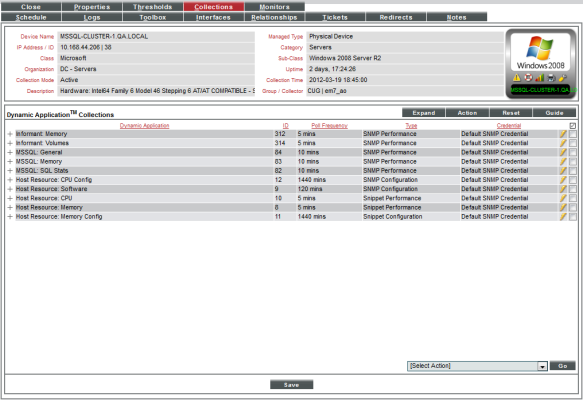
- Select the tab. The Dynamic Application Collections page is displayed:
- Select the checkbox for each Dynamic Application you want to disable.
- In the Select Action drop-down list, select Disable All Collection Objects.
- Select the button.
Discovering the Cluster IP Address
To discover the additional device that represents the cluster, you must run a discovery session to discover a shared IP address for the cluster as a pingable device. By discovering the shared IP address as a cluster, you will prevent SL1 from automatically collecting node-specific data using SNMP. After discovering the cluster as a pingable device, you can manually align the Dynamic Applications that will monitor the clustered service with the device record for the cluster.
If you are configuring SL1 to monitor multiple clusters that provide the same service, you can create a device template to speed up the manual configuration of Dynamic Applications.
To discover the virtual IP of the cluster as a pingable device:
- Go to the Devices page (
) or the Discovery Sessions page Devices > Discovery Sessions).
- Click the button.
- Click the button. Additional information about the requirements for discovery appears in the General Information page to the right.
- Click . The Add Devices page appears.
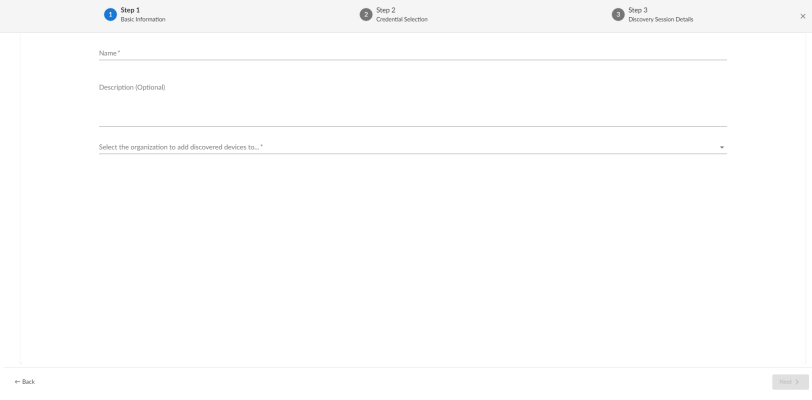
- Complete the following fields:
- Name. Type a unique name for this discovery session. This name is displayed in the list of discovery sessions on the Discovery Sessions tab.
- Description. Type a short description of the discovery session. You can use the text in this description to search for the discovery session on the Discovery Sessions tab. Optional.
- Select the organization to add discovered devices to. Select the name of the organization to which you want to add the discovered devices.
- Click . The Credentials page of the Add Devices wizard appears.
- Do not select anything in the Credentials page. Click .
- In the Discovery Session Details page, click the down arrow icon (
) next to Advanced Options to complete the following fields:
- List of IPs/Hostnames. Enter the shared IP address for the cluster.
- Discover Non-SNMP. Enable this setting (blue).
- Select Device Template. If you are using a device template to configure Dynamic Applications, select the device template in this field.
- For the other fields in this page, you can use the default values or select different values based on your operating procedures.
- Select the button.
Discovering the Cluster IP Address in the SL1 Classic User Interface
To discover the additional device that represents the cluster, you must run a discovery session to discover a shared IP address for the cluster as a pingable device. By discovering the shared IP address as a cluster, you will prevent SL1 from automatically collecting node-specific data using SNMP. After discovering the cluster as a pingable device, you can manually align the Dynamic Applications that will monitor the clustered service with the device record for the cluster.
If you are configuring SL1 to monitor multiple clusters that provide the same service, you can create a device template to speed up the manual configuration of Dynamic Applications.
To discover the virtual IP of the cluster as a pingable device:
- Go to the Discovery Control Panel page (System > Manage > Discovery).
- Select the button. The Discovery Session Editor page appears.
- Supply values in the following fields:
- IP Address Discovery List. Enter the shared IP address for the cluster.
- SNMP Credentials. Do not select any credentials.
- Other Credentials. Do not select any credentials.
- Discover Non-SNMP. Select this checkbox.
- Duplication Protection. Deselect this checkbox. If you discovered the cluster nodes as SNMP devices, SL1 will have associated the shared IP address for the cluster with one of those nodes. You must disable duplication protection for SL1 to discover the shared IP address as a new device.
- Apply Device Template. If you are using a device template to configure Dynamic Applications, select the device template in this field.
- For the other fields in this page, you can use the default values or select different values based on your operating procedures.
- Select the button.
- In the Discovery Control Panel page, select the lightning bolt icon (
 ) for the new discovery session.
Aligning Dynamic Applications with the Cluster Device
To manually align a Dynamic Application to the device record for the cluster, perform the following steps:
- Go to the Device Manager page (Registry > Devices > Device Manager).
- Select the wrench icon (
 ) for the device record for the cluster. The Device Properties page is displayed.
 - Select the tab. The Dynamic Application Collections page is displayed.
- Select the button.
- Select Add Dynamic Application. The Dynamic Application Alignment page appears.
- In the Dynamic Application Alignment page, select the Dynamic Application you want to align in the Dynamic Applications field.
- In the Credentials field, select the credential for the Dynamic Application.
- Select the button.
Using a Device Template to Configure Dynamic Applications
If you are configuring SL1 to monitor multiple clusters that provide the same service, you can create a device template to speed up the manual configuration of Dynamic Applications on the cluster nodes and/or the device record that represents the cluster.
To create a device template that configures a Dynamic Application on a device:
- Go to the Configuration Templates page (Devices > Templates or Registry > Devices > Templates in the SL1 classic user interface).
- Select the button. The Device Template Editor page is displayed.
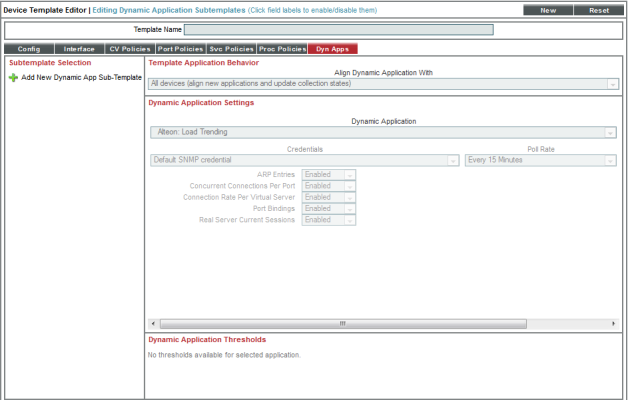
- Select the tab. The Editing Dynamic Application Subtemplates page is displayed:
- Select Add New Dynamic App Sub-Template in the left pane.
- Supply values in the following fields:
- Align Dynamic Application With. Select All devices.
- Dynamic Application. Select the Dynamic Application that you want to configure.
- Credentials. If you want to use the device template to align Dynamic Applications with a device, enable this field by clicking on the field name. Select the credential you want to align with the Dynamic Application on all devices to which this template is applied. If you want to use the device template to disable collection for this Dynamic Application, do not enable this field.
- If you want to use the device template to disable collection for this Dynamic Application, select the name of each object that appears in the Dynamic Application Settings page. The object names appear below the Credentials field. In the drop-down list for each object, select Disabled.
- If you want to configure multiple Dynamic Applications with this device template, repeat steps 4–6 for each additional Dynamic Application.
- Select the button.
You can apply the device template to all devices in a discovery session by selecting the device template in the Apply Device Template field in the discovery session. To apply a device template to one or more devices after discovery:
- Go to the Device Manager page (Registry > Devices > Device Manager).
- Select the checkbox for each device to which you want to apply the device template.
- In the Select Action drop-down list, select Modify By Template.
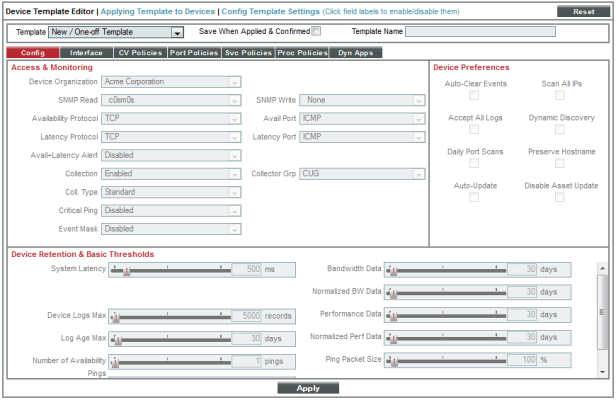
- Select the button. The Device Template Editor page is displayed:
- Select the device template that you want to apply in the Template field.
- Select the button. A summary of the changes you are about to make is displayed.
- Select the button.


