![]()
This chapter explains the authentication and role-based access control used by Skylar AI, including how to use the Skylar Settings page in the Skylar AI user interface.
This chapter is intended for Skylar AI administrators only.
Overview of Authentication in Skylar AI
Authentication for Skylar AI has the following features:
- Multi-tenant support, including a super-user login for host management .
- Multiple instances that represent separate domains of data access within an account (tenant ).
- Predefined roles for access control.
- Email and password (local accounts) authorization by default, and Security Assertion Markup Language (SAML) single sign-on (SSO) authorization configured as needed.
- Access tokens for integration with external tools.
When a user is logged in to Skylar AI, that session uses the following rules:
- The first login for any new user will start with a prompt to create a new password.
- A session expires after 18 hours or three hours of inactivity.
- Logging into a session requires either an email and password combination or a successful SAML2 redirect workflow.
- Email domains and SAML are configured per account (tenant).
- Ten failed password validations within ten minutes disables the user and requires administrator intervention.
Role-Based Access Control in Skylar AI
To access the role-based access control settings, log into the Skylar AI user interface and click Skylar Settings. The tab for the Skylar Settings page appears:
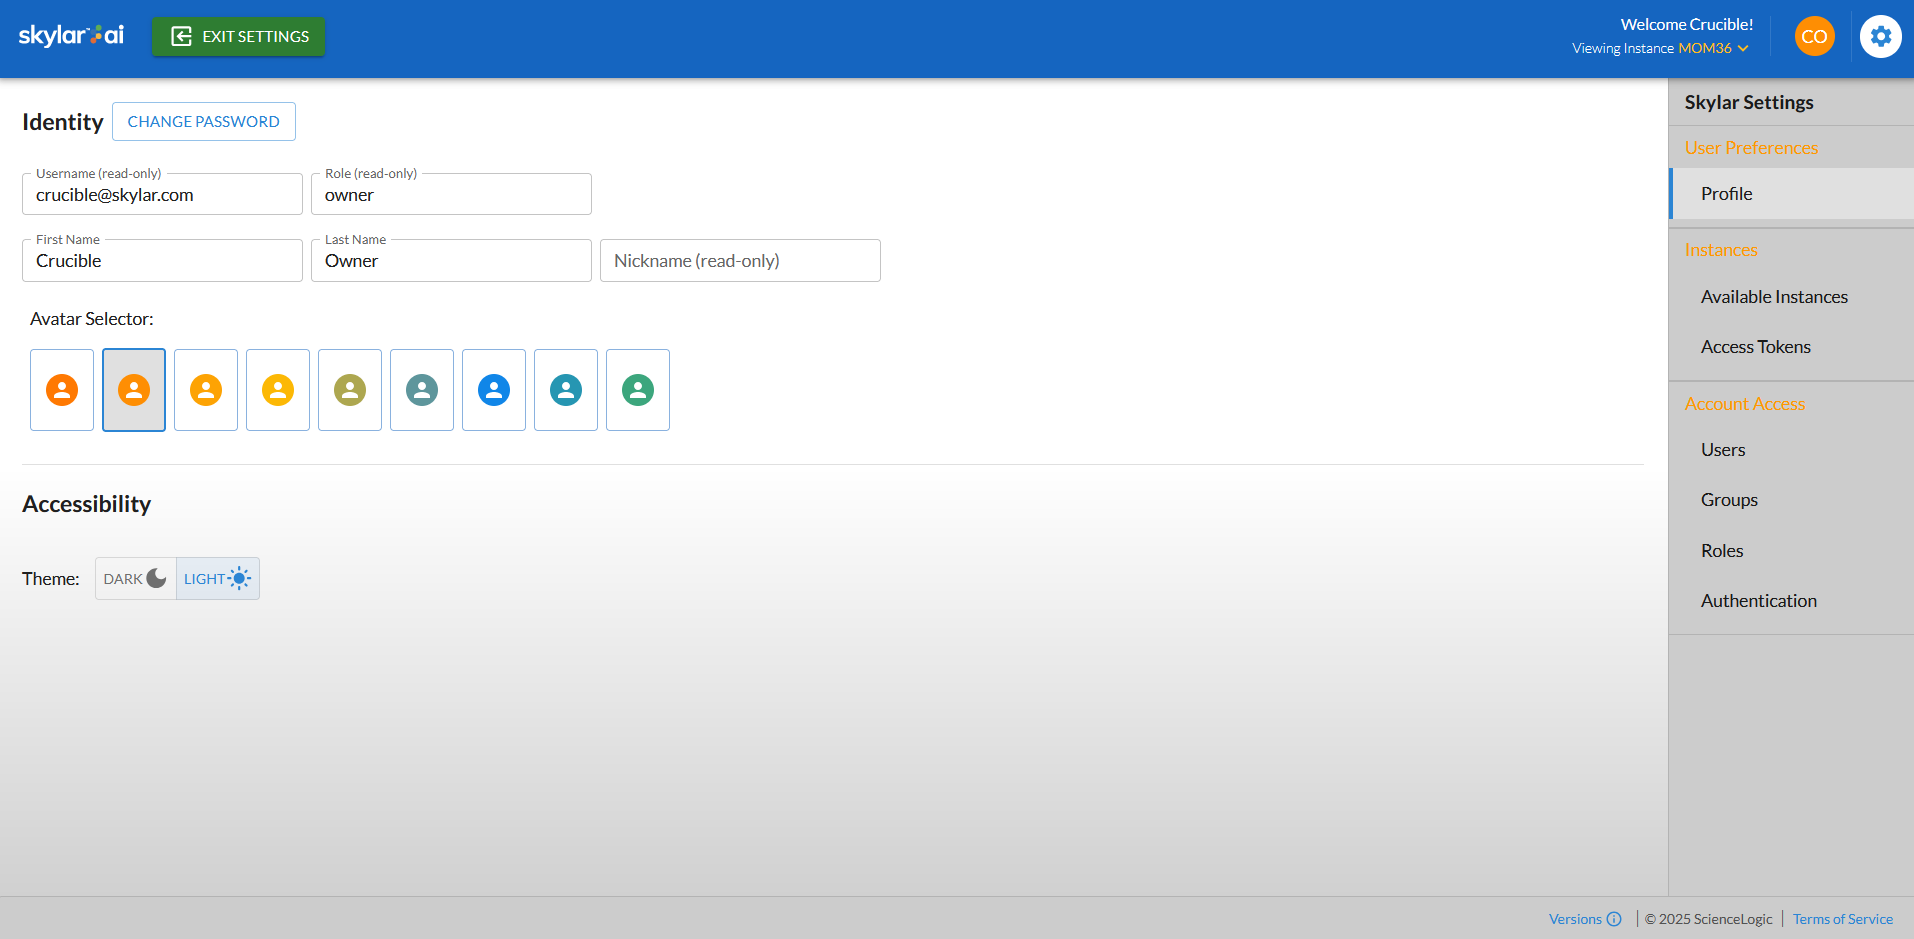
On the different tabs of the Skylar Settings page, you can edit your user profile, add users and groups to your account, assign roles to groups, and create access tokens. Depending on your user role, you can also set up additional forms of authentication.
Navigating the Skylar Settings User Interface
Use the following buttons and icons to help you navigate the Skylar Settings user interface:
- To return to the Skylar AI login page, click the "Skylar AI" icon or the button at top left.
- To view the email address and role for the current user in the Skylar AI user interface, click the user icon (
 ) at top right. You can also click the button to sign out of this session.
 - To return to the tab for the current user, click the profile icon (
 ) at top right.
 - To view version numbers for the Skylar Settings user interface, click the Versions link in the footer of any page. From the footer, you can also click links to view the Terms of Service and the license information.
Elements of Role-based User Accounts in Skylar AI
An account in a Skylar AI system represents a complete Skylar AI configuration for a company. You can have multiple accounts in a single Skylar AI system. Another way of thinking of an account is that an account is a "tenant", as in "multi-tenant software".
An account contains a combination of the following:
-
Instances. An instance is a logical store for account data. In other words, an instance is a complete Skylar AI system with its own set of login credentials and user settings. Examples of instances include a production instance, a QA instance, and a testing instance. An account can contain multiple instances. A user can view only the instances that are specified on the groups to which that user is a member. If only one instance is available, you will use the instance labeled "default".
On the tab of the Skylar Settings page, you can view a list of instances for the current user. An "Admin" user can also access the "Analytics Secrets" for an instance, which contains the Microsoft Open Database Connectivity (ODBC) host, password, port, and user information for Data Exploration using ODBC.
-
Access Tokens. You can add access tokens to connect Skylar AI with SL1 or a third-party application. The scope of an access token determines which application or service you can connect to with the access token. You can select more than one scope for an access token. You will need a different access token for each Skylar AI instance you are connecting to with an access token. You can set an expiration date for an access token, and you can also regenerate a token if needed.
On the tab of the Skylar Settings page, you can view and add access tokens. For more information, see Using Access Tokens for Users.
-
Users. Each person that uses Skylar AI should have his or her own user account. A user must belong to at least one group.
On the tab of the Skylar Settings page, you can view, edit, and add users for an account, and you can also reset the password for a user.
-
Groups. A group controls which areas of Skylar AI a user can access. User groups are configured with a role and either a list of specific instances or All instances. If you select All instances, any instances that are created later are aligned with this group. Users can belong to more than one group. The active role for a user is based on the highest privilege from the groups aligned with that user.
On the tab of the Skylar Settings page, you can view, edit, and add user groups for an account.
-
Roles. A role controls what features a user can access. You assign a role by creating or editing a user, and then aligning a group to that user. The active role for a user is based on the highest privilege from the groups aligned with that user. The types of roles include the following:
-
Super User. Assigned to the single admin user to manage all user accounts. The default login is skylar@sciencelogic.com. The Super User role can create and manage customer accounts, manage multiple instances, and set up SAML authentication for a customer.
-
Service Provider. This role lets you provision new accounts and set up SSO for accounts. This role cannot edit the user with the Super User role.
-
Owner. This role lets you monitor user management and user access, including the creation and assignment of instances. The Owner role also has the privilege to reset a user password.
-
Admin. This role lets you perform day-to-day configuration tasks, including integrations and customization. You can also add, edit, and delete users.
For this release of Skylar AI, the Admin, Editor, and Viewer roles are the same. In future releases, these roles will be further defined.
-
Editor. For a future release, this role will let a user edit (create, update, and delete) objects, particularly incident type metadata.
-
Viewer. For a future release, this role will give a user read-only access to Skylar AI. A Viewer user can edit his or her own profile.
On the tab of the Skylar Settings page, you can view your assigned roles for this account.
-
-
Authentication. Each Skylar AI system is configured by the Owner user by default for email authentication, which uses an email address and password combination. An Owner user can also set up authentication with a shared Identity Provider through the SAML2 protocol. If you enable single sign-on (SSO) with SAML, users that log in with the specified domain will be redirected to the SAML provider for this account.
On the tab of the Skylar Settings page, you can configure SAML for this account. For more information, see Configuring SSO Authentication with SAML.
Configuring SSO Authentication with SAML
Users with the Owner role can configure single sign-on (SSO) authentication with SAML for their accounts. When SSO authentication with SAML is enabled, all logins for that customer will be authenticated by the SAML identity provider, such as Auth0, Okta, or JumpCloud.
In case of an issue with authenticating, you can contact ScienceLogic to disable SAML for the account and potentially reset the owner's local (non-SAML) password if needed.
Before you can set up SSO authentication with SAML in Skylar AI, you will first need to create your user groups with your SAML identity provider if you do not already have them set up. Be sure to use the same names for your user groups with your SAML provider and with Skylar AI.
Do not switch the account to SAML until you have confirmed that the owner of the account has properly configured their SSO provider to recognize the Skylar platform.
To set up SSO Authentication with SAML in the Skylar AI user interface:
-
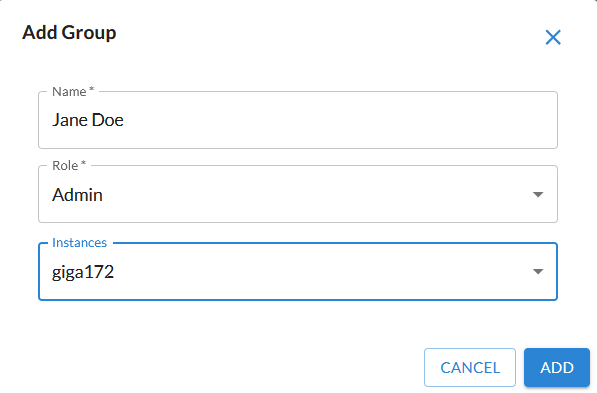
On the Skylar Settings page, click the tab and click . The Add Groupdialog appears:

-
Type a name for the group, select a role of Admin, and select one or more instances. Click . The group is added to the tab.
-
Go to the tab and review the instructions for SAML setup:
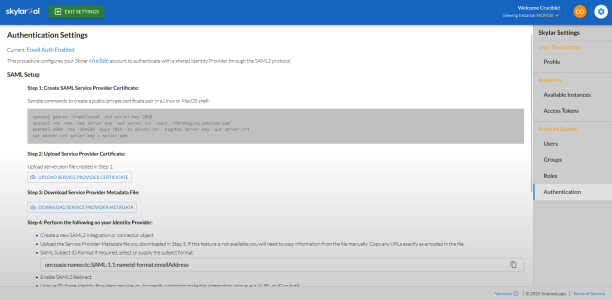
-
Follow steps 1-7 from the tab on the Skylar Settings page.
For step 7 on the tab, after you click the button, you can select Enable SAML Test Mode for 10 minutes to test the new authentication configuration. If the authentication works as expected, you can come back to step 7 and select SAML to make the configuration permanent.

Using Access Tokens for Users
You can use the tab from the Skylar Settings page to add access tokens to connect Skylar AI with SL1 or a third-party application. Starting with Skylar Analytics version 1.4.0, a Skylar access token is used for authentication in place of an API key.
You can set an expiration date for an access token, and you can also regenerate a token if needed.
To create an access token:
- Log in to Skylar AI and select Skylar Settings.
- Click the tab.
- Click the button. The Add Access Token window appears.
- Complete the following fields:
- Name. Type a name for the token, such as "SL1 Collector".
- Scopes. The scope of an access token determines which application or service you can connect to with the access token. You can select more than one scope for an access token. You will need a different access token for each Skylar AI instance you are connecting with access token. If you are creating this access token to use with the Skylar SL1 Management Tool, select both sl1_connector and telemetry.
- Expiration Date. Select an expiration date.
- Click the button. The access token is added to the tab.
- Click the copy icon (
 ) to copy the access token to the clipboard.