![]()
This chapter explains the different tasks that a user with the Service Provider role can perform in Skylar AI. A Service Provider user can provision new accounts and add an ODBC user for the Data Exploration component of Skylar Analytics.
This appendix is intended only for Skylar AI users with a role of Service Provider.
First Login as a Service Provider User
When you first log in to your Skylar AI system, you will use the default service provider name of provider@sciencelogic.com. The user interface will prompt you to set the ScienceLogic user password before your first login can continue.
After you log in for the first time, you will see a link for just the Skylar Settings page on the Skylar AI home page. Click that link to start setting up new accounts.
After you set up a licensed version of Skylar Analytics in Skylar Settings, you will see an Analytics link on this home page.
Provisioning a New Account
You can have multiple accounts in a single Skylar AI system. To add a new account, you will need to provision that account in Skylar Settings as a Super User.
To provision a new customer account:
-
Log in to Skylar AI as a Super User.
-
Click the All Accounts drop-down at the top of the page and select the customer account you want to provision. Skylar AI updates the contents of the page to show data for that account.
-
Click the All Accounts drop-down again and click at the bottom of the drop-down. The Provision a New Account wizard appears.

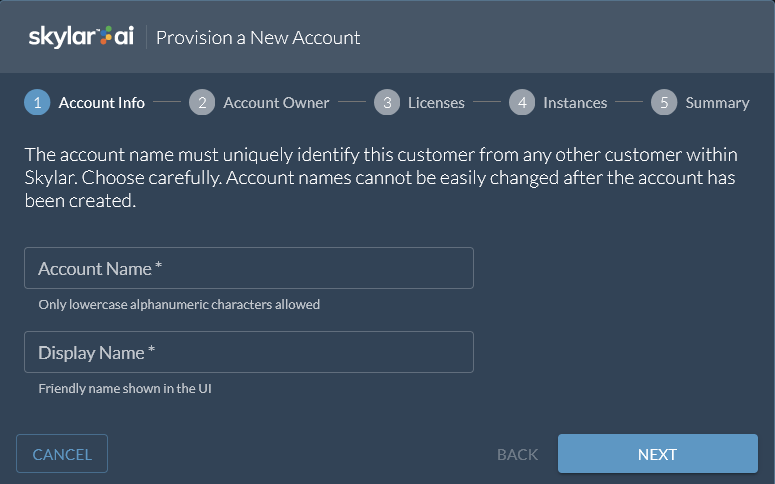
-
On the Account Name page, enter the name of the account in the Account Name field using only lower-case alphanumeric characters and type a user-friendly name for the account in the Display Name field.
-
Click .
-
On the Account Owner page, specify the First Name, Last Name, and Email for the first user of the new account.
-
When you enter an email address, Skylar AI automatically adds the domain name from that email to the Claim Email Domain field. If you are not using single sign-on (SSO) through Security Assertion Markup Language (SAML), or if you do not want to claim that email domain, you can remove the text from this field. This field is optional.
If you claim this domain, when SSO through SAML is enabled, users that log in with this domain will be redirected to the SAML provider for this account.
-
Click .
-
On the Licenses page, select Skylar Advisor if you want to enable Skylar Advisor for this account. You have the following additional options:
- Enable Advisories. Pairs Skylar Advisor to the data lake to mine telemetry to generate Advisories based on events and groups of similar events.
- Legacy Instance ID. For data lake connections, uses the legacy instance ID format.
- Enable Organizations. Restricts access based on organization. Once this feature is enabled, you will not be able to disable it.
-
Select Skylar Analytics to enable Skylar Analytics for this account. You have two additional options:
-
Consolidate Instance Reporting. Enables reporting from multiple Skylar One systems on this Skylar AI system. When this option is enabled, data from all instances under the account will be merged into a single database called reporting.
You must enable this option during the account provisioning wizard, as you cannot change it or enable it after the wizard is complete. When enabled, a note indicating that consolidated instance reporting is active appears on the Dashboards page (
 > Analytics Admin > Dashboards) in Skylar Settings.
 -
Enable ODBC. Creates an ODBC connection for the Data Exploration component of Skylar Analytics. In the ODBC Client IP Ranges field, you will need to add the public-facing IP addresses for the ODBC client so those IP addresses are added to the whitelist or "allow list". Otherwise users will not be able to access the ODBC connection.
These IP addresses display on the ODBC Users page (
> Analytics > Settings > ODBC Users). For more information, see Adding an ODBC User.You will need to add your ODBC users on the ODBC Users page after you complete this procedure. For more information, see Adding an ODBC User.
-
-
Click .
-
On the Instances page, enter a name for the instance associated with this account using only lowercase alphanumeric characters. Examples include a production, QA, or testing instance. You can also use default as the instance name. Click .
-
On the Summary page, review your settings and click to continue setting up the account. The provisioning process starts, and Skylar AI switches to the new account.
When the account is set up, you will need to give the email address you used in step 7 to the first user. On first login, the new user will be prompted to change their password.
-
After the account is set up, you can use the following links on the Super User toolbar to further configure this account:
-
Account Info. Lets you change the display name for this account.
-
Licenses. Lets you change the Skylar Advisor and Skylar Analytics licensing options. These options are the same options as those in the steps above.
-
Instances. Displays the current instances for this account, and lets you add another instance to the account.
-
Authentication. Lets you select the type of authentication you want to use for this site: email/password or SAML. For more information, see Configuring SSO Authentication with SAML.
-
-
To set up other security and authentication settings, go to the Authentication page (
> Account Settings > Account Access > Authentication). For more information, see Configuring Skylar AI System Settings.
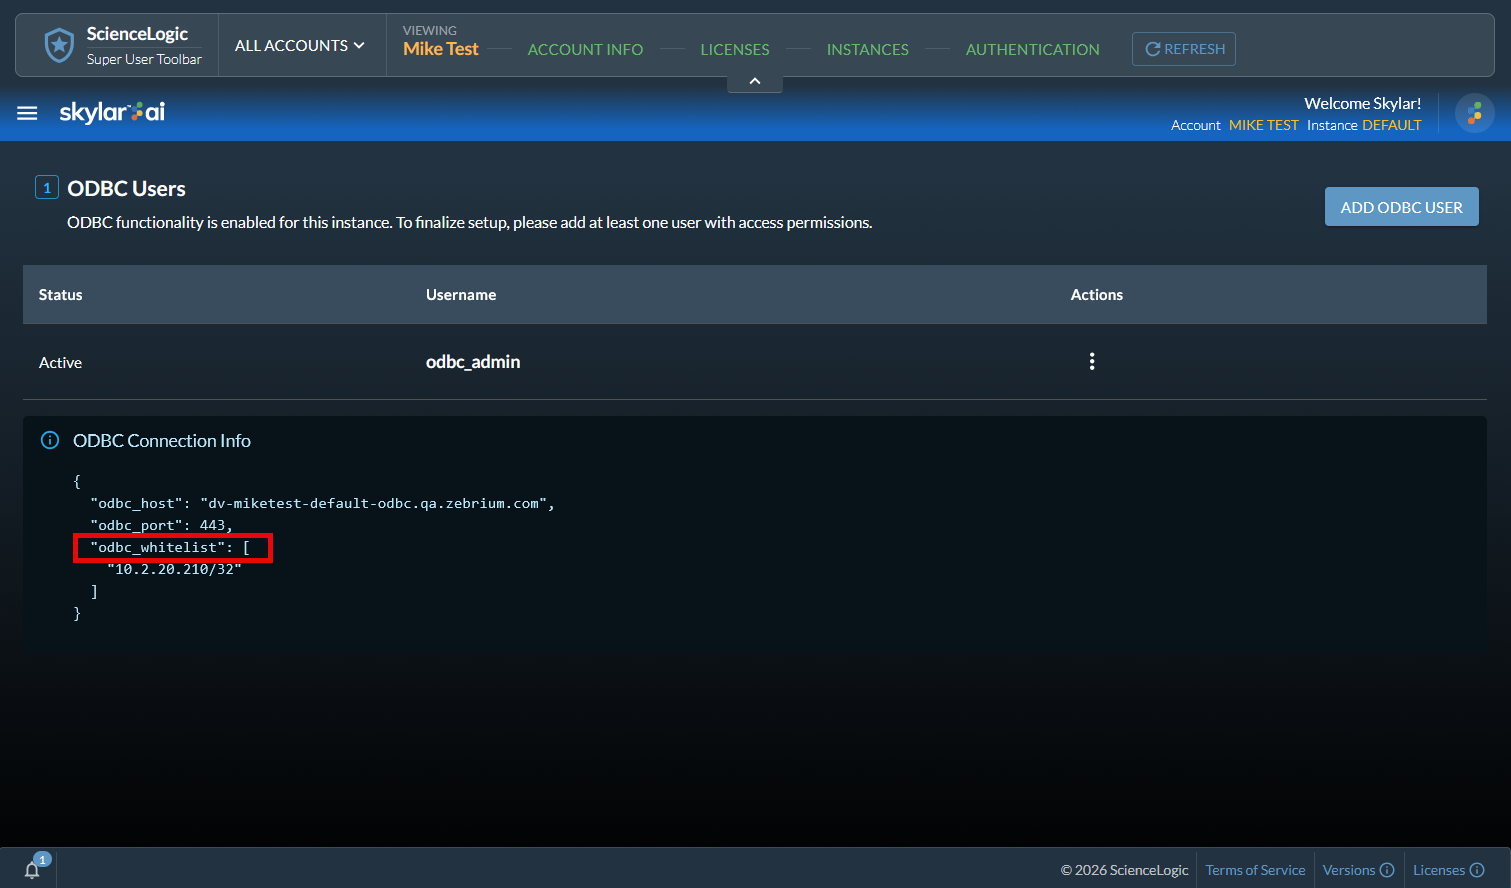
Adding an ODBC User
If you (as a Super User) created a new ODBC connection for Skylar Analytics when you provisioned an account, you will need to create one or more ODBC users on the ODBC Users page in Skylar Settings. You can also edit or delete existing users on this page.
To add an ODBC user:
-
In Skylar Settings, go to the ODBC Users page (
> Analytics > Settings > ODBC Users). This page displays the ODBC connection information for the Skylar AI system: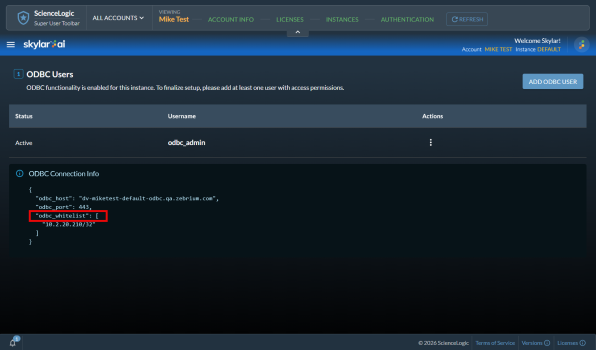
The IP address or addresses that display in the "odbc_whitelist" section of the code were configured in the Enable ODBC field on the tab as part of provisioning a new account. You cannot edit the addresses on this page, but you can edit them on the tab of the Super User toolbar.
-
Click the button. The Add ODBC User window appears.
-
In the Username field, type a name after the "odbc_" prefix, and then type the password in the two Password fields.
-
Click the button. The ODBC user is added to the ODBC Users page.