![]()
This chapter explains the different tasks that a user with the Service Provider role can perform in Skylar AI. A Service Provider user can provision new accounts.
The Super User role is assigned to the single admin user to manage all user accounts, and this role is typically reserved for ScienceLogic users. The default login is skylar@sciencelogic.com. The Super User role can create and manage customer accounts, manage multiple instances, and set up SAML authentication for a customer. A Service Provider user cannot edit the user with the Super User role.
This appendix is intended only for Skylar AI users with a role of Service Provider.
First Login as a Service Provider User
When you first log in to your Skylar AI system, you will use the default service provider name of provider@sciencelogic.com. The user interface will prompt you to set the ScienceLogic user password before your first login can continue.
After you log in for the first time, you will see a link for just the Skylar Settings page on the Skylar AI home page. Click that link to start setting up new accounts. After you set up a licensed version of Skylar Analytics in the Skylar Settings page, you will see an Analytics link on this home page.
Provisioning a New Account
You can have multiple accounts in a single Skylar AI system. To add a new account, you will need to provision that account in the Skylar Settings page.
To create a new account:
-
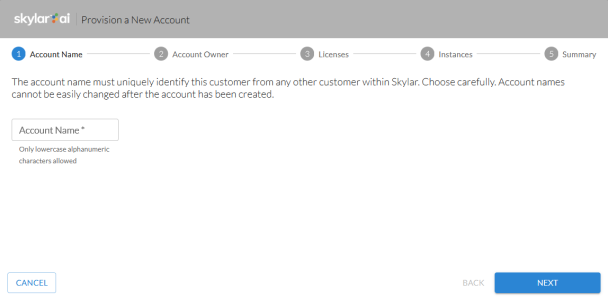
On the Skylar Settings page, create a new account by clicking the All Accounts drop-down at the top of the Skylar Settings page and clicking at the bottom of the drop-down. The Provision a New Account wizard appears:
-
On the Account Name page, type the Account Name using only lower-case alphanumeric characters, and then click .
-
On the Account Owner page, specify the First Name, Last Name, and Email for the first user of the new account. When you type the email address, Skylar AI adds the domain name from that email into the Claim Email Domain field. Click .
When single sign-on (SSO) through SAML is enabled, users that log in with the domain used by SAML will be redirected to the SAML provider for this account.
-
On the Licenses page, select Skylar Analytics to enable Skylar Analytics for this account.
-
If you select Enable ODBC, you will need to add the IP addresses for your ODBC client in the ODBC Client IP Ranges field. Be sure to add the public-facing IP address for the ODBC client to the "allow list" for Skylar AI. Click .
You will need to add any ODBC users after you complete this procedure. For more information, see Adding an ODBC User.
-
On the Instances page, type the name of your instance for this account, using only lower-case alphanumeric characters. You can also use default as the instance name. Click .
-
On the Summary page, review your settings and click to continue setting up the account. The provisioning process begins, and Skylar AI switches to the new account.
When the account is set up, you will need to give the email address you used in step 3 to the first user. On first login, the new user will be prompted to change their password.
-
To set up single sign-on (SSO) authentication with SAML for this new account, see Configuring SSO Authentication with SAML.

Adding an ODBC User
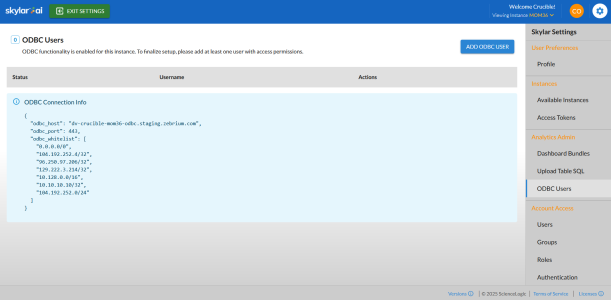
When you create a new ODBC connection for the Data Exploration component of Skylar Analytics, you will need to create the ODBC user or users and set their password from the tab on the Skylar Settings page. You can add, edit, disable, and delete ODBC users through the Skylar Settings page.
-
On the Skylar Settings page, click the tab. The tab displays the ODBC connection information for the Skylar AI system:
-
Click the button. The Add ODBC User window appears.
-
In the Username field, type a name after the "odbc_" prefix, and then type the password in the two Password fields.
-
Click the button. The ODBC user is added to the tab.

Super User Settings
If you are logged in as a user with the Super User role, a "Super User Account Toolbar" displays at the top of every window of the Skylar Settings. This toolbar give the Super User access to the following features:
- All Accounts. This drop-down lists all accounts that are available on this Skylar AI system. When you select an account, the various tabs on the right-hand side of the window update with data specific to that account. You can click the button to set up a new account.
- Licenses. Displays the Skylar AI modules that are licensed for the selected account, such as Skylar Analytics and ODBC (Data Exploration). You can add or remove modules from this dialog.
- Instances. Displays the instances that are have been created for the selected account. You can click the button to create a new instance for this account.
- Authentication. Displays the type of authentication currently set up for the selected account. The default authentication is email and password. You should not switch the account to SAML until you have confirmed that the owner of the account has properly configured their SSO provider to recognize the Skylar platform.
The Super User role is disabled by default.
Creating a Table in the Upload Database
A user with the Super User role can use the tab from the SkylarSettings page to create a table in the upload database used for Data Visualization. The new table will then be replicated.
After the user creates the table, the user can insert data into the table using an ODBC connection, using the user's schema. This option enables features that require cross-stack communication of data. This feature also enables you to send external data to Skylar Advisor.
Example syntax using ReplicatedMergeTree:
CREATE TABLE a (b UInt32) ENGINE=ReplicatedMergeTree ORDER BY b
Example syntax using ReplicatedReplacingMergeTree:
CREATE TABLE a (b UInt32) ENGINE=ReplicatedReplacingMergeTree(b) ORDER BY b

After you add a create statement to the text box the Upload Table SQL page and click the button, the table will be created in the relevant Data Visualization database, under the database named after the tenant with a suffix of _reporting_upload. You can only create tables in the database with the _reporting_upload suffix through the user interface.
After the table has been created, you can insert data into the table using ODBC or using the Superset SQL Lab tool.
Updating the Table
Any manipulations to the table should be done by the user directly against the table using their ODBC connection.
For example, to add a column, run a ALTER TABLE … ADD COLUMN query directly, instead of dropping the table and re-creating it with the updated schema.