![]()
Use the following menu options to navigate the SL1 user interface:
- To view a pop-out list of menu options, click the menu icon (
 ).
). - To view a page containing all the menu options, click the Advanced menu icon (
 ).
).
This
Types of SL1 Backups
SL1 allows you to define three types of backups for your system.
- Configuration Backup. Includes the core database tables and files required to restore an SL1 system. A configuration backup includes scope and policy information, but not performance data, data collected using configuration Dynamic Applications, events, or logs.
- Full Backup. Includes all SL1 databases and tables but does not include the configuration files specified in /etc/backup. These files are backed up in each configuration backup.
- Disaster Recovery Backup. Includes a full backup of the disaster-recovery database for SL1 systems configured for disaster recovery (DR). The Disaster Recovery backup is similar to the Full Backup.
The Backup Management page (System > Settings > Backup)

ScienceLogic does not support vmotion or VMware Snapshots for backups of data. For backup purposes, ScienceLogic supports only ScienceLogic backups to remote storage. vmotion and VMware Snapshots can cause SL1 outages.
Preparing for SL1 Backups
Before creating a backup of your system, you must complete the following steps:
- Identify the external system
It is the responsibility of the system administrator for the external system to create any necessary entries in /etc/fstab required to allow the SL1 system to access the share as root.
- Create a credential in SL1 that allows SL1 to write to the external system
- Define the configuration backup, full backup, or DR backup in SL1.
Creating a Backup Credential
To configure a backup, you must create a credential that allows SL1 to write to the external systems where you will store the backups. There are two types of credentials that you can create for this task:
- An S3 Backup credential, if you are backing up your system to an S3 storage service
- A Basic/Snippet credential, for all other backup scenarios
The sections below describe how to create both credential types.
Creating an S3 Backup Credential
You can use an S3 storage service to store configuration backups for SL1. To do so, you will need to create a credential that enables SL1 to connect to the S3 service. SL1 includes an S3 Backup credential type, which uses field names and terminology specific to S3 services, that you can use to connect with your S3 service.
SL1 supports the use of Amazon Web Services (AWS) or MinIO for S3 backup storage.
To define an S3 backup credential:
- Go to the Credentials page (Manage > Credentials).
- Click the button and then select Create S3 Backup Credential. The Create Credential modal page appears:

- Supply values in the following fields:
- Name. Type a unique name for the credential. Can be any combination of alphanumeric characters, up to 64 characters.
- All Organizations. Toggle on (blue) to align the credential to all organizations, or toggle off (gray) and then select one or more specific organizations from the What organization manages this service? drop-down field to align the credential with those specific organizations.
To learn more about credentials and organizations, see
- Timeout (ms). Type the time, in milliseconds, after which SL1 will stop trying to communicate with the S3 storage service.
- Provider. Select the S3 storage provider you want to use to store the backup. Choices are Amazon Web Services (AWS) S3 and Minio Object Storage.
- Access Key ID. Type the Access Key ID for the S3 account on which you want to store the backup.
- Secret Access Key. Type the Secret Access Key for the S3 account on which you want to store the backup.
- Endpoint. Type the URL of the S3 endpoint. The endpoint URL should not include the bucket name.
- Region. Select the region of the S3 endpoint.
- Bucket. Type the name of the S3 bucket on which you want to store the backup.
- Encryption Password. Type the encryption password for the backup file.
- Encryption Salt. Type the encryption salt used to safeguard the backup file encryption password.
- Click .
If you would like to test your credential using the Credential Tester panel, click . For detailed instructions on using the Credential Tester panel, see
Creating a Basic/Snippet Backup Credential
If you are backing up your SL1 system
To create a Basic/Snippet backup credential:
- Go to the Credentials page (Manage > Credentials).
- Click and select Create Basic/Snippet Credential. The Create Credential modal appears:

Alternatively, if you are using the classic SL1 user interface, you can go to the Credential Management page (System > Manage > Credentials), click the button, and select Create Basic/Snippet Credential to use the Credential Editor modal.
- Define values in the following fields:
- Name. Name of the credential. Can be any combination of alphanumeric characters.
- Organization. Select All Organizations or select an organization from the drop-down.
- Hostname/IP. The hostname or IP address.
- Port. This field is deprecated. Backups will not use this field.
- Timeout (ms). This field is deprecated. Backups will not use this field.
- Username. Username to use when connecting to the external system. If you are backing up to NFS-remote, this field is not required.
- Password. Password to use when connecting to the external system. If you are backing up to NFS-remote, this field is not required.
- Click .
Configuration Backups
A configuration backup stores a copy of the core database tables that are required to restore an SL1 system. Configuration backups use the "MySQL dump" tool to create backups.
You must store configuration backups on an external system (not the Database Server or All-In-One Appliance). You can specify that configuration backups be stored on an
SL1 Systems prior to 8.12 allow you to store backups locally. New SL1 systems later than 8.12 require you to store backups on an external system.
If you have a large system and very large backup files, you can use an alternative method to perform backups that reduces performance issues during backup. For more information, see the section Performing Config Backups and Full Backups on a Disaster Recovery Database Server.
SL1 automatically retains your last seven configuration backups.
Note the following information about configuration backups:
- SL1 can launch configuration backups automatically at the interval you specify.
- During configuration backup, the ScienceLogic database remains online.
- When the configuration backup starts, SL1 creates a temporary mount point to your remote share in /data.local/backup/remote<unix_timestamp>.
What Does a Configuration Backup Include?
A configuration backup includes:
- Scope and policy information, but not performance data, data collected using configuration Dynamic Applications, or events.
- By default, the following files are backed up during a configuration backup:
- /etc/backup.conf
- /etc/corosync/corosync.conf
- /etc/drbd.d/r0.res
- /etc/drbd-proxy.license
- /etc/hosts
- /etc/my.cnf.d/silo_mysql.cnf
- /etc/nginx/*
- /etc/phonehome/*
- /etc/php-fpm.d/*.conf
- /etc/postfix/main.cf
- /etc/silo.conf
- /etc/siteconfig/*
- /etc/ssh/*.key
- /etc/ssh/*.pub
- /etc/sysconfig/network-scripts/ifcfg-*
- /etc/sysctl.d/*
- /etc/systemd/system/mariadb.service.d/*.conf
- /opt/em7/nextui/nextui.conf
- /usr/libexec/postfix/main.cf
- /var/log/em7/*
- All files and folders specified in /etc/backup.conf. If you have additional files that you want to include in configuration backups, you can include them in the file /etc/backup.conf.
- The following databases:
- master. Includes system-level settings for SL1, Dynamic Application definitions and alignments, run book automation and action policies, monitoring policy definitions, and credentials.
- master_access. Includes user account information, access keys, and access hooks.
- master_ap2. Includes files from the new UI, including files from Business Services.
- master_biz. Includes asset information, dashboards, distribution lists, document templates, IT Service policy information, organization information, product SKU information, RSS feeds, ticketing information, and user preferences. By default, configuration backups do not include the ticket_external_requests table from the master_biz database.
- master_custom. Includes GUI customizations, dashboard widget definitions, and PowerPack files.
- master_dev. Includes information associated with device records, excluding performance data, data collected using configuration Dynamic Applications, events, or logs.
- master_dns. Includes DNS information.
- master_events. The configuration backup includes only the event_suppressions table from this database. This table stores event suppression settings.
-
master_filestore. Includes information about files, PowerPacks, and notes. By default, configuration backups do not include the tables metadata_system_package, metadata_system_patch, storage_system_package, and storage_system_patch .
In SL1 versions prior to 8.14, configuration backups contained RPM update and package files. In version 8.14 and higher, configuration backups no longer contain these files, making the backup process complete faster and making the backup file smaller.
- master_platform. Includes information about ScienceLogic appliances.
- master_reports. Includes custom report definitions.
- mysql. Contains the configuration settings for the MariaDB database.
- scheduler. Includes all instances of scheduled items: reports, discovery sessions, etc.
- sysinfo. Contains the configuration settings for High Availability, Disaster Recovery, and PhoneHome Collectors.
Adding Files to Include in Configuration Backups
All files and directories that are specified in /etc/backup.conf are included in configuration backups. If you have additional files or directories that you want to include in configuration backups, you can edit the /etc/backup.conf file to include them.
To add files or directories that you want to include in configuration backups:
- Either go to the console of the SL1 appliance or use SSH to access the server.
- Enter the following at the command line:
sudo vi /etc/backup.conf
- Move the cursor below the line that says, "Custom files can be added below this line".
- Make the following updates based on what you want to include:
- To add a file, enter the full directory path and filename.
- To add a directory or folder, enter an asterisk (*) instead of a filename after the full directory path.
- Save your changes and quit the file (:wq).
Viewing the Databases and Tables Included or Excluded from a Configuration Backup
To see which databases and tables are included in configuration backups in your environment:
-
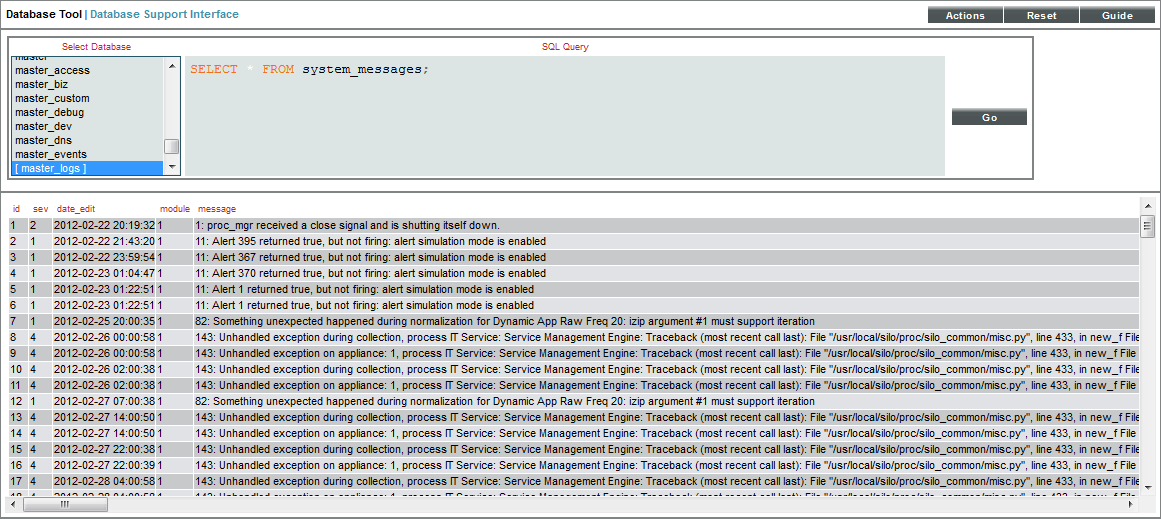
Navigate to the Database Tool page (System > Tools > DB Tool)
The Database Tool page does not display for users that do not have sufficient permissions for that page.
-
In the Select Database field, select Master.
-
In the "SQL Query" field, enter this query:
SELECT backup_db_list FROM `system_settings_backup` WHERE id = 1
To see which databases and tables are excluded in configuration backups in your environment:
- Navigate to the Database Tool page (System > Tools > DB Tool)
- In the Select Database field, select Master.
-
In the "SQL Query" field, enter this query:
SELECT backup_cb_table_exclude FROM `system_settings_backup` WHERE id = 1
Defining a Configuration Backup
To define and schedule a configuration backup:
- Go to the Backup Management page (System > Settings > Backup).
- In the Configuration Backup pane, provide values in the following fields:
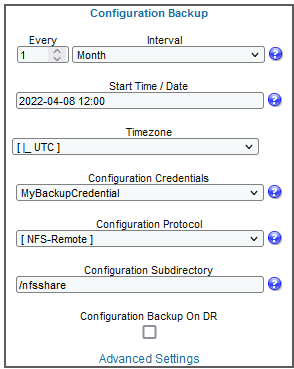
- Every. Together with the Interval field, specifies the frequency of the backup.
- Interval. Together with the Every field, you must specify how frequently SL1 should automatically execute a configuration backup. Your choices are:
- Disabled. Configuration backups are disabled. If you want to run on-demand configuration backups only, you do not need to change this setting.
- Day. SL1 will execute configuration backups daily as specified (for example, every 2 days).
- Week. SL1 will execute configuration backups weekly as specified (for example, every 2 weeks).
- Month. SL1 will execute configuration backups monthly as specified (for example, every 1 month).
- Start Time / Date. If you enabled configuration backups, you must specify the start time. You must specify the date on which you want configuration backups to begin, as well as the time of day you want the backups to run. For example, you might want to run configuration backups during a maintenance window late at night. Click the field to open a calendar and time selector.
- Timezone. Optional. Specify the timezone to use when running a backup. The default is UTC. Use the drop-down list to select the timezone.
- Configuration Credentials. Select the credential you created for SL1 to use to connect to your external system (
- Configuration Protocol. Specify the type of external system where the configuration backup will be stored. Choices are:
-
NFS-Remote. When you select this option, SL1 stores the configuration backup on an NFS share.
If you select the NFS-remote option, and your NFS share is hosted on a Solaris system, you must perform the steps listed in the Additional Configuration for Solaris NFS Mounts section.
- SMB-Remote. When you select this option, SL1 stores the configuration backup on an SMB share.
- S3. When you select this option, SL1 stores the configuration backup in an S3 bucket.
- Configuration Subdirectory. Specify a directory on the NFS or SMB share
- Configuration Backup on DR. Select this option if you want to create a configuration backup for Disaster Recovery (DR).
-
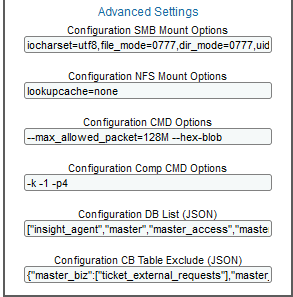
To access additional configuration options for this backup, click . The set of advanced options that appears are the same fields that you would have populated using SQL queries in versions of SL1 older than 11.2.0.
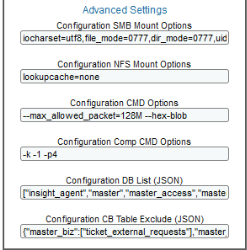
These advanced fields refer to the column names in the SL1 Database:
-
backup_smb_mount_options
-
backups_nfs_mount_options
-
backup_cmd_options
-
comp_cmd_options
-
backup_db_list (JSON)
-
backup_cb_table_exclude (JSON)
For more information about these Advanced Settings, contact ScienceLogic Support.
- Click the button to save your settings. SL1 will execute the configuration backup at the specified interval, starting on the date you specified in the Start Time / Date field and using the time you specified in the Start Time / Date field.
- To run the backup immediately, click the button under Configuration Backup in the Immediate Backup section of the Backup Management page. SL1 will run the backup immediately, as well as running the scheduled backup you configured in this procedure.
Restoring a Configuration Backup
If you have performed configuration backups, you can restore your system from a configuration backup in the event of data corruption or other failure. The configuration backup file contains one SQL (.sql) file for each database that was included in the configuration backup.
NOTE: These steps assume that the Database Server has not been previously configured.
NOTE: To complete these steps, you must be familiar with how to edit a file using the vi text editor. If you need assistance with these steps, please contact ScienceLogic Support.
To restore a database using the backup file:
- Either go to the console of the Database Server or use SSH to access the server.
The Database Server to which you are restoring the backup must be at the same revision number as the Database Server that created the backup file.
- Log in as user em7admin and assume root user privileges by using the following command:
$ sudo -s
- Execute the following commands at the command line to uncompress the backup file, where <new_subdirectory> is a directory you create that will be the destination for your uncompressed files:
mkdir /data.local/db/<new_subdirectory>
cd /data.local/db/<new_subdirectory>
export RCLONE_CONFIG_BACKUP_BUCKET_ACL="private"
export RCLONE_CONFIG_BACKUP_CHUNK_SIZE="128Mi"
export RCLONE_CONFIG_BACKUP_TYPE="s3"
export RCLONE_CONFIG_BACKUP_UPLOAD_CONCURRENCY="4"
export RCLONE_CONFIG_BACKUP_PROVIDER="<--- Provider --->"
export RCLONE_CONFIG_BACKUP_ACCESS_KEY_ID="<--- Access Key ID --->"
export RCLONE_CONFIG_BACKUP_SECRET_ACCESS_KEY="<--- Secret Access Key --->"
export RCLONE_CONFIG_BACKUP_ENDPOINT="<--- Endpoint URL --->"
export RCLONE_CONFIG_BACKUP_REGION="<--- Region --->"
export RCLONE_CONFIG_CRYPT_TYPE="crypt"
export RCLONE_CONFIG_CRYPT_DIRECTORY_NAME_ENCRYPTION="false"
export RCLONE_CONFIG_CRYPT_FILENAME_ENCRYPTION="off"
export RCLONE_CONFIG_CRYPT_REMOTE="backup:/<--- Bucket --->/<--- Folder --->"
export RCLONE_CONFIG_CRYPT_PASSWORD="`rclone obscure '<--- Encryption Password --->'`"
export RCLONE_CONFIG_CRYPT_PASSWORD2="`rclone obscure '<--- Encryption Salt --->'`"
rclone cat crypt:<--- File Name without the .bin --->|pigz -d|tar xv
- Your target directory will now contain one SQL file for each database included in the backup. Copy the configuration backup files to their original locations. For example:
cp -r opt /
cp -r var /
cp -r etc /
cp -r usr /
- To restore a database, execute the following command using the username of a user that has administrative privileges in MySQL (by default, the user is root and the password is em7admin):
silo_mysql <name_of_database> -u <username> -p<password> < <name_of_database>.sqlDo not include a space between "-p" and the password.
For example, to restore the database "master" as the user "root" with the default password of "em7admin", perform the following command:
silo_mysql master -u root -pem7admin < master.sql
- To restore all the databases that are included in the backup file, repeat step 5 for each .sql file.
- Re-license the Database Server using the standard licensing procedure. For details, see the section
Full Backup
Running a full backup creates a complete backup of the ScienceLogic database. Full backups use a built-in tool call MariaBackup.
You must store full backups on an external system (not the Database Server or All-In-One Appliance). You can specify that full backups be stored on
SL1 Systems prior to 8.12 allow you to store backups locally. New SL1 systems later than 8.12 require you to store backups on an external system.
If you have a large system and very large backup files, you can use an alternative method to perform backups that reduces performance issues during backup. For more information, see Performing Config Backups and Full Backups on a Disaster Recovery Database Server.
Note the following information about full backups:
- SL1 can launch full backups automatically at the interval you specify.
- During a full backup, the ScienceLogic database remains online.
What Does a Full Backup Include?
A full backup does the following:
- A full backup includes all databases and tables.
- A full backup does not back up the files in /etc/backup.conf.
NOTE: For very large SL1 systems, ScienceLogic recommends you use a SAN with snapshot technology to backup and restore data.
If your SL1 System uses AWS RDS (remote database), the Full Backup option is disabled.
Defining a Full Backup
Full backups include all databases and tables. SL1 automatically launches this backup at the frequency and time you specify.
To define and schedule a full backup:
- Go to the Backup Management page (System > Settings > Backup).
- In the Full Backup pane, provide values in the following fields:
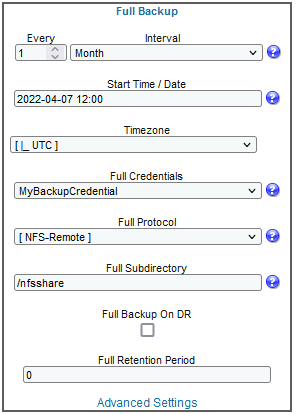
- Every. Together with the Interval field, specifies the frequency of the backup.
- Interval. Together with the Every field, specifies how frequently SL1 should automatically execute a full backup. Your choices are:
- Disabled. Full backups are disabled.
- Day. SL1 will execute full backups daily as specified (for example, every 2 days).
- Week. SL1 will execute full backups weekly as specified (for example, every 2 weeks).
- Month. SL1 will execute full backups monthly as specified (for example, every 1 month).
- Start Time / Date. If you enabled full backups, you must specify the start time. You must specify the date on which you want configuration backups to begin, as well as the time of day you want the backups to run. For example, you might want to run configuration backups during a maintenance window late at night. Click the field to open a calendar and time selector.
- Timezone. Optional. Specify the timezone to use when running a backup. The default is UTC. Use the drop-down list to select the timezone.
- Full Credentials. Select the credential you created for SL1 to use to connect to your external system (
- Full Protocol. Specify the type of external system where the full backup will be stored. Choices are:
-
NFS-Remote. When you select this option, SL1 stores the backup on an NFS share.
If you select the NFS-remote option, and your NFS share is hosted on a Solaris system, you must perform the steps listed in the Additional Configuration for Solaris NFS Mounts section.
- SMB-Remote. When you select this option, SL1 stores the backup on an SMB share.
- S3. When you select this option, SL1 stores the backup in an S3 bucket.
- Full Subdirectory. Specify a directory on the NFS or SMB share or S3 service in which you would like to store the full backup. When entering the subdirectory path, include the leading slash ("/"). On the remote share, the current Unix time will be appended to the directory name to ensure the directory name is unique each time the backup runs.
- Full Backup on DR. Select this option if you want to create a full backup for Disaster Recovery (DR).
- Full Retention Period. Specify in days how long you want SL1 to keep full backups before deleting them. The default is 0.
-
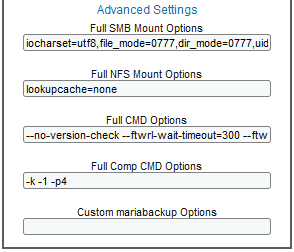
To access additional configuration options for this backup, click Advanced Settings. The set of advanced options that appears are the same fields that you would have populated using SQL queries in versions of SL1 older than 11.2.0.

These advanced fields refer to the column names in the SL1 Database:
-
backup_smb_mount_options
-
backups_nfs_mount_options
-
backup_cmd_options
-
comp_cmd_options
Also, the Custom mariabackup Options field lets you specify one or more custom backup options. For details on these options, see https://mariadb.com/kb/en/mariabackup-options/.
For more information about these Advanced Settings, contact ScienceLogic Support.
- Click the button to save your settings. SL1 will execute the full backup at the frequency and time you specified in the Every, Interval, and Start Time/Date fields.
- To run the backup immediately, click the button under Full Backup. SL1 will immediately run the backup and will still run the backup at the frequency and time you specified in the Backup Frequency and Start Time fields.
Restoring a Full Backup
To restore a SL1 system using a full backup file, perform the following steps:
NOTE: These steps assume that the Database Server has not been previously configured.
NOTE: To complete these steps, you must be familiar with how to edit a file using the vi text editor. If you need assistance with these steps, please contact ScienceLogic Support.
- Either go to the console of the Database Server where you want to restore the backup, or use SSH to log in to the Database Server.
The Database Server to which you are restoring the backup must be at the same revision number as the Database Server that created the backup file.
-
Log in as user em7admin and then assume root privileges:
$ sudo -s
- Execute the following commands:
WARNING: Executing this command will stop the database. SL1 will not be operational until you complete the restore procedure.
siloctl stop --full
systemctl stop mariadb
rm -rf /data.local/db/*
mkdir /data.local/db/.tmp
cd /data.local/db/.tmp
export RCLONE_CONFIG_BACKUP_BUCKET_ACL="private"
export RCLONE_CONFIG_BACKUP_CHUNK_SIZE="128Mi"
export RCLONE_CONFIG_BACKUP_TYPE="s3"
export RCLONE_CONFIG_BACKUP_UPLOAD_CONCURRENCY="4"
export RCLONE_CONFIG_BACKUP_PROVIDER="<--- Provider --->"
export RCLONE_CONFIG_BACKUP_ACCESS_KEY_ID="<--- Access Key ID --->"
export RCLONE_CONFIG_BACKUP_SECRET_ACCESS_KEY="<--- Secret Access Key --->"
export RCLONE_CONFIG_BACKUP_ENDPOINT="<--- Endpoint URL --->"
export RCLONE_CONFIG_BACKUP_REGION="<--- Region --->"
export RCLONE_CONFIG_CRYPT_TYPE="crypt"
export RCLONE_CONFIG_CRYPT_DIRECTORY_NAME_ENCRYPTION="false"
export RCLONE_CONFIG_CRYPT_FILENAME_ENCRYPTION="off"
export RCLONE_CONFIG_CRYPT_REMOTE="backup:/<--- Bucket --->/<--- Folder --->"
export RCLONE_CONFIG_CRYPT_PASSWORD="`rclone obscure '<--- Encryption Password --->'`"
export RCLONE_CONFIG_CRYPT_PASSWORD2="`rclone obscure '<--- Encryption Salt --->'`"
time rclone cat crypt:<--- Full Backup File Name without the .bin --->|pigz -d|mbstream -vvv -x -C .- Create a local directory or a directory on a mounted server that has sufficient space for your data to be extracted. This must be a directory other than /data.local/db:
mkdir <directory for data extraction>
cd <directory for data extraction>
pigz -dc <full_path_and_name_of_backup_file.gz> | mbstream -x -C .
Where <directory for data extraction> is the directory you created that will be the destination for your uncompressed files, and where <full path and filename for backup.tgz> is the location and name of your backup file. For example:
cd /backups/full
pigz -dc /mnt/db1_full_2021-02-01_21-00-00.gz | mbstream -x -C .
- Execute the following command, where <subdirectory> is the directory you created in the previous step:
more /<directory for data extraction>/backup-my.cnf
- Locate the line that looks like the following. Copy or write down the exact text that appears, such as:
innodb_data_file_path=ibdata1:354M;ibdata2:500M:autoextend:max:8925M
- Execute the following command to edit the /etc/my.cnf.d/silo_mysql.cnf file:
vimysql
- Add the line you copied in Step 7 to the mysql.siteconfig file, such as:
innodb_data_file_path=ibdata1:354M;ibdata2:500M:autoextend:max:8925M
- Save the file and exit the editor by entering :wq.
- Execute the following command to build the updated configuration file:
vimysql -f
- Execute the following commands:
mariabackup --prepare --target-dir=
mariabackup --move-back --force-non-empty-directories --target-dir .
cd /data.local/db
rm -rf .tmp
chown -R mysql.mysql *
systemctl start mariadb
siloctl start --full
Note that these commands assume you have changed directories to the directory that contains the extracted backup files. If you want to run these commands from a location other than the location of the extracted backup files, then you must enter a value after "target-dir=" to point to the directory where the extracted files are located. To learn more about MariaBackup, see https://mariadb.com/kb/en/full-backup-and-restore-with-mariabackup/.
Depending on the size of the backup, the mariabackup command might take a long time to complete.
- Re-license the Database Server using the standard licensing procedure. For details, see the section
Retaining Full Backups
SL1 can automatically delete backups to save space on the external system where you store your backup files.
You can specify a retention value. SL1 will keep the retention value plus one additional backup.
To specify the number of full backups to retain, perform the following:
- Go to the Database Tool page (System > Tools > DB Tool).
- In the SQL Query field, enter the following:
- For example, the following command would retain five full backups, the last four plus the current backup:
- Click the button to execute the query.
- SL1 will create an entry in /var/log/em7/silo.log when a backup is deleted.
UPDATE master.system_settings_backup SET backup_retention = <number of backups to retain> WHERE id = 2
UPDATE master.system_settings_backup SET backup_retention = 4 WHERE id = 2
Additional Configuration for Solaris NFS Remote Shares
To use the NFS-remote backup protocol with an NFS share hosted on a Solaris system, you must configure the Solaris system to allow the backup process to change file ownership permissions. To do this:
-
In /etc/dfs/dfstab on the Solaris system, you must specify that the fully-qualified domain name of the Database Server or All-In-One Appliance can access the NFS file system as root. For example:
share -F nfs -o sec=sys,root=database.sciencelogic.local -d "ScienceLogic Backup Share" /export/home/backup -
In /etc/defaults/nfs on the Solaris system, include the line "NFSMAPID_DOMAIN=<domain of Database Server or All-In-One Appliance>. For example:
NFSMAPID_DOMAIN=ScienceLogic.local
You can test this configuration by mounting the NFS file system from the console of your SL1 appliance, creating a new file on the file system using the "touch" command, and then executing the command "ls -la". If the Solaris system is configured correctly, the output of the ls command will indicate that the new file was created and is owned by the "root" user.
Disaster Recover Backup
For SL1 systems configured for disaster recovery, DR Backup temporarily stops replication, mounts the database, and runs a full backup of the disaster-recovery database. The process then re-enables replication and performs a partial resynchronization from the primary.
You must store DR backups on an external system (not the Database Server or All-In-One Appliance). You can specify that DR backups be stored on a remote NFS mount or SMB mount
Disaster Recovery Backups use ‘tar’ to create a copy and compress the /data.local/db directory.
DR backup includes all configuration data, performance data, and log data. During DR backup, the primary ScienceLogic database remains online.
NOTE: The DR Backup fields appear only for systems configured for Disaster Recovery. DR Backup is not available for the two-node High Availability cluster.
If your SL1 System uses AWS RDS (remote database), the DR Backup option is disabled.
Defining a DR Backup
To define and schedule a DR backup:
- Go to the Backup Management page (System > Settings > Backup).

- In the DR Backup pane, provide values in the following fields:
- Every. Together with the Interval field, specifies the frequency of the backup.
- Interval. Together with the Every field, you must specify how frequently SL1 should automatically execute a configuration backup. Your choices are:
- Disabled. DR backups are disabled. If you want to run on-demand DR backups only, you do not need to change this setting.
- Day. SL1 will execute DR backups daily as specified (for example, every 2 days).
- Week. SL1 will execute DR backups weekly as specified (for example, every 2 weeks).
- Month. SL1 will execute DR backups monthly as specified (for example, every 1 month).
-
Start Time/Date. If you enabled DR backups, you must specify the start time. You must specify the date on which you want DR backups to begin, as well as the time of day you want the backups to run. For example, you might want to run DR backups during a maintenance window late at night. Click the field to open a calendar and time selector.
-
Timezone. Optional. Specify the timezone to use when running a backup. The default is UTC. Use the drop-down list to select the timezone.
-
DR Credentials. Select the credential you created for SL1 to use to connect to your external system (
NOTE: Your organization membership(s) might affect the list of credentials you can see in the DR Credentials field.
- DR Protocol. Specifies where SL1 should store the full backups. Choices are:
-
NFS-Remote. When you select this option, SL1 stores the DR backup on an NFS share.
NOTE: If you select the NFS-remote option, and your NFS mount is hosted on a Solaris system, you must perform the steps listed in the Additional Configuration for Solaris NFS Mounts section of this chapter.
- SMB-Remote. When you select this option, SL1 stores the DR backup on an SMB share.
- S3. When you select this option, SL1 stores the DR backup in an S3 bucket.
- DR Subdirectory. Specify a directory on the NFS or SMB share
-
To access additional configuration options for this backup, click Advanced Settings. The set of advanced options that appears are the same fields that you would have populated using SQL queries in versions of SL1 older than 11.2.0.
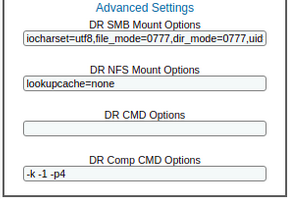
These advanced fields refer to the column names in the SL1 Database:
-
backup_smb_mount_options
-
backups_nfs_mount_options
-
backup_cmd_options
-
comp_cmd_options
For more information about these Advanced Settings, contact ScienceLogic Support.
-

- Click the button to save your settings. SL1 will execute the DR backup at the frequency and time you specified in the Backup Frequency and Start Time fields.
- To run the backup immediately, click the button under DR Backup. SL1 will immediately run the backup and will still run the backup at the frequency and time you specified in the Backup Frequency and Start Time fields.
Restoring a DR Backup
To restore a Database Server using a DR backup file, perform the following steps:
NOTE: These steps assume that the Database Server has not been previously configured.
- The Database Server to which you are restoring the backup must be at the same revision number as the Database Server that created the backup file.
- Either go to the console of the Database Server where you want to restore the backup or use SSH to access the Database Server.
- Log in as user em7admin and sudo to the root account:
sudo -s
- Execute the following commands:
Executing this command will stop the database. SL1 will not be operational until you complete the restore procedure.
siloctl stop --full
systemctl stop mariadb
rm -rf /data/db/*
cd /data/db
export RCLONE_CONFIG_BACKUP_BUCKET_ACL="private"
export RCLONE_CONFIG_BACKUP_CHUNK_SIZE="128Mi"
export RCLONE_CONFIG_BACKUP_TYPE="s3"
export RCLONE_CONFIG_BACKUP_UPLOAD_CONCURRENCY="4"
export RCLONE_CONFIG_BACKUP_PROVIDER="<--- Provider --->"
export RCLONE_CONFIG_BACKUP_ACCESS_KEY_ID="<--- Access Key ID --->"
export RCLONE_CONFIG_BACKUP_SECRET_ACCESS_KEY="<--- Secret Access Key --->"
export RCLONE_CONFIG_BACKUP_ENDPOINT="<--- Endpoint URL --->"
export RCLONE_CONFIG_BACKUP_REGION="<--- Region --->"
export RCLONE_CONFIG_CRYPT_TYPE="crypt"
export RCLONE_CONFIG_CRYPT_DIRECTORY_NAME_ENCRYPTION="false"
export RCLONE_CONFIG_CRYPT_FILENAME_ENCRYPTION="off"
export RCLONE_CONFIG_CRYPT_REMOTE="backup:/<--- Bucket --->/<--- Folder --->"
export RCLONE_CONFIG_CRYPT_PASSWORD="`rclone obscure '<--- Encryption Password --->'`"
export RCLONE_CONFIG_CRYPT_PASSWORD2="`rclone obscure '<--- Encryption Salt --->'`"
time rclone cat crypt:<--- Full Backup File Name without the .bin --->|pigz -d|mbstream -vvv -x -C .
rclone cat crypt:<--- File Name without the .bin --->|pigz -d|tar xv- Execute the following commands, substituting the full pathname of your backup file:
mv /data/db/data/db/* .
rm -rf /data/db/data
cp /data/db/etc/my.cnf.d/silo_mysql.cnf /root/silo_mysql.bak
rm -rf /data/db/etc
chown -R mysql:mysql /data/db/*
- Execute the following commands to restart SL1 and the database:
systemctl start em7
systemctl start mariadb
Retaining DR Backups
SL1 can automatically delete backups to save space on the external system where you store your backup files.
You can specify a retention value. SL1 will keep the retention value plus one additional backup.
To specify the number of DR backups to retain, perform the following:
- Go to the Database Tool page (System > Tools > DB Tool).
-
In the SQL Query field, enter the following:
UPDATE master.system_settings_backup SET backup_retention = <number of backups to retain> WHERE id = 3 - For example, the following command would retain five DR backups, the last four and the current backup:
- Select the button.
- SL1 will created an entry in /var/log/em7/silo.log when a backup is deleted.
UPDATE master.system_settings_backup SET backup_retention = 4 WHERE id = 3
Performing Configuration Backups and Full Backups on the Disaster Recovery Database Server
Users with large systems and very large backup files can use an alternative method to back up SL1. This alternative method, performing backups from the Disaster Recovery Database Server, reduces performance issues during backup.
DR Backup is a method for backing up the Disaster Recovery system. Performing standard configuration backups or full backups on the Disaster Recovery Database Server is an alternative method to backup SL1.
Unlike the DR Backup, which uses tar to make a compressed copy of the /data/db directory, performing a configuration backup from a Disaster Recovery Database Server uses the MySQL Dump tool and backs up the same data as described in the section on Configuration Backups.
Unlike the DR Backup, which uses tar to make a compressed copy of the /data/db directory, performing a full backup from a Disaster Recovery Database Server uses the MariaBackup tool and backs up the same data as described in the section on Full Backups.
During a configuration backup or full backup from a Disaster Recovery Database Server:
- The Disaster Recovery Database Server does not appear active to any other SL1 appliances.
- No applications or services can connect to the Disaster Recovery Database Server.
After you define configuration backups on the Disaster Recovery Database Server, you should disable any other existing configuration backups. However, you can continue to use standard DR Backup to backup your Disaster Recovery system.
After you define full backups on the Disaster Recovery Database Server, you should disable any other existing full backups. However, you can continue to use standard DR Backup to backup your Disaster Recovery system.
Configuration Backup on a Disaster Recovery Database Server
To perform a configuration backup on the Disaster Recovery Database Server:
- Go to the Database Tool page (System > Tools > DB Tool).
-
In the SQL Query field, enter the following:
UPDATE master.system_settings_backup SET backup__on_dr = 1 WHERE id = 1 - Select the button.
- Follow the instructions in the section on Creating a Credential.
- Following the instructions in the section on Defining a Configuration Backup.
- To restore the backup, follow the steps in the section Restoring a Configuration Backup.
If you enabled configuration backups on the Disaster Recovery Database Server, you should disable standard configuration backups.
Full Backup on a Disaster Recovery Database Server
To perform a full backup on the Disaster Recovery Database Server:
- Go to the Database Tool page (System > Tools > DB Tool).
-
In the SQL Query field, enter the following:
UPDATE master.system_settings_backup SET backup_on_dr = 1 WHERE id = 2 - Select the button.
- Follow the instructions in the section on Creating a Credential.
- Following the instructions in the section on Defining a Full Backup.
- To restore the backup, follow the steps in the section Restoring a Full Backup to restore a configuration backup.
If you enabled full backups on the Disaster Recovery Database Server, you should disable standard full backups.