This
Use the following menu options to navigate the SL1 user interface:
- To view a pop-out list of menu options, click the menu icon (
).
- To view a page containing all the menu options, click the Advanced menu icon (
).
This
Creating the Organizations
We need to create two organizations:
- NOC
- Engineering
To create an organization:
- Go to the Organizational Account Administration page (Registry > Accounts > Organizations).
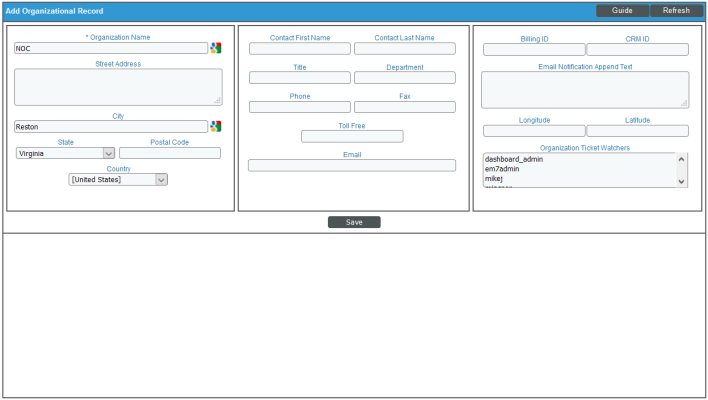
- Click the button. The Add Organizational Record page appears.
- Supply the following values in the Add Organizational Record page:
- Organization Name. Type "NOC".
- City. Type "Reston".
- State. Type "Virginia".
- Click the button.
- Click the button.
- On the Organizational Account Administration page, click the button. The Add Organizational Record page appears.
- Supply the following values on the Add Organizational Record page:
- Organization Name. Type "Engineering".
- City. Type "Reston".
- State. Type "Virginia".
- Click the button.
- Click the button.
Creating the User Accounts
To see how tickets move through the workflow at Super Service Provider, we need to create user accounts for each organization.
To create the user accounts, we need to first create two user policies:
- NOC policy, for members of the NOC organization
- Engineering policy, for members of the Engineering organization
User Policies allow you to define a custom set of account properties and key privileges, and then save them as a policy for reuse. When you create a user account, you can use the User Policy to quickly apply settings to the new account.
To create the user policies and apply the policies to user accounts, follow the instructions in the next two sections.
Creating the User Policies
To create user policies:
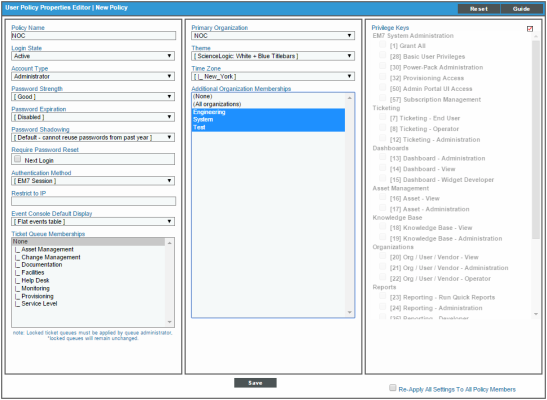
- Go to the User Policies page (Registry > Accounts > User Policies) and then click the button. The User Policy Properties Editor page appears.
- On the User Policy Properties Editor page, you can:
- Supply a value in each field that you want to include in the user policy.
- Click on the field name for each field you want to disable in the user policy. When you disable a field, its value is not applied to member User Accounts.
NOTE: If you have disabled fields in the User Policy, you must manually define these fields in the Account Permissions page for each aligned user account.
- First, create the user policy NOC. Supply the following values in the User Policy Property Editor page:
- Policy Name. Type "NOC".
- Login State. Select Active. User accounts created with this policy are active and can log in to SL1.
- Account Type. Select Administrator. This type of user has unlimited permissions in SL1.
NOTE: For security purposes in production environments, you might want to create accounts of type User and assign only the required Privilege Keys to the user policy. For details on Privilege Keys, see
- Password Strength. Accept the default value of Good. Passwords must be at least eight characters long and contain at least one number or one symbol.
- Password Expiration. Accept the default value of Disabled. Passwords do not expire.
- Password Shadowing. Accept the default value of Default. Users cannot reuse passwords from the past year.
- Require Password Reset. Accept the default value of (unselected). If selected, the user will be prompted to change his or her password at the next login.
- Authentication Method. Accept the default value of EM7 Session. The user's username and password are authenticated by the database.
- Restrict to IP. Leave this field blank.
- Event Console Default Display. Accept the default value of Flat events table.
- Ticket Queue Memberships. Leave this field blank. After you define ticket queues, you must come back to this user policy and select the following ticket queues:
- Triage
- Linux Engineering
- Network Engineering
- Windows Engineering
- Followup
- Primary Organization. Select NOC. This specifies the primary organization, and will be the default organization for user accounts aligned with this policy.
- Theme. Accept the default value, ScienceLogic: White + Blue Titlebars. This specifies the backgrounds, colors, fonts, and graphics that will appear when a user logs in.
- Time Zone. Accept the default (New_York).
- Additional Organization Memberships. Select (All organizations). This allows NOC members to view tickets from all users and process those tickets. To select, highlight one or more organizations.
- Privilege Keys. Leave this field blank. Users of type "Administrator" automatically have access to all pages and actions in SL1. The Privilege Keys section is grayed-out for "Administrator" policies.
- Re-Apply All Settings to All Policy Members. Select this checkbox. When you update and save the policy, all settings are re-applied to all policy members.
- Click the button to save your new user policy. The new policy now appears in the User Policies page.
- To create the Engineering user policy, perform steps 1-4 using the values in the table below. If a field is not specified in the table below, accept the default value for the field.
| Field | Value |
| Policy Name | Engineering |
| Login State | Active |
| Account Type | Administrator |
| Ticket Queue Membership |
None. You will come back later and assign:
|
| Primary Organization | Engineering |
| Additional Organization Memberships | NOC, System (allows work between ticket queues) |
Aligning User Policies with User Accounts
For our example, we create the following users:
| User | User Policy | Role |
| David Kahane | NOC | NOC staff |
| Larry Levy | NOC | NOC staff |
| Griffin Mill | NOC | Director of Operations |
| Bonnie Sherow | NOC | NOC staff |
| Fred Fenster | Engineering | Windows Engineer |
| Dean Keaton | Engineering | Linux Engineer |
| Roger Kint | Engineering | Director of Engineering |
| Jeff Rabin | Engineering | Network Engineer |
NOTE: The examples in the Scenarios explicitly use Larry Levy, Bonnie Sherow, Griffin Mill, Dean Keaton, and Roger Kint.
To align a user with a user policy:
- Go to the User Accounts page (Registry > Accounts > User Accounts).
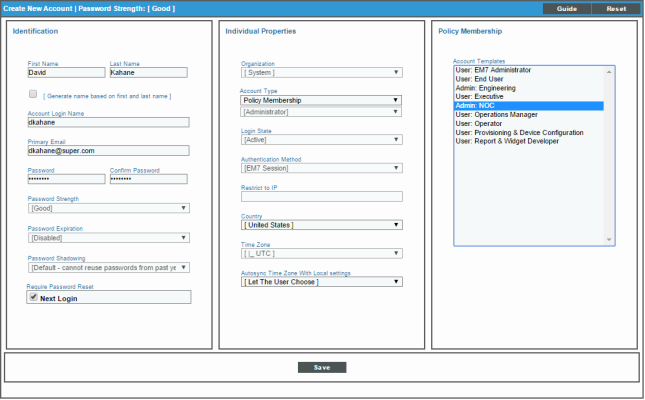
- Click the button. The Create New Account page appears:
- On the Create New Account page, supply the following information:
- Account Type. Select Policy Membership. This activates the list of user policies in the Policy Membership pane.
- Account Templates. Select Admin:NOC. The settings from the NOC user policy are applied to this account. Fields that are defined in the user policy are grayed out.
- First Name. Type "David".
- Last Name. Type "Kahane".
- Account Login Name. Type "dkahane".
- Primary Email. Type "dkahane@super.com".
- Password. Type a password of your choice.
- Confirm Password. Type the password again.
- Country. Use the default of United States.
- Click the button.
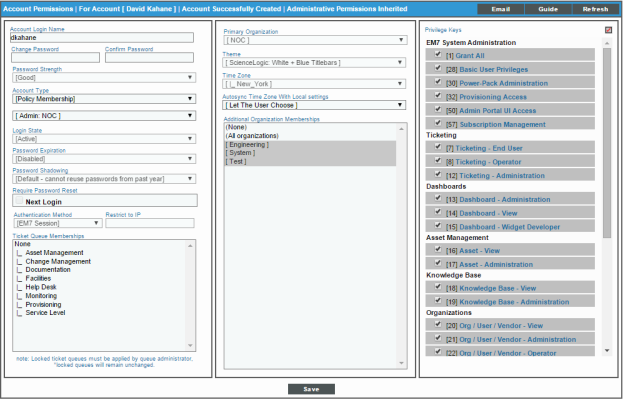
- When prompted, click the button to confirm that you want to save changes to the user account. The Account Permissions page appears, with the permissions from the user policy applied. All fields that are included in the user policy are grayed-out:
- You can perform steps 1-5 to create the other users for the examples in this chapter. The Account Login Name is always first initial plus last name. The Primary Email is always account login name@super.com, such as dkahane@super.com.


