Ticket queues allow you to organize and filter tickets. Organizing tickets by ticket queues and then assigning users to ticket queues allows each user to see only the tickets that are relevant to him/her.
SL1 allows you to view the list of existing ticket queues, define new ticket queues, edit existing ticket queues (including adding and removing users from the queue), and define and edit the list of "watchers" for each ticket queue from the Ticket Queue Management page (Registry > Ticketing > Queues).
Use the following menu options to navigate the SL1 user interface:
- To view a pop-out list of menu options, click the menu icon (
).
- To view a page containing all the menu options, click the Advanced menu icon (
).
This
Viewing the List of Ticket Queues
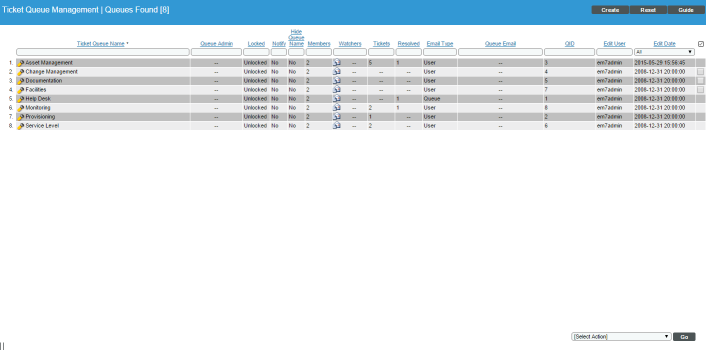
The list of ticket queues can be found in the Ticket Queue Management page (Registry > Ticketing > Queues). The Ticket Queue Management page displays a list of ticket queues and information on each queue. To view a list of ticket queues:
To sort the list of ticket queues, click on a column heading. The list will be sorted by column value, in ascending order. To sort by descending order, click the column heading again. The Edit Date column sorts by descending order on the first click; to sort by ascending order, click the column heading again.
- Go to the Ticket Queue Management page (Registry > Ticketing > Queues).
- The Ticket Queue Management page is displayed. For each ticket queue, the following information is displayed:
- Ticket Queue Name. Name of the ticket queue.
- Queue Admin. Username of the queue's Administrator.
- Locked. Specifies whether or not the queue is locked for editing. If so, only the queue administrator can edit the queue's properties.
- Notify. Specifies whether or not the queue Administrator is automatically notified when a ticket is resolved.
- Hide Queue Name. Specifies whether or not the queue name is hidden to non-queue members on the Ticket Console page and Ticket Editor page. If hidden, the queue's name appears as "Restricted Queue" to non-queue members.
- Members. Number of users assigned to the ticket queue.
- Watchers. Number of watchers for each ticket in the ticket queue. If you click on the envelope icon (
 ), SL1 displays the Ticket Queue Watchers modal page, where you can define or edit the list of watchers for the ticket queue.
 - Tickets. Number of tickets assigned to the ticket queue.
- Resolved. Number of resolved tickets assigned to the ticket queue.
- Email Type. Specifies the value that will appear in the From field when an email is sent from the Message tab (either automatically by SL1 or manually by a user). Choices are:
- Queue. The From field in email from the Message tab in the Ticket Editor page will contain the value specified in the Queue Email Address field.
- User. The From field in outgoing emails from the Message tab in the Ticket Editor page will contain the name of the user who last edited the ticket.
- Queue Email. If the Email Type field specifies Queue, this field specifies the email address that will appear in the From field in all emails sent from the Message tab in the Ticket Editor page.
- QID. Unique numeric ID assigned to the ticket queue by SL1.
- Edit User. Name of the user who created or last edited the definition of the ticket queue.
- Edit Date. Date and time the ticket queue was created or last edited.
Viewing Ticket Queue Properties and Editing a Ticket Queue
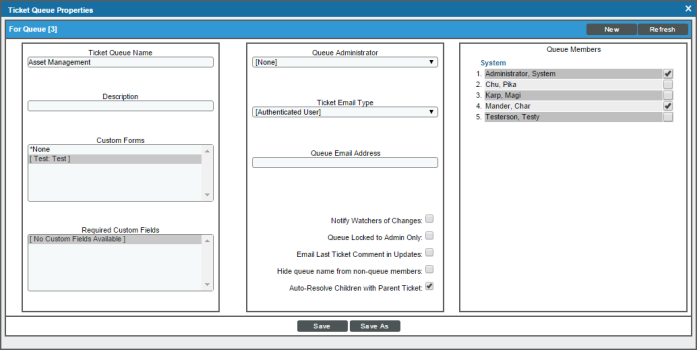
The Ticket Queue Properties page allows you to define a new ticket queue or edit the properties of an existing ticket queue.
To view a ticket queue's properties and/or edit the ticket queue:
- Go the Ticket Queue Management page (Registry > Ticketing > Queues).
- Select the ticket queue that you want to view or edit. Click its wrench icon (
 ).
).
- The Ticket Queue Properties page appears. You can view or edit the following fields:
- Ticket Queue Name. Name of the ticket queue. Can be any combination of alphanumeric characters, up to 48 characters in length.
- Description. A description of the ticket queue and escalation procedure. Can be any combination of alphanumeric characters, up to 560 characters in length.
- Custom Forms. Allows users to add custom fields to existing pages and to add custom tabbed pages to sets of pages. These custom fields and custom tabs are defined in the Application Forms page (System > Customize > Form Fields). When you select a custom form, it appears in the ticket panel for each ticket in the queue.
NOTE: Each custom tabbed form appears only in tickets in ticket queues that included the custom tabbed form in the Custom Forms field. Custom embedded fields appear in all tickets.
- Required Custom Fields. Each ticket assigned to the queue will include a list of custom fields that the user must populate before saving the ticket. SL1 will not save the ticket until these custom fields are populated. These custom fields and custom tabs are defined in the Application Forms page (System > Customize > Form Fields).
NOTE: If a custom field was defined as "required" in the in the Form Create page (System > Customize > Form Fields > create/edit), you will not have the option to define the field as "required" for the queue because the field will be required for all queues.
- Queue Administrator. User who is visible to all members of the queue and to whom all members, regardless of account type or organization, can assign tickets. (By default, Users can assign tickets only to queue members who are in their organization and to the Queue Administrator.)
- Ticket Email Type. Specifies the value that will appear in the From field in outgoing ticket emails sent from the Message tab (either automatically by SL1 or manually by a user). Choices are:
- Queue Email Address. The From field in emails from the Message tab in the Ticket Editor page will contain the value specified in the Queue Email Address field. Select this option when you want all emails associated with the ticket queue and sent from the Send Message page to have a single sender.
- Authenticate User. The From field in outgoing emails from the Message tab in the Ticket Editor page will contain the name of the user who last edited the ticket.
- Queue Email Address. The From field in emails associated with the ticket queue and sent from the Message tab in the Ticket Editor page will contain the value specified in this field.
- Notify Watchers of Changes. If selected, applies to all tickets in the ticket queue. If selected, when a user defines a list of watchers for a ticket queue or for an individual ticket, SL1 automatically notifies those watchers when:
- An uncloaked note is added to the ticket
- A ticket is moved to a different queue
- A ticket's state has changed
- A ticket's status has changed
- A custom field has changed
- A ticket is resolved
- A ticket is resurrected
NOTE: On the Behavior Settings page (System > Settings > Behavior, if the field Automatic Ticketing Emails is set to Disabled, all assignees and watchers will not receive automatic email notifications about any tickets. By default, the field is set to Enabled.
- Queue Locked to Admin Only. This queue definition can be edited only by a user designated as the Queue Administrator or a user of type "Administrator". This includes adding and deleting members to the queue.
NOTE: You can select and save Queue Locked to Admin Only only if the field Queue Administrator is set to a user other than None. If the Queue Administrator field is set to None, SL1 will not save the queue as Queue Locked to Admin Only.
- Email Last Ticket Comment in Updates. Select this checkbox if you want the last comment made in a ticket to be emailed to users when that ticket is updated.
NOTE: If the last comment was cloaked, emails that are automatically sent to the ticket's watchers when the ticket is updated will not include the last comment. This behavior occurs even if Notify Watchers of Changes and Email last Ticket Comment in Updates have been enabled and even if the watcher has access to view cloaked notes.
- Hide queue name from non-queue members. If selected, when non-queue members view tickets in the Ticket Console page and the Ticket Editor page, this queue's name will appear as Restricted Queue.
- Auto-Resolve Children with Parent Ticket. If selected, when a ticket is assigned to this queue and its status is set to Resolved, the status for all child tickets is automatically set to Resolved. If not selected, when a ticket is assigned to this queue and its status is set to Resolved, the status of all child tickets is not affected.
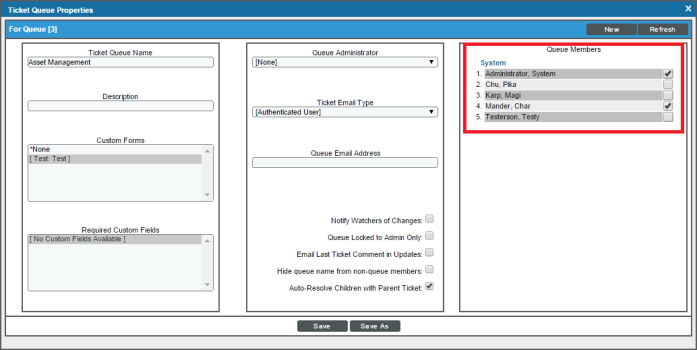
- Queue Members. The field displays a drop-down list of all users defined in SL1. Select the checkbox of each user you want to add to the queue. To remove a user from the queue, deselect the checkbox.
NOTE: If your account is of type "user", the Queue Members field displays only a list of users who are in your organization(s).
- If you have changed the name of the ticket queue, click the button. If you have made edits to other fields but have not changed the ticket queue's name, click the button.
NOTE: The [Save] button and the [Save As] button do not appear if the queue has been set to Queue Locked to Admin Only and you are not the Queue Administrator or a user of type "Administrator".
Creating a New Ticket Queue
Along with viewing and editing already existing ticket queues, you can create a new ticket queue.
To create a new ticket queue:
- Go to the Ticket Queue Management page (Registry > Ticketing > Queues).
- In the Ticket Queue Management page, click the button in the upper right of the page.
- The Create a New Ticket Queue modal page appears, with the same fields as the Ticket Queue Properties page.
- After filling out the necessary fields, click the button to save the new ticket queue.
- The ticket queue will now appear in the list in the Ticket Queue Management page. To delete the new ticket queue, or any other ticket queue in the list, click the queue's bomb icon (
 ).
).
Adding and Removing Users in a Ticket Queue
You can add a single or multiple users to a ticket queue from the Ticket Queue Properties page, or you can remove one or more users from the ticket queue.
To add or remove user(s) to a ticket queue:
- Go to the Ticket Queue Management page (Registry > Ticketing > Queues).
- Find the ticket queue for which you want to add or remove users. Click its wrench icon (
 ).
). - The Ticket Queue Propertiespage appears. The page includes the Queue Members pane, which contains a list of all users in SL1.
- If the user is already a member of the queue, the checkbox next to his/her name will be selected. If the user is not a member of the queue, the checkbox next to his/her name will not be selected.
- To add a user to the ticket queue, select his/her checkbox. To remove a user from the ticket queue, unselect his/her checkbox.
- Click the button to save your changes.
Adding and Removing Watchers to a Ticket Queue
You can add single or multiple watchers to a ticket queue from the Ticket Queue Management page, or you can remove single or multiple watchers from the ticket queue. SL1 will automatically send email notifications to the list of watchers when:
- An uncloaked note is added to the ticket
- A ticket is moved to a different queue
- A ticket's state has changed
- A ticket's status has changed
- A custom field has changed
- A ticket is resolved
- A ticket is resurrected
NOTE: To enable automatic notification of all users in the "Ticket Queue Watchers" list, you must first select the checkbox Notify Watchers of Changes in the Ticket Queue Properties modal page.
NOTE: On the Behavior Settings page (System > Settings > Behavior, if the field Automatic Ticketing Emails is set to Disabled, all assignees and watchers will not receive automatic email notifications about any tickets. By default, the field is set to Enabled.
To add or remove watcher(s) to a ticket queue:
- Go to the Ticket Queue Management page (Registry > Ticketing > Queues).
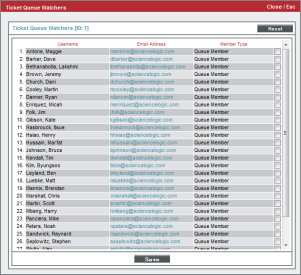
- In the Ticket Queue Management page find the ticket queue that you want to add or remove watchers to. Click its Edit Ticket Queue Watchers icon (
 ).
).
- The Ticket Queue Watchers modal page appears and displays a list of members in the specified ticket queue.
Users whose Login State is set to Suspended on the Account Permissions page will not display in the list of users in the Ticket Queue Watchers modal page. For details about suspending user accounts, see
- To add a ticket watcher to the ticket queue, select the user's checkbox. If a user had previously been added as a watcher and you would like to remove them as a watcher, deselect the users' checkbox.
- To save your changes, click the button.
Deleting One or More Ticket Queues
From the Ticket Queue Management page, you can delete an empty ticket queue. If a ticket queue contains one or more tickets, including resolved tickets, you cannot delete the ticket queue. If you try to delete a ticket queue that contains one or more tickets, you will be prompted to move the tickets to another queue. After moving the tickets, you can delete the ticket queue.
To delete a ticket queue:
- Go to the Ticket Queue Management page (Registry > Ticketing > Queues).
- In the Ticket Queue Management page, select the checkbox for each queue you want to delete. To select all checkboxes for all queues, select the gray checkbox (
 ) at the top of the page.
 - In the Select Action drop-down list, select Delete Ticket Queue.
- Click the button to delete the selected queue(s).


