Ticket templates allow you to standardize and simplify ticket creation in SL1. In a ticket template you provide default values for each field normally defined in the Ticket Editor page. You can use ticket templates when:
- Manually creating a ticket from the Ticket Editor page.
- Defining an action policy that creates a ticket.
- Defining recurring tickets.
- Defining tickets-from-email policies.
You can create, edit, and delete ticket templates from the Ticket Templates page (Registry > Ticketing > Templates).
Use the following menu options to navigate the SL1 user interface:
- To view a pop-out list of menu options, click the menu icon (
).
- To view a page containing all the menu options, click the Advanced menu icon (
).
This
Creating a Ticket Template
Ticket templates can be created, edited, and deleted from the Ticket Templates page (Registry > Ticketing > Templates). To create a ticket template:
- Go to the Ticket Templates page (Registry > Ticketing > Templates).
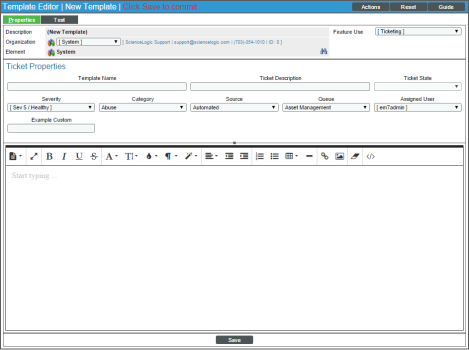
- In the Ticket Templates page, click the button in the upper right of the page. The Template Editor page appears.
- In the Template Editor page, supply a value in each field in each tab.
Properties Tab
This tab appears for all ticket templates.
- Description. Description of the problem or ticket. This is a read-only field that displays the ticket description that will appear in each ticket created by this template. This field can include one or more event variables, described later in this section.
- Organization. Organization to which the resulting ticket will be assigned. You can select one of the following:
- Automatically assign. The resulting ticket will be automatically assigned to an organization. This dynamic feature is useful in Tickets From Emails policies (Registry > Ticketing > Email Tickets).
If this field is set to Automatically Assign, when SL1 receives an email message for a Tickets From Emails policy, SL1 will try to match the "from" address in the email message to a user. If successful, SL1 will assign the resulting ticket to the same organization as the user. If SL1 cannot match the "from" address in an email message to a user, SL1 will assign the resulting ticket to the System organization.
- List of all existing organizations in EM7. The resulting ticket will be assigned to the selected organization.
- Element. Name of the entity (frequently, a device) associated with tickets created with this template. To select an element, click on the binoculars icon (
 ) or go to the [Actions] menu and choose Element Alignment. The Finder modal page appears, where you can filter by element type and search for an element.
 - Feature Use. Specifies where in SL1 this template will be used. Choices are:
- Automation. Templates with this Feature Use appear when a user defines an action policy that creates a ticket. Templates with this Feature Use appear in the Action Policy Editor modal page, in the Ticket Template field.
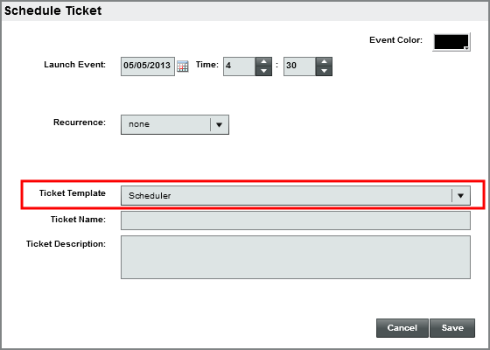
- Scheduler. Templates with this Feature Use appear when a user defines a recurring ticket. Templates with this Feature Use appear in the Schedule Ticket modal page, in the Ticket Template field.
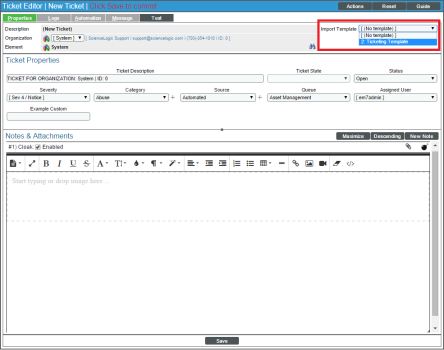
- Ticketing. Templates with this Feature Use appear in the Ticket Editor page, in the Import Template field.
NOTE: All types of templates appear in the Tickets From Emails page.
- Template Name. Name of the ticket template. This is a required field. If you use a unique name for each ticket template, you can use identical values in the Description field and still differentiate between templates.
- Ticket Description. Description of the problem or required work. This field can include one or more of the event variables from the following list of variables:
|
Variable |
Source |
Description |
|---|---|---|
|
%1 (one) |
Event |
Entity Type |
|
%2 |
Event |
Sub-entity Type |
|
%3 |
Event Policy |
Event Policy ID |
|
%4 |
Event |
Text string of the username that cleared the event. |
|
%5 |
Event |
Timestamp of when event was deleted. |
|
%6 |
Event |
Timestamp of event becoming active. |
|
%7 |
Event |
Event severity (1-5), for compatibility with previous versions of SL1. 1=critical, 2=major, 3=minor, 4=notify, 5=healthy. |
|
%A |
Account |
Username |
|
%a |
Entity |
IP address |
|
%B |
Organization |
Organization billing ID |
|
%b |
Organization |
Impacted Organization |
|
%C |
Organization |
Organization CRM ID |
|
%c |
Event |
Event counter |
|
%D |
Event |
Timestamp of first event occurrence |
|
%d |
Event |
Timestamp of last event occurrence |
|
%E |
Event Policy |
External ID from event policy |
|
%e |
Event |
Event ID |
|
%F |
Dynamic Alert |
Dynamic App alert ID |
|
%f |
Event Policy |
Specifies whether event is stateful, that is, has an associated event that will clear the current event. 1 (one) = stateful; 0 (zero) = not stateful. |
|
%G |
Event Policy |
Event Category |
|
%g |
Asset |
Asset serial |
|
%H |
Event |
URL link to event |
|
%h |
Asset |
Device ID associated with the asset |
|
%I (uppercase "eye") |
Dynamic Alert |
For events with a source of "dynamic", this variable contains the index value from SNMP. For events with a source of "syslog" or "trap", this variable contains the value that matches the Identifier Pattern field in the event definition |
|
%i (lowercase "eye") |
Asset |
Asset Location |
|
%7 |
Ticket |
Subject of email used to create a ticket. If you specify this variable in a ticket template, SL1 will use the subject line of the email in the ticket description or note text when SL1 creates the ticket. NOTE: When referring to a ticket, %7 represents the subject line of an email used to create a ticket. When referring to an event, %7 represents severity (for previous versions of SL1). |
|
%K |
Asset |
Asset Floor |
|
%k |
Asset |
Asset Room |
|
%M |
Event |
Event Message |
|
%m |
Automation |
Automation Policy Note |
|
%N |
Action |
Automation Action Name |
|
%n |
Automation |
Automation policy name |
|
%0 (uppercase "oh") |
Organization |
Organization |
|
%o (lowercase "oh") |
Organization |
Organization ID |
|
%P |
Asset |
Asset Plate |
|
%p |
Asset |
Asset Panel |
|
%Q |
Asset |
Asset Punch |
|
%q |
Asset |
Asset Zone |
|
%R |
Event Policy |
Event policy cause/action text |
|
%r |
System |
Unique ID/Name for the current SL1 system |
|
%S |
Event |
Severity (Healthy-Critical) |
|
%s |
Event |
Severity (0 - 4). 0=healthy, 1=notify, 2=minor, 3=major, 4=critical. |
|
%T |
Dynamic Alert |
Dynamic App alert threshold value |
|
%t |
Ticket |
Ticket ID |
|
%U |
Asset |
Asset rack |
|
%u |
Asset |
Asset shelf |
|
%V |
Dynamic Alert |
Dynamic App alert result value |
|
%v |
Asset |
Asset tag |
|
%W |
Asset |
Asset make |
|
%w |
Asset |
Asset model |
|
%X |
Event |
Entity Name |
|
%x |
Event |
Entity ID |
|
%Y |
Event |
Sub-entity bane |
|
%y |
Event |
Sub-entity ID |
|
%Z |
Event |
Event Source (1-8) |
|
%z |
Event |
Event source (Syslog - Group) |
- Ticket State. Custom parameter, defined in the Ticket States page (Registry > Ticketing > Custom States). Allows you to add additional workflow restrictions to a ticket.
- Severity. The severity of the problem. The choices are:
- Severity 0/Healthy
- Severity 1/Notice
- Severity 2/Minor
- Severity 3/Major
- Severity 4/Critical
- Category. Descriptive category assigned to the ticket. The list of possible categories can be customized in the Device Category Editor page (System > Customize > Device Categories).
- Source. Original source for the ticket. Choices are:
- Email. An email about an issue prompted this ticket.
- External. An external source created this ticket.
- Internal. Ticket created in SL1.
- Phone. A phone call about an issue prompted this ticket.
- Queue. Ticket Queue to assign the ticket to.
- Assigned User. User to assign the ticket to. All members of the ticket queue (specified in the Ticket Queue field) appear in this field.
- Custom Fields. If your SL1 system includes embedded fields for Ticketing, these fields will appear in the Template Editor. If an embedded field is required, you must supply a value for that field in the Template Editor.
Custom Tabs
After assigning a ticket queue to a ticket template and saving the ticket template, SL1 can add additional tabs to the Template Editor page.
For each tabbed form you selected in the Custom Forms field in the Ticket Queue Properties page, SL1 will display a tab in the Template Editor page.
Each tabbed form is defined in the Application Forms page (System > Customize > Form Fields).
For each custom tab, you can define a value for one or more fields. If a custom field is required (either in the Ticket Queue Properties page (Registry > Ticketing > Queues > Edit/Create) or in the Form Creator page (System > Customize > Form Fields > create/edit), you must supply a value for the field.
- Click the button to save the template.
Editing and Deleting a Ticket Template
You can edit and delete an existing ticket template from the Ticket Templates page. To edit a ticket template:
- Go to the Ticket Templates page (Registry > Ticketing > Templates).
- In the Ticket Templates page, find the template you want to edit. Click its wrench icon (
 ). The Template Editor modal page appears with the same fields listed above.
 - In the Template Editor modal page, change the values in one or more fields.
- Click the button to save your changes. If you have changed the name of the ticket template, click the button.
To delete a ticket template:
- Go to the Ticket Templates page (Registry > Ticketing > Templates).
- Find the ticket template you want to delete. Select its checkbox (
 ).
). - In the Select Action drop-down list, select DELETE Template.
- Click the [Go] button.
- The ticket template will be deleted.
Adding Watchers to a Ticket Template
By default, SL1 automatically sends an email message to the ticket assignee when:
- A ticket is assigned to that user
- A ticket is updated
You can also assign one or more watchers to the ticket. A ticket watcher is a user (in addition to the ticket's assignee) that receives email updates about the ticket. If a watcher is added to a ticket, SL1 automatically sends the watcher an email message when certain actions are taken on the ticket.
By default, the following watchers are assigned to a ticket when the ticket is created:
- The user who created the ticket (if applicable)
- Each user who was defined as a watcher in the ticket's ticket template (if applicable)
- Each user who was defined as a watcher for the ticket's initial ticket queue (if applicable)
- Each user who was defined as a watcher for the ticket's initial organization (if applicable)
SL1 automatically generates email messages for a ticket's watchers when:
- An uncloaked note is added to the ticket
- A ticket is moved to a different queue
- A ticket's state has changed
- A ticket's status has changed
- A custom field has changed
- A ticket is resolved
- A ticket is resurrected
NOTE: On the Behavior Settings page (System > Settings > Behavior, if the field Automatic Ticketing Emails is set to Disabled, all assignees and watchers will not receive automatic email notifications about any tickets. By default, the field is set to Enabled.
You can define a list of watchers for a ticket template. When a ticket is created using a template, the watchers defined in the template are automatically added to the new ticket's list of watchers. To define a list of watchers for a ticket template:
- Go to the Ticket Templates page (Registry > Ticketing > Templates).
- To create a new ticket template, click the [Create] button. To add watchers to an existing ticket template, click its wrench icon (
 ).
).
- In the Template Editor modal page, go to the [Actions] menu and choose Watchers. The Ticket Watchers modal page is displayed.
- In the Ticket Watchers modal page, select (or de-select) the checkbox for each user you want to add to the list of watchers for the ticket template. You can remove a user from the list of watchers for the ticket template by de-selecting the checkbox for that user.
Users whose Login State is set to Suspended on the Account Permissions page will not display in the list of users in the Ticket Watchers modal page. For details about suspending user accounts, see
- Click the [Save] button to save the list of watchers.


