![]()
This appendix describes how to create High Availability deployments to protect the data in PowerFlow.
This appendix covers the following topics:
Types of High Availability Deployments for PowerFlow
The following table contains a set of ratings that depict the level of resiliency enabled by various PowerFlow deployment types. The higher the rating, the more resilient the PowerFlow system, not just from a node failure perspective, but also from a throughput and load-balancing regard.
| Deployment Type | Resiliency Rating | Typical Audience |
| Single-node deployment | F | Users who want PowerFlow running, but do not care about failover. |
| Three-node cluster | B+ | Users who want PowerFlow running, and also want support for automatic failover for one-node failure. |
| 3+ node cluster with separate workers (at least 4 nodes) | A- | Users who want automatic failover for one-node failure, and intend to have very CPU- or memory-intensive tasks executing on the workers constantly. |
| 3+ node cluster with separate workers, and drained manager nodes (at least 6 nodes) | A | Users who want automatic failover for one-node failure, intend to have very CPU- or memory-intensive tasks executing on the workers, and want to completely mitigate risks of resource contention between services. |
You can start with any deployment type, and at a later time scale up to any other deployment type as needed. For example, a you can start with a single-node deployment, then at a later date add three more nodes to enable a 3+ node cluster with separate workers.
The deployments listed in the table are just the standards for deployment. For very high-scale customers, a more advanced deployment might be necessary. For deployment requirements like this, please contact ScienceLogic Support.
If you are deploying PowerFlow without a load balancer, you can only use the deployed IP address as the management user interface. If you use another node to log in to the PowerFlow system, you will get an internal server error. Also, if the deployed node is down, you must redeploy the system using the IP address for another active node to access the management user interface.
There is no support for active or passive Disaster Recovery. ScienceLogic recommends that your PowerFlow Disaster Recovery plans include regular backups and restoring from backup. For more information, see Backing up Data.
The standard deployments are listed below in the following topics:
- Standard Single-node Deployment (1 Node)
- Standard Three-node Cluster (3 Nodes)
- 3+ Node Cluster with Separate Workers (4 or More Nodes)
- 3+ Node Cluster with Separate Workers and Drained Manager Nodes (6 or More Nodes)
You can use a command-line utility called powerflowcontrol (pfctl) that performs multiple administrator-level actions on either the node or the cluster. You can use this script to automate the configuration of a three-node cluster. For more information, see Automating the Configuration of a Three-Node Cluster.
Standard Single-node Deployment (1 Node)
Single-node deployment is the standard deployment that comes along with the ISO and RPM installation. This is the default deployment if you install the ISO and run the pull_start_iservices.sh script.
This deployment provides a single node running the PowerFlow system. If this node fails, the system will not be operational.
Requirements
One node, 8 CPU, 24 GB memory minimum, preferably 34 GB to 56 GB memory, depending on workload sizes. For more information, see System Requirements.
Risks
A single node supports no data replication, no queue mirroring, and no failover capabilities.
Configuration
This configuration is available as a default deployment with the docker-compose included in the PowerFlow 2.0.0 or later ISO or RPM.
Standard Three-node Cluster (3 Nodes)
The following High Availability deployment is an example of a three-node cluster:
- Each node in the Swarm is a Swarm Manager.
- All Swarm nodes are located within the same data center.

The three-node cluster is the most basic option providing full High Availability and data replication support among three nodes. In this deployment, each of the three nodes are running the same services in a clustered environment, which provides failover and data loss prevention capabilities. This deployment option will satisfy most High Availability needs, but it does not mitigate risks with the potential for worker operations to affect and degrade the database and queue services, because all services are running on the same nodes.
This deployment provides:
- Automatic failover for one out of three node failure: If one node in the cluster fails, automatic failover occurs, and the PowerFlow system will continue to be operational running on two out of three of the nodes.
- Full data replication between all three nodes. All nodes have a copy of the same data replicated across all three nodes. If one or two nodes fail, you will not experience data loss in the database or in the queues.
- Full queue mirroring between all three nodes. All nodes have a mirror of the queues defined in the PowerFlow environment. If one or two nodes fail, the system still retains messages in queues using the autoheal policy by default. For more information about autoheal behavior in RabbitMQ, see The RabbitMQ Split-brain Handling Strategy.
Requirements
Three nodes, 8 CPU, 24 GB memory minimum, preferably 34 GB to 56 GB memory, depending on workload sizes. For more information, see System Requirements.
Risks
When only three nodes are allocated used for High Availability, the following risks are present:
- Over-utilization of nodes causing clustering issues. In a three node cluster, worker containers, and Docker Swarm Managers are running on the same node as the database and queue services. As a result, if the node is not provisioned correctly, there could be some resource contention. If a node reaches 100% CPU, Docker Swarm cluster operations might fail, causing a node to completely restart, and causing a failover or other unexpected behavior.
- Over-utilization of workers nodes causing database or queue issues. Since all services are sharing the same nodes in this configuration, if worker operations become extremely CPU- or memory-intensive, the system might try to use resources needed from the database or queue. If this happens, you might encounter failures when querying the database or using the queues.
Mitigating Risks
The above risks can be mitigated by ensuring that the node is deployed with adequate CPU and memory for the workloads that you plan to run on the node. Memory limits are placed on containers by default. If needed, you could also add CPU limits to worker containers to further prevent resource contention.
Configuration
PowerFlow uses a docker-compose-override.yml file to persistently store user-specific configurations for containers, such as proxy settings, replica settings, additional node settings, and deploy constraints. The user-specific changes are kept in this file so that they can be re-applied when the /opt/iservices/scripts/docker-compose.yml file is completely replaced on an RPM upgrade, ensuring that no user-specific configurations are lost.
Below is an example docker-compose-override.yml file for PowerFlow 2.0.0 or later:
services:
  contentapi:
    environment:
      db_host: "couchbase.isnet,couchbase-worker.isnet,couchbase-worker2.isnet"
  couchbase:
    deploy:
      placement:
        constraints:
          - "node.hostname == <Swarm node hostname1>"
    environment:
      db_host: couchbase.isnet
    hostname: couchbase.isnet
    networks:
      isnet:
        aliases:
          - couchbase
          - couchbase.isnet
  couchbase-worker:
    container_name: couchbase-worker
    deploy:
      placement:
        constraints:
          - "node.hostname == <Swarm node hostname2>"
      replicas: 0
    environment:
      AUTO_REBALANCE: "true"
      TYPE: WORKER
      db_host: couchbase
    hostname: couchbase-worker.isnet
    image: "sciencelogic/is-couchbase:1.7.0"
    networks:
      isnet:
        aliases:
          - couchbase-worker
          - couchbase-worker.isnet
    ports:
      - "8100:8091"
    secrets:
      - is_pass
      - encryption_key
    volumes:
      - "/var/data/couchbase:/opt/couchbase/var"
  couchbase-worker2:
    container_name: couchbase-worker2
    deploy:
      placement:
        constraints:
          - "node.hostname == <Swarm node hostname3>"
      replicas: 0
    environment:
      AUTO_REBALANCE: "true"
      TYPE: WORKER
      db_host: couchbase
    hostname: couchbase-worker2.isnet
    image: "sciencelogic/is-couchbase:1.7.0"
    networks:
      isnet:
        aliases:
          - couchbase-worker2
          - couchbase-worker2.isnet
    ports:
      - "8101:8091"
    secrets:
      - is_pass
      - encryption_key
    volumes:
      - "/var/data/couchbase:/opt/couchbase/var"
  dexserver:
    deploy:
      replicas: 2
    environment:
      db_host: "couchbase.isnet,couchbase-worker.isnet,couchbase-worker2.isnet"
  pypiserver:
    deploy:
      placement:
        constraints:
          - "node.hostname == <Swarm node hostname1>"
  rabbitmq:
    deploy:
      placement:
        constraints:
          - "node.hostname == <Swarm node hostname1>"
    hostname: rabbit_node1.isnet
    image: "sciencelogic/is-rabbit:3.7.14-3"
    networks:
      isnet:
        aliases:
          - rabbit
          - rabbit_node1.isnet
    volumes:
      - "rabbitdb:/var/lib/rabbitmq"
  rabbitmq2:
    deploy:
      placement:
        constraints:
          - "node.hostname == <Swarm node hostname2>"
    hostname: rabbit_node2.isnet
    image: "sciencelogic/is-rabbit:3.7.14-3"
    networks:
      isnet:
        aliases:
          - rabbit
          - rabbit_node2.isnet
    volumes:
      - "rabbitdb2:/var/lib/rabbitmq"
  rabbitmq3:
    deploy:
      placement:
        constraints:
          - "node.hostname == <Swarm node hostname3>"
    hostname: rabbit_node3.isnet
    image: "sciencelogic/is-rabbit:3.7.14-3"
    networks:
      isnet:
        aliases:
          - rabbit
          - rabbit_node3.isnet
    volumes:
      - "rabbitdb3:/var/lib/rabbitmq"
  scheduler:
    environment:
      db_host: "couchbase.isnet,couchbase-worker2.isnet,couchbase-worker.isnet"
  steprunner:
    environment:
      db_host: "couchbase.isnet,couchbase-worker2.isnet,couchbase-worker.isnet"
version: "3.4"
volumes:
  rabbitdb2:
  rabbitdb3:
3+ Node Cluster with Separate Workers (4 or More Nodes)
The three-node cluster with separate workers is a slight variation of the standard three-node cluster. With this deployment strategy, all worker operation load is run by a separate independent node. This is preferable over the standard three-node deployment, because it completely prevents worker operations from stealing resources from the databases or queues.
Since steprunner workload is entirely on dedicated servers, you have greater ability to scale up to more workers, or even add additional nodes of workers to the system, without affecting critical database or queue operations.
This deployment provides a complete separation of worker processing from the database and queue processing, which is very helpful for users which have very CPU-intensive tasks that execute frequently.
The following High Availability deployment adds Docker Swarm worker nodes where steprunners can be constrained. This lets you continue to scale out new worker nodes as the load increases. This also lets you distribute steprunners based on workloads. Core services include ContentAPI, RabbitMQ, and Couchbase.

You can add drained Docker Swarm Manager nodes to increase fault tolerance of the Swarm, and to ensure that the orchestration of the Swarm is not impeded by large workloads on the core nodes.
The maximum Couchbase cluster with fully replicated nodes is four. Anything greater than four will not have a full replica set and will auto-shard data across additional nodes. There is no way as of this version of Couchbase to set the placement of the replicas. Redis replication and clustering is not currently supported in this version of PowerFlow.
Requirements
Three nodes, 8 CPU, 24 GB memory minimum, preferably 34 GB to 56 GB memory, depending on workload sizes. For more information, see System Requirements.
One or more worker node with your choice of sizing.
Worker Node Sizing
Worker nodes can be sized to any CPU or memory constraints, though the greater the memory and CPU, more workers the node can run. The minimum size of a worker node is 2 CPU, 4 GB memory.
Risks
Core Node over-utilization could cause Swarm clustering problems. Because the Swarms are the same nodes as the core managers, there is a possibility for heavily loaded databases and queues to contend with the Swarm hosts for resources. In this case the Swarm may restart itself and the services running on that node. This is not as likely to occur with workers running on their own dedicated nodes.
Mitigating Risks
The above risks can easily be mitigated by ensuring the node is deployed with adequate CPU and memory for the workloads it is expected to run. Additionally, you can apply CPU and memory limits to the database or queue containers so that there will always be enough resources allocated to the host to prevent this scenario. For more information, see Configuring Additional Elements of PowerFlow.
Configuration
Using this configuration consists of:
- Joining the standard three-node Swarm cluster with one or more nodes as a Swarm worker.
- Labeling each additional "worker" node with a Swarm label "worker". For more information, see Creating a Node Label. You can also use the worker node role to restrict the steprunners to run only in the Swarm worker nodes using node.role==worker in the constraints section in the docker-compose file.
-
In addition to the standard three-node deployment, you should update the steprunners to run on a dedicated node in the docker-compose file:
steprunner3: deploy: placement: constraints: - node.labels.types == worker -
You can edit the value of --max-replica-per-node in the docker-compose-override file to restrict the number of replicas that will run in each Swarm node. The default value is 5:
steprunner:
  deploy:
    replicas: 15
    ...
    placement:
      max_replicas_per_node: 5
  environment:
    ...
The --max-replica-per-node option is available with docker-compose 3.8 or later. Add version: '3.8' at the start of the docker-compose file to ensure compatibility.
3+ Node Cluster with Separate Workers and Drained Manager Nodes (6 or More Nodes)
This deployment option is the most robust of the one-node auto-failover deployments, and completely mitigates known risks for resource contention in clusters.
This configuration provides everything that the 3+ node cluster with dedicated workers provides, with the addition of drained Swarm Managers. The drained Swarm Managers mitigate the risk of database or queue processing causing contention of resources for the Swarm clustering operations at the host level.
This deployment should only be used for large deployments of PowerFlow. This deployment separates out all the core services onto their own dedicated worker node and lets you distribute steprunners based on workloads:

You can add drained Docker Swarm Manager nodes to increase fault tolerance of the Swarm, and to ensure that the orchestration of the Swarm is not impeded by large workloads on the core nodes.
The maximum Couchbase cluster with fully replicated nodes is four. Anything greater than four will not have a full replica set and will auto-shard data across additional nodes. There is no way as of this version of Couchbase to set the placement of the replicas. Redis replication and clustering is not currently supported in this version of PowerFlow.
Requirements
Three nodes, 8 CPU, 24 GB memory minimum, preferably 34 GB to 56 GB memory, depending on workload sizes. For more information, see System Requirements.
Also, three nodes, 2 CPU, 4 GB memory for the Swarm Manager.
Risks
None.
Configuration
Use the same docker-compose-override.yml file found in Standard Three-node Cluster (3 Nodes).
Next, add the additional three nodes to the cluster as managers, and drain them of all services (see Using Drained Managers to Maintain Swarm Health). Promote the drained nodes to Swarm Managers, and make all other nodes workers.
Additional Deployment Options
The following diagrams show additional High Availability deployment architectures that are supported for PowerFlow.
Cross-Data Center Swarm Configuration
Docker Swarm requires three data centers to maintain quorum of the swarm in the event of a full data center outage. Each data center must have a low-latency connection between the data centers.

Implementing clustering across links with a latency that is greater than 80 ms is not supported, and may cause one or more of the following situations: nodes dropping out of the cluster, or automatically failover, failed data replication, and potential cluster communication issues resulting in timeouts and significantly increased overhead.
The cross-data center configuration has the following limitation: the Redis service cannot be deployed in High Availability. As a result, all task results saved by any steprunner will have to be saved within that data center. Upon a failure of that data center, a new Redis service will be created, but an application in the middle of its run would have to retry.
The following High Availability deployment shows a cross-data center swarm configuration:

Additional Notes
Tagging and constraints in the Docker compose file should be used to ensure proper placement. Example compose files are not available at this time.
Configuration management solutions such as Ansible should be used to update and manage large swarm environments.
For an easy upgrade of PowerFlow, use Docker Hub to pull the latest images or use an internal Docker registry.
Requirements Overview
Because PowerFlow uses the Docker Swarm tool to maintain its cluster and automatically re-balance services across nodes, ScienceLogic strongly recommends that you implement the following best practices from Docker, Couchbase, and RabbitMQ. The topics in this section describe those best practices, along with requirements and frequently asked questions.
IMPORTANT: To support automatic failover of the Couchbase database without manual intervention, you must set up at least three nodes for automatic failover of a single node, five nodes for automatic failover of two nodes, and so on.
For a clustered PowerFlow environment, you must install the PowerFlow RPM on every server that you plan to cluster the PowerFlow. You can load the Docker images for the services onto each server locally by running /opt/iservices/scripts/pull_start_iservices.sh. Installing the RPM onto each server ensures that the PowerFlow containers and necessary data are available on all servers in the cluster. For more information, see Installing PowerFlow via RPM.
You can use a command-line utility called powerflowcontrol (pfctl) that performs multiple administrator-level actions on either the node or the cluster. You can use this script to automate the configuration of a three-node cluster. For more information, see Automating the Configuration of a Three-Node Cluster.
Docker Swarm Requirements for High Availability
After implementing Docker Swarm High Availability, if a node goes down, all the services on that failed node can be dynamically re-provisioned and orchestrated among the other nodes in the cluster. High Availability for Swarm also facilitates network connections with the various other High Availability components.
Docker Swarm requires the following:
- The cluster contains at least three nodes running as managers. With three nodes, there can be a quorum vote between managers when a node is failed over.
- A load balancer with a virtual IP running in front of all nodes in the cluster. The load balancer allows user interface requests to be distributed among each of the hosts in the case one of the hosts fails for ports 443:HTTPS, 3141:Devpi and 5556:Dex.
An example of why a load balancer is needed in front of the virtual IP is the ServiceNow ticketing workflow. If you’re only directing the request to a single node and that node goes down, your ticketing will stop even if the other PowerFlow nodes are still up and functional. The load balancer will account for the downed node and automatically route to the other nodes in the cluster.
For more information, see the Docker High Availability Documentation.
What happens if I use three nodes and two of the nodes fail?
Docker fault tolerance is limited to one failure in a three-node cluster. If more than one node goes down in a three-node cluster, automatic High Availability and failover cannot be guaranteed, and manual intervention may be required. Adding more nodes is the only way to increase the fault tolerance.
In the event of a two out of three failure, after you perform manual failover actions, the PowerFlow system will be back up and running.
For more information about the manual failover steps, see the Failover section.
Couchbase Database Requirements for High Availability
Couchbase High Availability ensures that no application, configuration, or step data from the PowerFlow system will be lost in the event of a node failure.
To support automatic failover, Couchbase requires at least three nodes in the high availability cluster.
Each node will have an independent and persistent storage volume that is replicated throughout the cluster. Alternatively, shared storage can be used instead of independent persistent volumes. This replication ensures that data is replicated in all places, and if a single node goes down, no data will be lost.
For more information, see the Couchbase documentation.
What if I have three nodes and two of them fail?
In the event of a failure of two out of three nodes, no data will be lost, because the data is being replicated.
If multiple Couchbase data nodes go down at the same time, automatic failover might not occur (not even nodes for quorum to failover). You will then need to perform manual failover steps. After you perform these manual actions, the PowerFlow system will be operational again. For more information about the manual failover steps, see the Failover section.
RabbitMQ Clustering and Persistence for High Availability
Implementing RabbitMQ High Availability ensures that if any integrations or tasks are waiting in the Rabbit queue, those tasks will not be lost if a node containing the Rabbit queue fails.
NOTE: You can switch between both single-node and cluster options at any time during deployment.
RabbitMQ clustering requires a Docker Swarm configuration with multiple nodes. For more information, see Configuring Docker Swarm.
As a best practice for security, enable the user interface only temporarily during cluster configuration. The default user interface login is guest/guest.
RabbitMQ Option 1: Persisting Queue to Disk on a Single Node (Default Configuration)
With this configuration, the PowerFlow queue runs on a single node, and the queue is persisted on disk. As a result, if the PowerFlow stack is removed and re-deployed, no messages are lost during the downtime. Any messages that exist in the queue before the stack is stopped continue to exist after the stack is re-deployed.
Potential Risks and Mitigations
Because the queue runs on a single node, if that node fails, then the queue and its related data might be lost.
You can mitigate data loss by persisting the queues on your choice of network shared storage, so that if the queue fails on one node, the queue and its messages can be brought back up on another node.
Requirements/Setup (Enabled by Default)
- You must define a static hostname for the RabbitMQ host in the docker-compose file. The default is rabbit_node1.isnet.
- You must mount a volume to /var/lib/rabbitmq in the docker-compose file.
Example docker-compose Definition
rabbitmq:
  image: sciencelogic/is-rabbit:3.7.7-1
  hostname: rabbit_node1.isnet
  volumes:
    - "rabbitdb:/var/lib/rabbitmq"
  networks:
    isnet:
      aliases:
        - rabbit
        - rabbit_node1.isnet
RabbitMQ Option 2: Clustering Nodes with Persistent Queues on Each Node
This configuration lets multiple nodes join a RabbitMQ cluster. When you include multiple nodes int he RabbitMQ cluster, all queue data, messages, and other necessary information is automatically replicated and persisted on all nodes in the cluster. If any node fails, then the remaining nodes in the cluster continue maintaining and processing the queue.
Because the RabbitMQ cluster includes disk-persisted queues, if all nodes in the Rabbit cluster fail, or if the service is removed entirely, then no data loss should occur. Upon restart, the nodes will resume with the same cluster configuration and with the previously saved data.
If you include multiple nodes in a RabbitMQ cluster, PowerFlow automatically applies an HA policy of all-node replication, with retroactive queue synchronization disabled. For more information, refer to the RabbitMQ documentation.
Potential Risks and Mitigations
If you create a Docker Swarm cluster with only two nodes, the cluster might stop functioning if a single node fails. To prevent this situation, include at least three nodes in each cluster.
Requirements/Setup
For a Docker Swarm configuration with multiple independent nodes:
- Both RabbitMQ services must be "pinned" to each of the two nodes. See the Example Compose Definition below.
- You must add a new RabbitMQ service to the docker-compose.yml file. This new service should have a hostname and alias following the designated pattern. The designated pattern is: rabbit_nodex.isnet, where x is the node number. This configuration supports up to 20 clustered nodes by default.
- After you update the docker-compose.yml file, the nodes will auto-cluster when you perform a deployment.
Example docker-compose Definition of Two Clustered Rabbit Services
rabbitmq:
  image: sciencelogic/is-rabbit:3.7.7-1
  hostname: rabbit_node1.isnet
  volumes:
     - "rabbitdb:/var/lib/rabbitmq"
  networks:
     isnet:
       aliases:
         - rabbit
         - rabbit_node1.isnet
  deploy:
     placement:
       constraints:
         - node.hostname == node-number-1.domain
rabbitmq2:
   image: sciencelogic/is-rabbit:3.7.7-1
   hostname: rabbit_node2.isnet
   volumes:
     - "rabbitdb:/var/lib/rabbitmq"

   networks:
     isnet:
       aliases:
         - rabbit
         - rabbit_node2.isnet
  deploy:
     placement:
       constraints:
         - node.hostname == node-number-2.domain
Checking the Status of a RabbitMQ Cluster
This section contains commands and additional resources for administering your clusters.
To check the status of your clustered RabbitMQ environment:
- Run docker ps and locate the iservices_rabbit container.
-
Run the following command on the RabbitMQ container:
docker exec -it [container_id] /bin/bash
You can run the following commands for more information:
- rabbitmqctl cluster_status. Returns information about the current cluster status, including nodes in the cluster, and failed nodes.
- rabbitmqctl list_policies. Returns information about current policies. Ensure that the ha-all policy is automatically set for your cluster.
For additional cluster-related administrative commands, see the RabbitMQ Cluster Management documentation page.
Preparing the PowerFlow System for High Availability
You need to prepare your PowerFlow system in the following ways before configuring the High Availability solution:
-
Make sure that your PowerFlow system has been updated with yum upgrade.
-
Run the following commands to open up the proper firewall ports for Docker Swarm on each swarm node:
firewall-cmd --add-port=2376/tcp --permanent
firewall-cmd --add-port=2377/tcp --permanent
firewall-cmd --add-port=7946/tcp --permanent
firewall-cmd --add-port=7946/udp --permanent
firewall-cmd --add-port=4789/udp --permanent
firewall-cmd --add-protocol=esp --permanent
If your system is fully yum-updated, you only need to run the following commands:
firewall-cmd --add-service docker-swarm --permanent
firewall-cmd --reloadTo view a list of all ports, run the following command: firewall-cmd --list-all
- Make sure that the /etc/iservices/is_pass and /etc/iservices/encryption_key are identical on all clustered nodes.
- Make sure that NTP is properly configured on all nodes:
-
Edit the /etc/chrony.conf file to add NTP servers. If you want to use the pool.ntp.org NTP servers, remove the .ol. from the domain names.
-
Enable chronyd by running the following commands:
systemctl start chronyd
systemctl enable chronyd
timedatectl #ensure ntp is enabled is yes and ntp sync is yes
Troubleshooting Ports and Protocols
If you have trouble with cluster configuration, make sure that all of the following ports and protocols are enabled between each of the nodes in the PowerFlow cluster within your network:
- 2376/tcp
- 2377/tcp
- 7946/tcp
- 7946/udp
- 4789/udp
- protocol=esp (IP Protocol 50)
Firewall rules are automatically configured within the PowerFlow operating system. Failing to allow required ports between nodes block PowerFlow clustering and networking.
Additionally, when using a load balancer, ensure that each of the PowerFlow cluster nodes are able to communicate to the load balancer listening ports (443, 5556, 3141).
Configuring Clustering and High Availability
This section describes how to configure clustering and High Availability with Docker Swarm and the Couchbase database, using three or more nodes.
This topic assumes you are using PowerFlow ISOs for each node, which includes an initial Docker Swarm node configuration. The use of the PowerFlow ISO is not required, however. You could instead deploy another node (without using the PowerFlow ISO) and configure a Linux operating system based on Red Hat. You could then add that system to the swarm.
When configuring a three-node clustered environment, you can set the OPEN_SECONDARY_CB_PORTS configuration variable to "true" to expose Couchbase secondary ports through the main node IP or host name. You can set this configuration variable as a GUI environment variable in the docker-compose.yml file, or you can set it in the isconfig.yml file in the host. If OPEN_SECONDARY_CB_PORTS is set to "true", the GUI service exposes the Couchbase secondary ports in the compose file. The autocluster cluster-action in the powerflowcontrol (pfctl) utility was updated to automatically expose Couchbase secondary ports when creating a three-node clustered environment.
For more information about troubleshooting issues with clustering, see Troubleshooting Clustering and Node Failover.
Automating the Configuration of a Three-Node Cluster
You can use the powerflowcontrol (pfctl) command-line utility to perform multiple administrator-level actions on your PowerFlow cluster. You can use the autocluster action with the powerflowcontrol command to automate the configuration of a three-node cluster.
If you are using another cluster configuration, the deployment process should be manual, because the powerflowcontrol utility only supports the automated configuration of a three-node cluster.
The autocluster action will completely reset and remove all data from the system. When you run this action, you will get a prompt verifying that you want run the action and delete all data.
To automate the configuration of a three-node cluster, run the following command:
pfctl --host <PowerFlow_host1> <username>:<password> --host <PowerFlow_host2> <username>:<password> --host <PowerFlow_host3> <username>:<password> autocluster
For example:
pfctl --host 192.11.1.1 isadmin:passw0rd --host 192.11.1.2 isadmin:passw0rd --host 192.11.1.3 isadmin:passw0rd autocluster
Running this command will configure your PowerFlow three-node cluster without any additional manual steps required.
You can use the generate_haproxy_config cluster-action in the powerflowcontrol (pfctl) utility to create an HAProxy configuration template that lets you easily set an HAProxy load balancer for a three-node cluster. For example: pfctl cluster-action --action generate_haproxy_config
For more information about other actions you can perform with the powerflowcontrol utility, see Using the powerflowcontrol (pfctl) Command-line Utility.
Configuring Docker Swarm
To configure Docker Swarm for clustering (three or more nodes) and High Availability:
Two-Node High Availability is not possible because Docker Swarm requires an odd number of nodes (3+) for quorum and consensus.
-
If you do not already have PowerFlow running in your environment, install PowerFlow on a single node. Doing this creates a single-node Docker Swarm manager.
-
Ensure that NTP is configured on all swarm nodes. For more information, see Preparing PowerFlow System for High Availability.
-
SSH to the Docker Swarm manager (leader) and run the following command to retrieve the join token. Make note of the token, because you will need it to join a node to the swarm in step 4, below:
docker swarm join-token manager
-
Run the following commands on each Docker Swarm node that you want to join to the cluster:
docker swarm init
docker swarm join --token <join token> <swarm manager ip>:<port>
where <join token> is the value from step 3. For example:
docker swarm join --token SWMTKN-1-5e8skxby61cthkfkv6gzhhil89v0og2m7lx014tvvv42n7m0rz-an0fdam5zj0v7d471co57d09h 10.7.3.21:2377
-
Run the following command to verify that the nodes have been added:
docker node ls
-
If you are using local images and not connecting to Docker Hub, load docker images on the other swarm nodes:
for i in $(ls -1 /opt/iservices/images/); do docker load -i /opt/iservices/images/$i; done
Configuring the Couchbase Database
To add a Couchbase worker node:
-
In the docker-compose-override.yml file, add the following line to constrain the Couchbase container to a single Docker Swarm node at the bottom of the couchbase section:
deploy:
...
 hostname: couchbase.isnet
 deploy:
   placement:
     constraints:
       - node.hostname == <name of Docker Swarm node>

  networks:
    isnet:
      aliases:
        - couchbase
        - couchbase.isnet

   environment:
      db_host: couchbase.isnet
-
Add the couchbase-worker and couchbase-worker2 section. deploy > replicas on the workers should be set to 0:
couchbase-worker:
 image: repository.auto.sciencelogic.local:5000/is-couchbase:feature-INT-1208-HA-IS-Services
 container_name: couchbase-worker.isnet
 volumes:
   - "/var/data/couchbase:/opt/couchbase/var"
 deploy:
   placement:
     constraints:
       - node.hostname == <name of Docker Swarm node>
 networks:
   isnet:
     aliases:
       - couchbase-worker
       - couchbase-worker.isnet
 hostname: couchbase-worker.isnet

 ports:
   - "8095:8091"
 secrets:
   - is_pass
   - encryption_key
 ulimits:
   nofile: 80000
   core: 100000000
   memlock: 100000000
 environment:
   TYPE: 'WORKER'
   AUTO_REBALANCE: 'true'
   db_host: 'couchbase'
NOTE: This deployment makes the Couchbase worker user interface available on port 8095 of the Docker Swarm stack. If the master node goes down, or if the primary Couchbase user interface is not available on port 8091, you can still access the secondary Couchbase user interface through port 8095.
-
Add couchbase-worker to the db_host setting for contentapi:
contentapi:
...
  environment:
    ...
    db_host: 'couchbase,couchbase-worker,couchbase-worker2'
-
All db_host variables in docker-compose should be in the following format:
db_host: 'couchbase,couchbase-worker,couchbase-worker2'
-
If you are using the override file, run the /opt/iservices/compose_override.sh script to validate and update the docker-compose.yml file with your changes.
-
Deploy the stack with only the Couchbase node by editing the replicas on couchbase-worker to 1 and running the following command:
docker stack deploy -c <location of compose file> iservices
-
After the two-node Couchbase cluster has been successfully deployed and the secondary indexes are successfully added, edit the replicas on couchbase-worker2 to 1 and run the following command:
docker stack deploy -c <location of compose file> iservices
-
Set the replicas in the docker-compose-override.yml file as well.
-
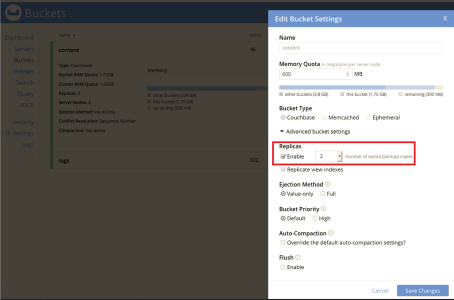
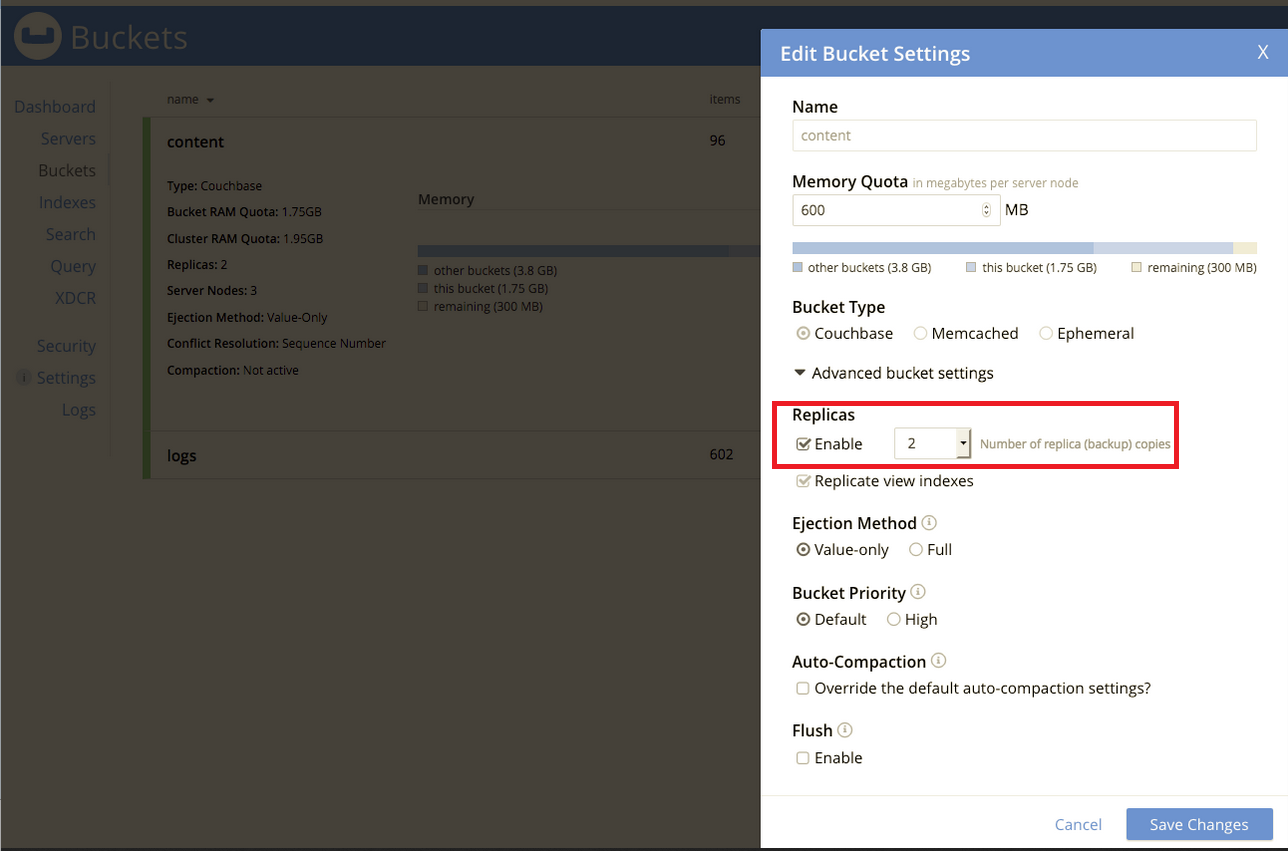
After the second worker is added, set the number of replicas to "2" on each bucket (content and logs) in the Couchbase Administrator user interface and click :
-
Rebalance the cluster by navigating to the Servers section of the Couchbase Administrator user interface and clicking the Rebalance button:


Code Example: docker-compose-override.yml
PowerFlow uses a docker-compose-override.yml file to persistently store user-specific configurations for containers, such as proxy settings, replica settings, additional node settings, and deploy constraints. The user-specific changes are kept in this file so that they can be re-applied when the /opt/iservices/scripts/docker-compose.yml file is completely replaced on an RPM upgrade, ensuring that no user-specific configurations are lost.
If you are running PowerFlow in a cluster, these files should always be the same between all manager nodes. With this in place, if any manager node dies, you can re-deploy with the same settings from any other manager node.
The following section includes a complete example of the /opt/iservices/scripts/docker-compose-override.yml file for a three-node Couchbase and RabbitMQ clustered deployment:
NOTE: If shared volumes are available in the cluster, the deploy placement can be omitted and removed.
version: '3.2'
services:
  steprunner:
    environment:
      db_host: couchbase.isnet,couchbase-worker2.isnet,couchbase-worker.isnet

  scheduler:
    environment:
      db_host: couchbase.isnet,couchbase-worker2.isnet,couchbase-worker.isnet

  couchbase:
    environment:
       db_host: 'couchbase.isnet'
    deploy:
      placement:
        constraints:
          - node.hostname == <swarm node hostname>
    networks:
      isnet:
        aliases:
          - couchbase
          - couchbase.isnet
    hostname: couchbase.isnet

  couchbase-worker:
    image: sciencelogic/is-couchbase:1.7.0
    container_name: couchbase-worker
    volumes:
      - "/var/data/couchbase:/opt/couchbase/var"
    ports:
      - "8100:8091"
    deploy:
      replicas: 0
      placement:
        constraints:
          - node.hostname == <swarm node hostname>
    networks:
      isnet:
        aliases:
          - couchbase-worker
          - couchbase-worker.isnet
    hostname: couchbase-worker.isnet
    secrets:
      - is_pass
      - encryption_key
    environment:
       TYPE: 'WORKER'
       AUTO_REBALANCE: 'true'
       db_host: 'couchbase'

  couchbase-worker2:
    image: sciencelogic/is-couchbase:1.7.0
    container_name: couchbase-worker2
    ports:
      - "8101:8091"
    volumes:
      - "/var/data/couchbase:/opt/couchbase/var"
    deploy:
      replicas: 0
      placement:
        constraints:
          - node.hostname == <swarm node hostname>
    networks:
      isnet:
        aliases:
          - couchbase-worker2
          - couchbase-worker2.isnet
    hostname: couchbase-worker2.isnet
    secrets:
      - is_pass
      - encryption_key
    environment:
       TYPE: 'WORKER'
       AUTO_REBALANCE: 'true'
       db_host: 'couchbase'
  rabbitmq:
    image: sciencelogic/is-rabbit:3.7.7-1
    hostname: rabbit_node1.isnet
    volumes:
       - "rabbitdb:/var/lib/rabbitmq"
    networks:
       isnet:
         aliases:
           - rabbit
           - rabbit_node1.isnet
    deploy:
       placement:
         constraints:
           - node.hostname == <swarm node hostname>
  rabbitmq2:
     image: sciencelogic/is-rabbit:3.7.7-1
     hostname: rabbit_node2.isnet
     volumes:
       - "rabbitdb2:/var/lib/rabbitmq"

     networks:
       isnet:
         aliases:
           - rabbit
           - rabbit_node2.isnet
     deploy:
       placement:
         constraints:
           - node.hostname == <swarm node hostname>
  rabbitmq3:
     image: sciencelogic/is-rabbit:3.7.7-1
     hostname: rabbit_node3.isnet
     volumes:
       - "rabbitdb3:/var/lib/rabbitmq"

     networks:
       isnet:
         aliases:
           - rabbit
           - rabbit_node3.isnet
    deploy:
       placement:
         constraints:
           - node.hostname == <swarm node hostname>
  contentapi:
    environment:
       db_host: 'couchbase.isnet,couchbase-worker.isnet,couchbase-worker2.isnet'

  pypiserver:
     image: sciencelogic/is-pypi:4.8.0-1
     hostname: devpi
     container_name: devpi
     volumes:
        - "devpi:/data"
     networks:
        isnet:
           aliases:
              - pypiserver
     secrets:
        - is_pass
  dexserver:
    image: scr.sl1.io/is-dex:2.18.0-1
    ports:
      - "5556:5556"
      - "5558:5558"
    command: ["serve", "/dexConfiguration.yaml"]
    networks:
      isnet:
        aliases:
          - dexserver
    configs:
      - source: dex_config
        target: /dexConfiguration.yaml
volumes:
  rabbitdb2:
  rabbitdb3:
  devpi:
configs:
  dex_config:
    file: /etc/iservices/dexConfiguration.yaml
Scaling iservices-contentapi
To scale out the iservices-contentapi to distribute the service across the three nodes, run the following command:
docker service scale iservices-contentapi=3
Manual Failover
If you have a cluster with three or more nodes that is not configured with automatic failover, you must perform the following manual failover steps.
NOTE: If you can access the Couchbase Administrator user interface (https://<IP of PowerFlow>:8091) on the node that is still running, you can simply click the button in the Couchbase Administrator user interface instead of manually running the couchbase-cli commands below.
NOTE: In a three-node cluster, a single failed node will be automatically removed, you will still need to perform a re-balance.
Initiating Manual Failover
To initiate a manual failover:
-
Log in to the Docker Swarm node where the node that is running resides.
-
Run the following command on that node to see which node IDs exist:
docker node ls
-
Remove any failed manager nodes from the cluster by running the following Docker commands:
docker swarm init --force-new-cluster
docker node rm <failed node id>
-
Run the following command to identify the Container ID of the running Couchbase container:
docker ps
-
Connect to the Docker container:
docker exec -i -t <container id> /bin/bash
-
Use the instance of Couchbase that is up by running the following commands:
couchbase-cli server-list -c <operating-couchbase-node> -u isadmin -p <password>
where <operating-couchbase-node> could be one of the following:
-
couchbase.isnet
-
couchbase-worker.isnet
-
couchbase-worker2.isnet
-
-
One of the previous commands will show a failed node. Copy the IP address and port number of the failed node for step 7.
-
Use the currently running cluster and the failed node's IP address and port to run the following command to failover:
couchbase-cli failover -c <operating-couchbase-worker> -u isadmin -p <password> --server-failover <isnet name:8091> --force
For example, if the operating node is couchbase-worker, and the isnet name:port of the failed service is couchbase.isnet:8091, then the command would be:
couchbase-cli failover -c couchbase-worker -u isadmin -p <password> --server-failover couchbase.isnet:8091 --force
If the surviving node is couchbase-worker2 and the contentapi is in a waiting state, restart couchbase-worker2 to reset the connection and resolve the API waiting. Run the following command: docker service update --force iservices_couchbase-worker2
-
Rebalance the cluster using the functioning container name:
couchbase-cli rebalance -c <operating-couchbase-worker> -u isadmin -p <password>
-
In the unlikely event that a failover occurs and no queries can be performed, validate that the indexes exist, and if not, rebuild them. To rebuild the primary indexes, run the following commands:
cbq -u isadmin
CREATE PRIMARY INDEX ON content;
CREATE PRIMARY INDEX ON logs;
Creating a primary index is only for troubleshooting, and primary indexes should not be left on the system.
Recovering a Docker Swarm Node
To recover a Docker Swarm node:
-
Restart the node.
-
If manual failover actions were taken while this node was offline, be sure to force the node to leave the swarm now that the node is back online by running the following command:
docker swarm leave --force
-
Follow the steps in Configuring Docker Swarm to add the node back to the existing swarm by obtaining the join-token from the manager.
Restoring a Couchbase Node
You should take the restoration actions in this topic only after a manual or automatic failover has been performed and the node has been completely removed from the cluster( the node should not be visible in the user interface or server-list).
If the surviving node is a worker node, you will need to update docker-compose.yml to restore the node. The following updates to docker-compose.yml ensure that the couchbase service is told to join the node that is currently up and running:
couchbase:
...
environment:
JOIN_ON: "couchbase-worker2"
This process defaults to couchbase-worker. As a result, this update is only needed when the only surviving node is couchbase-worker2, couchbase-worker3, couchbase-worker4, and so on. Also, this process only relates to re-clustering nodes that have been removed.
To restore the failed Couchbase node:
-
Log in to the node where the failed Couchbase cluster node was pinned.
-
Run one of the following commands, depending on the Couchbase node being recovered:
- docker service scale iservices_couchbase=0
- docker service scale iservices_couchbase-worker=0
-
If the Docker Swarm node was restored and not rebuilt, remove files from the old container:
rm -rf /var/data/couchbase/*
docker service scale iservices_couchbase=1
A new node is added to Couchbase that will automatically re-balance the cluster after it is added.
If the server is not completely removed from the cluster and is just waiting to be added back, you may do so using the Couchbase user interface, or by running healthcheck and autoheal actions with the powerflowcontrol (pfctl) command-line utility.
-
After all nodes in a cluster are running, be sure to perform healthcheck and autoheal actions with the powerflowcontrol (pfctl) command-line utility to re-validate the cluster and re-set configurations such as replication and index counts. For more information, see healthcheck and autoheal.
If the master node goes down, the Synchronization PowerPacks for the PowerFlow system might not display. This is because the pypiserver is constrained by default to one master node, so it does not start on workers if that master node goes down. To address this issue after completing the failover steps, above, you can re-import the Synchronization PowerPacks.
Additional Configuration Information
Optimization Settings to Improve Performance of Large-Scale Clusters
In large-scale clusters, one of the root causes of abnormal memory and CPU usage is from inter-worker communication overhead, or overly "chatty" workers, and their event queues. You can completely disable inter-worker eventing to significantly reduce overhead on the queuing system and prevent the symptoms associated with abnormal memory usage.
Also, to improve the performance of large-scale clusters by default, the following optimization settings were added to the docker-compose.yml file for all workers in version 2.0.1 of the PowerFlow platform:
steprunner-<worker-x>:
  environment:
    additional_worker_args: "--max-tasks-per-child 1 --without-gossip --without-mingle"
In addition to the default optimization settings above, you can further reduce system overhead by setting the --without-heartbeat environment variable in additional_worker_args. Please note that this setting will reduce the memory and CPU utilization of the system, but it will come at the cost of preventing the Flower service from getting an accurate depiction of current worker states.
If you want to disable these new configuration settings, set the environment variable "disable_default_optimizations" to "True" for all workers.
Workers will continue to generate events for consumption from monitoring tools like Flower even with the new default configuration settings. In some extremely large clusters, you might want to completely disable eventing of workers completely, especially if Flower is not in use. To completely disable worker eventing, set the environment variable "disable_events" to "True".
For more information, see https://docs.celeryproject.org/en/latest/reference/celery.bin.worker.html#cmdoption-celery-worker-without-gossip
Additional suggestions for improving performance in large-scale clusters:
-
Assess the impact of using Flower before keeping it enabled for a long period of time. Running Flower can cause increased overhead on the RabbitMQ nodes, but the overhead is not significant initially. However, the overhead generated by Flower will continue to increase as more workers are added to the stack, and those workers send events to Flower.
-
ScienceLogic recommends that you monitor memory and queue utilization before and after running Flower with your current environment size to determine whether the extra overhead provided is worth the task information it provides.
-
If a system event causes workers to restart, it is possible that all workers constantly restarting at the same time, every 0 seconds will generate increased load on the system, making it difficult for other services to start up. To prevent this, it is recommended to add a restart_delay to workers to prevent a "rush" of hundreds of workers trying to re-connect over the network all at once. For example:
steprunner-<worker-x>:
  deploy
    restart_policy:
      delay: 30s
Exposing Additional Couchbase Cluster Node Management Interfaces over TLS
The is_gui container acts as a reverse proxy to the internal services and their individual management interfaces. This container configured in /etc/nginx/conf.d/default.conf.
To expose the management interfaces of additional Couchbase nodes within a cluster:
-
Copy the configuration from the gui container:
docker cp <container id>:/etc/nginx/conf.d/default.conf ./
-
Edit the configuration to include the desired services:
server {
    listen       8092 ssl;
    server_name  couchbase-worker;

location = / {
  return 301 https://$host:8092/ui/index.html;
}

 location / {
  resolver 127.0.0.11 valid=5s;
  set $upstream couchbase-worker.isnet;
  proxy_pass http://$upstream:8092$request_uri;
  proxy_pass_header Server;
  proxy_pass_header Cache-Control;
  proxy_pass_header Content-Length;
  proxy_pass_header Connection;
  proxy_pass_header Pragma;
  proxy_pass_header ns-server-ui;
  proxy_pass_header invalid-auth-response;
}
    ssl_certificate     /etc/iservices/is_cert.pem;
    ssl_certificate_key /etc/iservices/is_key.pem;
    ssl_protocols       TLSv1.2;
    ssl_ciphers         'ECDHE-ECDSA-AES256-GCM-SHA384:ECDHE-RSA-AES256-GCM-
SHA384:ECDHE-ECDSA-CHACHA20-POLY1305:ECDHE-RSA-CHACHA20-POLY1305:ECDHE-ECDSA-AES128-
GCM-SHA256:ECDHE-RSA-AES128-GCM-SHA256:ECDHE-ECDSA-AES256-SHA384:ECDHE-RSA-AES256-
SHA384:ECDHE-ECDSA-AES128-SHA256:ECDHE-RSA-AES128-SHA256';
    ssl_prefer_server_ciphers on;
    ssl_session_cache shared:SSL:20m;
    ssl_session_timeout 180m;
    add_header Strict-Transport-Security "max-age=31536000" always;
}
-
Create the following Dockerfile:
FROM sciencelogic/is_gui
COPY ./default.conf /etc/nginx/conf.d/default.conf
-
Build the container with the new configurations:
docker build -t <customer>/is_gui:<PowerFlow version>-1 -f Dockerfile
-
Add the image name to the is_gui section in the docker-compose-override.yml file, and do a Docker stack deploy to enable the new is_gui container.
Restricting the Number of Replicas
If you use the max-replica-per-node option in the docker-compose-override file to restrict the number of replicas that will run in each Swarm node, you should also specify more than one replica for the replicas option.
ScienceLogic recommends using three replicas for the gui service: one running on each of the core nodes. The default max-replica-per-node value is 1 for the gui service.
For the gui service, the max_replicas_per_node option is set, but the gui service is not pinned to the core nodes using labels. If there are more than three nodes (core and worker nodes) the gui service replicas will run in any node, so you will need to add a restriction to the docker-compose-override file, such as the following:
placement:
  constraints:
    - node.labels.types == master
If you update the docker-compose-override file, you will need to redeploy the corresponding service. In the example below, you will need to redeploy the gui service after you update the override file:
gui:
  deploy:
    replicas: 3
    ...
    placement:
      max_replicas_per_node: 1
  environment:
    ...
You can also configure the max_replicas_per_node option for the contentapi, dexserver and steprunners services, and any other PowerFlow services that have more than one replica.
The max-replica-per-node option is available with docker-compose 3.8 or later. Add version: '3.8' at the start of the docker-compose file to ensure compatibility.
HAProxy Configuration (Optional)
As a convenience, ScienceLogic provides an example configuration for the HAProxy load balancer below. Please note that it is your responsibility to configure the load balancer. ScienceLogic cannot be held responsible for any deployments that deviate from the example HAProxy load balancer configuration.
The following example configuration describes using HAProxy as a load balancer:
defaults
    mode                    http
    log                     global
    option                  httplog
    option                  dontlognull
    option http-server-close
    option                  redispatch
    retries                 3
    timeout http-request    1m
    timeout queue           1m
    timeout connect         1m
    timeout client          1m
    timeout server          1m
    timeout http-keep-alive 10s
    timeout check           10s
    maxconn                 6000

frontend http_front
  bind *:80
  bind *:443
  option tcplog
  mode tcp
  tcp-request inspect-delay 5s
  default_backend http_back

frontend dex_front
  bind *:5556
  option tcplog
  mode tcp
  tcp-request inspect-delay 5s
  default_backend dex_back
frontend  devpi_front
  bind *:3141
  option tcplog
  mode tcp
  tcp-request inspect-delay 5s
  default_backend  devpi_back

backend http_back
  mode tcp
  balance roundrobin
  server master1 <docker swarm node 1 ip>:443 check
  server master2 <docker swarm node 2 ip>:443 check
  server master3 <docker swarm node 3 ip>:443 check

backend dex_back
  mode tcp
  balance roundrobin
  server master1 <docker swarm node 1 ip>:5556 check
  server master2 <docker swarm node 2 ip>:5556 check
  server master3 <docker swarm node 3 ip>:5556 check


backend devpi_back
  mode tcp
  balance roundrobin
  server master1 <docker swarm node 1 ip>:3141 check
  server master2 <docker swarm node 2 ip>:3141 check
  server master3 <docker swarm node 3 ip>:3141 check
Known Issues
The following section describes the known issues you might encounter with the High Availability solution and how to address those issues.
Docker Network Alias is incorrect
If you experience issues with the iservices_contentapi container, the Alias IP might be incorrect.
To address this issue, run the following commands on the relevant node:
docker service scale iservices_contentapi=0
docker service scale iservices_contentapi=1 (or another number as needed)
This issue was addressed in the docker-ce 18.06 version of Docker, which is required for version 1.8.0 of PowerFlow.
Docker container on last swarm node cannot communicate with other swarm nodes
This is an issue with the Encapsulating Security Payload (ESP) protocol not being enabled in firewalld. You can enable the ESP protocol with the firewalld docker-swarm script.
To address this issue, add the following firewall rule to each node:
firewall-cmd --add-protocol=esp --permanent
firewall-cmd --reload
Couchbase service does not start, remains at nc -z localhost
To address this issue, stop the container where this is happening and remove its persistent volume:
rm -rf /var/data/couchbase
Couchbase-worker fails to connect to master
A connection failure might happen a few times when a stack is freshly deployed. You can ignore these messages, and the worker should eventually connect to the master.
Couchbase database stops unexpectedly and the disk is full
If you are running large or customized workloads, you might encounter a situation where Couchbase stops unexpectedly because the disk is full. To prevent this situation, review the considerations in What should I do if the Couchbase disk is full, indexer is crashing, and the database is unusable?.
Couchbase rebalance fails with "Rebalance exited" error
In this situation, you received the following error:
Rebalance exited with reason {service_rebalance_failed,index,
{linked_process_died,<12807.821.0>,
{no_connection,"index-service_api"}
}}
If the Couchbase rebalance fails on the initial rejoin of a failed node into a cluster, you should check the index states and wait until the indexes are no longer in a warmup state. After the indexes are created on that node, the rebalance should succeed.
When setting up a three-node High Availability Couchbase cluster, the second node does not appear
In this situation, if you have cloned any of the nodes, the nodes might think that there is a split-brain condition.
To address this issue, delete the Couchbase data on the newly added nodes by running the following command on each node:
rm -rf /var/data/couchbase/*
The PowerFlow user interface fails to start after a manual failover of the swarm node
To address this issue, run the following commands on the relevant node:
docker stack rm iservices
systemctl restart docker
docker stack deploy -c docker-compose.yml iservices
The PowerFlow user interface returns 504 errors
Ensure that your PowerFlow systems have been updated with yum upgrade.
NTP should be used, and all node times should be in sync
If all nodes time are not in sync, you might experience issues with the iservices_steprunners.
The following is an example of a Docker Swarm error caused by the time not being in sync:
Error response from daemon: certificate (1 - 2v4umws4pxag6kbxaelwfl3vf) not valid before Fri, 30 Nov 2018 13:47:00 UTC, and it is currently Fri, 30 Nov 2018 06:41:24 UTC: x509: certificate has expired or is not yet valid
For more information, see Preparing the PowerFlow System for High Availability.
Example Logs from Flower
iservices_flower.1.jg6glaf298d2@is-scale-05 | [W 181023 20:17:40 state:113] Substantial drift from celery@1ee384863e37 may mean clocks are out of sync. Current drift is iservices_flower.1.jg6glaf298d2@is-scale-05 | 18 seconds. [orig: 2018-10-23 20:17:40.090473 recv: 2018-10-23 20:17:58.486666]