![]()
This
This
Workflow for Configuring the Integration with the ServiceNow Service Graph Connector
The following workflows describe how to configure ServiceNow and PowerFlow to work with the Synchronization PowerPack.
Configuring the ServiceNow Instance
- Configure the Service Graph Connector for ScienceLogic.
- Create a ServiceNow Group.
- Create a ServiceNow User.
Configuring the PowerFlow System
- Install the ServiceNow Service Graph Connector Synchronization PowerPack and its dependencies.
- Create a configuration object in the PowerFlow user interface.
- Align the new configuration object with the following PowerFlow applications:
- "Cache SL1 Device Classes"
- "Sync Devices from SL1 to ServiceNow via SGC"
- "Post to SGC"
- "Cache SL1 Device Classes"
- "Sync Devices from SL1 to ServiceNow via SGC"
Configuring the Service Graph Connector for ScienceLogic
In ServiceNow, you can use the Guided Setup process to configure the Service Graph Connector for ScienceLogic.
-
In ServiceNow, go to Service Graph Connector for ScienceLogic > Guided Setup. The ScienceLogic Integration with CMDB page appears:

-
In the Integration Account section, click and complete the tasks in order.
-
Click button to configure each task.
-
After you complete each task, click .

-
After you finish all the tasks in the Integration Account section, go to the PowerFlow Setup section and click :

-
These PowerFlow tasks are described in the following sections of this manual:


- Install the ServiceNow Service Graph Connector Synchronization PowerPack and its dependencies.
- Create a configuration object in the PowerFlow user interface.
- Align the new configuration file with the PowerFlow applications for this Synchronization PowerPack.
- Run the "Cache SL1 Device Classes" application.
- Run the "Sync Devices from SL1 to ServiceNow via SGC" application.
- After you complete each task in PowerFlow, click in the PowerFlow Setup section in ServiceNow.
- When are done with all the tasks in the PowerFlow Setup section, continue to the next topic, "Creating a ServiceNow Group".
Creating a ServiceNow Group
For best practice and security, create a dedicated ServiceNow account that has restricted access to only the groups, access control lists (ACLs), and roles needed for ScienceLogic integration.
To create a ServiceNow Account for ScienceLogic integration:
- In ServiceNow, search in the filter navigator for "groups".
- On the Groups page (System Security > Groups), click . A New record page appears.
-
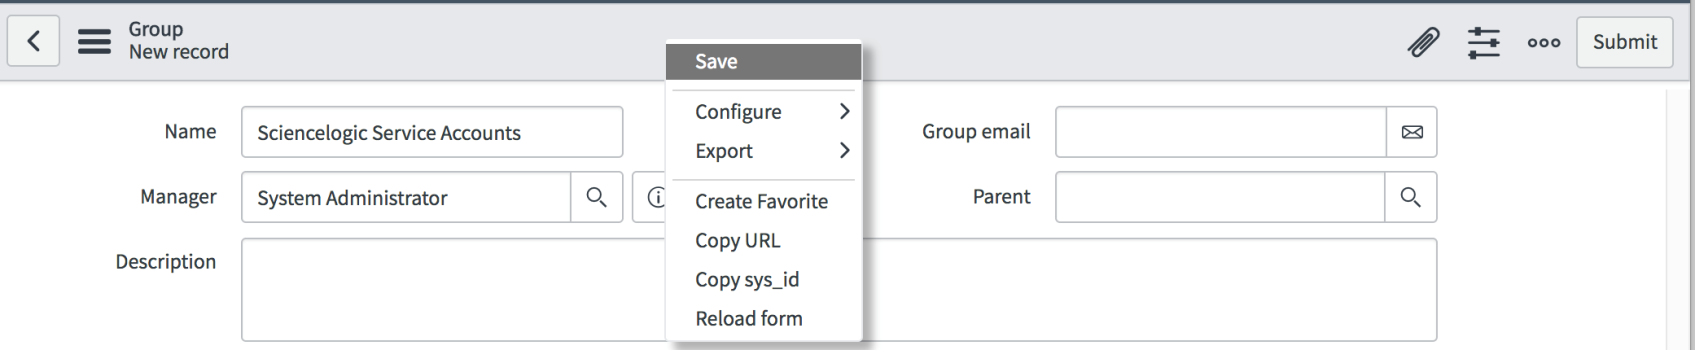
In the New record page, type the group name and any additional information. Name is the only required field:


-
Right-click the gray header and click Save to save the record.

-
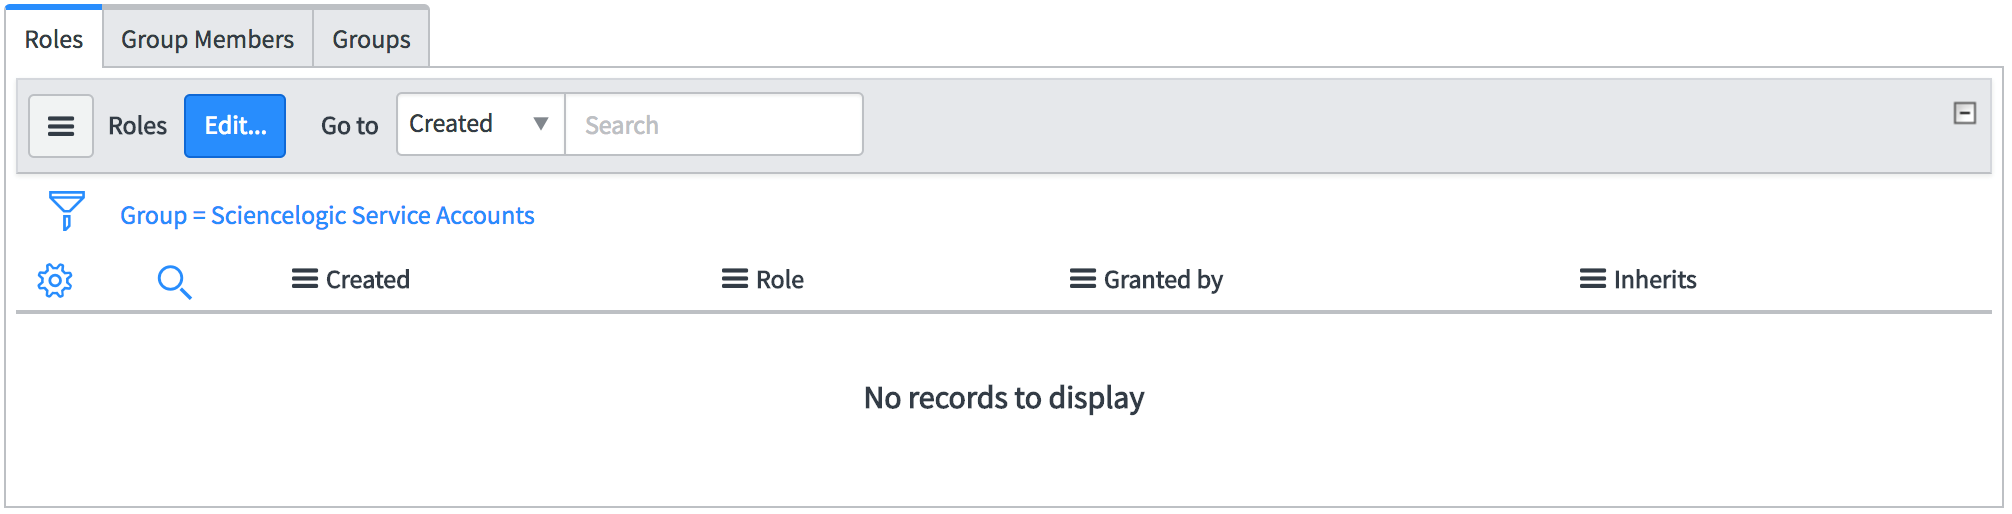
At the bottom of the Group form, select the tab and click

-
Search for cmdb_import_api_admin and x_sclo_devicesync.admin and move them to the Roles List column using the arrow buttons:


-
Click . Your ServiceNow Group now has two assigned Roles:


- Next, create a ServiceNow user to use with this Group. See the following procedure for the details.
Creating a ServiceNow User
NOTE: The ServiceNow user you create in this procedure will not be able to log into the ServiceNow user interface with the username and password you give this user. However, you will use the username and password in the relevant configuration objects in the PowerFlow user interface to run applications. For more information about configuration objects, see Creating and Aligning a Configuration Object.
To create a ServiceNow Account for ScienceLogic Incident management:
- In ServiceNow, search in the filter navigator for "users".
- On the Users page (System Security > Users), click . A New record page appears.
- Complete the following fields:
- User ID. Type a user ID. Required.
- First Name. Type the user's first name.
- Last Name. Type the user's last name.
- Password. Type a password. Required.
- Active. Select this checkbox. Required.
- Web Service Access Only. Select this checkbox. Required.
- Time Zone. Select GMT. Required.
- Date Format. Select System (yyyy-MM-dd).
- Right-click the gray header and click Save to save the user.
-
Select the tab at the bottom of the record and click the button:


-
Find the group you created previously and move the group to the right-hand column using the arrow buttons:


-
Click . After the user has been added to the group, you can see their Roles and Groups at bottom of the record:


NOTE: As a best practice, you should use a non-administrator ServiceNow user for the PowerFlow configuration object.
Creating and Aligning a Configuration Object
A configuration object supplies the login credentials and other required information needed to execute the steps for an application in PowerFlow. The Configurations page (![]() ) of the PowerFlow user interface lists all available configuration objects for that system.
) of the PowerFlow user interface lists all available configuration objects for that system.
You can create as many configuration objects as you need. A PowerFlow application can only use one configuration object at a time, but you can use (or "align") the same configuration object with multiple PowerFlow applications.
To use this Synchronization PowerPack, you will need to create one or more configuration objects in the PowerFlow user interface and align that configuration object to the applications that let you sync data between SL1 and ServiceNow.
Depending on your SL1 and ServiceNow environments, you might be able to use the same configuration object with other ServiceNow Synchronization PowerPacks.
When either multiple SL1 stacks or multiple ServiceNow systems are involved with PowerFlow, you should create an individual configuration object for each SL1 stack or ServiceNow system. Next, create an individual schedule for each configuration object. Each schedule should use a configuration object that is specific to that single SL1 stack or ServiceNow system. Creating copies of a PowerFlow application from a Synchronization PowerPack for the purpose of distinguishing between domains is not supported, and will result in issues on upgrades.
Creating a Configuration Object
For this Synchronization PowerPack, you can make a copy of the "ServiceNow SyncPack" configuration object, which is the sample configuration file that was installed with the ServiceNow Base Synchronization PowerPack.
The "ServiceNow SyncPack" configuration object contains all of the required variables. Make a copy of the configuration object and update the variables from that object to match your SL1 and ServiceNow settings.
To create a configuration object based on the "ServiceNow SyncPack" configuration object:
- In the PowerFlow user interface, go to the Configurations page (
 ).
). -
Click the button (
 ) for the "ServiceNow SyncPack" configuration object and select Edit. The Configuration pane appears:
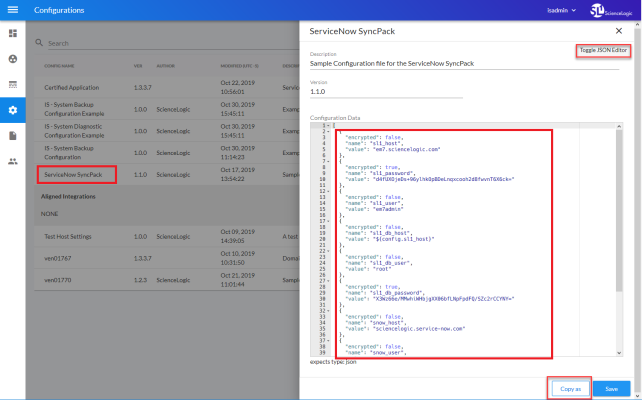
Click to show the JSON code. Click the button again to see the fields.

-
Click . The Create Configuration pane appears.
This step is required. Do not use the original configuration object to run PowerFlow applications.
-
Complete the following fields:
- Friendly Name. Name of the configuration object that will display on the Configurations page.
- Description. A brief description of the configuration object.
- Author. User or organization that created the configuration object.
- Version. Version of the configuration object.
-
In the Configuration Data field, include the required block of code to ensure that the applications aligned to this configuration object do not fail:
{
"encrypted": false,
"name": "<sl1_db_host?",
"value": "${<config.sl1_host>}"
}
For example:
{
"encrypted": false,
"name": "sl1_db_host",
"value": "10.2.11.42"
}
If you are using IPv6 for IP addresses, wrap the IP string in brackets, such as https://[2001:db8:3333:4444:5555:6666:7777:8888]
Click to show the JSON code. Click the button again to see the fields. You can also click and add a new name-value pair in the Configuration Data Values section.
If you are using SL1 with an External Database (SL1 Extended architecture or a cloud-based architecture), update the "value" of that block of code to be the host of your database. This field accepts IP addresses. For example: "value": "db.sciencelogic.com". If you are not using the SL1 Extended architecture or a cloud-based architecture, you do not need to make any changes to the block of code other than pasting the code into the configuration object.
-
In the Configuration Data Values field, update the default variable definitions to match your PowerFlow configuration.
The region value is a user-defined variable that identifies your SL1 instance within ServiceNow.
- To create a configuration variable in the JSON Editor, define the following keys:
- encrypted. Specifies whether the value will appear in plain text or encrypted in this JSON file. If you set this to "true", when the value is uploaded, PowerFlow encrypts the value of the variable. The plain text value cannot be retrieved again by an end user. The encryption key is unique to each PowerFlow system. The value is followed by a comma.
- name. Specifies the name of the configuration file, without the JSON suffix. This value appears in the user interface. The value is surrounded by double-quotes and followed by a comma.
- value. Specifies the value to assign to the variable. The value is surrounded by double-quotes and followed by a comma.
- Click . You can now align this configuration object with one or more applications.
Aligning a Configuration Object
Before you can run the applications in this Synchronization PowerPack, you must first "align" a configuration object with those applications. The applications you need to align include the following:
- Cache SL1 Device Classes. Reads all existing SL1 Device Classes and writes them to a cache. You must run this application before you run the "Sync Devices from SL1 to ServiceNow via SGC" application.
- Sync Devices from SL1 to ServiceNow via SGC. Syncs devices and their organizations and relationships from SL1 to ServiceNow.
The first time you run both of these applications, ScienceLogic recommends that you run them on Debug Mode to help you identify any misconfigurations.
To align a configuration object with an application:
-
From the Applications page of the PowerFlow user interface, open the relevant application and click (
 ). The Configurations pane for that application appears:
- From the Configuration drop-down, select the configuration object you want to use.
- Click to align that configuration with the application.
- Wait for the "App & Config modifications saved" pop-up message to appear. The Configuration automatically closes after this message appears.
- Repeat this process for the remaining PowerFlow applications in this Synchronization PowerPack.
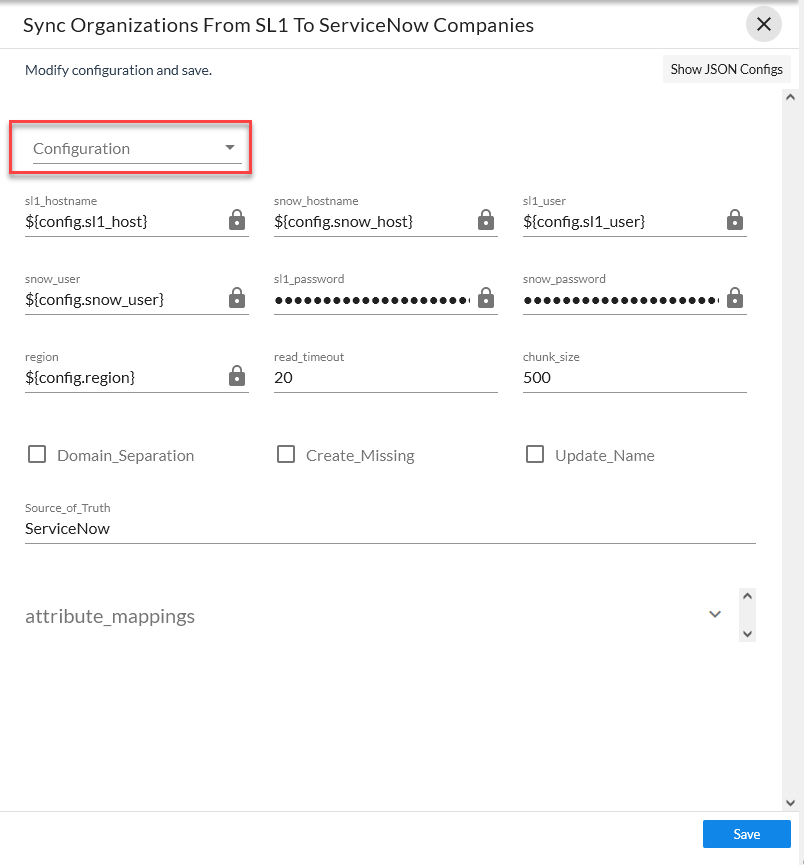
The values for eventDetails and the other parameters that appear in the Configuration pane with a padlock icon (![]() ) are populated by the configuration object. Do not modify these values.
) are populated by the configuration object. Do not modify these values.
Managing Organizations
Two fields are used to select a company. The first non-null value returned will be used for the company. These fields include the following, in order:
-
CRM ID. The org_crm_id supplied is validated using a lookup of the sys_id to validate that the sys_id match is found on the core company table.
-
Name: The org_name is used in a lookup to find a matching name on the core company table.
Syncing Devices from SL1 to ServiceNow
To perform a Device Sync between SL1 and ServiceNow, run the following applications in the PowerFlow user interface:
- Cache SL1 Device Classes. Reads all existing SL1 Device Classes and writes them to a cache.
- Sync Devices from SL1 to ServiceNow via SGC. Syncs devices and their organizations and relationships from SL1 to ServiceNow.
Currently, all data is being synced from SL1 to ServiceNow only.
To sync SL1 devices with ServiceNow:
-
In the PowerFlow user interface, select the "Cache SL1 Device Classes" application from the Applications page, click (
 ), align a configuration object, and then click (
 ).
). -
Select the "Sync Devices from SL1 to ServiceNow via SGC" application from the Applications page and click (
). The Configuration pane appears:
-
Complete the following fields, as needed:

-
Configuration. Select the configuration object with the relevant SL1 and ServiceNow credentials to align with this application. You cannot edit fields that are populated by the configuration object. Required.
The region field (along with other fields related to user names and passwords) is populated by the configuration object you aligned with this application. The region value must match the value in the SL1 Region field in ServiceNow. If you need to update this value, you will need to define the region variable in the configuration object that is aligned with this application, or align a different configuration object that has the correct region value.
-
read_timeout. Specify the maximum amount of time in seconds that the application should wait for a response before timing out. The default is 20 seconds. If the Device Sync continually times out, you might want to increase the timeout to 120 seconds, as this sync can be data-intensive.
Scroll past the mappings section to access the next set of fields. For more information about the mappings section, go to step 6.
- Include_Orgs. If you want to include SL1 Organizations in the device sync, add the Organization IDs from SL1 in this field, separated by commas. Leave this field empty to sync all SL1 Organizations.
- Include_CUGs. If you want to include SL1 Collector Groups (CUGs) in the device sync, add the Collector Group IDs from SL1 in this field, separated by commas. Leave this field empty to sync all SL1 Collector Groups.
- exclude_inactive. Select this option to prevent syncing devices to ServiceNow that are disabled, unavailable, or in maintenance. By default, this field is not selected.
- enable_device_active. Select this option to enable the Device Active block in the device GraphQL query, which contains information about the active state of the SL1 device. By default, this field is not selected. Accessing this data in the attribute mappings requires a Jinja2 Template.
-
enable_asset_networks. Select this option to enable the assetNetworks block in the device GraphQL query, which returns a list of asset networks. By default, this field is not selected. Accessing this data in the attribute mappings requires a Jinja2 Template.
Please note that enabling this option might cause performance issues on the SL1 side.
- sl1_chunk_size. Specify the number of devices to include in each chunk sent to in the SL1 GraphQL query when you run this application. The default chunk size is 100 devices.
-
gql_filter. Using JSON, define a custom GraphQL filter to apply to the devices in the sync. To test a GraphQL filter, go to the GraphiQL interface in SL1 by typing the URL or IP address for SL1 in a browser, add /gql to the end of the URL or IP address, and press . Search the built in GraphQL docs for DeviceSearch and determine how to set up your custom filter. An example of a Device Search query using JSON: {"name": {"doesNotBeginWith": "jc-is-ma"}}
- sl1_url_override. Update this field if you want to use an URL that is different from the standard SL1 URL that gets sent to the ServiceNow CI record. Optional.
- excluded_devices. Type a list of comma-separated device names or device IDs for any devices that you want to exclude from the device sync. Optional.
- selected_devices. If you want to sync a sub-set of all discovered devices, type a comma-separated list of the Device IDs from SL1 for only the devices that you want to sync. Leave this field empty to sync all SL1 devices.
- lookup_chunk_size. Specify the number of devices in each chunk when pulling the device cache from Couchbase. The default is 10 devices.
-
snow_chunk_size. Specify the number of devices per chunk to post to ServiceNow when you run this application. The default chunk size is 5000 devices.
Scroll down to the bottom of the Configuration pane to access the following fields.
-
all_devices_template. Add a Jinja2 Template to apply to all devices. The result must be a dictionary (Key | Value pair) and will then be included in each JSON device object.
- retry_max. The maximum number of times PowerFlow will retry to execute the step before it stops retrying and logs a step failure. For example, if retry_max is 3, PowerFlow will retry after 1 second, then 2 seconds, then 4 seconds, and stop if the last retry fails. The default is 0.
- retry_jitter. Instead of using a defined interval between retries, the PowerFlow system will retry the step execution at random intervals. The default is unselected.
- retry_backoff. Instead of using a defined interval between retries, PowerFlow will incrementally increase the interval between retries. The default is unselected.
- retry_backoff_max.The maximum time interval for the retry_backoff option, in seconds. For example, This means, if you have retry_max set to 15, the delays will be 1, 2, 4, 8, 16, 32, 64, 120, 240, 480, 600, 600, 600, 600, and 600. The default is 600.
-
The sgc_uri_categories and the sgc_category_overrides sections lets you send specific SL1 Device Classes to a custom transform target within ServiceNow:
-
In the sgc_uri_categories section, you can map from a category name or a tag to a ServiceNow import table.
-
In the sgc_category_overrides section, you can map from the category names or tags in the first section to Device Classes.
You can use the default settings in these two sections without making any changes. ScienceLogic recommends that only advanced users edit or create new mappings in these sections. Any Device Classes that are not listed in these sections will be included in the default "Hardware" rule.
-
- Click and wait for the "App & Config modifications saved" pop-up message to appear. The Configuration pane automatically closes after this message appears.
- Run the "Sync Devices from SL1 to ServiceNow via SGC" application. If this is the first time you are running this application, run it a second time to build the internal cache.
Known Issues
This section covers known issues with this release of the Synchronization PowerPack.
Adding or Checking Hosting Dependent Relationships
Versions of the ServiceNow CMDB CI Class Models application older than version 1.30.0 do not include the following two relationships, which are required for correct mapping:
cmdb_ci_vcenter_datastore:
| Parent Class | Relationship | Child Class |
|---|---|---|
| ESX Resource Pool | Hosted on::Hosts | Logical Datacenter |
cmdb_ci_esx_resource_pool:
| Parent Class | Relationship | Child Class |
|---|---|---|
| VMware vCenter Datastore | Hosted on::Hosts | Logical Datacenter |
These two relationships are included in version 1.30.0 and later of the ServiceNow CMDB CI Class Models application. You can download the application from the ServiceNow Store.
In addition, not all classes are mapped. Only a limited set of classes are handled by default. Currently, if not specified, all classes from SL1 will be sent to the physical hardware import table.
Known Issue with VMware Sync
Base ServiceNow Discovery of VMware is incompatible with the VMware mapping in this Synchronization PowerPack. At the request of ServiceNow, PowerFlow lines up VMware with the cloud management model for mapping, which is different if you do not have the cloud management plugin installed.
In the future, ServiceNow will update Base ServiceNow discovery for VMware to bring it in line with cloud management mapping.
For more information about addressing specific issues, see the Troubleshooting chapter.
Additional Known Issues
The Physical Robust transform map will filter out devices that do not have virtual type of Physical:
| Virtual Types |
|
Physical |
|
Component |
|
Virtual |
|
DCMR (PowerFlow-generated) |
|
Cloud service account (PowerFlow-generated) |
Physical Hardware and Hardware within ServiceNow do not line up exactly. There is some "best guess" handling when OIDs do not match to get the Device close to the correct class in ServiceNow.
Also, the OID list within ServiceNow and ScienceLogic do not always match up, which might cause some devices to either end up on the hardware table or a "best guess".
Scheduling PowerFlow Applications
You can create one or more schedules for a single application in the PowerFlow user interface. When creating each schedule, you can specify the queue and the configuration file for that application.
To schedule an application:
-
On the Applications page (
 ), click the button for the application you want to schedule. The Schedule window appears, displaying any existing schedules for that application:
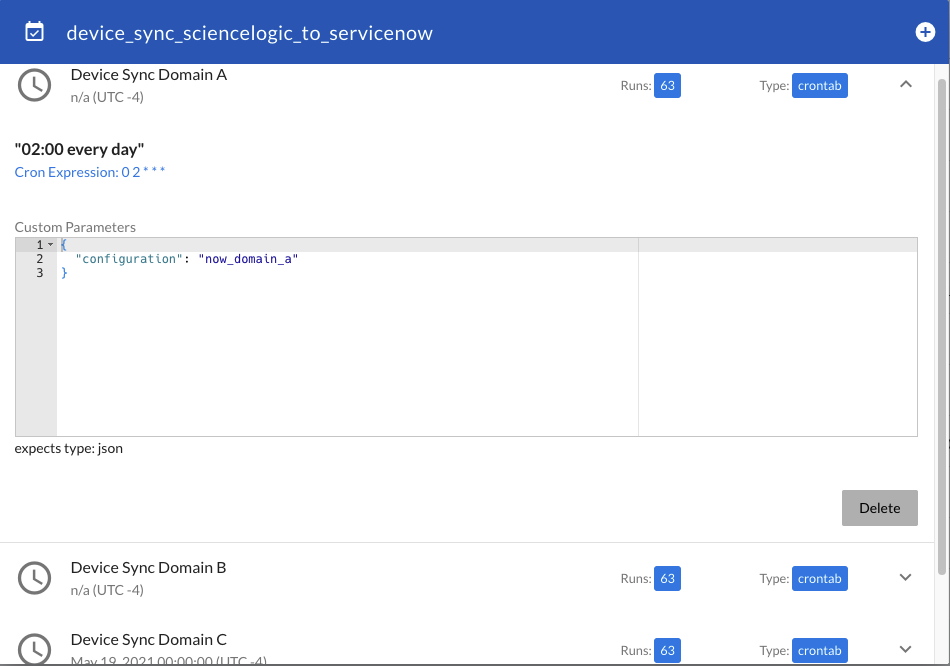
If you set up a schedule using a cron expression, the details of that schedule display in a more readable format in this list. For example, if you set up a cron expression of */4 * * * *, the schedule on this window includes the cron expression along with an explanation of that expression: "Every 0, 4, 8, 12, 16, 20, 24, 28, 32, 36, 40, 44, 48, 52, and 56th minute past every hour".
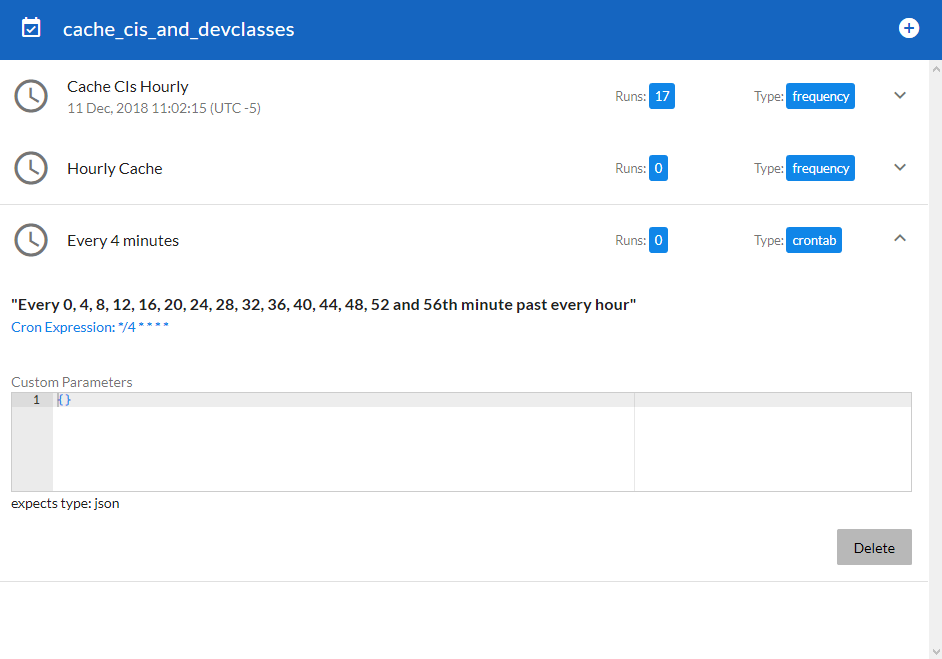
- Select a schedule from the list to view the details for that schedule.
-
Click the + icon to create a schedule. A blank Schedule window appears:
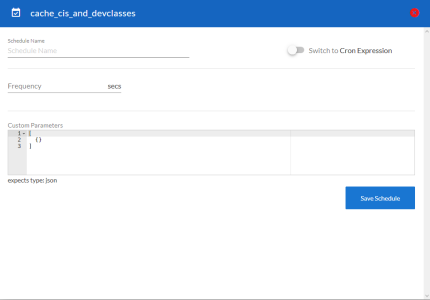

- In the Schedule window, complete the following fields:
- Schedule Name. Type a name for the schedule.
- Switch to. Use this toggle to switch between a cron expression and setting the frequency in seconds.
- Cron expression. Select this option to schedule the application using a cron expression. If you select this option, you can create complicated schedules based on minutes, hours, the day of the month, the month, and the day of the week. As you update the cron expression, the Schedule window displays the results of the expression in more readable language, such as Expression: "Every 0 and 30th minute past every hour on the 1 and 31st of every month", based on */30 * * /30 * *.
- Frequency in seconds. Type the number of seconds per interval that you want to run the application.
- Custom Parameters. Type any JSON parameters you want to use for this schedule, such as information about a configuration file or mappings.
-
Click . The schedule is added to the list of schedules on the initial Schedule window. Also, on the Applications page, the word "Scheduled" appears in the Scheduled column for this application, and the button contains a check mark:

After you create a schedule, it continues to run until you delete it. Also, you cannot edit an existing schedule, but you can delete it and create a similar schedule if needed.
To view or delete an existing schedule:
- On the Applications page, click the button for the application that contains a schedule you want to delete. The Schedule window appears.
-
Click the down arrow icon (
 ) to view the details of an existing schedule:
- To delete the selected schedule, click .
When either multiple SL1 stacks or multiple ServiceNow systems are involved with PowerFlow, you should create an individual configuration object for each SL1 stack or ServiceNow system. Next, create an individual schedule for each configuration object. Each schedule should use a configuration object that is specific to that single SL1 stack or ServiceNow system. Creating copies of a PowerFlow application from a Synchronization PowerPack for the purpose of distinguishing between domains is not supported, and will result in issues on upgrades.
The following image shows how you can schedule PowerFlow applications for multiple ServiceNow domains: