Use the following menu options to navigate the SL1 user interface:
- To view a pop-out list of menu options, click the menu icon (
).
- To view a page containing all the menu options, click the Advanced menu icon (
).
The following video covers infrastructure monitoring with advanced event suppression:
Responding to Events
When events occur, there are multiple ways you can respond to them:
- Acknowledge. Lets other users know that you are aware of an event and are working on a response.
- Add a Note. Adds additional text to an event. Notes can be displayed in the Events page and can be included in automation actions.
- Clear. Removes an instance of an event from the Events page. The cleared instance is no longer displayed.
- Suppress. Specifies that if the event occurs again on the same device, the event will not be displayed in the Events page.
- Disable. Specifies that if the event occurs on any device or is triggered by any application or policy, the event will not appear in the Event Console.
Selecting Multiple Events
On the Events page, you can use the checkboxes to the left of the event to select more than one event at a time. After you select the events, you can click the or button at the bottom of the page to acknowledge or clear those events simultaneously.
If you do not want to acknowledge or clear the selected events, click the button to deselect the checkboxes.
If you want to select all of the events that are currently showing on the tab, click the button.
Acknowledging and Clearing Events
When you acknowledge an event, you let other users know that you are aware of that event, and you are working on a response.
When you clear an event, you let other users know that this event has been addressed. Clearing an event removes a single instance of the event from the Events page. If the event occurs again on the same device, it will reappear in the Events page.
If the same event occurs again on the same device, it will appear in the tab, even if you have previously cleared that event.
When you acknowledge a parent event, all masked events under that parent event are also acknowledged.
To acknowledge and clear events:
- To acknowledge an event, find the event on the page and click the button for that event. Your user name replaces the button for that event:
You can also click the button in a specific event's Investigator page.
- To see when an event was acknowledged and who acknowledged it, hover your mouse over an acknowledged field.
- If an event was acknowledged by another user and you have the relevant permissions, you can click the button to acknowledge that event.
- To clear an event, click the button. The event is removed from the Events page.
If you want to hide the or buttons on the Events page, click the Select Columns icon () and deselect those columns.
Viewing and Editing Event Notes
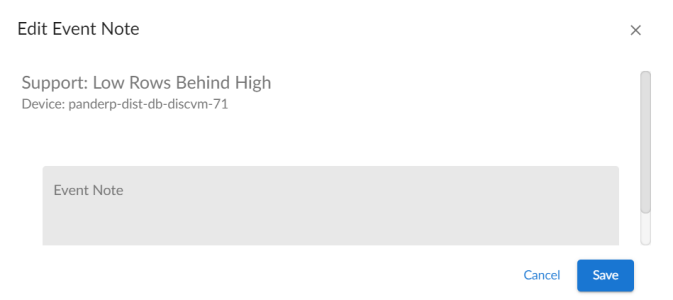
From the Events page, you can access event notes, which contain event definitions, probable causes, and resolutions for the event, along with a text field where you can add more information about the event or the device you are monitoring. If event notes already exist for that event, the opening text of that note appears in the Event Note column of the Events page.
To view or edit an event note:
- On the Events page, click the Note icon (
) for that event. The Edit Event Note window appears:
You can also edit an event note on the Events page by clicking the button () for that event and selecting Edit Event Note. This is helpful if you have hidden the Event Note column on the Events page.
- Type your additional text for the event note and then click . The event note is updated.
Viewing the Event Policy
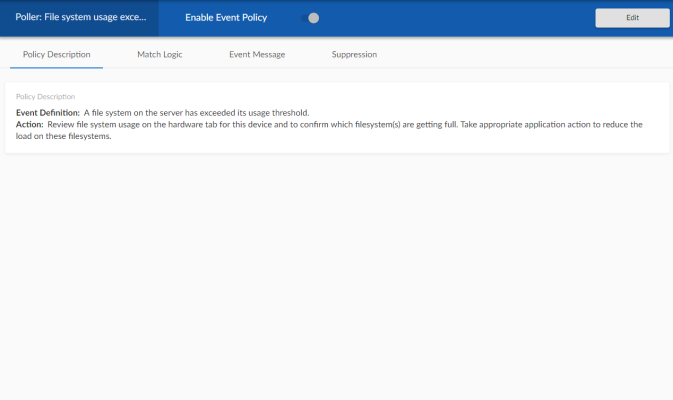
From the Events page, you can view the Event Policy for an event, which allows you to view a description of the policy, enable or disable the policy, and edit policy details.
To view an Event Policy from the Events page:
-
On the Events page, click the Actions menu (
) for that event and select View Event Policy. The Event Policy Editor page appears for that event:
- Click the button to edit the Event Policy. For more information, see Defining and Editing Event Policies.
Suppressing and Unsuppressing an Event for a Device
When you suppress an event, you are specifying that in the future, if this event occurs again on the same device, the event will not appear in the Events page or the Events tab for a device.
If a suppressed event occurs on a different device, it will appear in the Events page and on the Events tab for that different device.
When you suppress an event, the current instance of the event still appears in the Events. To remove the current instance from the event console, clear the event
NOTE: To suppress an event, accounts of type "user" must be granted one or more access keys that include the following access hooks: Events/Event:View and Event:Clear. Accounts of type "user" will then be able to view and suppress events that belong to the same organization(s) as the user. For more information on access hooks, see the
Suppressing an Event
To suppress an event:
- Go to the Events page.
- Click the Actions button (
) for the event you want to suppress and select Suppress Event for this Device. In the future, if this event occurs again on the same device, the event will not appear in the Events page.
NOTE: Users of type "user" can view only suppressed events that are aligned with the same organization(s) to which the user is aligned. Users of type "administrator" can view all suppressed events.
Suppressing an Event on Multiple Devices
When you suppress an event on multiple devices, you are specifying that, in the future, if this event occurs again on any of those devices, the event will not appear in the Events page or in the Viewing Events page for any of those devices.
To suppress an event on multiple devices:
- Go to Event Policies page (Events > Event Policies).
- In the Event Policies page, select the Actions menu (
) of the event policy you want to edit and select Edit.
- The selected event policy is displayed in the Event Policy Editor page, where you can edit one or more properties of the event policy.
- Click the tab.
- On the tab, you can select the devices or device groups on which to suppress the event. To do so:
- Click to select one or more devices on which to suppress the event. When you click , the Available Devices modal page appears. Select the checkboxes of the devices you want to add to the suppression list, and then click .
- Click to select one or more device groups on which to suppress the event. When you click , the Available Device Groups modal page appears. Select the checkboxes of the device groups you want to add to the suppression list, and then click .
- Click .
Unsuppressing an Event
On the Event Suppression List page (Events > Suppressions), you can view a list of all suppressed events in SL1 and choose to unsuppress one or more of those events. When you unsuppress an event, if this event occurs again on the same device, the event will appear in the Events page.
NOTE: To unsuppress an event, accounts of type "user" must be granted one or more access keys that include the following access hooks: Registry, Registry>Events>Suppressions, and Event:Suppressions. Accounts of type "user" will then be able to view a list of suppressed events that belong to the same organization as the user. Accounts of type "user" will also be able to unsuppress one or more of these suppressed events. For more information on access hooks, see the
To unsuppress an event:
- Go to the Event Suppression List page (Events > Suppressions).
- Select the checkbox for each event you want to unsuppress.
- In the Select Action drop-down menu, in the lower right, select DELETE Suppression.
- Click . In the future, if the unsuppressed event occurs again on the same device, the event will appear in the Events page.
Unsuppressing All Instances of an Event
You can simultaneously unsuppress all instances of an event. That is, if a single event has been suppressed for multiple devices, you can unsuppress the event on all devices. In the future, if the unsupressed event occurs again on any device, the event will appear in the Events page.
NOTE: To unsuppress an event on all devices, accounts of type "user" must be granted one or more access keys that include the following access hooks: Registry, Registry>Events>Event Manager, and Event:Add/Rem. Accounts of type "user" will then be able to access the Event Policies page and unsuppress one or more events on all devices. For more information on access hooks, see the
To unsuppress an event on all devices:
- Go to the Event Policies page (Events > Event Policies).
- Select the checkbox for the event you want to unsuppress on all devices.
- Click . In the future, if the unsuppressed event occurs again on any device, it will appear in the Events page or in the Viewing Events page for the device.
Enabling and Disabling Events
You can simultaneously disable one or more events on all devices. When an event is disabled, it will no longer appear in the Events page for any devices. You can also enable an event that has been disabled.
NOTE: To disable or enable an event on all devices, accounts of type "user" must be granted one or more access keys that include the following access hooks: Registry, Registry>Events>Event Manager, and Event:Add/Rem. Accounts of type "user" will then be able to access the Event Policies page and enable one or more events on all devices. For more information on access hooks, see the
Disabling Events
To disable one or more events:
- Go to the Event Policies page (Events > Event Policies).
- Select the checkboxes for the events you want to disable.
- Click . The selected events will no longer appear in SL1 for any device, application, or policy.
Enabling Events
To enable one or more events:
- Go to the Event Policies page (Events > Event Policies).
- Select the checkboxes for the events you want to enable.
- Click . The selected event(s) will once again appear in SL1.
Creating a Ticket from an Event
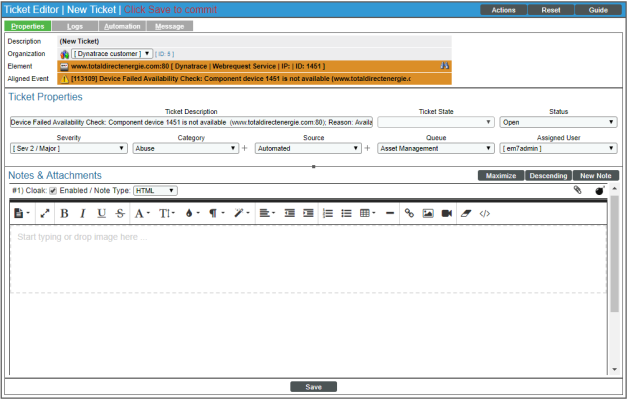
On the Events page, you can create a ticket from an event by clicking the button () for that event and selecting Create Ticket. The Ticket Editor appears. For more information about creating a ticket from the Events page, see the Creating a Ticket from the List of Events section.
Responding to Events in the Event Console in the Classic SL1 User Interface
The Event Console page in the classic user interface allows you to acknowledge new events as they are detected by the system. Acknowledging an event lets other users know that you are aware of the event and working to resolve it.
When an event has been acknowledged, the acknowledging user's name appears in the Acknowledged column. This lets other users know that someone is investigating or taking action on the event.
NOTE: To acknowledge an event, accounts of type "user" must be granted one or more access keys that include the following access hooks: Events/Event:View and Event: Acknowledge. Accounts of type "user" will then be able to view and acknowledge events in the same organization(s) as the user. For more information on Access Keys, see the
When you acknowledge a parent event, all masked events under that parent event are also acknowledged. For more information about parent/child events and masked events, see
To acknowledge a single event:
- Go to the tab in the classic user interface.
- In , find the event you want to acknowledge and click on the gray checkmark icon (
 ) in the Acknowledged column for that event.
 - A red checkmark icon (
 ) and your username will appear in the Acknowledged column for that event.
- You can also acknowledge an event that has already been acknowledged by another user. To do this, click on the red checkmark icon (
 ). Your username will now appear in the Acknowledged column for that event, replacing the username of the person who previously acknowledged the event.
To acknowledge multiple events:
- In , select the checkbox in the far right column for each event that you want to acknowledge.
- For each acknowledged event, a red checkmark icon (
 ) and your username will appear in the Acknowledged column.
NOTE: Users cannot unacknowledge an event. Another person can acknowledge the event to change the name associated with the acknowledged event, but you cannot remove an acknowledgment.
Adding a Note About an Event
You can add brief notes to an event in . Each note will appear in the Note column for an event. SL1 does not keep a historical record of each note.
NOTE: A note can be included in an action policy by using the %_user_note variable. For details on creating automation policies and action policies,
To create or edit a note for an event:
- In , find the event to which you want to add a note.
- In the Note column for that event, click on the wrench icon (
 ).
).
- In the Add a Note modal page, enter the note text. Click to save the note.
- The new or edited text appears in the Note column for the event.
Adding a Note to Multiple Events
You can add a brief note to multiple events simultaneously and/or overwrite existing notes for multiple events. The note will appear in the Note column for each event and in the Note field in the Event Information page for each event. SL1 does not keep a historical record of each note.
NOTE: A note can be included in an action policy by using the %_user_note variable. For details on creating automation policies and action policies,
To create or edit a note for multiple events:
- In , find the events for which you want to add a note and/or overwrite the existing note.
- For each event that you want to add and/or edit a note, select the checkbox in the last column.
- In the Select Action drop-down field, select Add/Update Event Note, then click the button.
- In the Add a Note modal page, enter the text for the note. Click the button.
- The new or edited text appears in the Note column for each selected event.
Clearing One or More Events
When you clear an event, you remove only a single instance of the event from the current display in . If the event occurs again on the same entity, it will reappear in .
NOTE: To clear an event, accounts of type "user" must be granted one or more access keys that include the following access hooks: Events/Event:View and Event: Clear. Accounts of type "user" will then be able to view and clear events in the same organization(s) as the user. For more information on access hooks, see the
To clear an event:
- Go to the tab.
- In , select the checkbox for each event you want to clear. To select all events in an organization, click the checkmark icon above each organization's group of events.
- When you successfully clear an event, it will no longer appear in .
NOTE: The Event Clearing Mode option in the Behavior Settings page (System > Settings > Behavior) affects how rolled up events and suppressed events can be cleared. For details, see the
Suppressing an Event on a Single Device
When you suppress an event in the classic SL1 user interface, you are specifying that in the future, if this event occurs again on the same device, the event will not appear in the Event Console page or the Viewing Events page for a device.
If a suppressed event occurs on a different device, it will appear in the Event Console page and on the Viewing Events page for that different device.
When you suppress an event, the current instance of the event still appears in the Event Console. To remove the current instance from the event console, clear the event (see the section Clearing One or More Events).
NOTE: To suppress an event, accounts of type "user" must be granted one or more access keys that include the following access hooks: Events/Event:View and Event:Clear. Accounts of type "user" will then be able to view and suppress events that belong to the same organization(s) as the user. For more information on access hooks, see the
To suppress an event in the classic SL1 user interface:
- Go to the tab.
- In the Event Console, click the information icon (
 ) for the event you want to suppress.
 - In the Event Information page, click the menu and select Suppress Event for this Device.
- In the future, if this event occurs again on the same device, the event will not appear in the Event Console page.
NOTE: Users of type "user" can view only suppressed events that are aligned with the same organization(s) to which the user is aligned. Users of type "administrator" can view all suppressed events.
Suppressing an Event On Multiple Devices
When you suppress an event on multiple devices, you are specifying that, in the future, if this event occurs again on any of those devices, the event will not appear in the Event Console page or in the Viewing Events page for any of those devices.
To suppress an event on multiple devices in the classic SL1 user interface:
- Go to the Event Policy Manager page (Registry > Events > Event Manager).
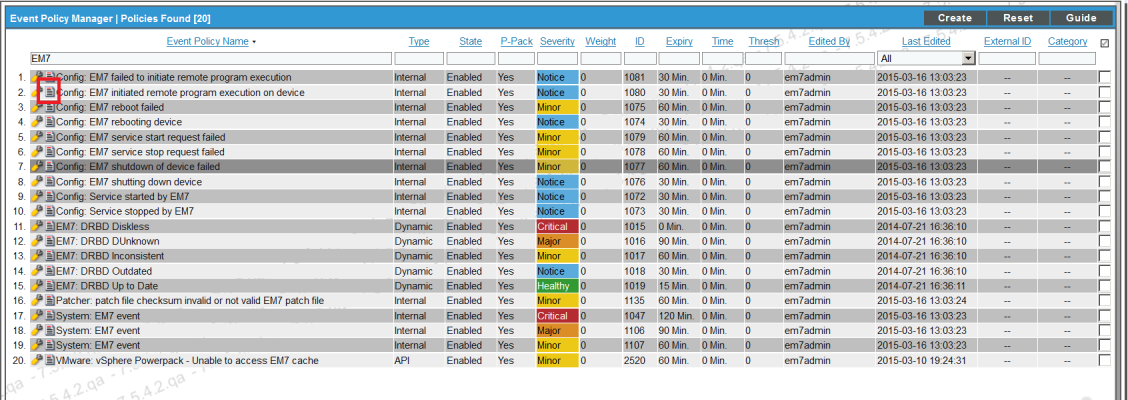
- In the Event Policy Manager page, select the page icon (
 ) of the event you want to suppress.
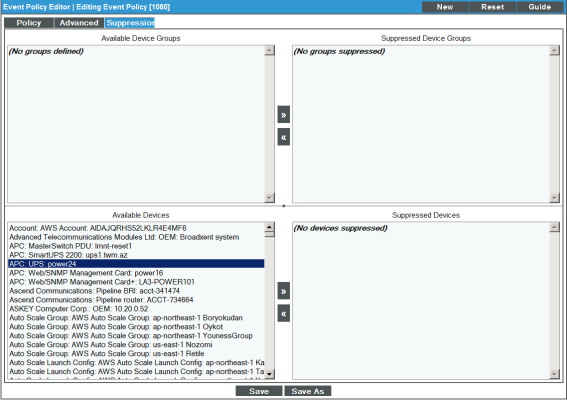
- The Event Policy Editor page appears, with the Suppressions tab selected.
- In the Suppressions tab, you can select the devices or device groups on which to suppress the event. To do so:
- Select one or more device groups in the Available Device Groups field and then click the right arrow button () so those groups appear in the Suppressed Device Groups field.
- Select one or more devices in the Available Devices field and then click the right arrow button () so those devices appear in the Suppressed Devices field.
- Click .
In the future, if the event occurs on one of the selected devices, the event will not appear in the Event Console page or in the Viewing Events page for the device.
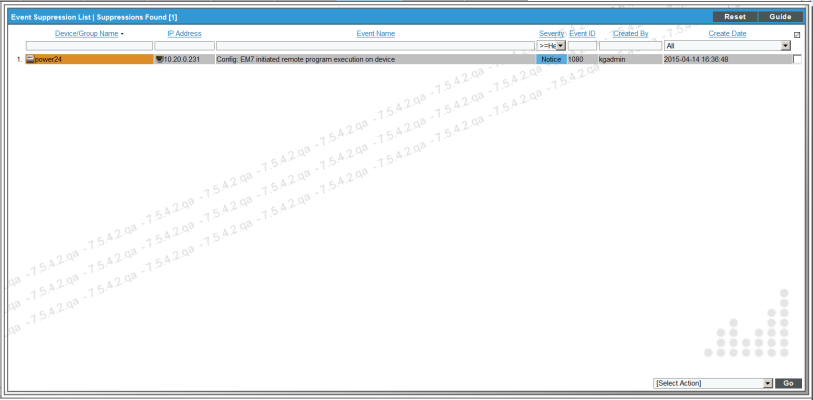
The suppressed event will appear in the Event Suppression List page (Registry > Events > Suppressions).
Unsuppressing an Event
You can view a list of all suppressed events in SL1 and choose to unsuppress one or more of those events. When you unsuppress an event, if this event occurs again on the same device, the event will appear in the Events page (or the Event Console page in the classic SL1 user interface) .
NOTE: To unsuppress an event, accounts of type "user" must be granted one or more access keys that include the following access hooks: Registry, Registry>Events>Suppressions, and Event:Suppressions. Accounts of type "user" will then be able to view a list of suppressed events that belong to the same organization as the user. Accounts of type "user" will also be able to unsuppress one or more of these suppressed events. For more information on access hooks, see the
To unsuppress an event:
- Go to the Event Suppression List page (Registry > Events > Suppressions).
- In the Event Suppression List page, select the checkbox for each event you want to unsuppress.
- In the Select Action drop-down menu, in the lower right, select DELETE Suppression.
- Click the button.
- In the future, if the unsuppressed event occurs again on the same device, the event will appear in the Events page (or the Event Console page in the classic SL1 user interface) .
Unsuppressing All Instances of an Event
You can simultaneously unsuppress all instances of an event. That is, if a single event has been suppressed for multiple devices, you can unsuppress the event on all devices. In the future, if the unsupressed event occurs again on any device, the event will appear in the Event Console page.
NOTE: To unsuppress an event on all devices, accounts of type "user" must be granted one or more access keys that include the following access hooks: Registry, Registry>Events>Event Manager, and Event:Add/Rem. Accounts of type "user" will then be able to access the Event Policy Manager page and unsuppress one or more events on all devices. For more information on access hooks, see the
To unsuppress an event on all devices in the classic SL1 user interface:
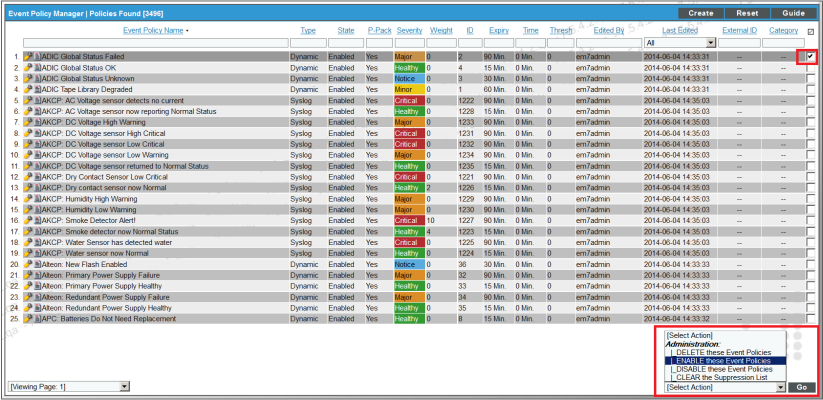
- Go to the Event Policy Manager page (Registry > Events > Event Manager).
- In the Event Policy Manager page , select the checkbox for the event you want to unsuppress on all devices.
- In the Select Action drop-down menu select CLEAR the Suppression List.
- Click the button.
In the future, if the unsuppressed event occurs again on any device, it will appear in the Event Console page or in the Viewing Events page for the device.
Disabling an Event
You can simultaneously disable one or more events on all devices. When an event is disabled, it will no longer appear in the Event Console for any devices.
NOTE: To disable an event on all devices, accounts of type "user" must be granted one or more access keys that include the following access hooks: Registry, Registry>Events>Event Manager, and Event:Add/Rem. Accounts of type "user" will then be able to access the Event Policy Manager page and disable one or more events on all devices. For more information on access hooks, see the
To disable one or more events in the classic SL1 user interface:
- Go to the Event Policy Manager page (Registry > Events > Event Manager).
- In the Event Policy Manager page , select the checkbox for each event you want to disable.
- In the Select Actions drop-down list, select DISABLE these Event Policies.
- Click the button.
The selected event(s) will no longer appear in SL1 for any device, application, or policy.
Enabling an Event
You can simultaneously disable one or more events on all devices. When an event is disabled, it will no longer appear in the Event Console for any devices. You can also enable an event that has been disabled.
NOTE: To enable an event on all devices, accounts of type "user" must be granted one or more access keys that include the following access hooks: Registry, Registry>Events>Event Manager, and Event:Add/Rem. Accounts of type "user" will then be able to access the Event Policy Manager page and enable one or more events on all devices. For more information on access hooks, see the
To enable one or more events in the classic SL1 user interface:
- Go to the Event Policy Manager page (Registry > Events > Event Manager).
- In the Event Policy Manager page , select the checkbox for each event you want to enable.
- In the Select Actions drop-down list, select ENABLE these Event Policies.
- Click the button. The selected event(s) will once again appear in SL1.

