![]()
This
Starting with SL1 version 11.2.0, the PhoneHome Communication configuration process for SL1 Collectors has been moved to Installing and Configuring an SL1 Collector. The PhoneHome page in the Web Configuration Utility in SL1 version 11.2.0 contains a link that redirects you to the tab of the Nodes page in SL1. The procedures in this chapter are not compatible with the new procedures for SL1 version 11.2.0 or later that are covered in that chapter.
The PhoneHome configuration process for SL1 Database Servers did not change in SL1 version 11.2.0, and updates to the PhoneHome command-line interface for SL1 version 11.2.0 are covered in this chapter.
Use the following menu options to navigate the SL1 user interface:
- To view a pop-out list of menu options, click the menu icon (
 ).
). - To view a page containing all the menu options, click the Advanced menu icon (
 ).
).
The following topics cover the details of configuring PhoneHome Communication:
What is PhoneHome Communication?
SL1 supports two methods for communication between Database Servers and the Data Collectors and Message Collectors in a system:
The traditional method. The Database Server initiates communication with each Data Collector and Message Collector. The Database Server periodically pushes configuration data to the Data Collectors and Message Collectors and retrieves data from the Data Collectors and Message Collectors. The collector administrator must allow ingress communication from the Database Server on port 7707. The communication is encrypted using SSL whenever possible.
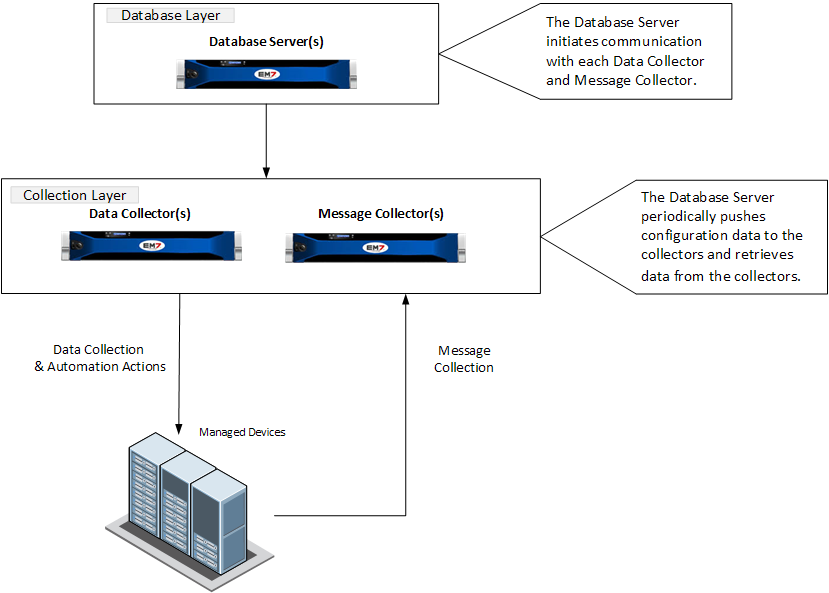
The benefit of the traditional method is that communication to the Database Server is extremely limited, so the Database Server remains as secure as possible.
The PhoneHome method.The Data Collectors and Message Collectors initiate communication with the Database Server. The Data Collectors and Message Collectors create an SSH tunnel. The Database Server uses the SSH tunnel to periodically push configuration data to the Data Collectors and Message Collectors and retrieve data from the Data Collectors and Message Collectors.

The benefits of this method are that no firewall rules must be added on the network that contains the Data Collectors, and no new TCP ports are opened on the network that contains the Data Collectors.
The PhoneHome configuration uses public key/private key authentication to maintain the security of the Database Server. Each Data Collector is aligned with an SSH account on the Database Server and uses SSH to communicate with the Database Server. Each SSH account on the Database Server is highly restricted, has no login access, and cannot access a shell or execute commands on the Database Server.
Prerequisites
Before configuring PhoneHome communication in your ScienceLogic environment, you must:
- Have SSH access or console access to each database.
- On each ScienceLogic appliance, know the username and password for access to the console as em7admin.
- Ensure that the Database Server opens a port for PhoneHome communication. The default port used by the Configuration Utility is 7705, but you can use other ports besides 7705.
NOTE: If you use a proxy in your PhoneHome configuration, perform the steps in the proxy section before configuring the other steps in the PhoneHome configuration. The remaining configuration steps require the proxy for communication.
Overview of the PhoneHome Configuration
For a configuration that includes one or more Database Servers, perform the following steps to use PhoneHome communications:
-
Configure one or more Database Servers for PhoneHome. Each Database Server must have SL1 installed, have an IP address, and be licensed with ScienceLogic.
NOTE: If you are using a High Availability and Disaster Recovery configuration, see Configuring PhoneHome for High Availability and Disaster Recovery to configure Database Servers.
-
Configure the Data Collectors and Message Collectors for PhoneHome. Each Data Collector or Message Collector must have SL1 installed and have an IP address.
Starting with SL1 version 11.2.0, the PhoneHome Communication configuration process for SL1 Collectors has been moved to Installing and Configuring an SL1 Collector. The PhoneHome page in the Web Configuration Utility in SL1 version 11.2.0 contains a link that redirects you to the tab of the Nodes page in SL1. The procedures in this chapter are not compatible with the new procedures for SL1 version 11.2.0 or later that are covered in that chapter.
-
Define the Database Server associated with each Data Collector or Message Collector appliance.
-
As needed, define port forwarding for each collector to use SSH from the Database Server to access that Data Collector or Message Collector.
-
See the Troubleshooting section for additional help.
Configuring the Database Server for PhoneHome
In PhoneHome communication, the Database Server communicates with the Data Collectors and the optional Message Collectors. The Database Server stores all the configuration information for the PhoneHome configuration.
In 8.14.0 or later releases, PhoneHome configuration is stored in tables on the Database Server. The information is accessible to all Database Servers in the SL1 system. Any Database Server in the SL1 system can provide network access.
To configure a Database Server for PhoneHome communication, you must first perform the following required steps:
-
Install the SL1 on the Database Server.
-
Assign an IP address to the Database Server.
-
License the Database Server with ScienceLogic. For more information, see Licensing and Configuring a Database Server.
You do not need to license the Database Server for appliances running SL1 version 11.2.0.
Next, configure the Database Server for PhoneHome communication:
- Go to the console of the Database Server or use SSH to access the server.
- Log in as user em7admin with the password you configured during setup.
- For the Database Server, you must open a port to accept incoming connection requests. To do this, type the following at the shell prompt:
sudo phonehome open-control-port port_number
where port_number is an unused port number greater than 1000. The Configuration Utility uses port 7705 as the default port. If you want to use the default port, specify 7705 in this command. To use a different port, specify that port number in this command.
- To define the Database Server (to itself), type the following at the shell prompt:
sudo phonehome add database
- Review the output, which should look like the following:
Created local: #0
Reloading sshd configurations
Created database: #11
Changing password for user: "phonehome11"
Created Device Id: "11"
Created token: "phonehome://11@71.97.6.197/ee4sdRRK8yNu"
- Note the ID number for the database (11 in our example).
- If the database is behind a firewall, you need to define the public-facing IP address of the Database Server and also define the port to use for SSH communication from PhoneHome servers to the Database Server. To do this, type the following at the shell prompt:
sudo phonehome set appliance_ID -ip=IP_address -port=port_number
where appliance_ID is the value you noted in step 6, IP_address is the public-facing IP address, and port_number is the port you want to use for SSH communication to and from the Database Server.
For example:
sudo phonehome set 11 -ip=71.197.6.197 -port=7705
- You must now configure the Data Collectors and Message Collectors in your network. To do this, go the next section.
Configuring the Data Collectors and Message Collectors for PhoneHome
Starting with SL1 version 11.2.0, the configuration process for SL1 Collectors was updated. For detailed procedures about configuring a collector, see Installing and Configuring an SL1 Collector.
This section describes how to configure a Data Collector and a Message Collector for use in a PhoneHome configuration
Before configuring a Data Collector and a Message Collector for use in a PhoneHome configuration, you must first perform the following required steps:
- Install SL1 on each Data Collector and Message Collector
- Assign an IP address to each Data Collector and Message Collector
NOTE: If your PhoneHome configuration uses proxy servers, do not use this section to configure a Data Collector or Message Collector. See the section on proxy servers instead.
To configure a Data Collector or Message Collector as part of a PhoneHome configuration:
- On the Data Collector or Message Collector, log in to the Web Configuration Utility using any web browser supported by SL1. The address of the Web Configuration Utility is in the following format:
https://<IP_address_of_collector>:7700
- Type the address of the Web Configuration Utility in the Address bar of your browser, replacing <IP_address_of_collector> with the IP address of the Data Collector or Message Collector.
- When prompted to enter your user name and password, log in as the "em7admin" user with either the default password of em7admin or the password you configured.
- After you log in, the Configuration Utilities page appears:
- Click the button. The PhoneHome - Collector page appears.

- Complete the following fields:
- Hostname/IP. Type the Hostname or IP address of the Database Server that is configured for PhoneHome.
- Port (if not 7705). Optional. Port number for SSH communications with the Database Server that is configured for PhoneHome. If you are using a port other than 7705 on the Database Server, type the port number in this field. Otherwise, leave this field blank.
- Click the button to send the request from the Data Collector to the Database Server that is configured for PhoneHome. After clicking the button, the PhoneHome - Collector page displays the status Pending database approval.
NOTE: Do not close the browser window or navigate away from this page while the connection request is being processed.
- In a new browser window, open the ScienceLogic Web Configuration Utility for the Database Server. To do this, type the following, replacing "ip-address-of-database" with the IP address of the Database Server:
https://<IP_address_of_database>:7700
- When prompted to enter your username and password, log in as the "em7admin" user with either the default password of em7admin or the password you configured. The main Configuration Utility page appears.
- Click the button. The PhoneHome Database - Master page appears.
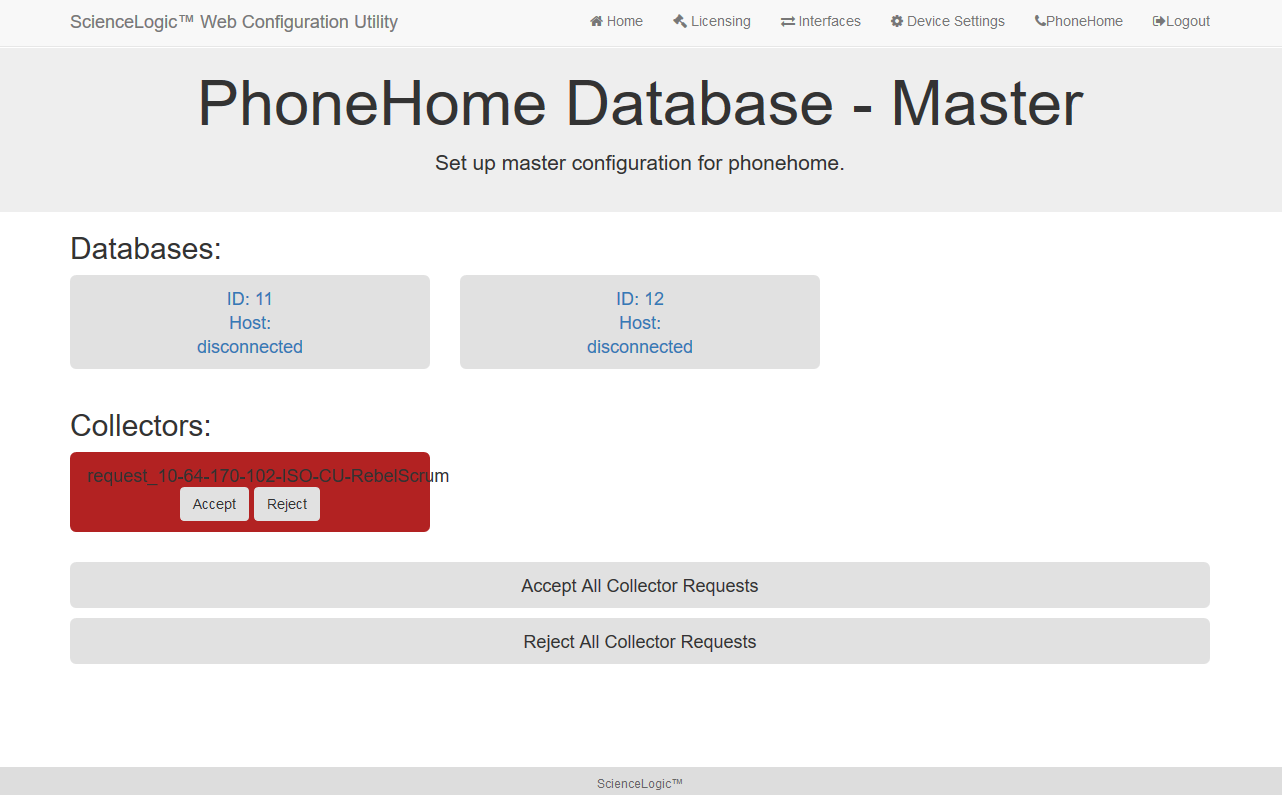
- Note that the list of Collectors includes a request. Click the button for that collector. The Status for the Collector now displays as Approved.
- On the Data Collector or Message Collector, open the ScienceLogic Web Configuration Utility and click the button. The PhoneHome - Collector page appears:

- Click the [Check Approval] button. Note that the Status message is now Configured - ID [phonehome_user_number].
- If you refresh the page, the status field displays the message Synced and Connected.
If you have a large number of collectors, you can perform the following steps to approve multiple collectors at the same time:
- On each Data Collector or Message Collector, follow steps 1-7 in the previous procedure to send the connection request for each collector.
- Open the ScienceLogic Web Configuration Utility for the Database Server and click the button.
- Click the button.
- Open the ScienceLogic Web Configuration Utility for each collector, click the button, and then click the button.
- Repeat step 4 until you have approved all of your collectors.
Registering the Data Collectors and Message Collectors
NOTE: Perform the steps in this section after you have successfully established a PhoneHome connection between Data Collectors or Message Collectors and the main Database Server. The steps in this section ensure that the SL1 system uses the loopback address that is assigned to each Data Collector and Message Collector upon successful completion of a phonehome connection request.
In SL1, to register a Data Collector or Message Collector with the main Database Server:
- In the address bar of your browser, type the IP address of the SL1 appliance that provides the user interface for your SL1 system. The user interface is provided by either the Database Server or an Administration Portal. The login page appears:

- Log in as the "em7admin" user with the password "em7admin" (or the password you configured).
- If this is your first successful login, you will be asked to agree to the End-user License Agreement. Read the End-user License Agreement and then click the button.
- Go to the Appliance Manager page (System > Settings > Appliances):

- Complete the following fields:
- Host Name. Type the host name of the Data Collector or Message Collector.
- IP Address. Type the loopback IP address of the Data Collector or Message Collector. The loopback IP address is a special, virtual network interface that your computer uses to communicate with itself. This address also allows you to view content on a server in the same way a client would. In most cases, the loopback address is 127.0.0.1, although the loopback address can be any IP address in the 127.0.0.0/8 block.
TIP: If you go to the Web Configuration Utility of the Database Server and click the PhoneHome button, you can view a list of all the connected collectors, along with their IDs. The ID indicates the loopback address. For example, if the ID of a given collector is 12, then its loopback address is 127.0.0.12.
- Model Type. Select the type of appliance (Data Collector or Message Collector) you are registering.
- Description. Type a description for the Data Collector or Message Collector. This field is optional.
- Click the button. If the save is successful, the message "Appliance Registered" displays.
- If all information is valid and the Database Server can communicate with the Data Collector or Message Collector, the Appliance Manager page displays the ScienceLogic version installed on the collector in the Build column. If the Build column remains blank for longer than five minutes, double-check your settings and network connection.
- Perform these steps for each Data Collector and Message Collector in your PhoneHome configuration.
Managing Port Forwarding for PhoneHome Communication in SL1 Version 11.2.0 and Later
A port forward is a configuration that allows a PhoneHome client to "copy" a local port from the SL1 Collector to the Database Server, essentially making the local port available on the Database Server appliance as if it was physically present on that appliance itself.
The local MariaDB port 7707 on the collector is forwarded to the Database Server by default.
Viewing a List of Port Forwards
This section applies only to SL1 version 11.2.0 and later.
To view a list of ports forwarded from an SL1 Collector to the Database Server:
-
Go to the console of the SL1 Collector.
-
Run the following command on the SL1 Collector:
phonehome forwards list
This list will not include the MariaDB port 7707, which is forwarded by default.
Adding a Port Forward
This section applies only to SL1 version 11.2.0 and later.
To add a port forward:
- Go to the console of the SL1 Collector.
- Run the following command on the SL1 Collector, replacing <Remote Address> with the port on the Database Server onto which the local port will be forwarded and <Local Address> with the local port to forward from the SL1 Collector:
phonehome forward add <Remote Address> <Local Address>
Addresses should be in the format :<port>.
The remote port should be an unprivileged port—in other words, a port greater than 1023.
For example, if you want to forward SSH port 22 from the SL1 Collector to the Database Server appliance as port 10022 to enable a Database Server administrator to SSH into the SL1 Collector from the Database Server appliance, you would run the following command:
phonehome forward add :10022 :22
New forwards do not take effect until the PhoneHome client is restarted or the next watchdog cycle occurs.
Removing a Port Forward
This section applies only to SL1 version 11.2.0 and later.
To remove a port forward:
-
Go to the console of the SL1 Collector.
-
Run the following command on the SL1 Collector, replacing <Remote Address> with the port on the Database Server appliance onto which the local port was forwarded and <Local Address> with the local port that was forwarded from the SL1 Collector:
phonehome forward remove <Remote Address> <Local Address>
Addresses should be in the format :<port>.
For example, if you want to no longer forward SSH port 22 from the SL1 Collector to the Database Server appliance as port 10022, run the following command:
phonehome forward remove :10022 :22
Deleted forwards do not take effect until the PhoneHome client is restarted or the next watchdog cycle occurs.
Defining Port Forwarding for PhoneHome Communication in SL1 Version 11.1.0 and Earlier
If you define port forwarding for each Data Collector or Message Collector in the PhoneHome configuration, you can use SSH from the Database Server to access the Data Collector or Message Collector.
To define port forwarding:
- Either go to the console of the Database Server or use SSH to access the server.
- Log in as user em7admin with the password you configured during setup.
- For each Data Collector and/or Message Collector, type the following at the shell prompt:
sudo phonehome set appliance_ID -forwards=port_number
where:
- appliance_ID is device ID for the Data Collector or Message Collector.
- port_number is the port you want to use for SSH communication from the Database Server to the Data Collector or Message Collector.
For example:
sudo phonehome set 12 -forwards=22
- For every other server in the PhoneHome configuration, go to the console of the Database Server or use SSH to access the server.
- Log in as user em7admin with the password you configured during setup.
- Type the following at the shell prompt:
sudo phonehome sync
- Now, whenever you are SSHed in to the Database Server, you can SSH to the Data Collector or Message Collector.
- To use the forward port, append "100" to the front of the port you defined in step #3 and use the loopback IP of the Data Collector or Message Collector using port 10022:
ssh –p 10022 root@127.0.0.12
Using Custom Options for AutoSSH
By default, SL1 stores settings for AutoSSH for PhoneHome configurations in the file /opt/em7/backend/phonehome/em7_ph_tunnels on each Data Collector and Message Collector in your configuration.
If you want to use custom AutoSSH settings for a specific Data Collector or Message Collector in your configuration, you can create the file /etc/phonehome/local.conf and define custom AutoSSH options for that server.
To define custom SSH options for a server:
- Log in to the console of the Data Collector or Message Collector as the root user.
- Open the file /etc/phonehome/local.confg with a text editor like vi:
vi /etc/phonehome/local.conf
- Add one or more custom settings for AutoSSH. You can define:
- TCPKeepAlive = "yes or no". Specifies whether the client will send a null packet to the server (to keep the connection alive). Uses the TCP layer to send the packet. The default value is "no". If you set this value to zero (0), this feature is disabled. Your connection will drop if idle for too long.
- ServerAliveInterval = "number of seconds". The number of seconds the client will wait before sending a null packet to the server (to keep the connection alive). Uses the SSH layer to send the packet. The default value is "10". If you set this value to zero (0), this feature is disabled.
- StrictHostKeyChecking = "yes or no". If this flag is set to “yes”, AutoSSH will never automatically add host keys to AutoSSH configuration and will refuse to connect to hosts whose host key has changed. This option forces the user to manually add all new hosts. If this flag is set to “no”, ssh will automatically add new host keys to the known hosts files. The default value is "no".
- ServerAliveCountMax = "number of messages". The maximum number of unacknowledged null packets the client will send to the server (to keep the connection alive). After the maximum number of unacknowledged null packets, the client will drop the SSH connection to the server. The default value is "2". If you set this value to zero (0), this feature is disabled. Your connection will drop if idle for too long.
- CUSTOM_PARAMS = "-o parameter = argument". Any additional SSH parameters can be configured with this option. For example:
CUSTOM_PARAMS="-o ExitOnForwardFailure=yes"
NOTE: To determine the format for entries in the /etc/phonehome/local.confg file, see the file /opt/em7/backend/phonehome/em7_ph_tunnels.
- Save your changes and exit the file.
Configuring PhoneHome for High Availability and Disaster Recovery
This section describes how to configure the Database Servers in your system for use in a PhoneHome configuration.
NOTE: You can use the same Database Servers in both a PhoneHome configuration and a traditional configuration.
After performing the steps in this section, go the section on Configuring the Data Collectors and Message Collectors to complete the configuration.
Configuring the Primary Database Server for High Availability and Disaster Recovery
To configure the primaryDatabase Server for PhoneHome communication:
-
Go to the console of the primary Database Server or use SSH to access the server.
-
Log in as user em7admin with the password you configured during setup.
-
For the primary Database Server, you must first open a port to accept incoming connection requests. To do this, type the following at the shell prompt:
-
To define the primary Database Server (to itself), type the following at the shell prompt:
sudo phonehome add database
-
Review the output, which should look like the following:
Created local: #0
Reloading sshd configurations
Created database: #11
Changing password for user: "phonehome11"
Created Device Id: "11"
Created token: "phonehome://11@71.97.6.197/ee4sdRRK8yNu"
-
Note the ID number for the primary Database Server (11 in our example).
-
To define the public-facing IP address of the primary Database Server and the port to use for SSH communication from PhoneHome servers to the primary Database Server, type the following at the shell prompt:
sudo phonehome set appliance_ID -ip=IP_address -port=port_number
where port_number is an unused port number greater than 1000. The Configuration Utility uses port 7705 as the default port. If you want to use the default port, specify 7705 in this command. To use a different port, specify that port number in this command.
For example:
sudo phonehome set 11 -ip=71.197.6.197 -port=7705
-
Start the PhoneHome watchdog. To do so, type the following at the shell prompt:
sudo systemctl enable em7_ph_watchdog
sudo systemctl start em7_ph_watchdog
-
If your SL1 System uses multiple databases for high availability and/or disaster recovery, you must create a record for the secondary Database Server on the primary Database Server. To do so, type the following at the shell prompt:
sudo phonehome add database
-
The output will look like this:
Reloading sshd configurations
Created database: #13
Changing password for user: "phonehome13"
Created Device Id: "13"
Created token: "phonehome://13@10.64.68.31:22/GmHtYvDd9O0V"
-
Note the ID number for the secondary Database Server. You will need this value later in the configuration.
-
Copy and save the token for the secondary Database Server. You will need this value later in the configuration.
-
To define the public-facing IP address of the secondary Database Server and the port to use for SSH communications from PhoneHome servers to the secondary Database Server, type the following at the shell prompt:
sudo phonehome set appliance_ID -ip=IP_address -port=port_number
where:
sudo phonehome open-control-port port_number
where port_number is an unused port number greater than 1000. The default value in the Configuration Utility is 7705. If you want to use the default port later in the Configuration Utility, specify "7705" in this command.
- appliance_ID is the value you noted in step 5.
- IP_address is the public-facing IP address.
- port_number is the port you want to use for SSH communication to and from the primary Database Server.
For example, we could enter:
sudo phonehome set 13 -ip=71.197.6.198 -port=7705
Configuring the Secondary Database Server for High Availability and Disaster Recovery
To configure a secondary Database Server as part of a PhoneHome configuration:
- Either go to the console of the secondary Database Server or use SSH to access the server.
- Log in as user em7admin with the password you configured during setup.
- For the secondary Database Server, you must first open a port to accept incoming connection requests. To do this, type the following at the shell prompt:
- port_number is an unused port number greater than 1000. The default value in the Configuration Utility is 7705. If you want to use the default value, specify "7705".
sudo phonehome open-control-port port_number
where:
NOTE: ScienceLogic recommends that you use the same port number on each database in your PhoneHome configuration.
- To register the secondary Database Server, type the following at the shell prompt:
sudo phonehome register appliance_token
where:
- appliance_token is the URL you saved during step 11 in the section Configuring the Primary Database for High Availability and Disaster Recovery.
- The output looks like this:
Registered device successfully
- Type the following at the shell prompt:
sudo phonehome sync
- The output looks like this:
Started synchronization
Synchronized: collectors
Synchronized: databases
Reloading sshd configurations
Finished synchronizations
Configuring Data Collectors and Message Collectors for High Availability and Disaster Recovery
You must now configure the Data Collectors and Message Collectors in your network. To do this, see Configuring the Data Collectors and Message Collectors.
NOTE: If your PhoneHome configuration uses proxy servers, do not use this section to configure a Data Collector or Message Collector. See the section on proxy servers instead.
Syncing the High Availability and Disaster Recovery System
After adding Data Collector(s) or Message Collector(s) to your PhoneHome configuration, you must once again execute the sync command on all Database Servers and then on the newly configured Collectors in the PhoneHome configuration.
To sync your PhoneHome configuration:
- Either go to the console of the Database Server (or the new Collectors) or use SSH to access the server.
- Log in as user em7admin with the password you configured during setup.
- At the shell prompt, type the following:
sudo phonehome sync
- Perform these steps on each Database Server, Data Collector, and Message Collector in your PhoneHome configuration.
Adding a New Secondary Database Server
To add a new secondary Database Server to an existing PhoneHome configuration:
- On the primary Database Server, perform the steps from the section Configuring the Primary Database Server. These are the steps that define the secondary Database Server, including saving the token and saving the new configuration.
- On the new secondary Database Server, perform the steps from the section Configuring the Secondary Database Server for High Availability and Disaster Recovery.
- Either go to the console of the SL1 appliance or use SSH to access the new secondary Database Server. Log in as "root".
- At the shell prompt, type the following:
phonehome status
- The new secondary Database Server should be connected to each Data Collector in the PhoneHome configuration.
Managing Destinations
A destination is a list of addresses associated with a Database Server. A PhoneHome Database Server can have one or more destination addresses associated with it.
Destination addresses can be IPv4 addresses or DNS names, or a combination of both.
Viewing a List of Destinations
This section applies only to SL1 version 11.2.0 and later.
To view a list of all destinations in your stack:
-
Go to the console of the SL1 Collector.
-
Run the following command on the SL1 Collector:
phonehome destination list
This command provides a list of all Database Servers with their device IDs, addresses, and priorities. Priorities define the order in which an SL1 Collector will try to connect to the individual addresses. It will keep trying until it can connect to one of them.
To view a list of destinations on a specific PhoneHome Database Server, run the following command, where <Device ID> is the ID of the PhoneHome Database Server:
phonehome destination list --id <Device ID>
Adding a Destination
This section applies only to SL1 version 11.2.0 and later.
To add a new destination address:
-
Go to the console of the SL1 Collector.
-
Run the following command on the SL1 Collector, where <Device ID> is the ID of the device to which you want to add a new address and <Address> is the destination address:
phonehome destination add <Device ID> <Address>
Addresses should be in the format <host>:<port>.
Host addresses can be IPv4 addresses or DNS names.
If successful, you will get a message confirming that the new address was successfully added to the destination.
For example, if you wanted to add the destination address 192.168.0.13, with port 7705 open, to the device with the device ID 2, run the following command:
phonehome destination add 2 192.168.0.13:7705
The port you open must match the port that is open for the original device. Otherwise, you will receive an error.
Optionally, you can add the suffix --priority <Priority> to establish the destination's priority, or use the suffix --force to force add a destination address, even if the port does not match with the device's listed port.
Removing a Destination
This section applies only to SL1 version 11.2.0 and later.
To remove an existing address from a destination:
-
Go to the console of the SL1 Collector.
-
Run the following command on the SL1 Collector, where <Device ID> is the ID of the device from which you want to remove a destination address and <Address> is the destination address:
phonehome dest remove <Device ID> <Address>
Addresses should be in the format <host>:<port>.
Host addresses can be IPv4 addresses or DNS names.
You cannot remove an address from a destination if it is the destination's only address.
Managing Proxy Connections for PhoneHome Communication in SL1 Version 11.2.0 and Later
If your organization requires that you use a proxy for outbound requests, you can configure one or more proxy connections between the an SL1 Collector and the Database Server.
For example, you might use a proxy connection if your SL1 Collector does not have a direct outbound internet connection to reach the Database Server. A PhoneHome proxy configuration includes the destination address—either the address of the Database Server or that of the next proxy host—and the address of the proxy server to which the client must connect to reach the destination.
There can be one or more proxy hosts in between an SL1 Collector and a Database Server, thus forming a proxy chain.
If you use a proxy in your PhoneHome configuration, perform the steps in the section about Adding a Proxy Connection before you configure the other steps in thissection. The other steps in the PhoneHome configuration will require the proxy for communication.
Viewing a List of Proxy Connections
To view a list of proxy connections from an SL1 Collector to the Database Server:
-
Go to the console of the SL1 Collector.
-
Run the following command on the SL1 Collector:
phonehome proxy list
Adding a Proxy Configuration
To add a proxy connection between an SL1 Collector to the Database Server:
-
Go to the console of the SL1 Collector.
-
Run the following command on the SL1 Collector, replacing <Destination Address> with the address and port of the Database Server appliance to which you want to connect, <Proxy Address> with the proxy host address and port you want to use as a tunnel, and <Proxy User> with the username used to log in to the proxy host:
phonehome proxy new <Destination Address> <Proxy Address> <Proxy User>
Addresses should be in the format <host>:<port>. The host can be either an IP address or a DNS name.
For example, if you want to configure the SL1 Collector to connect to the Database Server with an address of 202.35.52.71 through a proxy host with the address 10.1.17.68 with the user em7admin, you would run the following command:
phonehome proxy new 202.35.52.71:7705 10.1.17.68:22 em7admin
If you are connecting to the Database Server through a chain consisting of multiple proxies, you should add the proxy configurations in reverse order, starting with the destination address and last proxy host address, then the last proxy host address and previous proxy host address, and so forth, until you get to the first proxy host.
For example, if you want to connect to the Database Server with an address of 202.42.63.79 through proxy host A with an address of 192.168.0.3 with the user proxyuser, and also proxy host B with an address of 10.2.13.79 with the user em7admin, then you would run the following commands:
phonehome proxy new 202.42.63.79:7705 10.2.13.79:22 em7admin
phonehome proxy new 10.2.13.79:22 192.168.0.3 proxyuser
New proxy configurations do not take effect until the PhoneHome client is restarted or the next watchdog cycle occurs.
When you run the command, the system prompts you for a password for the proxy host. The system uses this password to automatically configure and validate SSH key-based authentication to the host; the next time you need to run anything via the proxy host, it will use the collector's private key for authentication rather than prompting you for the password. Optionally, you can disable this behavior by adding "-n" to the end of the command. If you do so, you must then manually configure the proxy's SSH key-based authentication.
Deleting a Proxy Configuration
To add a proxy configuration between an SL1 Collector to the Database Server:
-
Go to the console of the SL1 Collector.
-
Run the following command on the SL1 Collector, replacing <Destination Address> with the address and port of the Database Server appliance to which the proxy is connecting:
phonehome proxy delete <Destination Address>
Addresses should be in the format <host>:<port>. The host can be either an IP address or a DNS name.
Removed proxy configurations do not take effect until the PhoneHome client is restarted or the next watchdog cycle occurs.
Managing Proxy Connections for PhoneHome Communication in SL1 Version 11.1.0 and Earlier
If your organization requires that you use a proxy for outbound requests, you can configure one or more Data Collectors to act as proxy servers. These proxy servers will sit between the Data Collectors in your PhoneHome configuration and the Database Server in your PhoneHome configuration.
To use one or more Data Collectors as proxy servers in a PhoneHome configuration:
- Ensure that the SSH port is open on each Data Collector that acts as a proxy server.
- Ensure that the SSH port is open on each Database Server in the PhoneHome configuration.
NOTE: If you use a proxy in your PhoneHome configuration, perform the steps in this section before you configure the other steps in this section. The other steps in the PhoneHome configuration will require the proxy for communication.
To configure your PhoneHome configuration to use a proxy server, you must:
- Configure a Database Server for PhoneHome configuration as either a stand-alone Database Server (Configuring the Database Servers) or a High Availability Database Server (Configuring the Database Servers for High Availability)
- Edit the ssh_config file.
- Use the command line to configure Data Collectors that connect via proxy.
- Copy the SSH key to each proxy.
- Synchronize the Data Collectors with the Database Server.
Editing ssh_config
- Either go to the console of the Data Collector that will be part of the PhoneHome configuration or use SSH to access the server.
NOTE: Perform these steps on the Data Collector that will be part of the PhoneHome configuration, not on the Data Collector that will serve as a proxy server.
- Log in as user em7admin with the password you configured during setup.
- Open the file /etc/ssh/ssh_config with vi or another text editor:
sudo vi /etc/ssh/ssh_config
- Add the following lines to the file:
Host hostname_of_primary_Database_Server
ProxyCommand ssh -q em7admin@proxy_hostname nc %h %p
where:
hostname_of_primary_Database_Server is the hostname for the primary Database Server.
proxy_hostname is the hostname of the proxy server that directly communicates with the Database Server. If you have a chain of proxy servers, this value is the hostname of the last proxy server in that chain (the proxy server that connects to the Database Server).
NOTE: If you use hostnames to configure proxy servers, you must use hostnames for all PhoneHome configuration. If you use IP addresses to configure proxy servers, you must use IP addresses for all PhoneHome configuration. You cannot mix hostnames and IP addresses in ssh_config and in PhoneHome configuration.
- If applicable, for all secondary databases, add the following lines to the file:
Host hostname_of_secondary_Database_Server
ProxyCommand ssh -q em7admin@proxy_hostname nc %h %p
where:
hostname_of_secondary_Database_Server is the hostname for the secondary Database Server.
proxy_hostname is the hostname of the proxy server that directly communicates with the secondary Database Server. If you have a chain of proxy servers, this value is the hostname of the last proxy server in that chain (the proxy server that connects to the Database Server).
- If you have more than one proxy server, add the following lines to the file:
Host hostname_of_proxy_server
ProxyCommand ssh -q em7admin@proxy_hostname nc %h %p
where:
hostname_of_proxy_server is the hostname of the current proxy server (the proxy server you are creating an entry for). For example, you could create an entry for "ProxyServer2".
proxy_hostname is the hostname of the proxy server that is previous in the chain and communicates with the current proxy server. If your entry is for "ProxyServer2", you would specify "ProxyServer1" in this field.
For example, if you had the following configuration:
PhoneHome Data Collector -> ProxyServer1 -> ProxyServer2 -> ProxyServer3 -> Database Server
You would add the following entries to /etc/ssh/ssh_config:
Host ProxyServer2
ProxyCommand ssh -q em7admin@ProxyServer1 nc %h %p
Host ProxyServer3
ProxyCommand ssh -q em7admin@ProxyServer2 nc %h %p
Host EM7_DB1
ProxyCommand ssh -q em7admin@ProxyServer3 nc %h %p
For another example, if you had the following configuration:
PhoneHome Data Collector -> ProxyServer1 -> ProxyServer2 -> ProxyServer3 -> primary Database Server
PhoneHome Data Collector -> ProxyServer1 -> ProxyServer2 -> ProxyServer3 -> secondary Database Server
You would add the following entries to /etc/ssh/ssh_config:
Host ProxyServer2
ProxyCommand ssh -q em7admin@ProxyServer1 nc %h %p
Host ProxyServer3
ProxyCommand ssh -q em7admin@ProxyServer2 nc %h %p
Host EM7_DB1
ProxyCommand ssh -q em7admin@ProxyServer3 nc %h %p
Host EM7_DB2
ProxyCommand ssh -q em7admin@ProxyServer3 nc %h %p
- Save (:wq) your changes to the /etc/ssh/ssh_config file.
Configuring Data Collectors that Connect to the PhoneHome Database Server Through a Proxy
To configure a Data Collector that connect to the PhoneHome Database Server through a Proxy:
- Either go to the console of the Database Server or use SSH to access the server.
- Log in as user em7admin with the password you configured during setup.
- For the Database Server, you must first open a port to accept incoming connection requests. To do this, type the following at the shell prompt:
sudo phonehome open-control-port port_number
where:
- port_number is an unused port number greater than 1000.
- To define the Data Collector (to the Database Server), type the following at the shell prompt:
sudo phonehome add collector
- The output will look like this:
Created collector: #12
Changing password for user: "phonehome12"
Created Device Id: "12"
Created token: "phonehome://12@10.64.68.31:22/om3Odt3iPEAD
- Note the token for the Data Collector.
- Either go to the console of the Data Collector or use SSH to access the server.
NOTE: Perform these steps on the Data Collector that will be part of the PhoneHome configuration, not on the Data Collector that will serve as a proxy server.
- Register the Data Collector with the Database Server . To do this, type the following at the shell prompt:
sudo phonehome register token
where:
- token is the value you noted in step 5.
Copying the SSH key to Each Proxy
You must now copy the SSH key to each proxy server. To do this:
- Either go to the console of the Data Collector that will be part of the PhoneHome configuration (not the proxy server) or use SSH to access the server.
- Log in as user em7admin with the password you configured during setup.
- At the shell prompt, type the following:
ssh-copy-id -i /home/phonehome0/.ssh/id_rsa.pub em7admin@[IP_address_of_proxy_server]
- Perform step 3 for each proxy server in your PhoneHome configuration.
Synchronize the Data Collectors with the Database Server
After adding Data Collector(s) or Message Collector(s) to your PhoneHome configuration, you must execute the sync command on all Database Servers in the PhoneHome configuration.
To execute the sync command on all Database Servers:
- Either go to the console of the Database Server or use SSH to access the server.
- Log in as user em7admin with the password you configured during setup.
- At the shell prompt, type the following:
sudo phonehome sync
- Perform these steps on each Database Server in your PhoneHome configuration.
Deleting a PhoneHome Collector
This section applies only to SL1 version 11.2.0 and later.
You can delete a PhoneHome SL1 Collector only if it has no corresponding SL1 appliance.
Therefore, to delete a PhoneHome SL1 Collector, you must also perform the following steps, if applicable:
- If the SL1 Collector has a corresponding SL1 appliance, you must delete that appliance before you can delete the SL1 Collector.
- If the corresponding SL1 appliance is included in a collector group, you must delete that collector group before you can delete the appliance and then the SL1 Collector.
- If the SL1 appliance's collector group includes other devices, you must move those devices to a different collector group before you can delete the appliance's collector group, then the appliance, and finally the SL1 Collector.
Once you delete a PhoneHome SL1 Collector, you cannot undelete it. Deleting an SL1 Collector will delete all configuration related to the device and cause all Database Servers to close incoming connections from the device.
To delete a PhoneHome SL1 Collector:
-
Go to the console of the SL1 Collector.
-
Run the following command on the SL1 Collector, replacing <id> with the device ID of the device you want to delete:
phonehome delete <id>
This command works only with SL1 Collectors. It does not work on Database Servers.
One of the following will occur:
-
If the device does not have a corresponding SL1 appliance on the stack, a confirmation prompt appears, asking you to confirm that you want to delete the device. Type "Y" and press Enter. The device is deleted and you can skip the rest of this section.
-
If the device does have a corresponding SL1 appliance, a message similar to the following appears:
Error: Cannot delete a phonehome device that has a corresponding appliance: [Module ID: 10, Name: example-device-cu1, CUG(s): cug-dc09]
If you receive an error message, proceed to the next step.
- Go to the Appliance Manager page (System > Settings > Appliances).
- Locate the device with the ID that matches the Module ID value that was returned in the error message in step 2, and then do one of the following:
- If the appliance is not part of a collector group, click its bomb icon (
 ) to delete it. You can then repeat steps 1 and 2 to delete the SL1 Collector.
 - If the appliance is part of a collector group, the bomb icon is disabled. Proceed to the next step.
- Go to the Collector Group Management page (System > Settings > Collector Groups).
- Locate the collector group with the name that matches the CUG value that was returned in the error message in step 2, and then do one of the following.
- If the collector group does not contain any devices, click its bomb icon () to delete it. You can then repeat steps 3 and 4 to delete the appliance.
- If the collector group contains devices, the bomb icon is disabled. Proceed to the next step.
- Go to the Device Manager page (Registry > Devices > Device Manager).
- Select the checkbox for each device that you want to move to a different collector group.
- In the Select Action field (in the lower right), select Change Collector Group and then select a collector group.
- Click the button. The selected devices will now be aligned with the selected collector group.
- Repeat steps 5 and 6, and then work your way backwards as needed, completing steps 3 and 4, followed by steps 1 and 2. Repeat these steps as needed until the device is deleted successfully in step 2.
Deleting a PhoneHome Database Server
This section applies only to SL1 version 11.2.0 and later.
To delete a PhoneHome Database Server:
-
Go to the console of the Database Server that you want to delete.
-
Run the following command:
sudo phonehome clear -d
A confirmation prompt appears, asking you to confirm that you want to delete the device. Type "delete" and press Enter.
You must run this command from the Database Server that you want to delete. You cannot run it from any other Database Server or the Administration Portal.
Once you delete a PhoneHome Database Server, you cannot undelete it. Deleting a Database Server will delete all configuration related to the device and close all incoming connections from PhoneHome SL1 Collectors.
The Watchdog Service
Each Database Server, Data Collector and Message Collector in a PhoneHome configuration runs a service called watchdog. The watchdog process automatically checks the connection between the Data Collector or Message Collector and the Database Server. If the connection is stale, the watchdog service automatically forces the Database Server to reconnect to the Data Collector or Message Collector.
The watchdog service can also detect configuration changes. If the PhoneHome configuration changes, the watchdog service will detect the changes and synchronize the configuration data on each device in the PhoneHome configuration.
The watchdog service is started automatically on each Data Collector, Message Collector, and secondary Database Server.
To view information about the watchdog service:
- Log in to the console of the Data Collector, Message Collector, and secondary Database Server as the root user.
- At the command line, type the following:
phonehome watchdog view
- You should see something like the following:
Current settings:
autosync: yes
interval: 20
state: enabled
autoreconnect: yes
timeoutcount: 2
check: default
- You can change any of these settings by typing the following at the command line:
phonehome watchdog set -settingvalue
where setting is one of the settings displayed with the view command and value is the value to assign to that setting.
- For details about the watchdog service, type the following at the command line:
phonehome watchdog help
For details about the arguments and settings for watchdog, see the section on Using the Command Line Interface.
Logging PhoneHome Configuration Information
The PhoneHome configuration logs information to the following files:
- /var/log/phonehome/phonehome0.log. Resides on each device in the PhoneHome configuration. This log file stores the date and time that devices are added to or removed from the PhoneHome configuration and each configuration action, including token generation, device registration, and configuration data synchronization, performed for each device. This log is rotated daily.
- /var/log/phonehome/phonehome<device ID>.log. Resides on the Database Server. This log file stores an entry for each action requested by or performed on a specific device (specified by device ID). This log is rotated daily.
- Log files that store information about registration operations and periodic checks performed by the Data Collectors reside in the directories listed below. These log files are auto-rotated when they exceed 10MB.
- /var/log/ph_shell_collector. Contains shell logs from users in group em7-ph-collectors (Data Collectors).
- /var/log/ph_shell_local. Contains shell logs for users in group em7-ph-local (the phonehome0 and phonehomerequest users).
- /var/log/ph_shell_database/. Contains shell logs for users in group em7-ph-cdb (Database Servers)
- /var/log/phonehome/commands.log. Stores the log entries about each phonehome command executed on that appliance.
- /var/log/phonehome/
- /var/log/phonehome/ph_watchdog.log. Resides on the Database Server. This log file stores information about the watchdog service. This log is rotated daily.
Using the Command-Line Interface for PhoneHome Collection in SL1 Version 11.2.0 and Later
If you have access to the console for a Database Server or SL1 Collector in a PhoneHome configuration, you can use the phonehome command to configure and troubleshoot your PhoneHome configuration in SL1 version 11.2.0 and later. To do so, run the following command:
phonehome <command>
You can use the following commands with the phonehome command:
- clear. Clears the PhoneHome configuration on a PhoneHome device.
- check. Checks the state of the connection from an SL1 Collector to the Database Server, visualizing the network path from the SL1 Collector to the Database Server as well as any proxy hops in between, if applicable. The output indicates any failures connecting to any hop.
- client. Runs the PhoneHome client.
- config. Displays and enables you to edit PhoneHome configuration related to the server and client.
- delete. Deletes a PhoneHome SL1 Collector. This argument prevents you from deleting any SL1 Collector with an associated SL1 appliance.
- destination. Enables you to add, remove, or view addresses to a PhoneHome Database Server.
- forwards. Enables you to add, remove, or view ports forwarded from an SL1 Collector to the Database Server.
- list. Displays a list of PhoneHome devices.
- migrate. Migrates the configuration from the classic PhoneHome setup to the new PhoneHome setup. This is done automatically during upgrade.
- proxy. Enables you to add, remove, or view proxy configurations along the network path from an SL1 Collector to the Database Server.
- register. Registers a new SL1 Collector as a PhoneHome collector with a token.
- request. Enables you to send, view, accept, or reject an SL1 Collector registration request.
- server. Runs the PhoneHome server.
- setup. Configures a new PhoneHome Database Server.
- status. Displays the status of the PhoneHome SL1 Collectors. The output is tabular by default but supports JSON output as well. The output does not contain the remote loopback IP address of PhoneHome SL1 Collectors, nor does it list PhoneHome Database Servers.
- sync. Syncs the configuration from the Database Server.
- token. Enables you to create, view, or delete registration tokens.
- view. Displays the configuration and state of an SL1 Collector. This argument must be run on a Database Server.
Using the Command-Line Interface for PhoneHome Collection in SL1 Version 11.1.0 and Earlier
If you have access to the console for each appliance in the PhoneHome configuration, or if you have SSH access to each appliance in the PhoneHome configuration, you can use a shell session and the phonehome command to configure and troubleshoot your PhoneHome configuration.
The phonehome Command
To use the phonehome command:
- Either go to the console of the SL1 appliance or use SSH to access the server. Log in as "root".
For details on enabling and using SSH with SL1,
- At the command prompt, you can type the following:
phonehome argument
where argument is one of the following:
- add appliance_type or request_file. Run this command on the primary Database Server. Adds an appliance to the current PhoneHome configuration.
- appliance_type. Type one of the following:
- collector. Adds a Data Collector or Message Collector to the PhoneHome configuration.
- database. Adds a primary Database Server or a secondary Database Server to the PhoneHome configuration.
- request_file. When the Data Collector or Message Collector sends a request to the Database Server, the Database Server creates a request file in the directory /home/phonehomerequest/requests. You can specify the full pathname of a request file to accept a request and add a new Data Collector or Message Collector to the PhoneHome configuration.
NOTE: The phonehome add request_file command performs the same operations as selecting the button for a request in ScienceLogic Web Configuration Utility.
- check -json yes. Run this command on any appliance in the PhoneHome configuration. Executes diagnostic steps to aid in troubleshooting.
The phonehome command first tries to connect to the primary Database Server.
If you issue this command from a Database Server, the command checks the status of the database port, the SSH port, and port for the web configuration tool for each Data Collector and Message Collector.
If you issue this command from a Data Collector or Message Collector, the command checks the status of the database port, the SSH port, and port for the web configuration tool for each Database Server.
- -json yes. Displays output in json format.
- clear clear_type. Clears the PhoneHome configuration, as specified in the clear_type argument.
- clear_type. Specifies which configuration to remove. Can be one of the following:
- client. Run this command on the secondary Database Server, Data Collector, or Message Collector. Removes the PhoneHome connection (SSH tunnel). The appliance can then no longer connect to the primary Database Server.
- users. Run this command on the primary Database Server. Removes the PhoneHome configuration for all appliances except the primary Database Server.
- all. Run this command on the primary Database Server. Removes the PhoneHome configuration for each Data Collector, Message Collector, secondary Database Server, and the primary Database Server.
- close-control-port port_number. Run this command on Database Servers (primary and secondary). Blocks future connection requests from Data Collectors and secondary Database Servers.
- connect. Run this command from the Data Collectors, Message Collectors, or secondary Database Server. Starts communication between the primary Database Server and the Data Collector, Message Collector, or secondary Database Server.
- delete appliance_ID. Run this command on the primary Database Server. Deletes an appliance from the current PhoneHome configuration.
- appliance_ID. Enter the numeric ID of the appliance. You can find this ID with the phonehome status command.
- disconnect. Run this command from the Data Collector(s), Message Collector(s), or secondary Database Server. Stops communication between the primary Database Server and the Data Collector, Message Collector, or secondary Database Server.
- help. Run this command from any appliance in the PhoneHome configuration. Displays information about each parameter for the phonehome command.
- help extra. Run this command from any appliance in the PhoneHome configuration. Displays information about the basic steps to configure a PhoneHome configuration.
- mysql appliance_id. Run this command on the primary Database Server. Tests the connection to the MySQL database. If the appliance_ID specifies a Data Collector or Message Collector, the phonehome command will test the MySQL connection using the loopback address of the Data Collector or Message Collector and port 7707. If the appliance_ID specifies a Database Server, the phonehome command will test the MySQL connection using the public IP address of the Database Server and port 7706.
- appliance_ID. Enter the numeric ID of the appliance. You can find this ID with the phonehome status command.
- open-control-port port_number. Run this command on Database Servers (primary and secondary). Adds an entry for the specified SSH port to the /etc/sysconfig/iptables file on the current server.
- reconnect. Run this command from the Data Collector(s), Message Collector(s), or secondary Database Server. Stops and then restarts communication between the primary Database Server and the Data Collector(s),Message Collector(s), or secondary Database Server.
- register device_token. Run this command from the Data Collector(s),Message Collector(s), or secondary Database Server. Registers the appliance with the primary Database Server.
After you generate a token for a Data Collector or Message Collector (either with phonehome token or phonehome add), go to the Data Collector or Message Collector and use the phonehome register command to register the Data Collector or Message Collector with the primary Database Server. The Data Collector or Message Collector will then upload its public key to the primary Database Server and download its configuration for PhoneHome from the primary Database Server. After executing this command, the Data Collector or Message Collector will automatically connect to the Database Server.
In configurations that have multiple Database Servers: After you generate a token for a secondary Database Server (either with phonehome token or phonehome add), go to the secondary Database Server and use the phonehome register command to register the secondary Database Server with the primary Database Server. The secondary Database Server will then upload its public key to the primary Database Server and download its configuration for PhoneHome from the primary Database Server.
- device_token. Enter the token you generated for the Data Collector, Message Collector, or secondary Database Server.
- reload. Can be run on any appliance in the PhoneHome configuration. Stops the em7_sshd and em7_ph_service processes, finds and applies any configuration changes, and restarts the service.
- request [protocol]://[database_IP] [no_verify]. Run this command from the Data Collector or Message Collector to send a request to the Database Server.
- protocol. Enter the protocol to use to send the request to the Database Server. Choices are phonehome or https.
- database_IP. The IP address of the Database Server in the PhoneHome configuration.
- no_verify. Optional. If you specified https in the protocol option, you can specify no_verify to disable SSL verification.
NOTE: The phonehome request command performs the same operations as sending a request to the Database Server from the ScienceLogic Web Configuration Utility. Specifying no_verify performs the same operation as not selecting the Verify SSL Cert checkbox.
You can use the phonehome request command and the phonehome add request_file command to add a Data Collector or Message Collector to a PhoneHome Configuration. Go to the Data Collector or Message Collector and use the phonehome request command to send a request to join the PhoneHome configuration. Go to the Database Server and use the phonehome add request_file command to accept the request from the Data Collector or Message Collector. Go to the Data Collector or Message Collector again and execute the phonehome request command a second time to retrieve the request approval and set up the connection.
- set appliance_ID -parameter=value. Run on the primary Database Server. For a specific device, assigns a value to a parameter:
- appliance_ID. Enter the numeric ID of the appliance. You can find this ID with the phonehome status command.
- parameter. Can be one of the following parameters, preceded by a dash:
- name. Specifies the name of the device in the Name field in the Web Configuration Utility.
- ssh. Specifies whether or not to enable port forwarding for the SSH port for this device. Possible values are "yes" or "no".
- ip. Specifies the IP address of the device in the IP Address field in the Web Configuration Utility.
- forwards. Enables port forwarding for one or more ports. Specify one or more port numbers, separated by a space.
- value. Value to assign to the parameter, surrounded by double quotes.
For example:
phonehome set 11 -ssh yes -name "Reston"
- This example affects the device with an appliance ID of "11".
- The example enables port forwarding for SSH.
- The example enables port forwarding for the Web Configuration Utility.
- The example sets the device’s device name to "Reston".
- ssh appliance_id. Run on the primary Database Server. Tests the SSH connection to the specified appliance. If the appliance_ID specifies a Data Collector or Message Collector, the phonehome command will test the SSH connection using the loopback address of the Data Collector or Message Collector and port 10022. If the appliance ID specifies a Database Server, the phonehome command will test the SSH connection using the public IP address of the Database Server and defined SSH port.
- appliance_ID. Enter the numeric ID of the appliance. You can find this ID with the phonehome status command.
- status. Can be run on any appliance in the PhoneHome configuration. Displays the name and status of each currently defined PhoneHome appliance.
- sync. Run this command from the Data Collectors or Message Collectors. Downloads the current configuration for PhoneHome from the primary Database Server to the Data Collector or Message Collector.
- token appliance_ID. Run this command from the primary Database Server. This command creates a URL that allows the Data Collector(s), Message Collector(s), or secondary Database Server to log in to the primary Database Server, upload a public key to the primary Database Server, and download the configuration for PhoneHome from the primary Database Server.
- appliance_ID. Enter the numeric ID of the Data Collector, Message Collector, or secondary Database Server. You can find this ID with the phonehome status command.
- view appliance_id -jsonyes. Run this command from the primary Database Server. Displays the name, type, loopback IP, port status, revision number, and SSH status of the Data Collector, Message Collector, or secondary Database Server specified in appliance_ID.
- appliance_ID. Enter the numeric ID of the appliance that you want. You can find this ID with the phonehome status command.
- -json yes. Displays output in json format.
- wake appliance_id. Run this command from the primary Database Server. Depending on the specified appliance_ID, stops and then restarts communication between the Database Server and the Data Collector, Message Collector, or secondary Database Server.
- appliance_ID. Enter the numeric ID of the appliance that you want. You can find this ID with the phonehome status command.
- watchdog option. Run this command from the Data Collector, Message Collector, or secondary Database Server. The watchdog service runs automatically on each Data Collector, Message Collector, or secondary Database Server and checks the connection to the primary Database Server. If the connection is stale, the watchdog service automatically forces the primary Database Server to reconnect to the Data Collector, Message Collector, or secondary Database Server. The watchdog service can also detect configuration changes. If the PhoneHome configuration changes, the watchdog service will detect the changes and synchronize the configuration data on each device in the PhoneHome configuration.
NOTE: The watchdog and autosync services are not available for versions of SL1 earlier than the 7.5.3 ISO.
You can use this command to control the watchdog service. The options are:
- start. Starts the PhoneHome watchdog service.
- stop. Stops the PhoneHome watchdog service.
- status. Gets the status of the PhoneHome watchdog service.
- view. Displays the current settings for the watchdog service.
- set -parameter value. Sets the value of a parameter for the watchdog service. Parameters are:
- interval seconds. Specify the interval, in seconds, at which to execute the watchdog service. The default value is "50".
- autosync (yes, no). Specifies whether or not you want the watchdog service to cause configuration data to be synchronized automatically at regular intervals.
- autoreconnect (yes, no). Specifies whether or not you want the watchdog service to reconnect stale connections automatically.
- state (enabled, disabled). Specifies whether or not the watchdog service is running.
- timeoutcount number. Specifies the number of failed calls to the watchdog service before stopping and restarting the watchdog. The default value is "3".
- check (ssh, db, default). Specifies which port the watchdog service checks. The default value is "db".
- run -verbose (yes, no). Manually starts the watchdog service if it is not already running.
- -verbose (yes, no). Specifies whether or not to display verbose logging to standard output.
The monitor_phonehome Command
The monitor_phonehome utility is available to use when debugging or diagnosing PhoneHome related issues. It is especially useful when escalating a PhoneHome issue to ScienceLogic Support.
Tuning PhoneHome Settings in SL1 Version 11.2.0 and Later
A PhoneHome setting is a customizable configuration that impacts how a PhoneHome server or client behaves. Some settings impact both the server and client; others are localized to either just the server or just the client.
Updated PhoneHome settings do not take effect until the PhoneHome server or client is restarted or the next watchdog cycle occurs.
Viewing a List of Current PhoneHome Settings
This section applies only to SL1 version 11.2.0 and later.
To view a list of current PhoneHome settings:
-
Go to the console of the SL1 Collector or Database Server.
-
Run the following command on the SL1 Collector or Database Server:
phonehome config list
When you run the command, the system returns a list that includes each configuration setting, its value, a description, and an indication of whether the setting affects the client, the server, or both.
Updating PhoneHome Settings
This section applies only to SL1 version 11.2.0 and later.
To set a new value for an existing PhoneHome setting:
-
Go to the console of the SL1 Collector or Database Server.
-
Run the following command on the SL1 Collector or Database Server:
phonehome config set <Setting Name> <New Value>
For example, if you want to change the client timeout value to 30 seconds, you would run the command phonehome config set client_timeout 30s.
You can update the following settings:
| Configuration | Setting | Description | Default Value | Affects |
|---|---|---|---|---|
| Client Timeout | client_timeout | Maximum amount of time allowed for the client to connect to a Database Server, after which the connection times out. The value is an actual time value, such as 30s, 5m, or 2h. | 30s | Client |
| Exit on Forward Failure | exit_on_forward_failure | Indicates whether to close the connection to the Database Server if any custom ports fail to forward. This is not applicable to MariaDB port forwarding (port 7707). If the MariaDB port fails to forward, the client closes the connection regardless of this setting. The value is either true or false. | false | Client |
| Watchdog Frequency Duration | watchdog_freq | Amount of time between watchdog service cycles. The value is an actual time value, such 30s, 5m, or 2h. | 1m0s | Both |
| Port Ping Timeout | port_ping_timeout | Maximum allowed time for a Database Server's watchdog to connect to the forwarded port before it marks the SL1 Collector as disconnected and closes the incoming client connection. The value is an actual time value, such as 30s, 5m, or 2h. | 10s | Server |
| Token Time to Live (TTL) | token_ttl | Default amount of time a token is valid before it expires. The value is an actual time value, such as 30s, 5m, or 2h. The maximum value is 2h. | 30m0s | Server |
| Expired Token Cleanup Frequency | expired_token_cleanup_freq | Amount of time after which an expired token is deleted by the server. The value is an actual time value, such as 30s, 5m, or 2h. | 48h0m0s | Server |
Troubleshooting the PhoneHome Configuration in SL1 Version 11.1.0 and Earlier
Using the PhoneHome Troubleshooting Script
The troubleshooting tool for PhoneHome provides diagnostics about the connection between a Data Collector and a Database Server in the PhoneHome system.
This section applies only to SL1 version 11.1.0 and earlier.
To use the troubleshooting tool:
- Either go to the console of a Data Collector or use SSH to access the Data Collector.
- Enter the following at the shell prompt:
sudo phtb -h
Available Commands
- This command checks the SSH connectivity between the Data Collector and the PhoneHome primary Database Server
sudo phtb destination
- If the connection is healthy, the output looks like this:
Executing phonehome destination check
Running check for destination with host 52.70.238.48, port 7705, user phonehome13
=================================================================================
Remote server 52.70.238.48 reported back the status of this device (check command): [Status: forwarded, Summary: db (Alive), Phonehome status: operational]
SSH test to destination (Name: Phone Home database 11, IP: 52.70.238.48, Port: 7705) is successful
Destination check summary: [Total: 1, Skipped: 0, Success: 1, failed: 0]
- If the connection is not healthy, the output looks like this:
Executing phonehome destination check
Running check for destination with host 10.152.2.100, port 7705, user phonehome13
=================================================================================
Failed to check destination 10.152.2.100 on port 7705. Error: dial tcp 10.152.2.100:7705: i/o timeout
Destination check summary: [Total: 1, Skipped: 0, Success: 0, failed: 1]
- This command checks the SSH credentials.
sudo phtb probe-host <hostname or IP address of server> <port number> <username> <-p password or -k path to private key> <options>
- Here is an example with output for correct credentials:
phtb probe-host 52.70.238.48 7705 phonehome13 -k /home/phonehome0/.ssh/id_rsa.pub
Executing probe for host 52.70.238.48 on port 7705
Successfully established SSH connection to host 52.70.238.48 on port 7705
- Here is an example with output for incorrect credentials:
phtb probe-host 52.70.238.48 7705 em7admin -p em7admin
Executing probe for host 52.70.238.48 on port 7705
Failed to obtain SSH connection to host 52.70.238.48 on port 7705. Error: ssh: handshake failed: ssh: unable to authenticate, attempted methods [none], no supported methods remain
- This command verifies the connection to a proxy server.
sudo phtb proxy <hostname or IP address of server> <port number> <optional -u username>
- Here is an example with output for "no proxy found":
sudo phtb proxy 52.70.238.48 7705
Executing proxy check for host 52.70.238.48, port 7705
There is not any proxy configured for host 52.70.238.48. No further action needed.
Basic Troubleshooting
| Problem | Possible Cause | Diagnostics |
|---|---|---|
| Can't register a server or sync a server |
Confirm that the Data Collector can "see" the phonehome port on the Database Server. |
At the command line of the server that can't sync or register: nmap -p port_number IP_address_of_database_server For example: nmap -p 7705 71.197.6.197 |
| Can't register a server or sync a server |
Confirm that the PhoneHome port is open on the firewall on the Database Server. |
At the command line of the Database Server: iptables -nL You should see output that specifies that the port accepts connections. To open the port, run this command: sudo phonehome open-control-port |
| Can't register a server or sync a server | Ensure that the Data Collector has line-of-sight with the Database Server | sudo tcptraceroute <IP_address_of_database> |
| Can't register a server or sync a server | Ensure the Data Collector can initiate an SSH session to the phonehome port on the Database Server |
sudo -u phonehome0 -s ssh -vvv -o StrictHostKeyChecking=no -p <control_port_(usually_7705)> phonehome<device_id_of_collector>@<IP_address_of_database> Output should include:
|
| Can't register a server | Ensure that tunnel service is running on the Data Collector. |
sudo systemctl status em7_ph_tunnels.service If the services is not running, force a sync using the following command: sudo phonehome sync |
| Problem with authentication | Ensure that the Data Collector is registered with the Database Server. | |
| Problem with authentication | Check that that the public keys of the Data Collector(/home/phonehome0/.ssh/id_rsa.pub) are configured correctly. |
Ensure that the public keys of the Data Collector(/home/phonehome0/.ssh/id_rsa.pub) are present in the following places: On the Database Server, in /home/phonehome<id>/.ssh/authorized_keys On the Database Server, in /home/phonehome<id>/remote_key file On the Database Server, in the database table sysinfo..phonehome_devices, find the row for the Data Collector. The pub column should contain the public keys |
| Forgot to copy the token for a server |
phonehome token appliance_ID |
|
| Confirm that Data Collector(s) and/or Message Collector(s) are successfully configured for PhoneHome |
At the command line of the Database Server: netstat –an |grep –i listen |grep “127.0.0.” |grep 7707 Output displays each Data Collector and Message Collector that is listening for PhoneHome communications. |