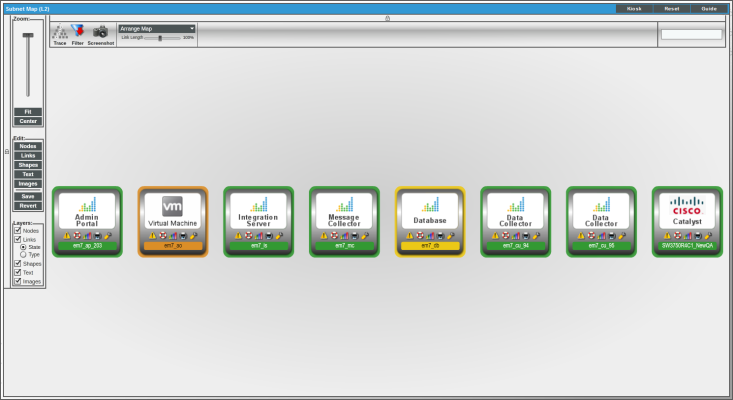
During discovery, SL1 automatically discovers all networks and subnets in your infrastructure. SL1 then creates graphical representations of these discovered networks and subnets to create topology maps. SL1 creates four types of topology maps:
- Layer-2 Maps
- CDP Maps
- LLDP Maps
- Layer-3 Maps
Use the following menu options to navigate the SL1 user interface:
- To view a pop-out list of menu options, click the menu icon (
 ).
). - To view a page containing all of the menu options, click the Advanced menu icon (
 ).
).
Layer-2 Maps
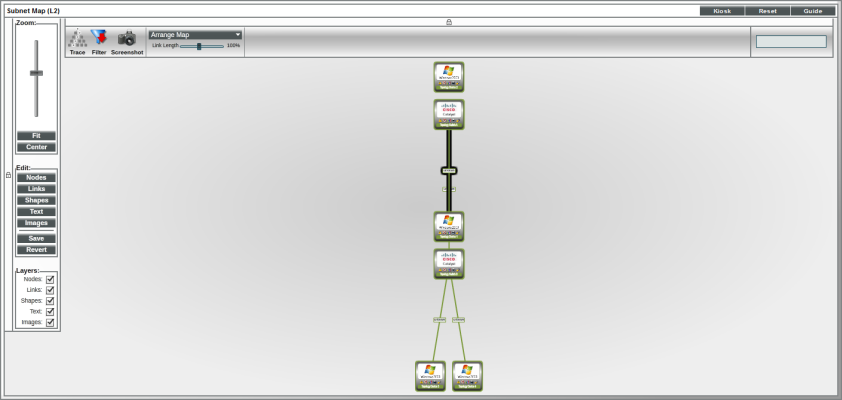
The Layer-2 Maps page displays a network map, where you can view details and relationships in any layer-2 network that has been discovered by SL1.
Layer-2 networks are unrouted subnets, where devices are identified by MAC addresses (as opposed to routed networks, where devices are identified by IP address). Layer-2 links communicate over the Data Link Layer and use Ethernet and MAC addresses to communicate with devices in the same LAN or WAN.
A layer-2 network map can include:
- Devices of each device category defined in SL1.
- Unknown devices are represented with cloud icons and labeled as "unknown".
- Links between devices.
- Links between networks (created with switches or routers).
- Unknown connections are represented with cloud icons and labeled as "unknown".
- SL1 automatically updates the map as new devices are discovered. SL1 also updates the map with the latest status and event information.
Viewing a Layer-2 Map
To view a layer-2 map:
- Go to the Classic Maps page (Maps > Classic Maps).
- Expand the links for Topology Maps > Layer-2 and then select a network. Depending on the network you select, the layer-2 map will display the following information:
- The blank field in the upper right allows you to find one or more devices in the map. You can enter a string, and SL1 will highlight only the devices that have a device name that matches the string.
- Each device appears as an icon in the map. If a device on a map appears with a question mark icon (?), this means that SL1 has not discovered this device but can detect that the device is linked to a device that SL1 has discovered.
NOTE: If your account is of type "user", you can view only devices that belong to the same organization(s) as your user account.
- Each network device is connected to its parent device with a line. The color of the line specifies the current state of the connection at each end. The state reflects the event of the highest severity for the network connection. For example, a link line that is red on the child end and yellow on the parent end indicates that the interface has a critical event on the child end and a minor event on the parent end.
NOTE: If all or part of a link is white, this means that SL1 could not determine the interface state or device state for that end of the link.
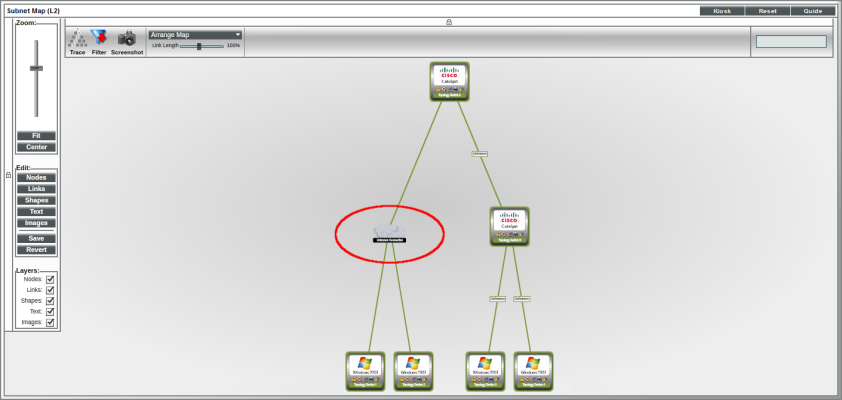
- If you see a cloud icon, this means that SL1 has discovered a connection between two devices but requires confirmation of the link. This occurs when there is an undiscovered device connected between two discovered devices.
- Each device icon has a color outline. The color of the outline specifies the current state of the device. The state reflects the event of the highest severity for the device.
- When the map appears, you can view and reposition the components. The map can be edited and rearranged using drag-and-drop features. Devices and links can be repositioned for easier reading, if necessary. For details, see the section on Buttons, Tools, Icons and Customization.
- Mousing over a device displays its name, IP address, device type, and device category.
- Mousing over a link displays as much of the following information as SL1 can retrieve about both the parent and child interface: MAC address, vendor, interface name, interface alias, and IP address.
- If the nodes in the map are using Extended display (Edit: [Nodes]), you can click on an icon to view events on the device (
 ), create a ticket about the device (
 ), view the Device Summary page (
 ), print a report about the device (
 ), or view the Device Properties page (
 ).
).
Filtering Nodes in a Layer-2 Map
You can use the Filter tool to filter the nodes that are included in the current map.
Selecting the Filter icon ( ) toggles on and off the display of the Node Filters checkboxes.
These checkboxes allow you to filter the nodes included in a map based on whether a device or connection is managed or unmanaged in SL1, whether the node is part of a device group, the status of the device (healthy, notice, minor, major, critical), or the device category assigned to the device.
NOTE: By default, each filter is already selected except for Unmanaged Devices. By default, all devices and connections except unmanaged devices will be included in the map. This means that by default, unmanaged devices will not appear in the map until you select the Unmanaged Devices checkbox.
To use the Filter tool:
- Go to Classic Maps > Topology Maps > Layer-2 and select the map you want to view.
- After the map is displayed, select the Filter tool (
 ) in the upper left.
 - SL1 displays a pane with the Node Filters checkboxes.
- Select a checkbox to include the devices in the map.
- Unselect a checkbox to remove the devices from the map.
- You can select or unselect one or more of the following filters:
- Managed Devices. If selected, the map will include devices that are managed by SL1. Managed devices are those that have been discovered with discovery.
- Unknown Connections. If selected, the map will include connections that are "unknown" to SL1. This means that SL1 has detected a connection but cannot provide details on all or one end of the connection.
- Device Groups. If selected, the map will include device groups.
- Unmanaged Devices. If selected, the map will include devices that are not managed by SL1. This means that SL1 has detected a device but has not performed discovery on that device.
- Healthy. If selected, the map will include devices with a status of "healthy". This means that the most severe event associated with the device has a severity of "healthy".
- Notice. If selected, the map will include devices with a status of "notice". This means that the most severe event associated with the device has a severity of "notice".
- Minor. If selected, the map will include devices with a status of "minor". This means that the most severe event associated with the device has a severity of "minor".
- Major. If selected, the map will include devices with a status of "major". This means that the most severe event associated with the device has a severity of "major".
- Critical. If selected, the map will include devices with a status of "critical". This means that the most severe event associated with the device has a severity of "critical".
- Unknown. If selected, the map will include devices with a status of "unknown". This means that SL1 cannot determine the most severe event associated with the device.
- List of Device Categories. The pane includes a checkbox for each device category associated with the current map. For each selected device category, the map will include devices with that device category.
Confirming or Deleting an Unconfirmed Link
If SL1 discovers a connection between an undiscovered device connected between two or more discovered devices, it will create an unconfirmed link, represented by a cloud icon. You can confirm or delete this link. If you confirm the link, SL1 will not override it, and the link will be displayed in all maps featuring the devices.
The two most common causes of an unknown connection are:
- An interface associated with the ambiguous port on the network switch or bridge is connected to another network switch or bridge that is not discovered in SL1.
- The network switch or bridge is reporting incorrect information. The network switch or bridge detects multiple devices associated with a single port and interface. One of those devices is connected to the interface associated with that port; the other devices reported for the ambiguous port are actually connected to a different interface on the network switch or bridge.
Perform the following steps to determine the cause of the unknown connection:
- Open the Layer-2 topology map that displays the unknown connection.
- Select the link that connects the two devices with the "Unknown Connection" cloud.
- Hover over the link that connects the network switch or bridge to the "Unknown Connection" cloud. The Link Details pop-up window will appear. The Link Details pop-up window displays information about the parent interface (the interface on the network switch or bridge associated with the ambiguous port).
- Based on your knowledge of the network and the tools you have available to you, determine what is connected to that interface.
- If the interface is connected to a network switch or bridge that is not discovered in SL1, discover that network switch or bridge.
- If the interface is connected to one of the possible connections identified by SL1, confirm that connection.
To confirm an unconfirmed link:
- Go to the Topology Maps pages (Maps > Classic Maps > Topology Maps).
- If the map you are viewing contains an unconfirmed link, it will be represented by a cloud icon:
The cloud icon will be connected to one parent device and multiple child devices. SL1 has determined that for each cloud icon, there exists one parent-child relationship, but cannot fully determine which child device link is correct. The links between the cloud icon and the child devices represent all possible connections for the link. You must determine which of the possible connections is correct
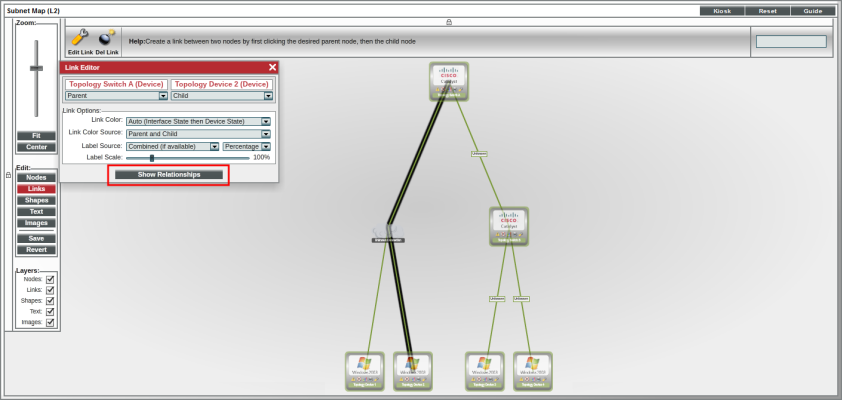
- Select the , and then double click the path between the known and unknown device you want to confirm. The Link Editor modal page appears.
- Select Show Relationships.
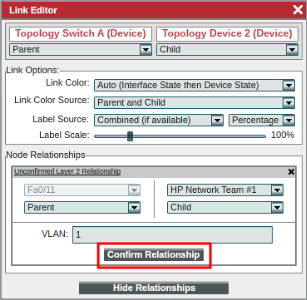
- In the Node Relationships pane, select Confirm Relationship.
- The link will be confirmed, and the other possible links will automatically be deleted.
If the "unknown connection" cloud connected a switch or bridge to multiple devices and you confirmed that one of the connections was correct, the possible connections to the other devices will be removed. To create new connections for those other devices, perform the following steps:
- Select the button.
- Select the first device (typically a switch or bridge) and then the connected device.
- A link is created between the two devices and the Link Editor modal page appears.
- When the Link Editor modal page appears, select the button. In the expanded view, you can select the interface on the parent device and the interface on the child device for this topology record.
- Select the button to save the new topology record.
You can also manually delete an unconfirmed link. To delete an unconfirmed link:
- Go to the Topology Maps pages (Maps > Classic Maps > Topology Maps).
- If the map you are viewing contains an unconfirmed link, it will be represented by a cloud icon.
- Select the , and click the path between the parent device and all possible child devices.
- Select in the upper left of the page.
- The links will be deleted, and will not be overwritten.
Creating, Editing and Deleting a Link
In a Layer-2 Map, you can create links between two devices, edit links between two devices, and delete links between two devices. You can also confirm a relationship between two devices.
In a Layer-2 Map, you can create only layer-2 links.
Creating a Link
If SL1 does not discover a layer-2 link, you can manually create the link in the appropriate layer-2 map. The manually created link will be saved in SL1. SL1 will not overwrite the new link.
To create a layer-2 link:
- Go to Maps > Classic Maps > Topology Maps > Layer-2 and select a map.
- Select the Edit: button.
- Find the device icon for the parent device. Click on it.
- Find the device icon for the child device. Click on it.
- SL1 creates a link between the two icons.
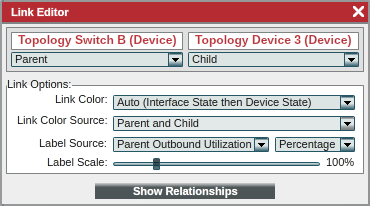
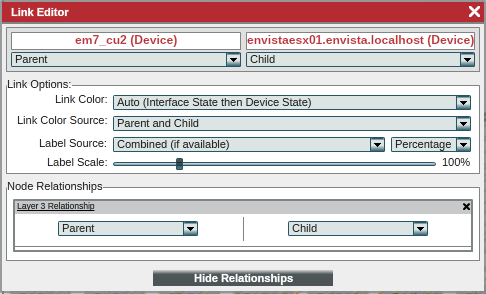
- When the Link Editor page appears, you can edit the values in the following fields:
- Device. Displays the name of the device at one end of the link. You can specify whether this device is a parent, sibling, or child (as compared to the other end of the link). A sibling relationship affects only the display of the map when the default arrangement options are used; the two devices will be on the same horizontal plane in the tree view or the same distance from the center point in the radial tree view.
- Device. Displays the name of the device at the other end of the link. You can specify whether this device is a parent, sibling, or child (as compared to the other end of the link).
- Link Color. Specifies how SL1 should color-code the link. The link can use either interface state or device state. Interface state reflects the event with the highest severity that is aligned with the interface. Device state means the event with the highest severity that is aligned with the device. Choices are:
- Auto (Interface State then Device State). This is the default setting. If possible, SL1 will first use the interface state to color-code the link. If SL1 cannot determine the interface state, SL1 will use the device state to color-code the link. If you select Parent and Child in the Link Color Source field, each end of the link can have a different color.
- Interface State. SL1 will first use the interface state to color-code the link. If you select Parent and Child in the Link Color Source field, each end of the link can have a different color.
- Device State. SL1 will use the device state to color-code the link. If you select Parent and Child in the Link Color Source field, each end of the link can have a different color.
NOTE: If all or part of a link are white, this means that SL1 could not determine the interface state or device state for that end of the link.
- Link Color Source. Specifies whether SL1 will display the status of both interfaces or only one interface when displaying link status. Choices are:
- Parent and Child. This is the default setting. Half the link will display the parent status and half the link will display the child status.
- Parent Node Only. The link will be color-coded to display only the parent status.
- Child Node Only. The link will be color-coded to display only the child status.
- Label Source. Specifies whether or not to include a label with the link and if so, the information to use in the label. Choices are:
- Disabled. This is the default setting. SL1 will not include a label with this link.
- Auto (based on relationships). Based on what information is available, SL1 will automatically select the label source that provides the most information.
- Parent Interface Utilization. Specifies the label will display the utilization of the percent interface.
- Child Interface Utilization. Specifies the label will display the utilization of the child interface.
- Combined Link Utilization. Specifies the label will display the combined utilization of the percent and child interfaces.
- Label Scale. Allows you to set the size of the text box and text of the label in relation to the size of the link. You can use the slider to choose scale between 50% to 300%.
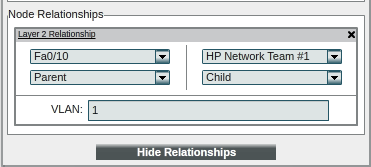
- If you select , you can define Layer-2 Relationships. Layer-2 relationships appear only in Customized Maps pages and Layer-2 maps pages. Layer-2 links use the Data Link Layer and allow devices in a WAN or LAN to communicate with one another. Layer-2 links use Ethernet and MAC addresses to communicate with devices in the same LAN or WAN. Layer-2 links are unrouted. For Layer-2 relationships, you can define the following:
- Interface. Displays the name of the interface at one end of the link. You can select a different interface on the device. You can then specify this device is a parent, sibling, or child (as compared to the other end of the link). Editing the parent/sibling/child setting in this field also changes the setting in the Device field.
- VLAN. Displays the VLAN created by the link.
- To save the new link, select the Edit: button.
- The manually created link will be saved in SL1. SL1 will not overwrite the new link.
Editing a Link
If SL1 discovers inaccurate information about a link, you can manually edit the link's properties in the appropriate layer-2 map. The manually edited link will be saved in SL1. SL1 will not overwrite the changes to the link.
To edit a layer-2 link:
- Go to Maps > Classic Maps > Topology Maps > Layer-2 and select a map.
- Select the Edit: button.
- Select the link you want to edit.
- Select the Edit Link icon in the Link menu (at the top of the pane).
- When the Link Editor page appears, you can edit the values in each field.
- To save your changes, select the Edit: button.
- The changes to the link will be saved in SL1. SL1 will not overwrite the edited link.
Deleting a Link
If SL1 discovers an incorrect layer-2 link, you can delete the link. You can also delete links that were created manually. When you delete a link from a layer-2 map, the change will be saved in SL1. The link will no longer be used for event correlation and will not appear in any maps or the device relationships page. SL1 will not re-add the link.
To delete a link:
- Go to Maps > Classic Maps > Topology Maps > Layer-2.
- Select the Edit: button.
- Select the link you want to delete.
- Select the Delete Link icon in the Link menu (at the top of the pane).
- To save your changes, select the Edit: button.
- The deleted relationship will be saved in SL1. SL1 will not overwrite the deleted relationship.
Customizing the Display of a Layer-2 Map
For details and examples on how to customize a Layer-2 Map, see Buttons, Tools, Icons and Customization.
Event Correlation and Precedence
For details on parent and child devices, event correlation and precedence, see the section on Event Correlation and Precedence.
CDP Maps
Cisco Discovery Protocol (CDP) allows discovery of Cisco hardware and allows Cisco hardware within the same LAN or WAN to share information about each other. This information includes the MAC address and IP address, the operating system, and information about the network interface. CDP is a Layer-2 protocol that uses the Data Link Layer and is unrouted. CDP can also run on legacy Hewlett Packard Hardware.
NOTE: For SL1 to create CDP maps, you must first enable the Enable CDP Topology checkbox in the Behavior Settings page. This checkbox tells SL1 to discover CDP relationships where possible.
If you enable Use CDP Topology, SL1 automatically discovers all CDP relationships in your infrastructure. SL1 then creates graphical representations of those discovered networks and subnets. These graphical representations are called Topology Views. The Classic Maps > Topology Maps pages allow you to view details and relationships in any network that has been discovered by SL1.
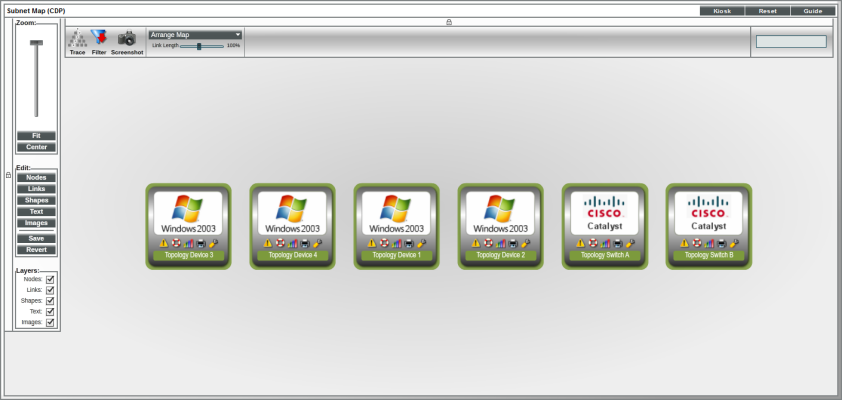
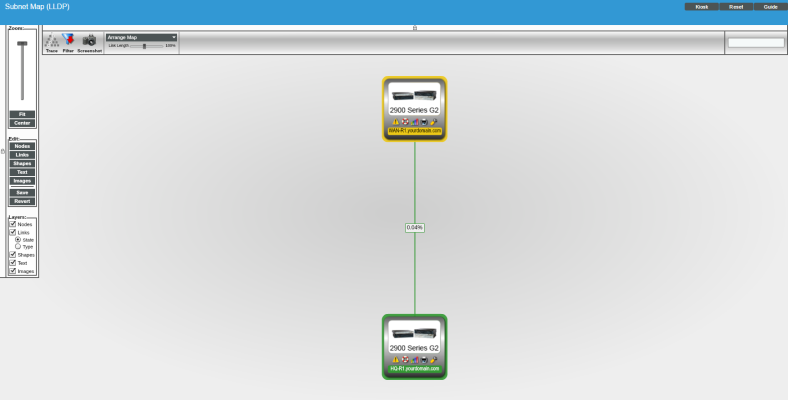
The Subnet Map (CDP) page displays a network map, where you can view details and relationships in any CDP network that has been discovered by SL1.
CDP maps show layer-2, unrouted subnets, where devices are identified by MAC addresses (as opposed to routed networks, where devices are identified by IP address).
A CDP map can include:
- Devices of each device category defined in SL1.
- Links between devices.
- Links between networks (created with switches or routers).
- SL1 automatically updates the map as new devices are discovered. SL1 also updates the map with the latest status and event information.
NOTE: Because CDP provides very accurate discovery details, links and relationships in CDP Maps take precedence over links and relationships in Layer-2 Maps.
Viewing a CDP Map
You can view a CDP map from the Subnet Map (CDP) page (Classic Maps > Topology Maps > CDP). To view a CDP map:
- Go to the Classic Maps page (Maps > Classic Maps).
- Expand the links for Topology Maps > CDP and then select a network. The Subnet Map (CDP) page appears and displays a map of the selected network.
- Depending on the network you select, the CDP map will display the following information:
- The blank field in the upper right allows you to find one or more devices in the map. You can enter a string, and SL1 will highlight only the devices that have a device name that matches the string.
- Each device appears as an icon in the map.
NOTE: If your account is of type "user", you can view only devices that belong to the same organization(s) as your user account.
- Each network device is connected to its parent device with a line. The color of the line specifies the current state of the connection at each end. The state reflects the event of the highest severity for the network connection. For example, a link line that is red on the child end and yellow on the parent end indicates that the interface has a critical event on the child end and a minor event on the parent end.
NOTE: If all or part of a link are white, this means that SL1 could not determine the interface state or device state for that end of the link.
- Each device icon has a color outline. The color of the outline specifies the current state of the device. The state reflects the event of the highest severity for the device.
- When the map appears, you can view and reposition the components. The map can be edited and re-arranged using drag-and-drop features. Devices and links can be repositioned for easier reading, if necessary. For details, see Buttons, Tools, Icons and Customization.
- Mousing over a device displays its name, IP address, device type, and device category.
- Mousing over a link displays as much of the following information as SL1 can retrieve about both the parent and child interface: the MAC address, vendor, interface name, interface alias, and IP address.
- If the nodes in the map are using Extended display (Edit: Nodes), you can click on an icon to view events on the device (
 ), create a ticket about the device (
 ), view the Device Summary page (
 ), print a report about the device (
 ), or view the Device Properties page (
 ).
).
Filtering the Nodes in a CDP Map
You can filter the nodes in a CDP map. This feature works the same as Layer-2 map. To learn more about filtering nodes in a CDP map, see the section Filtering Nodes in a Layer-2 map.
Creating, Editing, Confirming and Deleting a Link
You can confirm or delete unconfirmed links in a CDP map. To learn more about confirming or deleting links in a CDP map, see the section on Confirming or Deleting an Unconfirmed Link.
You can create links between nodes in a CDP map. The Link Editor pane is the same as described for Layer-2 maps. To learn more about the Link Editor pane, see the section on Creating, Editing, and Deleting a Link.
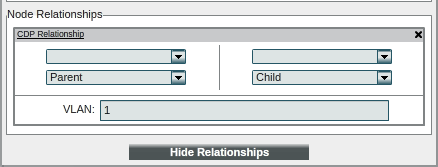
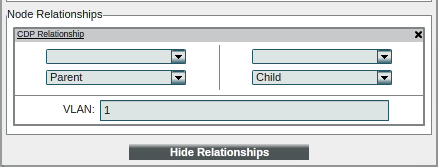
If you select for a CDP link, you can view CDP relationships. CDP relationships appear only in Customized Maps pages and CDP maps pages. Cisco Discovery Protocol (CDP) allows discovery of Cisco hardware and allows Cisco hardware within the same LAN or WAN to share information about each other. This information includes the MAC address and IP address, the operating system, and information about the network interface. CDP uses is a Layer-2 protocol that uses the Data Link Layer and is unrouted. CDP can also run on legacy Hewlett Packard Hardware. For CDP relationships, you can define the following:
- Interface. Displays the name of the interface at one end of the link. You can select a different interface on the device. You can then specify this device is a parent, sibling, or child (as compared to the other end of the link). Editing the parent/sibling/child setting in this field also changes the setting in the Device field.
- Interface. Displays the name of the interface at one end of the link. You can select a different interface on the device. You can then specify this device is a parent, sibling, or child (as compared to the other end of the link). Editing the parent/sibling/child setting in this field also changes the setting in the Device field.
- VLAN. Displays the VLAN created by the link.
For more information on how edit and delete links in a CDP map, see the section on Creating, Editing, and Deleting a Link.
Customizing the Display of a CDP Map
For details and examples on how to customize a CDP map, see Buttons, Tools, Icons and Customization.
Event Correlation and Precedence
For details on parent and child devices, event correlation and precedence, see the section on Event Correlation and Precedence.
LLDP Maps
Link Layer Discovery Protocol (LLDP) allows discovery of Cisco hardware and allows Cisco hardware within the same LAN or WAN to share information about each other. This information includes the MAC address and IP address, the operating system, and information about the network interface. LLDP is a layer-2 protocol that uses the Data Link Layer and is unrouted.
NOTE: For SL1 to create LLDP maps, you must first select the Enable LLDP Topology checkbox in the Behavior Settings page. This checkbox tells SL1 to discover LLDP relationships where possible.
If you enable Enable LLDP Topology, SL1 automatically discovers all LLDP relationships in your infrastructure. SL1 then creates graphical representations of those discovered networks and subnets. These graphical representations are called Topology Views. The Classic Maps > Topology Maps pages allow you to view details and relationships in any network that has been discovered by SL1.
The Subnet Map (LLDP) page displays a network map, where you can view details and relationships in any LLDP network that has been discovered by SL1.
LLDP maps show layer-2, unrouted subnets, where devices are identified by MAC addresses (as opposed to routed networks, where devices are identified by IP address).
A LLDP map can include:
- Devices of each device category defined in SL1.
- Links between devices.
- Links between networks (created with switches or routers).
- SL1 automatically updates the map as new devices are discovered. SL1 also updates the map with the latest status and event information.
NOTE: Because LLDP provides very accurate discovery details, links and relationships in LLDP Maps take precedence over links and relationships in layer-2 Maps.
Viewing an LLDP Map
You can view an LLDP map from the Subnet Map (LLDP) page (Classic Maps > Topology Maps > LLDP). To view an LLDP map:
- Go to the Classic Maps page (Maps > Classic Maps).
- Expand the links for Topology Maps > LLDP and then select a network. The Subnet Map (LLDP) page appears and displays a map of the selected network.
- Depending on the network you select, the LLDP map will display the following information:
- The blank field in the upper right allows you to find one or more devices in the map. You can enter a string, and SL1 will highlight only the devices that have a device name that matches the string.
- Each device appears as an icon in the map.
NOTE: If your account is of type "user", you can view only devices that belong to the same organization(s) as your user account.
- Each network device is connected to its parent device with a line. The color of the line specifies the current state of the connection at each end. The state reflects the event of the highest severity for the network connection. For example, a link line that is red on the child end and yellow on the parent end indicates that the interface has a critical event on the child end and a minor event on the parent end.
NOTE: If all or part of a link are white, this means that SL1 could not determine the interface state or device state for that end of the link.
- Each device icon has a color outline. The color of the outline specifies the current state of the device. The state reflects the event of the highest severity for the device.
- When the map appears, you can view and reposition the components. The map can be edited and re-arranged using drag-and-drop features. Devices and links can be repositioned for easier reading, if necessary. For details, see Buttons, Tools, Icons and Customization.
- Mousing over a device displays its name, IP address, device type, and device category.
- Mousing over a link displays as much of the following information as SL1 can retrieve about both the parent and child interface: the MAC address, vendor, interface name, interface alias, and IP address.
- If the nodes in the map are using Extended display (Edit: Nodes), you can click on an icon to view events on the device (
 ), create a ticket about the device (
 ), view the Device Summary page (
 ), print a report about the device (
 ), or view the Device Properties page (
 ).
).
Filtering the Nodes in a LLDP Map
You can filter the nodes in a LLDP map. This feature works the same as Layer-2 map. To learn more about filtering nodes in a LLDP map, see the section Filtering Nodes in a Layer-2 map.
Creating, Editing, Confirming and Deleting a Link
You can confirm or delete unconfirmed links in a LLDP map. To learn more about confirming or deleting links in a LLDP map, see the section on Confirming or Deleting an Unconfirmed Link.
You can create links between nodes in a LLDP map. The Link Editor pane is the same as described for Layer-2 maps. To learn more about the Link Editor pane, see the section on Creating, Editing, and Deleting a Link.
If you select for a LLDP link, you can view LLDP relationships. LLDP relationships appear only in Customized Maps pages and LLDP maps pages. Link Layer Discovery Protocol (LLDP) allows discovery of hardware and allows hardware within the same LAN or WAN to share information about each other. This information includes the MAC address and IP address, the operating system, and information about the network interface. LLDP uses is a Layer-2 protocol that uses the Data Link Layer and is unrouted. For LLDP relationships, you can define the following:
- Interface. Displays the name of the interface at one end of the link. You can select a different interface on the device. You can then specify this device is a parent, sibling, or child (as compared to the other end of the link). Editing the parent/sibling/child setting in this field also changes the setting in the Device field.
- Interface. Displays the name of the interface at one end of the link. You can select a different interface on the device. You can then specify this device is a parent, sibling, or child (as compared to the other end of the link). Editing the parent/sibling/child setting in this field also changes the setting in the Device field.
- VLAN. Displays the VLAN created by the link.
For more information on how edit and delete links in a LLDP map, see the section on Creating, Editing, and Deleting a Link.
Customizing the Display of a LLDP Map
For details and examples on how to customize a LLDP map, see Buttons, Tools, Icons and Customization.
Event Correlation and Precedence
For details on parent and child devices, event correlation and precedence, see the section on Event Correlation and Precedence.
Layer-3 Maps
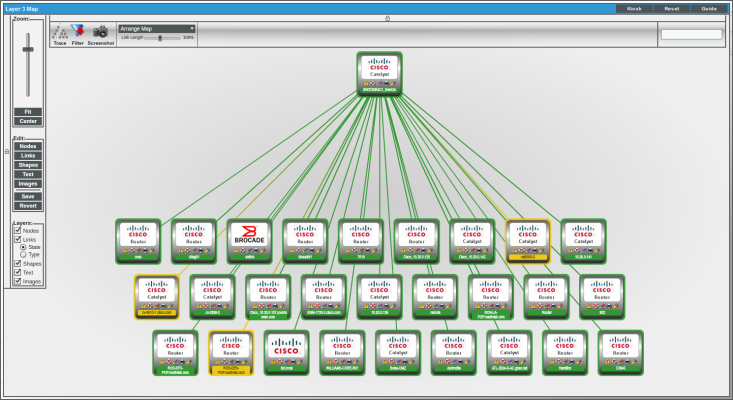
The Layer-3 Maps page displays a network map, where you can view details and relationships between Data Collectors and layer-3 routers and switches, and between the layer-3 routers and switches that have been discovered by SL1.
SL1 creates Layer-3 maps by running traceroute from a Data Collector to all devices that have layer-3 collection enabled in the device class.
Layer-3 networks are routed subnets, where devices are identified by IP address (as opposed to unrouted networks, where devices are identified by MAC address). Layer-3 links communicate over the Network Layer and allow devices from different subnets or networks to communicate. Layer-3 links use IP addresses to identify devices and their networks and therefore are routed and can pass messages through routers.
A layer-3 network map can include:
- Data Collectors, switches, and routers.
- Links between devices.
- Links between networks (created with switches or routers).
- SL1 automatically updates the map as new devices are discovered. SL1 also updates the map with the latest status and event information.
Viewing a Layer-3 Map
You can view a layer-3 Map from the Layer 3 Map page (Classic Maps > Topology Maps > Layer-3). To view a layer-3 map:
- Go to the Classic Maps page (Maps > Classic Maps).
- Expand the links for Topology Maps > Layer-3 and then select a network. The Layer 3 Map page appears and displays a map of the selected network.
NOTE: If your environment includes only a single layer-3 network, the NavBar will not list any networks under Layer-3. When you navigate to Layer-3 in the NavBar, SL1 will automatically load the map of your single layer-3 network.
- Depending on the layer-3 map you select, the map will display the following:
NOTE: In order to have devices appear in Layer-3 maps, you must edit the device class and select the L3 Topology checkbox in the Device Class Editor page (System > Customize > Device Classes).
- The blank field in the upper right allows you to find one or more devices in the map. You can enter a string, and SL1 will highlight only the devices that have a device name that matches the string.
- Each device appears as an icon in the map.
- Each network device is connected to its parent device with a line. The color of the line specifies the current state of the connection at each end. The state reflects the event of the highest severity for the network connection. For example, a link line that is red on the child end and yellow on the parent end indicates that the interface has a critical event on the child end and a minor event on the parent end.
NOTE: If all or part of a link is white, this means that SL1 could not determine the interface state or device state for that end of the link.
- Each device icon has a color outline. The color of the outline specifies the current state of the device. The state reflects the event of the highest severity for the device.
- When the map appears, you can view and reposition the components. The map can be edited and re-arranged using drag-and-drop features. Devices and links can be repositioned for easier reading, if necessary. For details, see Buttons, Tools, Icons and Customization.
- Mousing over a device displays its name, IP address, device type, and device category.
- Mousing over a link displays as much of the following information as SL1 can retrieve about both the parent and child interface: the MAC address, vendor, interface name, interface alias, and IP address.
- If the nodes in the map are using Extended display (Edit: [Nodes]), you can click on an icon to view events on the device (
 ), create a ticket about the device (
 ), view the Device Summary page (
 ), print a report about the device (
 ), or view the Device Properties page (
 ).
).
You can filter the nodes in a Layer-3 map. This feature works the same as Layer-2 map. To learn more about filtering nodes in a Layer-3 map, see the section Filtering Nodes in a Layer-2 map.
Creating, Editing, Confirming and Deleting a Link
You can confirm or deleted unconfirmed links in a Layer-3 map. To learn more about confirming or deleting links in a Layer-3 map, see the section on Confirming of Deleting an Unconfirmed Link.
You can create links between nodes in a Layer-3 map. The Link Editor pane is the same as described for Layer-2 maps. To learn more about the Link Editor pane, see the section on Creating, Editing, and Deleting a Link.
If you select for a Layer-3 link, you can view Layer-3 relationships. Layer 3 Relationships appears only in the My Customized Maps pages and Layer-3 Maps pages. Layer-3 links use the Network Layer and allow devices from different subnets or networks to communicate. Layer-3 links use IP addresses and therefore are routed and can pass messages through routers. For Layer 3 Relationships, you can define the following:
- Device.Displays the name of the device at one end of the link. You can specify whether this device is a parent, sibling, or child (as compared to the other end of the link). Editing the parent/sibling/child setting in this field also changes the setting in the Device field.
- Device. Displays the name of the device at the other end of the link. You can specify whether this device is a parent, sibling, or child (as compared to the other end of the link). Editing the parent/sibling/child setting in this field also changes the setting in the Device field.
For more information on how to edit and delete links in a Layer-3 map, see the section on Creating, Editing, and Deleting a Link.
Customizing the Display of a Layer-3 Map
For details and examples on how to customize a layer-3 map, see Buttons, Tools, Icons and Customization.
Event Correlation and Precedence
For details on parent and child devices, event correlation and precedence, see the section on Event Correlation and Precedence.
