This
Use the following menu options to navigate the SL1 user interface:
- To view a pop-out list of menu options, click the menu icon (
 ).
). - To view a page containing all of the menu options, click the Advanced menu icon (
 ).
).
What is Scheduled Maintenance?
Scheduled Maintenance is a date and time when a device is put into "maintenance mode". During maintenance mode, for the selected devices SL1 will generate only events with a severity less than the system-wide Maintenance Minimum Severity setting. By default, no events are generated during maintenance. You can choose to enable or disable polling during maintenance mode. Even if polling is enabled, SL1 will collect information from the selected devices but will not generate applicable events for the devices.
SL1 includes tools that allow you to view, edit, and define scheduled maintenance for one or more devices. The Schedule Manager page allows you to schedule one-time and recurring maintenance tasks and downtime for a device. You can use the scheduled maintenance to:
- Specify a recurring downtime for routine maintenance (such as a database backup that occurs weekly every Tuesday at 3 AM).
- Specify a monthly schedule based on day of the week (such as a backup that occurs every third Sunday of the month at 11 PM)
- Specify one-time downtime (such as a specific day for upgrading software or hardware).
When a device is in maintenance, SL1 will generate only events with a severity less than the system-wide Maintenance Minimum Severity setting. By default, no events are generated during maintenance. You can choose to enable or disable polling during maintenance mode. Even if polling is enabled during maintenance, SL1 will collect information from the device but will not generate applicable events for the device.
You can specify a "patch window" within the larger maintenance period. The "patch window" allows SL1 to limit the suppression events to a small time-frame within the larger maintenance window. For example:
Suppose you have to patch a server that is monitored by SL1. Suppose you know you will perform this task sometime between midnight and 6:00 AM. Suppose you know that the actual patch process will require only 15 minutes of downtime for the server. In SL1, you would define a maintenance window of 24:00 - 6:00 and a patch window of 15 minutes.
- At 24:00, SL1 generates an event saying that the server is going into maintenance mode. Because you have defined a patch window, SL1 continues to monitor this server as normal.
- At 3:00, you apply the patch to the server. The server reboots, and SL1 generates an event saying that the server is offline. This first event within the larger maintenance window triggers the start of the patch maintenance window.
- SL1 suppresses the event that triggered the patch maintenance window and instead generates an event "Patch Maintenance Window Opened".
- For the next 15 minutes, SL1 will suppress all events for the device.
- At 3:15, SL1 will generate an event for "Patch Maintenance Window Closed". This event clears the previous event "Patch Maintenance Window Opened".
- SL1 will now generate events for the device, even though the maintenance window extends until 6:00.
NOTE: If the patch was applied at 5:50, the server was rebooted, and SL1 generated an event saying that the server is offline, events would be suppressed only until the end of the maintenance window, 6:00, even though the patch window is 15 minutes.
NOTE: If you disable an active maintenance schedule, the device will be pulled out of maintenance mode; if you re-enable the schedule during the scheduled time window, the device will return to maintenance mode.
What is User Maintenance?
User maintenance is an option that allows a user to manually put a device in to "maintenance mode". During maintenance mode, for the selected devices SL1 will generate only events with a severity less than the system-wide Maintenance Minimum Severity setting. By default, no events are generated during maintenance. You can choose to enable or disable polling during maintenance mode. Even if polling is enabled, SL1 will collect information from the selected devices but will not generate applicable events for the devices.
User maintenance mode is not scheduled. That is, a user must manually enable user maintenance to put a device into this mode and a user must manually disable user maintenance to turn off this mode for a device. User maintenance mode overrides scheduled maintenance for a device.
User maintenance can be enabled and disabled in the user interface or through the API.
The Maintenance Minimum Severity Setting
The global Maintenance Minimum Severity setting specifies the minimum severity required for an event to be suppressed during device maintenance and user maintenance. The default value is Healthy, which causes all events to be suppressed. To change this setting:
- Go to the Behavior Settings page (System > Settings > Behavior).
- In the Behavior Settings page, select a value in the Maintenance Minimum Severity drop-down list. The choices are Healthy, Notice, Minor, Major, or Critical.
- Select the button. Events with a severity lower than the severity you chose will now be generated for all devices in scheduled maintenance mode and user maintenance mode.
Enabling and Disabling User Maintenance for a Single Device
You can enable and disable user maintenance mode in the Device Properties page.
To enable or disable user maintenance mode for a device:
-
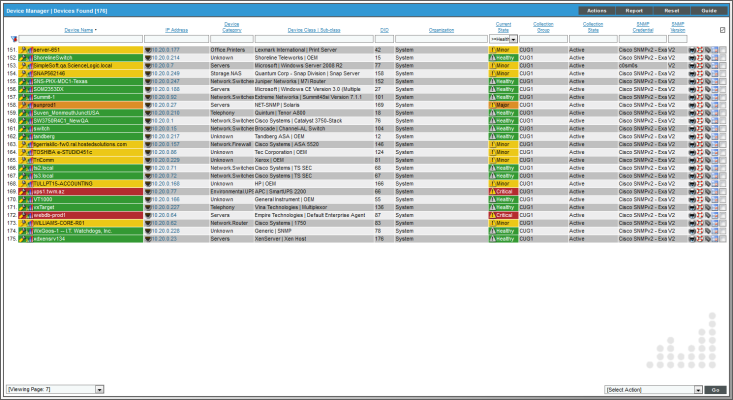
Go to the Device Manager page (Devices > Device Manager).
- In the Device Manager page, find the device for which you want to enable or disable user maintenance. Select its wrench icon (
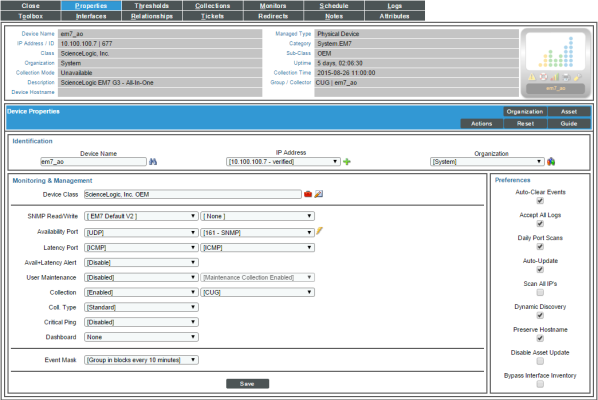
 ). The Device Properties page is displayed:
- In the Device Properties page, edit the following fields:
- User Maintenance. Specifies whether the device is in user maintenance mode. During maintenance mode, for the selected devices SL1 will generate only events with a severity less than the system-wide Maintenance Minimum Severity setting. By default, no events are generated during maintenance. You can choose to enable or disable polling during maintenance mode. Even if polling is enabled, SL1 will collect information from the selected devices but will not generate applicable events for the devices. Choices are:
- Enabled. Device will be put in user maintenance mode. The device will remain in this state until you or another user disables user maintenance mode.
- Disabled. User maintenance mode will be disabled for this device.
- User Maintenance Collection. The drop-down list to the right of the User Maintenance field specifies whether SL1 will poll the device during user maintenance mode. Choices are:
- Enabled. The device will be polled during user maintenance mode.
- Disabled. The device will not be polled during user maintenance mode.
- Select the button.
Enabling and Disabling User Maintenance for One or More Devices
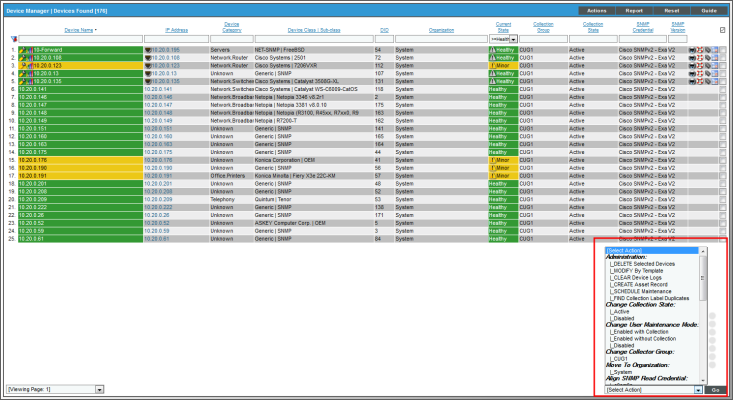
The Device Manager page contains a drop-down field in the lower right called Select Action. This field allows you to apply an action to multiple devices at once. From the Select Action menu, you can enable or disable user maintenance mode for multiple devices, simultaneously.
To enable or disable user maintenance mode for multiple devices:
-
Go to the Device Manager page (Devices > Device Manager).
- In the Device Manager page, select the checkbox for each device to which you want to apply the action. To select all checkboxes for all devices, select the red checkbox (
 ) at the top of the page.
 - In the Select Action drop-down list, select one of the following:
- Change User Maintenance Mode: Enabled with Collection. This option puts the selected devices into user maintenance mode with collection enabled. The devices will remain in this state until you or another user disables user maintenance mode.
- Change User Maintenance Mode: Enabled without Collection. This option puts the selected devices into user maintenance mode with collection disabled. The devices will remain in this state until you or another user disables user maintenance mode.
- Change User Maintenance Mode: Disabled. This option disables user maintenance mode for the selected devices.
- Click the button.
- The changes are applied to each selected device.
Scheduling Maintenance for a Single Device
You can schedule maintenance and downtime for a device on the Schedules tab of the Device Investigator (or on the Schedule Manager page in the Device Administration panel in the classic SL1 user interface).
You can also view and manage all scheduled processes from the Schedule Manager page (Registry > Schedules > Schedule Manager). For more information, see the
Viewing the Schedule Manager
The Schedules tab of the Device Investigator (or the Schedule Manager page in the Device Administration panel in the classic SL1 user interface) displays the following information about each scheduled or recurring device maintenance window:
- Schedule Summary. Displays the name assigned to the scheduled process.
- Schedule Description. Displays a description of the scheduled process.
- Event ID. Displays a unique, numeric ID for the scheduled process. SL1 automatically creates this ID for each scheduled process.
- sch id. Displays a unique, numeric ID for the schedule. SL1 automatically creates this ID for each schedule.
- Context. Displays the area of SL1 upon which the schedule works.
- Timezone. Displays the time zone associated with the scheduled process.
- Start Time. Displays the date and time at which the scheduled process will begin.
- Duration. Displays the duration, in minutes, which the scheduled process occurs.
- Recurrence Interval. If applicable, displays the interval at which the scheduled process recurs.
- End Date. If applicable, displays the date and time on which the scheduled process will recur.
- Last Run. If applicable, displays the date and time the scheduled process most recently ran.
- Owner. Displays the username of the owner of the scheduled process.
- Organization. Displays the organization to which the scheduled process is assigned.
- Visibility. Displays the visibility level for the scheduled process. Possible values are "Private", "Organization", or "World".
- Enabled. Specifies if the scheduled process is enabled. Possible values are "Yes" or "No".
To edit a scheduled or recurring device maintenance window, click its wrench icon (![]() ) and update the settings as needed on the Schedule Editor modal page. (For more information, see the section Defining a Scheduled or Recurring Device Maintenance Window for a Single Device.)
) and update the settings as needed on the Schedule Editor modal page. (For more information, see the section Defining a Scheduled or Recurring Device Maintenance Window for a Single Device.)
Defining a Scheduled or Recurring Device Maintenance Window for a Single Device
You can schedule a device maintenance window in SL1 from the Schedules tab of the Device Investigator (or the Schedule Manager page in the Device Administration panel in the classic SL1 user interface). SL1 will automatically set the status of the device to "maintenance" at the scheduled time.
To define a scheduled or recurring device maintenance window:
- Go to the Schedules tab of the Device Investigator. (Alternatively, in the classic SL1 user interface, go to the Schedule Manager page (Devices > Device Manager > wrench icon > Schedule)).
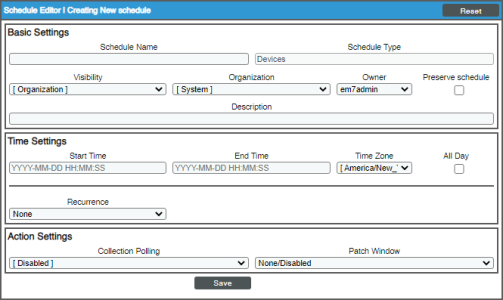
- Click . The Schedule Editor modal page appears.
-
On the Schedule Editor modal page, enter values in the following fields:
Basic Settings
- Schedule Name. Type a name for the scheduled process.
- Schedule Type. Indicates the scheduled process type (such as Tickets, Reports, or Devices).
- Visibility. Select the visibility for the scheduled process. You can select one of the following:
- Private. The scheduled process is visible only to the owner selected in the Owner field.
- Organization. The scheduled process is visible only to the organization selected in the Organization field.
- World. The scheduled process is visible to all users.
- Organization. Select the organization to which you want to assign the scheduled process.
- Owner. Select the owner of the scheduled process. The default value is the username of the user who created the scheduled process.
- Preserve Schedule. Select this checkbox to exclude this schedule from being pruned after expiration.
- Description. Type a description of the scheduled process.
Time Settings
- Start Time. Click in the field and select the date and time you want the scheduled process to start.
- End Time. Click in the field and select the date and time you want the scheduled process to end.
- Time Zone. Select the region or time zone for the scheduled start time.
If you want SL1 to automatically adjust for daylight savings time (if applicable), then you must select a named region (such as America/New York) in the Time Zone field. If you select a specific time zone (such as EST) or a specific time offset (such as GMT-5), then SL1 will not automatically adjust for daylight savings time.
- All Day. Select this checkbox if the scheduled process occurs all day rather than during a specific period of time. If you do so, the End Time field becomes disabled.
- Recurrence. Select whether you want the scheduled process to occur once or on a recurring basis. You can select one of the following:
- None. The scheduled process occurs only once.
- By Interval. The scheduled process recurs at a specific interval.
- Every Xth day of the Week. The scheduled process occurs at a monthly interval based on a day of the week. The day of the week displayed in this option matched the day selected in the Start Time field. For example, if you set the Start Time to Thursday, August 5th and that day is the first Thursday of the month, then the recurrence option will be Every 1st Thursday, and the scheduled process will occur monthly on the first Thursday of the month.
If you select By Interval, the following additional fields appear:
- Interval. In the first field, enter a number representing the frequency of the scheduled process, then select the time interval in the second field. Choices are Minutes, Hours, Days, Weeks, or Months. For example:
- If you specify "6 Hours", then the scheduled process recurs every six hours from the time listed in the Start Time field.
- If you specify "10 Days", then the scheduled process recurs every 10 days from the date listed in the Start Time field.
- If you specify "2 Weeks", then the scheduled process recurs every two weeks, on the same day of the week as the Start Time.
- If you specify "3 Months" the ticket recurs every three months, on the same day of the month as the Start Time.
- Recur Until. Specifies when the scheduled process stops recurring. You can select one of the following:
- No Limit. The scheduled process recurs indefinitely until it is disabled.
- Specified Date. The scheduled process recurs until a specific date and time. If you select Specified Date, you must select a date and time in the Last Recurrence field.
- Last Recurrence. Click in the field and select the date and time you want the scheduled process to stop recurring.
Action Settings
- Collection Polling. Specifies whether SL1 should perform collection on the device during the scheduled maintenance. Choices are:
-
Enabled. During scheduled maintenance, SL1 will collect data from the device, but no events will be triggered for the device.
-
Disabled. During scheduled maintenance, SL1 will not collect data from the device. No events will be triggered for the device.
If a patch window is set, data collection will continue when a maintenance window opens and stop only during the patch window instead.
- Patch Window. You can specify a "patch window" within the larger maintenance period. The "patch window" allows SL1 to limit the suppression of events to a small time-frame within the larger maintenance window. Your choices are:
- None
- Between 5 minutes and 60 minutes, in five-minute intervals.
For example:
Suppose you have to apply a patch to a server that is monitored by SL1. Suppose you know you will perform this task sometime between midnight and 6:00 AM. Suppose you know that the actual patch process requires only 15 minutes of downtime for the server. In SL1, you would define a maintenance window of 24:00 - 6:00 and a patch window of 15 minutes. In this scenario:
- At 24:00, SL1 generates an event saying that the server is going into maintenance mode. Because you have defined a patch window, SL1 continues to monitor this server as normal.
- At 3:00, you apply the patch to the server. The server reboots, and SL1 generates an event saying that the server is offline. The first event that both matches or exceeds the Patch Maintenance Minimum Severity in the Behavior Settings page (System > Settings > Behavior) and occurs within the larger maintenance window triggers the start of the patch window.
- SL1 suppresses the event that triggered the patch maintenance window and instead generates an event "Patch Maintenance Window Opened".
- For the next 15 minutes, SL1 will suppress all events for the device.
- At 3:15, SL1 will generate an event for "Patch Maintenance Window Closed". This event clears the previous event "Patch Maintenance Window Opened".
- SL1 will now generate events for the device, even though the maintenance window extends until 6:00.
NOTE: If the patch was applied at 5:50, the server was rebooted, and SL1 generated an event saying that the server is offline, events would be suppressed only until the end of the maintenance window, 6:00, even though the patch window is 15 minutes.
- Click .
Scheduling Maintenance for One or More Devices
The Device Manager page contains a drop-down field in the lower right called Select Action. This field allows you to apply an action to multiple devices at once. From the Select Action menu, you can schedule maintenance for multiple devices, simultaneously.
To schedule maintenance for multiple devices:
- Go to the Device Manager page (Devices > Device Manager):
- In the Device Manager page, select the checkbox for each device for which you want to schedule maintenance. To select all checkboxes for all devices, select the red checkbox (
 ) at the top of the page.
 - In the Select Action drop-down list, select Schedule Maintenance, and then click . The Schedule Editor modal page appears.
- To schedule maintenance for the selected devices, follow the steps described in the section Defining a Scheduled or Recurring Device Maintenance Window for a Single Device. The values you supply in the Schedule Editor modal page are applied to each selected device.
Enabling or Disabling Scheduled Maintenance for One or More Devices
You can enable or disable one or more scheduled or recurring device maintenance windows from the Schedules tab of the Device Investigator (or the Schedule Manager page in the Device Administration panel in the classic SL1 user interface).
To do this:
- Go to the Schedules tab of the Device Investigator. (Alternatively, in the classic SL1 user interface, go to the Schedule Manager page (Devices > Device Manager > wrench icon > Schedule)).
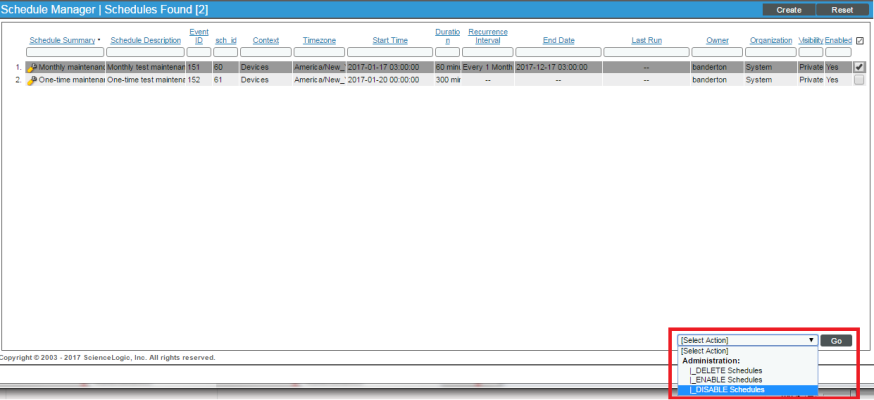
- Select the checkbox icon for each scheduled process you want to enable or disable.
- Click the Select Action menu and choose Enable Schedules or Disable Schedules.
- Click the button.
Deleting Scheduled Maintenance for One or More Devices
You can delete one or more scheduled or recurring device maintenance windows from the Schedules tab of the Device Investigator (or the Schedule Manager page in the Device Administration panel in the classic SL1 user interface).
To delete maintenance windows:
- Go to the Schedules tab of the Device Investigator. (Alternatively, in the classic SL1 user interface, go to the Schedule Manager page (Devices > Device Manager > wrench icon > Schedule)).
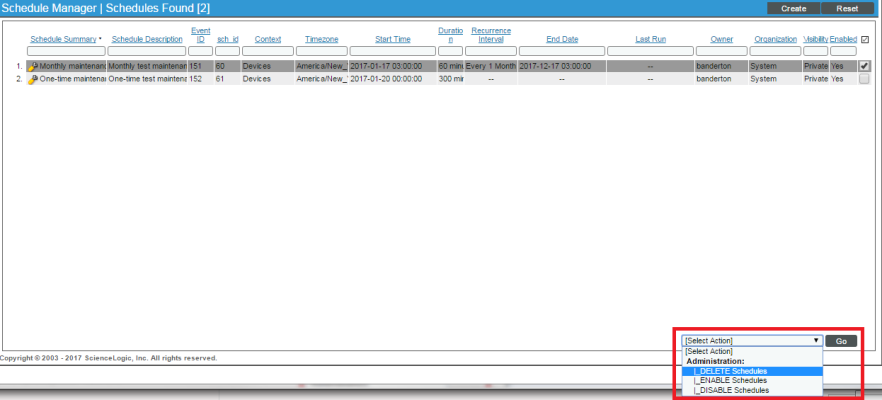
- Select the checkbox icon for each scheduled process you want to delete.
- Click the Select Action menu and choose Delete Schedules.
- Click the button.
