How to Build Dynamic Applications with the Snippet Framework
This tutorial will guide you through building Dynamic Applications with the Snippet Framework. By completing this tutorial, you will be able to create the same Dynamic Applications found in the REST: Toolkit available on the ScienceLogic Portal. REST: Toolkit is monitoring an SL1 stack by using the ScienceLogic API.
This document contains:
General concepts to have a better understanding of the framework (Snippet Framework Overview).
The explanation of how to create Dynamic Applications the steps from REST: Toolkit (Creating Dynamic Applications with Out-Of-The-Box Steps).
How to create Dynamic Applications using custom steps (Creating Dynamic Applications with Custom Steps).
Snippet Framework Overview
The Snippet Framework can help you develop Dynamic Applications in an easy and standard way by maximizing code reuse between applications and technologies.
In SL1, a collection is the sequence of actions in a specific order. These actions are defined in steps. The steps are pieces of code with a single purpose and can be re-used easily in different applications. The Snippet Framework does not come with any available steps, but the Toolkit PowerPacks provide the required steps to build a Dynamic Application on a specific protocol. If a required step is missing, you can have the ability to create a custom steps. To create a custom step, refer to the Creating a Custom Step document. There are three type of steps in the Snippet Framework.
Syntax - Convert a Dynamic Application Snippet Argument into a format that can be consumed by the Snippet Framework. (This is the only type of step that has a non-customizable default).
Requestor - A step that makes the request over the network using the proper technology (e.g. SSH, HTTP, JMX-remote, etc.)
Processors - Transform and select the data from the result of a Requestor.
The framework relies on the Snippet Arguments to determine what to collect and how. This approach is known as “snippet argument-driven”. The Snippet Framework uses a Syntax to interpret the syntax of the Snippet Argument.
Creating Dynamic Applications with Out-Of-The-Box Steps
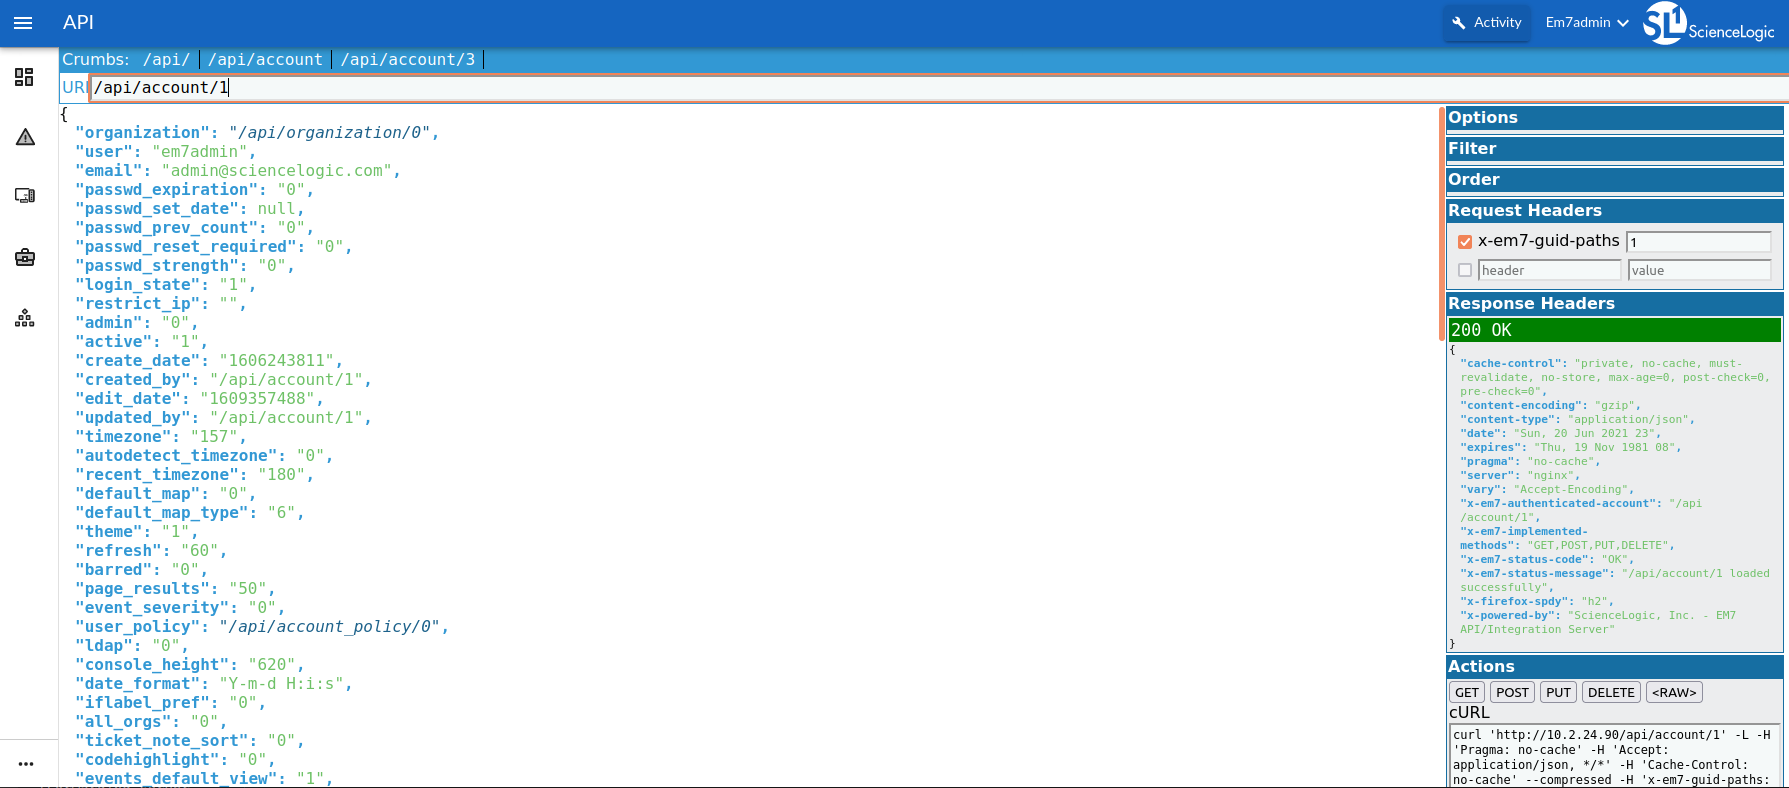
This section explains how to create Dynamic Applications without writing new code, by using the Available steps from the REST: Toolkit PowerPack. We will create a Dynamic Application that reaches the SL1 API to get information. The image below shows the SL1 API found at:
System > Tools > API Browser
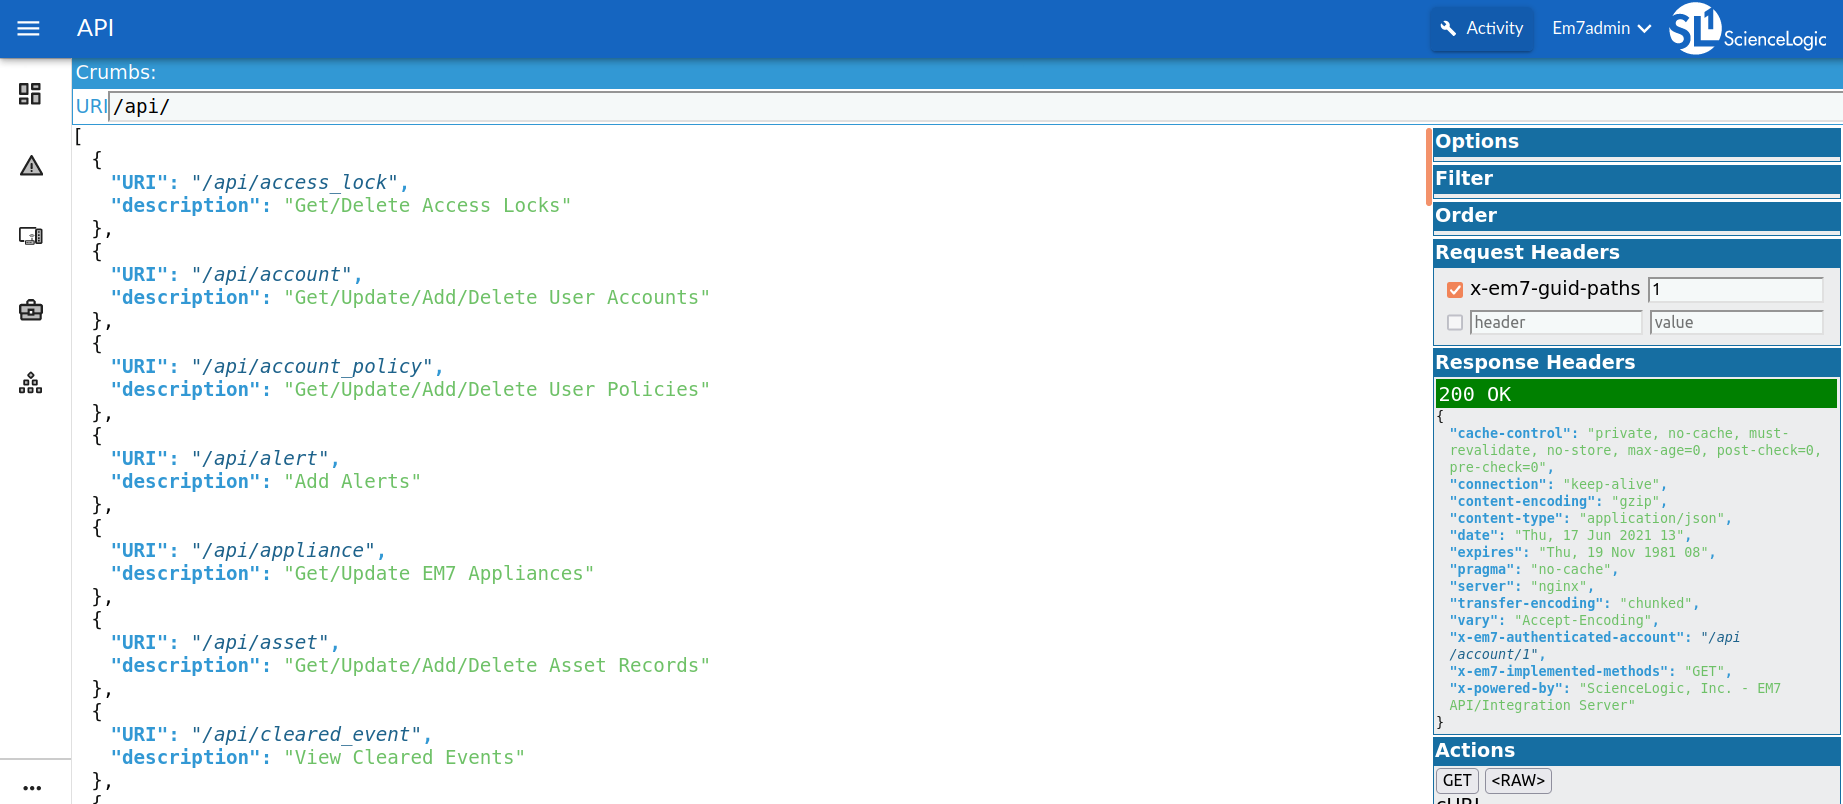
Start by creating a Dynamic Application by accessing the following SL1 API endpoint:
/api/account
Note
Media type specifies the format of the data as type/subtype (e.g. text/HTML, text/XML, application/JSON). In an HTTP request, the media type is specified in the request header using the Accept attribute, which specifies the response format. If you hit a SL1 endpoint directly on a browser, the response is in XML format. Browsers, by default, format the response in XML.
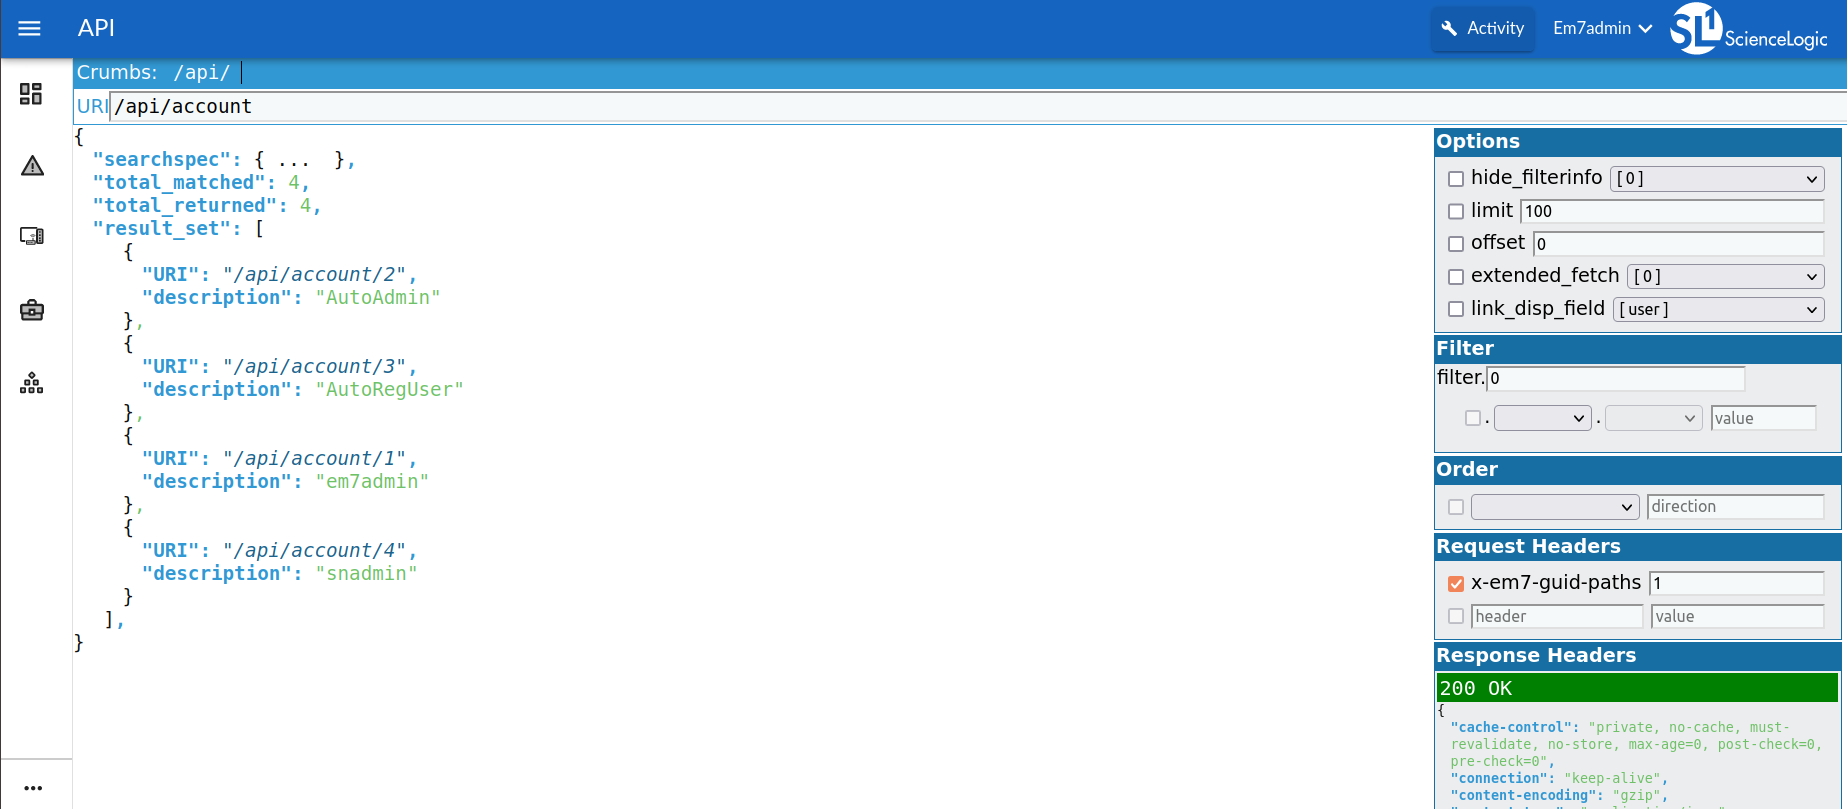
We will create a Dynamic Application that gathers configuration data about the existing accounts in a particular SL1 server. The image below shows an example of the response for a particular server.
For the creation of the following Dynamic Applications, we will utilize the following steps from the REST: Toolkit PowerPack:
low_code Syntax to process the Snippet Argument to be consumable by the Snippet Framework
http Requestor to gather API data from SL1
json Processor to convert the API response into a Python dictionary
jsonpath to extract the data from the Python dictionary
Discovery Dynamic Application Creation
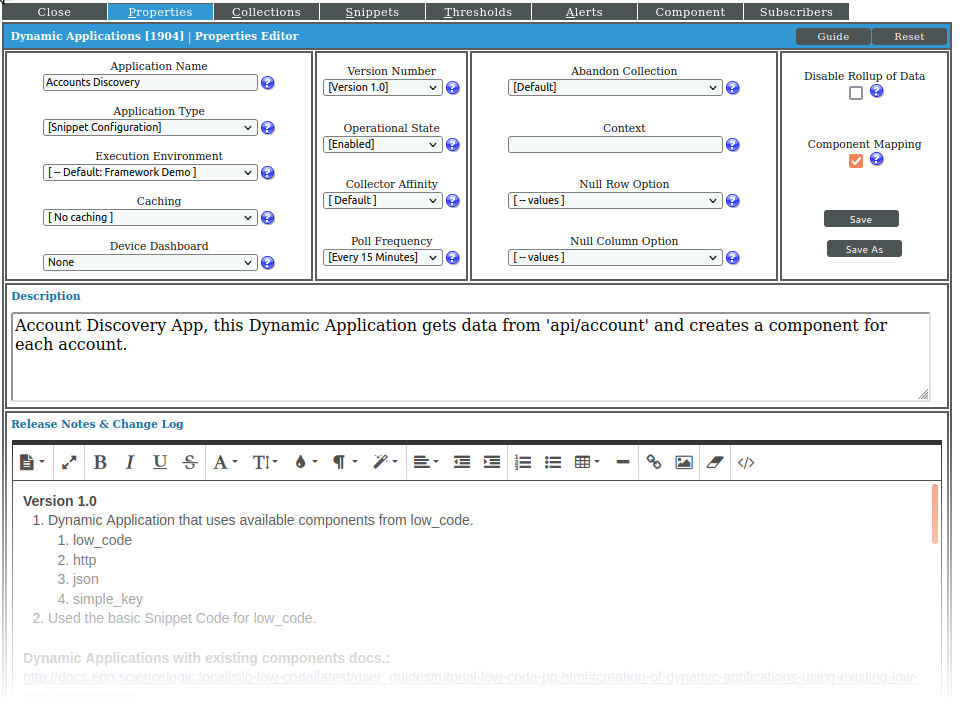
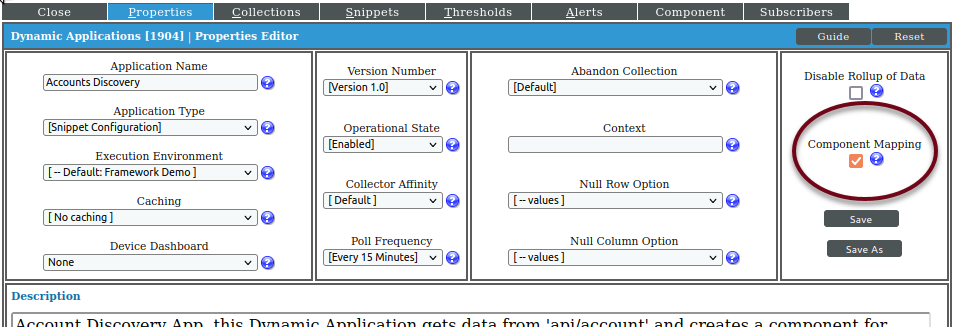
First, create a “Snippet Configuration” Dynamic Application called Accounts Discovery.
The creation of Dynamic Application happens in the Dynamic Application Manager, located at:
System > Manage > Dynamic Applications > [Actions] button > Create New Dynamic Application
You need to set the required configuration of this Dynamic Application as follows.
Application Name |
Accounts Discovery |
Application Type |
Snippet Configuration |
Execution Environment |
REST: Toolkit 100 |
Version Number |
Version 1.0 |
Poll Frequency |
Every 15 Minutes |
Component Mapping |
Checkbox selected |
Note
This Dynamic Application can also be a Bulk Snippet Dynamic Application (BSDA) with no changes. However, since the substitution happens in the network requester, a BSDA will not save much execution time.
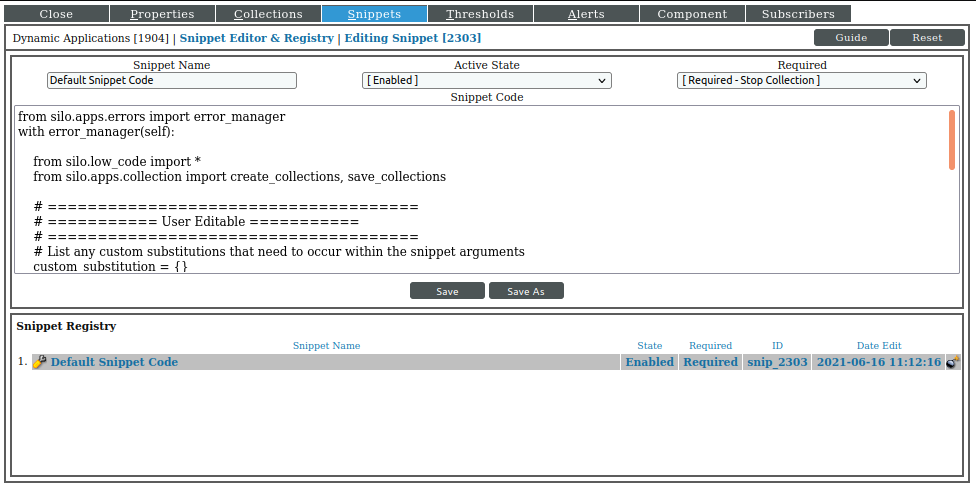
In the snippet tab, paste the default snippet code.
Default Snippet Code
from silo.apps.errors import error_manager
with error_manager(self):

    from silo.low_code import *
    from silo.apps.collection import create_collections, save_collections

    # =====================================
    # =========== User Editable ===========
    # =====================================
    # List any custom substitutions that need to occur within the snippet arguments
    custom_substitution = {}
    # =====================================
    # ========= End User Editable =========
    # =====================================


    collections = create_collections(self)
    snippet_framework(collections, custom_substitution, snippet_id, app=self)
    save_collections(collections, self)
Save the snippet with the name Default Snippet Code.
In the collection tab, create the following collection objects:
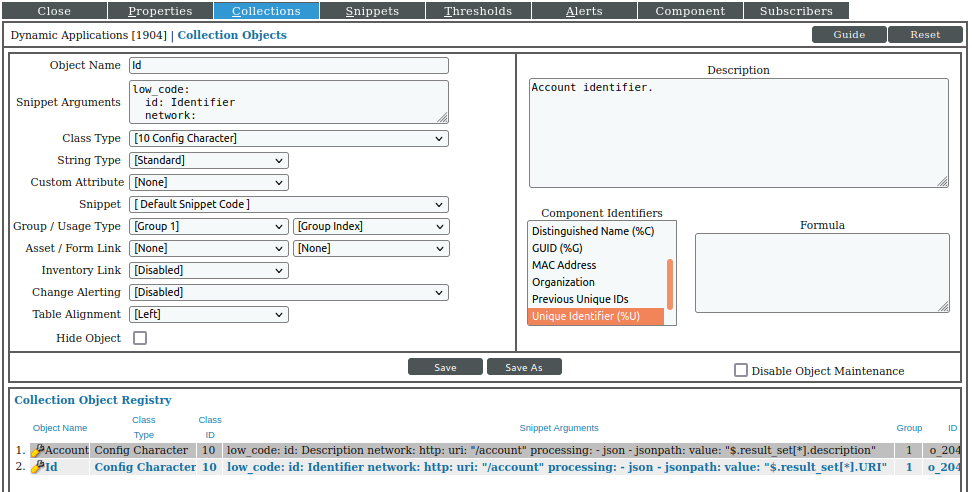
Id using the following configuration:
Object Name
Id
Snippet Argument
low_code:
  id: Identifier
  version: 2
  steps:
    - http:
        uri: "/account"
    - json
    - jsonpath:
        value: "$.result_set[*].URI"
Class Type
Config Character
Snippet
Default Snippet Code
Component Identifiers
Unique Identifier (%U)
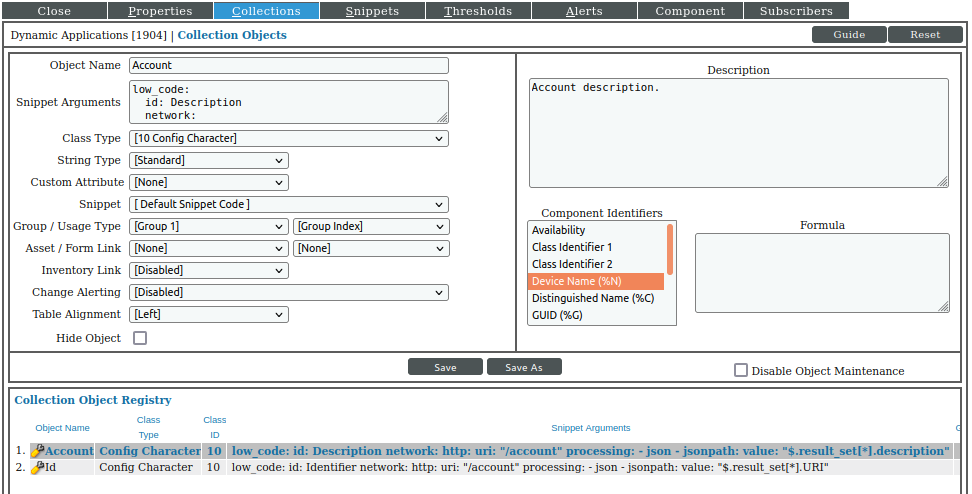
Account using the following configuration:
Object Name
Account
Snippet Argument
low_code:
  id: Description
  version: 2
  steps:
    - http:
        uri: "/account"
    - json
    - jsonpath:
        value: "$.result_set[*].description"
Class Type
Config Character
Snippet
Default Snippet Code
Component Identifiers
Device Name (%N)
Note
Notice that network requester only required /account. The complete API
endpoint is coming from the information provided by the credential (e.g.
https://10.10.10.10/api).
Configuration Dynamic Application Creation
After completing creating the first Dynamic Application, create a second Dynamic Application to collect some configuration data.
We will create a Snippet Configuration Dynamic Application called Account Configuration. For this application, the data source will be:
/api/account/<account_id>
For the creation of this Dynamic Application, we use the following Out-Of-The-Box steps from the framework:
The Low_Code as the argument parser.
The HTTP Requester, as the requester.
The JSON Parser, as the parser.
The Simple Key as the selector.
In SL1, go to the Dynamic Application Manager and create the Dynamic Application with the following configuration:
Application Name |
Account Configuration |
Application Type |
Snippet Configuration |
Execution Environment |
REST: Toolkit 100 |
Version Number |
Version 1.0 |
Poll Frequency |
Every 5 Minutes |
We will use the same (Default Snippet Code). Save the snippet with the name Custom Step Configuration.
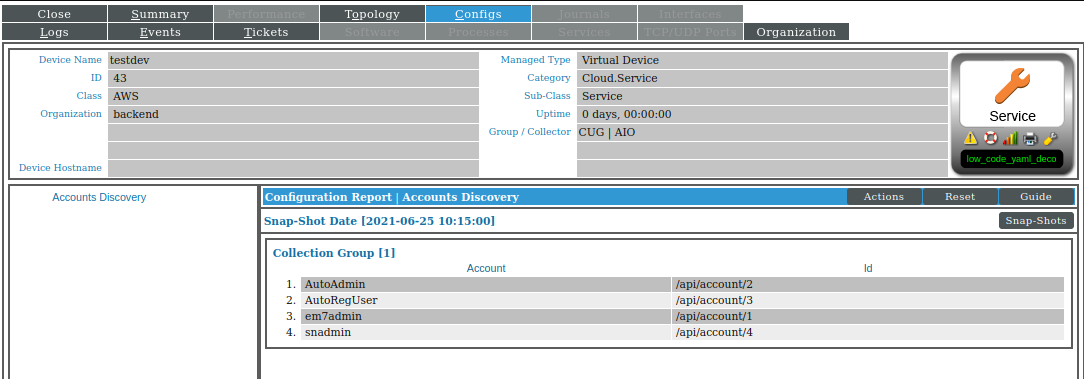
To get the API endpoint to create this Dynamic Application, you will use automatic substitution. The previously created Accounts Discovery Dynamic Application returns the endpoints for each account in the ID Collection Object as displayed in the picture below.
To make this automatic substitution, use the value <silo:comp_uid> as the
parameter of the HTTP URI in the YAML configuration at the Snippet Argument
(refer to the Substitution).
Define the following collection objects:
GROUP 1
Basic Information using the following configuration:
Object Name
Basic Information
Class Type
Label (Config Group)
Snippet
Custom Step Configuration
Group / Usage Type
Group 1
Contact First Name using the following configuration.
Object Name
Contact First Name
Snippet Argument
low_code:
  id: FirstName
  version: 2
  steps:
    - http:
        uri: "<silo:comp_uid>"
    - json
    - simple_key: "contact_fname"
Class Type
Config Character
Snippet
Custom Step Configuration
Group / Usage Type
Group 1
Contact Last Name using the following configuration:
Object Name
Contact Last Name
Snippet Argument
low_code:
  id: LastName
  version: 2
  steps:
    - http:
        uri: "<silo:comp_uid>"
    - json
    - simple_key: "contact_lname"
Class Type
Config Character
Snippet
Custom Step Configuration
Group / Usage Type
Group 1
Country using the following configuration:
Object Name
Country
Snippet Argument
low_code:
  id: Country
  version: 2
  steps:
    - http:
        uri: "<silo:comp_uid>"
    - json
    - simple_key: "country"
Class Type
Config Character
Snippet
Custom Step Configuration
Group / Usage Type
Group 1
GROUP 2
User Data using the following configuration:
Object Name
User Data
Class Type
Label (Config Group)
Snippet
Custom Step Configuration
Group / Usage Type
Group 2
Email using the following configuration:
Object Name
Email
Snippet Argument
low_code:
  id: Email
  version: 2
  steps:
    - http:
        uri: "<silo:comp_uid>"
    - json
    - simple_key: "email"
Class Type
Config Character
Snippet
Custom Step Configuration
Group / Usage Type
Group 2
Phone using the following configuration:
Object Name
Phone
Snippet Argument
low_code:
  id: Phone
  version: 2
  steps:
    - http:
        uri: "<silo:comp_uid>"
    - json
    - simple_key: "phone"
Class Type
Config Character
Snippet
Custom Step Configuration
Group / Usage Type
Group 2
User using the following configuration:
Object Name
User
Snippet Argument
low_code:
  id: User
  version: 2
  steps:
    - http:
        uri: "<silo:comp_uid>"
    - json
    - simple_key: "user"
Class Type
Config Character
Snippet
Custom Step Configuration
Group / Usage Type
Group 2
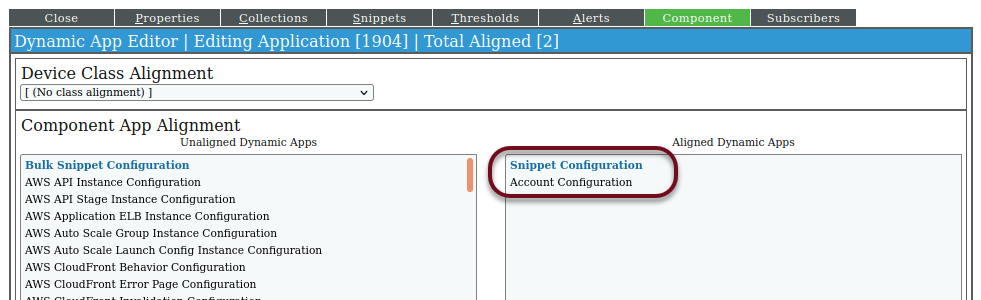
Align this application to the Accounts Discovery Dynamic Application, by selecting the Component Mapping checkbox in the Properties tab, and selecting the Dynamic Application in Component tab.
Create a new credential by navigating to the following location:
Manage > Credentials
Actions > Create New > Create Rest snippet framework Credential
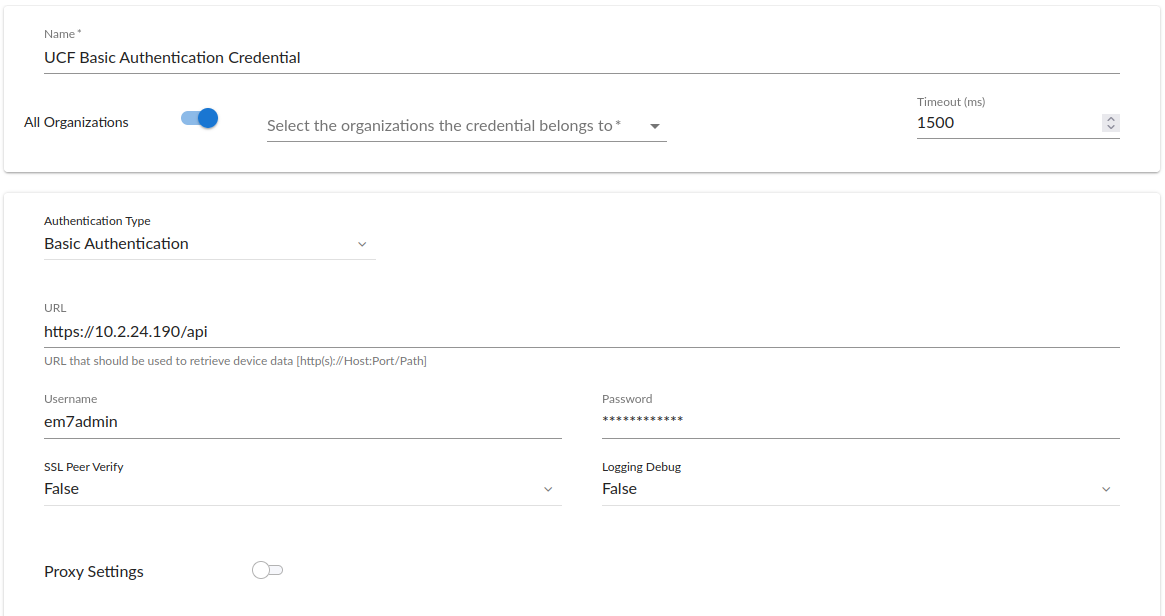
Select the Basic Authentication as the Authentication Type and
complete the required server fields: URL, Username, and Password.
Select [True] or [False] for the SSL Peer Verify and
Logging Debug fields, and configure the Proxy Settings if needed.
Next, create a virtual device and align the Dynamic Applications to start the collection. The creation of a virtual device happens at the Device Manager, located at:
Devices > Device Manager
Actions > Create Virtual Device
Align the Dynamic Application Accounts Discovery to the device using the just created credential.
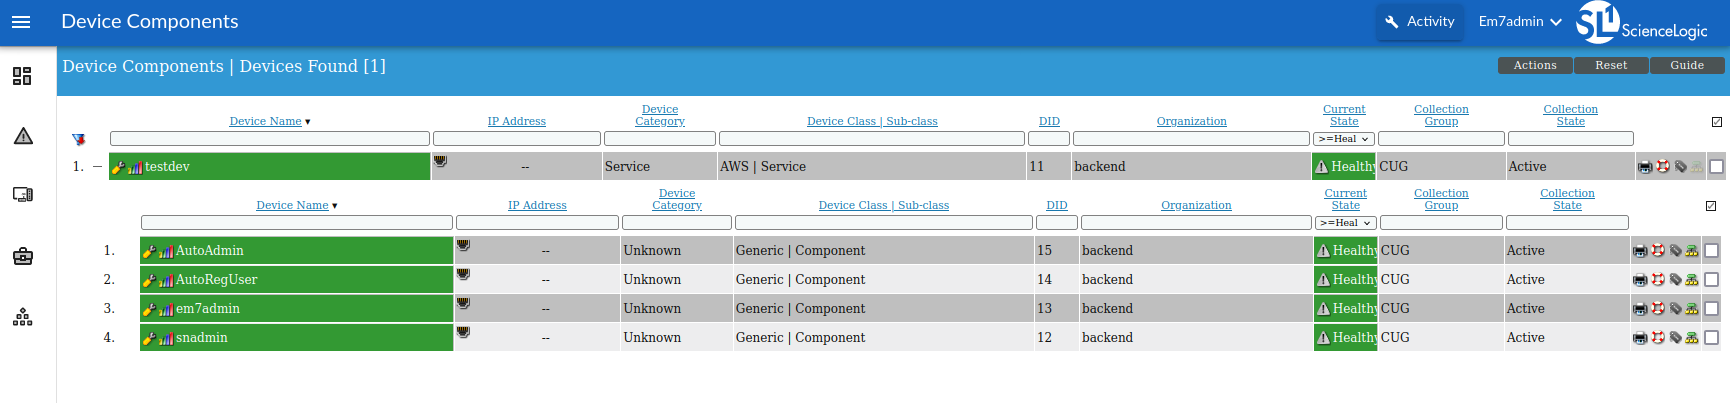
Once the data is collected, you will have a similar DCM tree like the one shown below.
Creating Dynamic Applications with Custom Steps
The Snippet Framework allows you to create and define your steps (refer to the Creating a Custom Step document). In this section, you will learn how to create your steps. In the example below, we will create a performance application that gets information about existing accounts of an SL1 server by accessing the following SL1 API endpoint:
/api/account/<account_id>
For the creation of the following Dynamic Applications, we will use the existing steps of the framework:
low_code Syntax to process the Snippet Argument to be consumable by the Snippet Framework
http Requestor to gather API data from SL1
json Processor to convert the API response into a Python dictionary
And you need to define a new step:
The Random Number Generator Based On Arg as a Processor. This step will generate a Random number between 0 and the size/length of a provided argument.
Performance Dynamic Application Creation
First, create a “Snippet Performance” Dynamic Application called Account Performance.
The creation of Dynamic Application happens in the Dynamic Application Manager, located at:
System > Manage > Dynamic Applications
Actions > Create New Dynamic Application
You need to set the required configuration of this Dynamic Application.
Application Name |
Account Performance |
Application Type |
Snippet Performance |
Execution Environment |
REST: Toolkit 100 |
Version Number |
Version 1.0 |
Poll Frequency |
Every 5 Minutes |
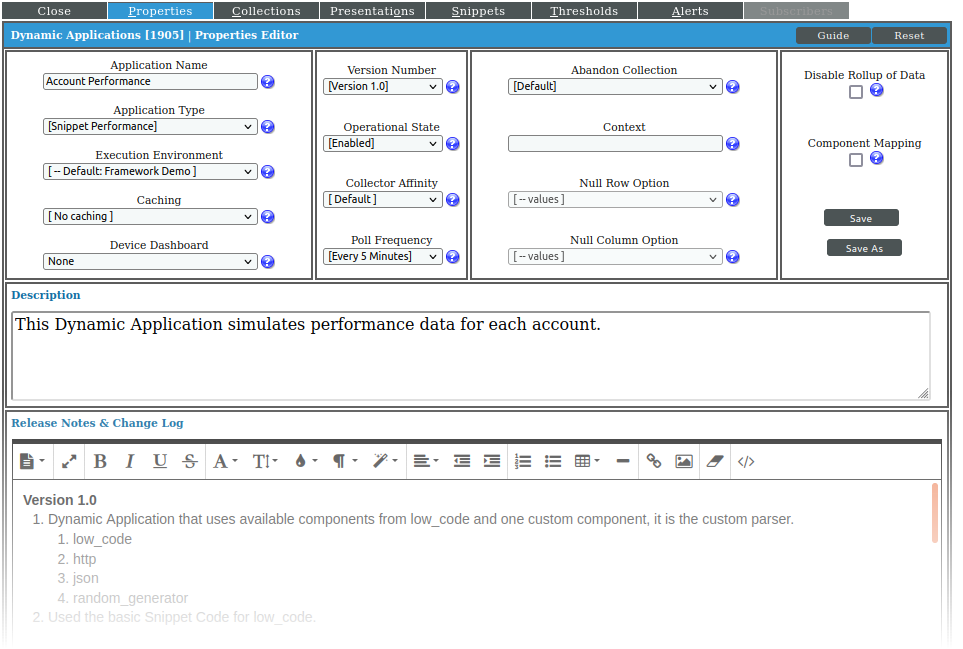
In the Snippet tab, initially, we will use the same (Default Snippet Code). Save the snippet with the name Custom Step Performance.
This time, we define a new step in the “User Editable” area of the
snippet. This step is a new selector. Create a method named
random_generator that generates a random number between 0 and the
size/length of the argument that gets, so that this method allows you to
simulate performance data.
# =====================================
# =========== User Editable ===========
# =====================================
import random

@register_processor
@typechecked(input=dict, output=int)
def random_generator(result, action_arg):
    """Generates random number between 0 and action_arg value size.

    :param object result: Result from the parser
    :param int action_arg: Action argument for the step, in this case, the simple_key specified to get data using it.

    :return: Random number between 0 and action_arg value size
    :rtype: Integer
    """
    attribute_leng = len(result[action_arg])
    generated_number = random.randint(0, attribute_leng)
    return generated_number


# List any custom substitutions that need to occur within the snippet arguments
custom_substitution = {}
# Custom functions that need to get executed during the framework
# @register_processor
# def my_func:
#   pass
# =====================================
# ========= End User Editable =========
# =====================================
When creating this Dynamic Application, the ID of the account in the URL should be substituted by the Id of the discovery application previously created (URI of the account).
In the Collections tab, define the following collection objects:
Based on Aligned Ticket Queues using the following configuration:
Object Name
Based on Aligned Ticket Queues
Snippet Argument
low_code:
  id: TicketQueues
  version: 2
  steps:
    - http:
        uri: "<silo:comp_uid>"
    - json
    - random_generator: "aligned_ticket_queues"
Class Type
Performance Gauge
Snippet
Custom Step Performance
Group / Usage Type
No Group
Based on Email using the following configuration:
Object Name
Based on Email
Snippet Argument
low_code:
  id: Email
  version: 2
  steps:
    - http:
        uri: "<silo:comp_uid>"
    - json
    - random_generator: "email"
Class Type
Performance Gauge
Snippet
Custom Step Performance
Group / Usage Type
No Group
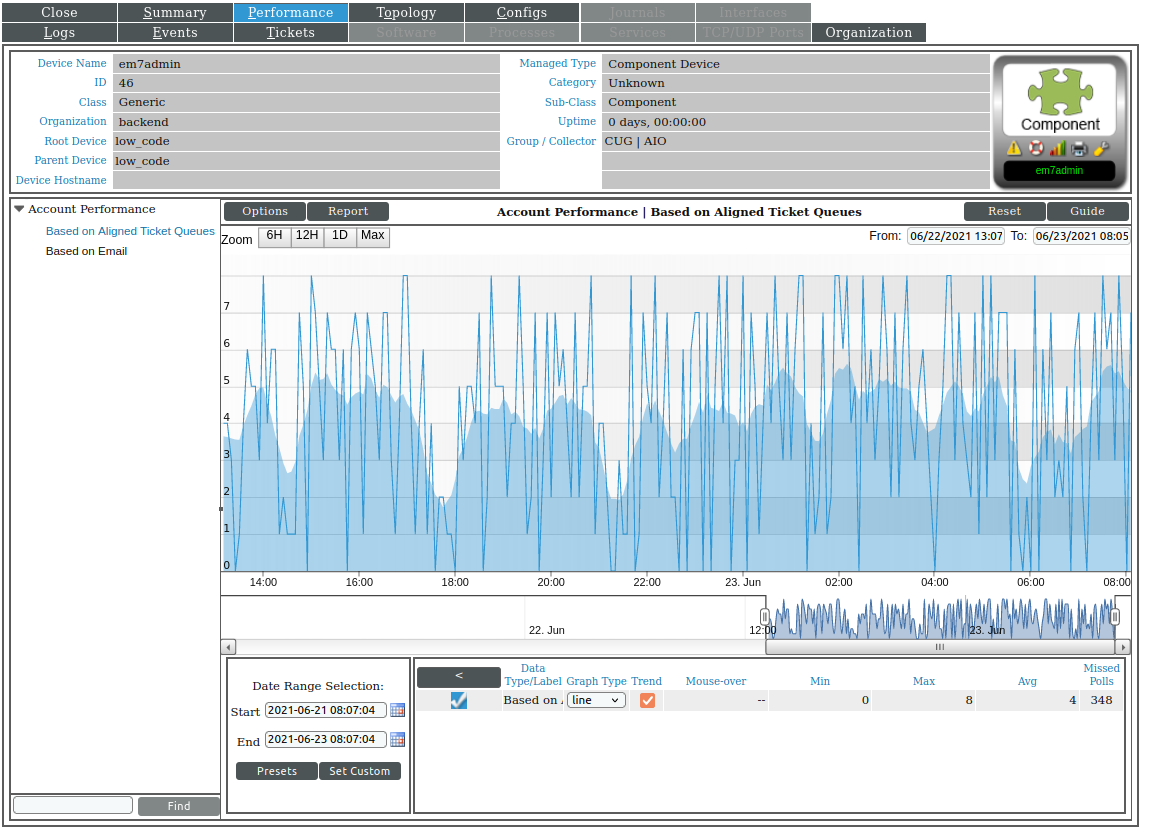
As you can see in these collection objects, the step you just defined generates two random numbers. The first one, between 0 and the size of tickets in queues, and the second number, between 0 and the length of the account’s email address.
Align this application to the “Accounts Discovery” Dynamic Application.

After SL1 collects the data, you will have simulated performance information like the one shown below:
Another Example of the Creation of a Custom Step
Next, you have a second example of the creation of a custom step. For this, we modify the snippet code in the Account Configuration Dynamic Application.
We define a custom step in the “User Editable” area. This
step is a new selector. Create a method named index_selector.
This method gets a list and returns a dictionary with elements of the list as
keys and either the elements of the list as values (if the word “key” is
provided) or just the last part of each element of the list after the /
character (if the word “value” is provided).
# =====================================
# =========== User Editable ===========
# =====================================
from typing import Any, Iterable

@register_processor
@typechecked(input=Iterable[Any], output=dict)
def index_selector(result, action_arg):
    """Store data based on the action_arg, if it's going to be keys, or values.

    :param object result: Result from the parser
    :param int action_arg: Action argument for the step

    :return: Selected value from result
    :rtype: object
    """
    if isinstance(result, list):
        if (action_arg=="key"):
            result = {item: item for item in result}
        if (action_arg=="value"):
            result = {item: item.split("/")[-1] for item in result}
    return result

# List any custom substitutions that need to occur within the snippet arguments
custom_substitution = {}
# Custom functions that need to get executed during the framework
# @register_processor
# def my_func:
#   pass
# =====================================
# ========= End User Editable =========
# =====================================
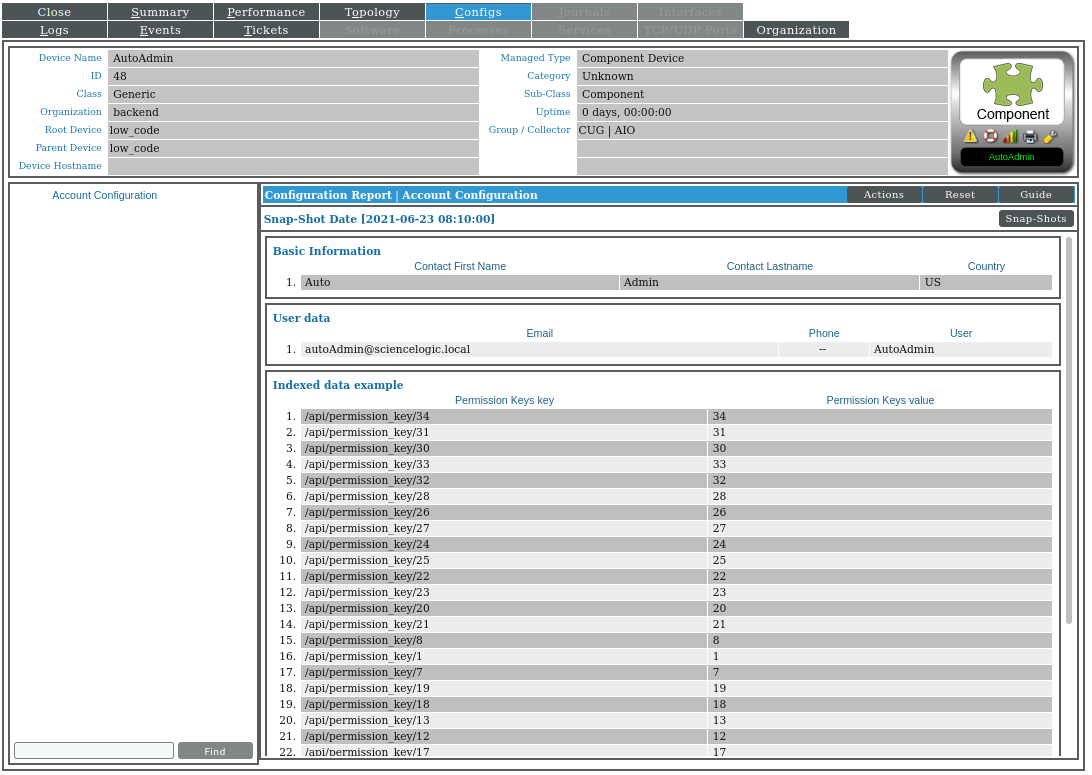
In the Collections tab, add the following collection objects.
GROUP 3
Indexed Data example using the following configuration:
Object Name
Indexed Data example
Class Type
Label (Config Group)
Snippet
Custom Step Configuration
Group / Usage Type
Group 3
Permission Keys key using the following configuration:
Object Name
Permission Keys key
Snippet Argument
low_code:
  id: key
  version: 2
  steps:
    - http:
        uri: "<silo:comp_uid>"
    - json
    - simple_key: "permission_keys"
    - index_selector: "key"
Class Type
Config Character
Snippet
Custom Step Configuration
Group / Usage Type
Group 3
Permission Keys value using the following configuration:
Object Name
Permission Keys value
Snippet Argument
low_code:
  id: value
  version: 2
  steps:
    - http:
        uri: "<silo:comp_uid>"
    - json
    - simple_key: "permission_keys"
    - index_selector: "value"
Class Type
Config Character
Snippet
Custom Step Configuration
Group / Usage Type
Group 3
After SL1 collects the data you will have configuration information like the one shown below: