![]()
In Cherwell Service Management (CSM), an mApp is a set of XML files containing configuration information that can be installed and configured on multiple instances of CSM. You need to install and configure the following mApps to before you can use the Cherwell SyncPack:
- The "Federated CMDB" mApp
- The "IS Content" mApp
This
Installing the Federated CMDB mApp
The "Federated CMDB" mApp provides a Federated CMDB solution where you can add and map Federated CMDB sources for Cherwell Configuration Items (CIs).
Applying this mApp might overwrite some of your system definitions. Performing a system backup is highly recommended.
You will need to have a local version of the mApp to complete this process; see your Cherwell or ScienceLogic contact for the latest mApp. Also, the name of the mApp might be different from the name used in these steps.
To install the "Federated CMDB" mApp:
-
Open the CSM Administrator client and select mApps from the Categories sub-menu.

-
From the Pick a task section, select Apply a mApp. An Open dialog appears.
- Navigate to the mApp on your local drive, select the mApp, and click . The Apply mApp Wizard page appears.
- Click . The License Information page appears.
- Select Yes, I accept the terms and click . The Localization page appears.
- Click . The Amount of User Interaction page appears.
-
Select Make reasonable decisions, but ask me if unsure and click . The Merge Actions for Configuration Item Child Items page appears:

The contents of the windows in this portion of the wizard might vary depending on the system to which you are installing.
- Click . The Merge Actions for Change Request Child Items page appears.
- Click . The Merge Actions for Event Child Items page appears.
- Click . The Merge Actions for Incident Child Items page appears.
- Click . A second Merge Actions for Incident Child Items page appears.
- Click . A third Merge Actions for Incident Child Items page appears.
-
Click . The Summary of Changes page appears:

- Review your list of selected mApp changes and click . The Final Options page appears.
-
Select Open a Blueprint so that I can preview the changes and click . CSM will create a Blueprint, which is an XML definition of changes being made to the underlying system. When the Blueprint is created, the Manage objects page appears:

-
From the list of objects, select the "Federation Registration" object and then click Edit Actions. The Business Object Actions for Federation Registration window appears:

- From the Blueprints sub-menu, select Save Blueprint to disk and provide a name and location for the Blueprint when prompted.
-
From the Blueprints sub-menu, select Publish Blueprint to apply the Blueprint changes to the current CSM system. A Publish Options page appears.
- Leave the options set to the defaults and click . The Blueprint is scanned for changes against the current CSM system. When the scan completes, a Scan successful dialog appears.
-
Click . The publishing process for the Blueprint begins. When the Blueprint is published, a Blueprint has been published dialog appears.
During the publishing process, a rollback Blueprint is created. This rollback Blueprint is in the same file system location as the saved Blueprint, but it has _rollback added to the name. You can use this Blueprint to roll back the published changes if needed.
- Click . The "Federated CMDB" mApp is now published.


Installing the IS Content mApp
Integration with a Federated source such as PowerFlow is typically accomplished using automation processes and One-Steps that have been specifically configured for this purpose. These features are known as Content, and they are contained in the "IS Content" mApp.
Applying this mApp might overwrite some of your system definitions. Performing a system backup is highly recommended.
You will need to have a local version of the mApp to complete this process; see your Cherwell or ScienceLogic contact for the latest mApp. Also, the name of the mApp might be different from the name used in these steps.
To install the "IS Content" mApp:
-
Open the CSM Administrator client and select mApps from the Categories sub-menu:


- From the Pick a task section, select Apply a mApp. An Open dialog appears.
- Navigate to the mApp on your local drive, select the mApp, and click . The Apply mApp Wizard page appears.
- Click . The License Information page appears.
- Select Yes, I accept the terms and click . The Localization page appears.
- Click . The Amount of User Interaction page appears.
-
Select Make reasonable decisions, but ask me if unsure and click . The Summary of Changes page appears:

- Review your list of selected mApp changes and click . The Final Options page appears.
-
Select Open a Blueprint so that I can preview the changes and click . When the Blueprint is created, the Manage objects page appears.
- From the Blueprints sub-menu on the left, select Save Blueprint to disk and provide a name and location for the Blueprint when prompted.
- From the Blueprints sub-menu, select Publish Blueprint to apply the Blueprint changes to the current CSM system. A Publish Options page appears.
-
Leave the options set to the defaults and click . The Blueprint is scanned for changes against the current CSM system. When the scan completes, a Scan successful dialog appears.
-
Click . The publishing process for the Blueprint begins. When the Blueprint is published, a Blueprint has been published dialog appears.
During the publishing process, a rollback Blueprint is created. This rollback Blueprint is in the same file system location as the saved Blueprint, but it has _rollback added to the name. You can use this Blueprint to roll back the published changes if needed.
- Click . The "IS Content" mApp is now published.

Creating the Federation Registration Record
The main component of the Federated CMDB system is the Federation Registration record. Before any further configuration can occur, you must create at least one Federation Registration record.
After you create the Federation Registration record, you can configure that record to use the various automation processes and One-Steps in the two mApps you just installed.
To create a new Federation Registration record:
-
Open the CSM User client (not the Administrator client) and log in to CSM using your credentials, preferably with administrator rights:

-
Open the Tools menu and select Table Management. The Table Management page appears:

- In the Type drop-down, select Federation Type.
-
Click to create a new Federation Type. A new Federation Type record appears:

-
Type a name in the Federation Type field, such as "ScienceLogic", and click to select an appropriate image for this type.
You select images from the Cherwell Image Manager. If the image you need is not available, you can import it by right-clicking in the Explorer view of the Image Manager screen and selecting New.
- Click the button (
 ).
). -
Click the button (
 ) and select New Federation Registration from the menu. A new Federation Registration record appears:
- From the Federation Type drop-down, select the Federation Type that you created in steps 3-6.
-
Type a name for the Federation Name field, such as "Skylar One-Dev", and add a description to the Description field for the new record.
Federation Name is a system-unique value and cannot be duplicated. You will use this value when PowerFlow applications interact with the Federated CMDB. The PowerFlow applications need to be configured to pass this unique name in all interactions.
- Click .
-
Click Activate if you wish to progress this record to the "Active" state. The Federation Registration record is initially created in an "Inactive" state:

PowerFlow applications and any custom applications should check for this state before passing integration data to CSM. Only "Active" records should be allowed to process data. This allows the CSM administrator to turn off poorly behaving applications.
- The Federation Registration record is now "Active", but it is not properly configured to support integrations. Go to the following topic to continue the configuration process.


Configuring CSM Access for the REST API
The Federation Registration One-Steps use the CSM REST API to create and update CI records. You need to create a new CSM Security Group and a CSM user account that has Create, Read, and Write access to all Federation business objects and all Configuration Item business objects. This account must be able to access the CSM REST API remotely.
Creating a New Security Group
To create a new Security Group with CSM access:
- Open the CSM Administrator client and select Security from the Categories sub-menu on the left.
-
From the Pick a task section, select Edit security groups. A Security Groups window appears:

-
Click and select New Cherwell User Security Group. A new Security Groups dialog appears.

-
In the Name field, type a name for the new Security Group, and type a description of the group in the Description field.
The name you create for the group is not important, as the CSM This Security Group user will later be linked to this Security Group. The name can abide by other naming standards if needed.
-
Click the tab and make sure that the Can run searches that reference fields to which the user doesn't have rights option is configured for "Allow":

- Click the tab.
-
Select the Customer business object from the Business Object drop-down and make sure that the following rights are selected in the General section for that business object: View, Add, Edit, and Delete:

-
Select New Field under the Customer business object and make sure that the following rights are selected in the General section for that business object: View and Edit:

- Select the Customer - Internal business object from the Business Object drop-down and make sure that the following rights are selected in the General section for that business object: View, Add, Edit, and Delete. No other options should be selected.
- Select New Field under the Customer - Internal business object and make sure that the following rights are selected in the General section for that business object: View and Edit.
-
Select the Event business object from the Business Object drop-down and make sure that the following rights are selected in the General section for that business object: View, Add, Edit, and Delete. No other options should be selected.
- Select New Field under the Event business object and make sure that the following rights are selected in the General section for that business object: View and Edit.
- Select the Federated CI business object from the Business Object drop-down and make sure that the following rights are selected in the General section for that business object: View, Add, Edit, and Delete. No other options should be selected.
- Select New Field under the Federated CI business object and make sure that the following rights are selected in the General section for that business object: View and Edit.
- Select the Federated CI Mapping business object from the Business Object drop-down and make sure that the following rights are selected in the General section for that business object: View, Add, Edit, and Delete. No other options should be selected.
- Select New Field under the Federated CI Mapping business object and make sure that the following rights are selected in the General section for that business object: View and Edit.
- Select the Federated Field Mapping business object from the Business Object drop-down and make sure that the following rights are selected in the General section for that business object: View, Add, Edit, and Delete. No other options should be selected.
- Select New Field under the Federated Field Mapping business object and make sure that the following rights are selected in the General section for that business object: View and Edit.
- Select the Federated Maintenance business object from the Business Object drop-down and make sure that the following rights are selected in the General section for that business object: View, Add, Edit, and Delete. No other options should be selected.
- Select New Field under the Federated Maintenance business object and make sure that the following rights are selected in the General section for that business object: View and Edit.
- Select the Federated Relationship business object from the Business Object drop-down and make sure that the following rights are selected in the General section for that business object: View, Add, Edit, and Delete. No other options should be selected.
- Select New Field under the Federated Relationship business object and make sure that the following rights are selected in the General section for that business object: View and Edit.
- Select the Federated Retired business object from the Business Object drop-down and make sure that the following rights are selected in the General section for that business object: View, Add, Edit, and Delete. No other options should be selected.
- Select New Field under the Federated Retired business object and make sure that the following rights are selected in the General section for that business object: View and Edit.
- Select the Federated Credential business object from the Business Object drop-down and make sure that the following rights are selected in the General section for that business object: View, Add, Edit, and Delete. No other options should be selected.
- Select New Field under the Federated Credential business object and make sure that the following rights are selected in the General section for that business object: View and Edit.
- Select the Federated Field Mapping Definitions business object from the Business Object drop-down and make sure that the following rights are selected in the General section for that business object: View, Add, Edit, and Delete. No other options should be selected.
- Select New Field under the Federated Field Mapping Definitions business object and make sure that the following rights are selected in the General section for that business object: View and Edit.
- Select the Federated Registration business object from the Business Object drop-down and make sure that the following rights are selected in the General section for that business object: View, Add, Edit, and Delete. No other options should be selected.
- Select New Field under the Federated Registration business object and make sure that the following rights are selected in the General section for that business object: View and Edit.
- Select the Federated Type business object from the Business Object drop-down and make sure that the following rights are selected in the General section for that business object: View, Add, Edit, and Delete. No other options should be selected.
- Select New Field under the Federated Type business object and make sure that the following rights are selected in the General section for that business object: View and Edit.
- Select the Federation_joins_CI business object from the Business Object drop-down and make sure that the following rights are selected in the General section for that business object: View, Add, Edit, and Delete. No other options should be selected.
- Select New Field under the Federation_joins_CI business object and make sure that the following rights are selected in the General section for that business object: View and Edit.
- Select the Configuration Item business object from the Business Object drop-down and make sure that the following rights are selected in the General section for that business object: View, Add, Edit, and Delete. No other options should be selected.
- Select New Field under the Configuration Item business object and make sure that the following rights are selected in the General section for that business object: View and Edit.
-
Make sure that the following rights are selected in the General section for all Configuration Item types remaining in the drop-down: View, Add, Edit, and Delete (or just View and Edit where relevant):

The Configuration Item types all have "Config" at the start of their names.
- Select the CILink Table business object from the Business Object drop-down and make sure that the following rights are selected in the General section for that business object: View, Add, Edit, and Delete. No other options should be selected.
- Select New Field under the CILink Table business object and make sure that the following rights are selected in the General section for that business object: View and Edit.
- Select the Manufacturer business object from the Business Object drop-down and make sure that the following rights are selected in the General section for that business object: View, Add, Edit, and Delete. No other options should be selected.
- Select New Field under the Manufacturer business object and make sure that the following rights are selected in the General section for that business object: View and Edit.
-
Select the CI Upstream Relationship business object from the Business Object drop-down and make sure that the following rights are selected in the General section for that business object: View, Add, Edit, and Delete. No other options should be selected.
- Select New Field under the CI Upstream Relationship business object and make sure that the following rights are selected in the General section for that business object: View and Edit.
- Click the button () to save the new Security Group, and then close the Security Groups window.


Creating a New User
To create a user for the new Security Group:
-
From the Pick a task section of the CSM Administrator client, select Edit users. The Users window appears:

-
Click the button (
). - On the tab, complete the following fields:

- Login ID. Type a unique login for the user, such as "Skylar One".
- Security Group. Select the Security Group that you created in the previous procedure.
- Password. Type a password for the user, and confirm the password in the corresponding field.
-
Full Name. Type a unique name for the user, such as "ScienceLogic Integration User".
Make a note of the Login ID and Password values, as you will use these in additional configuration steps.
- Click the button ().
-
From the Pick a task section, select Edit teams and workgroups. The Teams and Workgroups dialog appears:

- In the User teams section, select 1st Level Support.
- Click the tab and make sure that the new user is listed as a member of this team.

Verifying the URL for API Access
By default, the URL used by the Federated CMDB integration is the same URL used by the web-based client. This section describes how to find this URL and how to make sure that the API is functioning using this URL.
To verify the URL for API access:
- From the Categories sub-menu of the CSM Administrator client, select Browser and Mobile:
-
From the Pick a task section, select Browser Application Settings. A Browser Settings window appears:
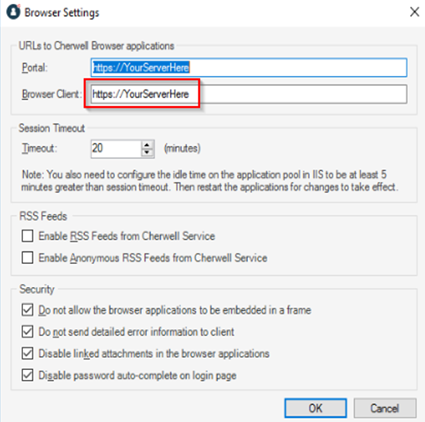
- Review the URL in the Browser Client field. If the field displays https://YourServerHere, then this value has not been set yet.
- If the value has not been set, specify the URL in the Browser Client field and then click .
-
If you add a suffix of /CherwellAPI to that URL in a web browser, the browser opens a Swagger window similar to the following:

-
Make a note of that URL for later configuration steps.
If a DNS name is used in the URL, then that DNS name must be able to be resolved on the server itself, as that is where all API calls are made.

Obtaining a Client Key
Access to the CSM REST API is controlled with the username and password as well as what is known as a Client Key.
To create the Client Key:
-
Open the CSM Administrator client and select Security from the Categories sub-menu on the left.
- From the Pick a task section, select Edit REST API Client settings. A REST API Clients window appears.
-
Click the button (
) to create a new Client Key. A new record appears:
- In the Name field, type a name for the Client Key, such as "ScienceLogic Integration".
- Copy the value in the Client Key field for later configuration steps.
- Click the button ().

Configuring CSM Scheduled Tasks
Various back-end configuration processes, including scheduled tasks, are needed to cache configuration data for the Federation to occur in an automated fashion. This back-end configuration uses web services, and you will use the CSM user account that you just created for these configurations.
Configuring the Back-end Credentials and Endpoints
To configure the back-end credentials and endpoints:
- Log in to the CSM Administrator client as an administrator and select Create a new Blueprint in the Common Tasks sub-menu on the left.
- From the menu, select Stored Values. The Stored Values Manager window appears.
- Select the Blueprint scope so you can edit the stored values.
-
Right-click the Cherwell REST API Key and select Edit. The Stored Value dialog appears:

- In the Value field, add the REST API Client Key that you configured in Obtaining a Client Key and click . This value authenticates against the CSM REST API.
-
Right-click the Cherwell REST API Username and select Edit. The Stored Value dialog appears:

- In the Value field, type the unique login, such as "Skylar One", for the user you created in Creating a New User and click .
-
Right-click the Cherwell REST API Password and select Edit. The Stored Value dialog appears:
- In the Value field, type the password for the user you created in Creating a New User and click .
- Close the Stored Value Manager window and then click Save Blueprint to disk from the Blueprints sub-menu.
- Click Publish Blueprint. The Publish Options dialog appears.
- Accept all defaults and click .
- After the changes have been published, go to the following section to add the scheduled tasks.

