This
Architecture Overview for ServiceNow SyncPacks
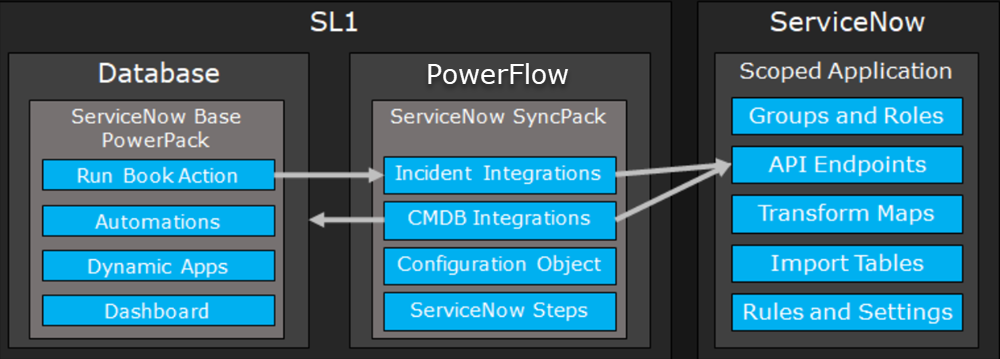
The following diagram details the various elements that are contained in SL1 and the PowerFlow system, and how PowerFlow sits between the core SL1 platform and an external data platform:
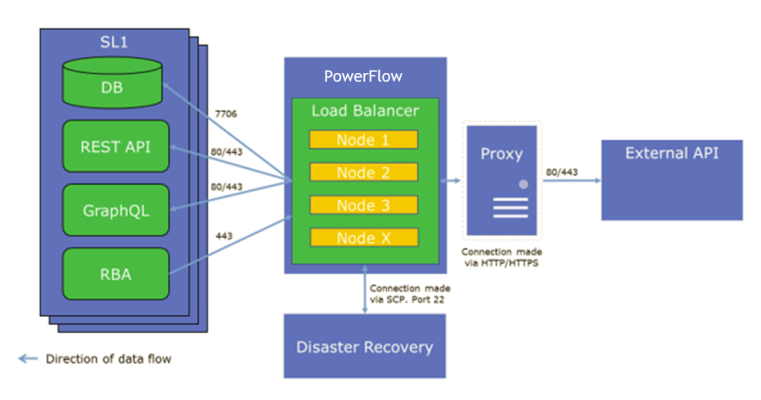
The following diagram provides an example of the high-level architecture of a PowerFlow system with High Availability, Disaster Recovery, and a proxy configured:
Prerequisites for ServiceNow SyncPacks
This section describes the prerequisites for the ServiceNow SyncPacks. For more information about the specific software versions required by a ServiceNow SyncPack, see the latest release notes for this SyncPack on the SL1 PowerFlow SyncPack Release Notes page.
To install any of the ScienceLogic ServiceNow SyncPacks, you must have administrator access to both SL1 and ServiceNow. Specifically, you will need:
- ScienceLogic administrator access to the Administration Portal
- ServiceNow administrator access
If you want to upload and install multiple ServiceNow SyncPacks at the same time, you should upload all of the SyncPacks first, and then install them to address any dependencies between the SyncPacks.
The following table lists the port access required by PowerFlow and this SyncPack:
| Source IP | PowerFlow Destination | PowerFlow Source Port | Destination Port | Requirement |
| PowerFlow | SL1 API | Any | TCP 443 | SL1 API Access |
| PowerFlow | ServiceNow API | Any | TCP 443 | ServiceNow API Access |
ScienceLogic highly recommends that you disable all firewall session-limiting policies. Firewalls will drop HTTPS requests, which results in data loss.
SL1 and ServiceNow Terminology
The following table lists the different names for the shared elements in SL1 and ServiceNow:
| SL1 | ServiceNow |
|
Asset, Custom Attribute |
Asset (ITAM) |
|
Device |
CI (Configuration Item) |
|
Discovery Session |
Service Request, Catalog Request |
|
Event |
Incident, Event, or Case (depending on the SyncPack you are using) |
|
Alert |
Event |
|
Organization |
Company, Domain |
|
Schedule, Maintenance Schedule |
Change Request, Change Schedule |
|
Topology, Relationships, Dynamic Component Mapping and Relationships (DCM+R) |
Dependency View, Affected CIs |
Dependency Map for ServiceNow SyncPacks
The following graphic describes which SyncPacks depend on other SyncPacks:
For more information about the Standard Base Steps SyncPack, see Default SyncPacks.
Downloading the SyncPack
A SyncPack file has the .whl file extension type. You can download the SyncPack file from the ScienceLogic Support site.
If you are installing or upgrading to the latest version of this SyncPack in an offline deployment, see Installing or Upgrading in an Offline Environment to ensure you install any external dependencies.
To locate and download the SyncPack:
- Go to the ScienceLogic Support Site at https://support.sciencelogic.com/s/.
- Click the tab and select PowerPacks & SyncPacks.
- In the Search field, search for the SyncPack and select it from the search results. The Release Version page appears.
- On the tab, click the down arrow next to the SyncPack version that you want to install, and select Show File Details. The Release File Details page appears.
- Click the button to download the SyncPack.
After you download the SyncPack, you can import it to your PowerFlow system using the PowerFlow user interface.
Importing the SyncPack
You must import and install the "ServiceNow Base" SyncPack before uploading and installing this SyncPack.
To import a SyncPack in the Skylar Automation user interface:
- On the SyncPacks page (
) of the Skylar Automation user interface, click . The Import SyncPack page appears.
- Click and select the .whl file for the SyncPack you want to install. You can also drag and drop a .whl file to the Import SyncPack page.
- Click . Skylar Automation registers and uploads the SyncPack. The SyncPack is added to the SyncPacks page.
- You will need to activate and install the SyncPack in Skylar Automation. For more information, see the following topic.
You cannot edit the content package in a SyncPack published by ScienceLogic. You must make a copy of a ScienceLogic SyncPack and save your changes to the new SyncPack to prevent overwriting any information in the original SyncPack when upgrading.
Installing the SyncPack
If you are upgrading to this version of the SyncPack from a previous version, make a note of any settings you made on the Configuration pane of the various PowerFlow applications in this SyncPack, as these settings are not retained when you upgrade.
To activate and install a SyncPack in the Skylar Automation user interface:
-
On the SyncPacks page of the Skylar Automation user interface, click the button (
) for the SyncPack you want to install and select Activate & Install. The Activate & Install SyncPack modal appears.
If you try to activate and install a SyncPack that is already activated and installed, you can choose to "force" installation across all the nodes in the Skylar Automation system.
If you do not see the SyncPack that you want to install, click the Filter icon (
) on the SyncPacks page and select Toggle Inactive SyncPacks to see a list of the imported PowerPacks.
- Click to confirm the activation and installation. When the SyncPack is activated, the SyncPacks page displays a green check mark icon (
) for that SyncPack. If the activation or installation failed, then a red exclamation mark icon (
) appears.
- For more information about the activation and installation process, click the highlighted version in the Installed SyncPack column for that SyncPack. For a successful installation, the "Activate & Install SyncPack" application appears, and you can view the Step Log for the steps. For a failed installation, go to the hidden "activate & Install SyncPack" application on the Applications page and check the step logs.
- If you have other versions of the same SyncPack on your Skylar Automation system, you can click the button (
) for that SyncPack and select Change active version to activate a different version other than the version that is currently running.
Installing the "ScienceLogic SL1: Customer Service Management Integration" Application in ServiceNow
You must install the "ScienceLogic SL1: Customer Service Management Integration" application on the ServiceNow instance to enable this SyncPack. You must first request the "ScienceLogic SL1: Customer Service Management Integration" application from the ServiceNow Store, and then you can install it.
If you want to sync CMDB data, such as Company information, you should also install the "ScienceLogic SL1: CMDB & Incident Automation" application version 1.0.45 or later.
The "ScienceLogic SL1: Case Integration" application requires that you have already installed the ServiceNow "Customer Service Management" module on the target ServiceNow instance.
You must have a ServiceNow HI Service Account to request this application and download it onto your ServiceNow instance.
To request and install the "ScienceLogic SL1: Customer Service Management Integration" application:
- Go to the ServiceNow Store at https://store.servicenow.com and search for "ScienceLogic SL1".
- Select the "ScienceLogic SL1: Customer Service Management Integration" application. The detail page for the application appears.
- Click Get and log in with your HI credentials.
- After the request is approved, log in to ServiceNow as an administrator and navigate to Application Manager (System Applications > Applications).
- Click Downloads in the menu header or search for "ScienceLogic".
- Click the version drop-down for the "ScienceLogic SL1: Customer Service Management Integration" application listing to make sure you are using the correct version of the application that is compatible with your version of the ServiceNow Events SyncPack.
- Click Install for the "ScienceLogic SL1: Customer Service Management Integration" application. The installation is complete when the button changes to Installed.
-
In the filter navigator, search for "ScienceLogic" and locate the application in the navigation menu in the left pane.
You might need to log out of ServiceNow and log in again to see the updated left-hand navigation menu.
For Case Integration ServiceNow Environments Only
Add the following roles to the Integration user so that user can interact with the "ScienceLogic SL1: Customer Service Management Integration" Application in ServiceNow.
- x_sclo_case_mgmt.admin. Provides user rights to interact with the scoped application tables and modules in ServiceNow.
- import_transformer. Provides user rights to manage import set transform maps, run transforms, and access responses.
If your ServiceNow environment is using the Case Integration module and you intend to use customer_account records, you will need to add additional rights to the Integration user. These rights allow the Integration user to read the table fields:
- sn_customerservice.customer_data_viewer
You will need to add cross-scoped access for read-only to the customer_account table as well. ScienceLogic recommends that you use ServiceNow as the source of truth for Organizations (Companies). For more information, see
Installing the ServiceNow Base Pack PowerPack in SL1
The ServiceNow Base Pack PowerPack version 105 or later contains Run Book Automations that you use to integrate with the ServiceNow Cases SyncPack.
By default, installing a new version of a PowerPack overwrites all content in that PowerPack that has already been installed on the target system. You can use the Enable Selective PowerPack Field Protection setting in the Behavior Settings page (System > Settings > Behavior) to prevent new PowerPacks from overwriting local changes for some commonly customized fields. For more information, see
To install the "ServiceNow Base Pack" PowerPack:
- Search for and download the "ServiceNow Base Pack" PowerPack from the PowerPacks page (Product Downloads > PowerPacks & SyncPacks) at https://support.sciencelogic.com/s/.
- In SL1, go to the PowerPacks page (System > Manage > PowerPacks).
- Click the Actions menu and choose Import PowerPack. The Import PowerPack modal appears.
- Click and navigate to the "ServiceNow Base Pack" PowerPack file from step 1.
- Select the PowerPack file and click . The PowerPack Installer modal page displays a list of the PowerPack contents.
- Click . After the installation is complete, the "ServiceNow Base Pack" PowerPack appears on the PowerPacks page.


