![]()
Skylar One (formerly SL1) offers you the capabilities to monitor your hybrid cloud infrastructure, improve service visibility, and automate your IT workflows.
Use the following menu options to navigate the Skylar One user interface:
- To view a pop-out list of menu options, click the menu icon (
 ).
). - To view a page containing all of the menu options, click the Advanced menu icon (
 ).
).
Prerequisites
This manual assumes that the initial installation and configuration (deployment) of Skylar One has been completed. For details on the initial configuration of Skylar One, see the Installation manual.
Logging In and Out of the Skylar One User Interface
This topic covers how to access the different user interfaces for Skylar One: the default Skylar One user interface ("AP2") and the "classic" user interface (also known as "EM7").
The Skylar One User Interface
To log in to the Skylar One user interface:
-
In a browser, type the URL or IP address for your Skylar One system. The login page for Skylar One appears.
-
Type the current user name and password you use with Skylar One and click Log In. The Skylar One login button displays a spinning status icon while you are being logged in.
When logging in for the first time with a new Skylar One user account, a Notice dialog appears, prompting you to accept an agreement that you may use the product only in accordance with the applicable contract and within the scope of the rights purchased by your organization. To accept, check the box and then click .
-
If your company uses Single Sign-On (SSO) for authentication, you will be redirected to your company's SSO page, where you can log in to Skylar One with your SSO credentials. When you log out, the logout screen redirects you to an SSO page instead of the typical login screen.
-
If you are logging in for the first time or you are using the default system password, you will be prompted to change your password. Type your username, your old password, and type your new password twice in the New Password and Confirm Password fields. Click .
-
If your Skylar One system is a Military Unique Deployment (MUD) system, a Disclaimer modal appears, and you will need to click after reading the text to use Skylar One.
-
For an Administrator user, the End User License Agreement (EULA) appears the first time the Administrator user logs in to Skylar One. The user must agree to the terms before using Skylar One.
If you navigate to the classic Skylar One user interface by typing /em7 in the URL, the top navigation might be missing. To address this issue, navigate back to the new user interface, log out, and then log in to the classic user interface.
To log out of the Skylar One user interface:
- Click your user name in the navigation bar at the top of any Skylar One page.
- Click Log off. You are logged out, and a logoff page appears with the option to log in again.
The Classic User Interface
To log in to the classic user interface for Skylar One:
-
In a browser, type the URL or IP address for your Skylar One system, followed by /em7. The login page for the classic user interface appears.
-
Type the current user name and password you use with Skylar One and click Log In.
You can log out of the classic user interface by typing /em7/logout.em7 at the end of the URL or IP address.
-
If you are logging in for the first time or you are using the default system password, you will be prompted to change your password. Type your username, your old password, and type your new password twice in the New Password and Confirm Password fields. Click .
-
To switch to the default Skylar One user interface while you are using the classic user interface, type / at the end of the URL or IP address for your Skylar One system and press . The login page of the Skylar One user interface appears.
-
To switch to the classic user interface while you are using the Skylar One user interface, type /em7 at the end of the URL or IP address for your Skylar One system and press . The login page for the classic user interface appears.
-
To make the classic user interface the default interface, go to the Behavior Settings page (System > Settings > Behavior) and unselect the New UI Default checkbox.
Using the Navigation Menus
The Skylar One user interface user interface uses two menus: a basic menu and an Advanced menu. The basic menu and the Advanced menu displays links for only the pages for which you have access.
The name of the Skylar One page appears in the title bar of your browser, and the page title also appears in your browsing history to help you navigate through the pages you have visited.
Use the following menu options to navigate the Skylar One user interface:
- To view a pop-out list of menu options for the basic menu, click the menu icon () at the top left of any Skylar One page. Use the up and down arrow buttons (

 ) to expand and contract the menu options.
 - To view the Advanced Menu page, which contains links to all of the menu options, click the Advanced menu icon () at the bottom left of any Skylar One page. Use + in your browser to quickly find a page.
Using the Setup and Config Page
The Setup and Config page (![]() ) displays all information relevant to getting started in Skylar One for administrator-level users. Included on this page are a number of journeys, intuitive self-service workflows that will guide you through the most common Skylar One system tasks. Click the name of a workflow to get started.
) displays all information relevant to getting started in Skylar One for administrator-level users. Included on this page are a number of journeys, intuitive self-service workflows that will guide you through the most common Skylar One system tasks. Click the name of a workflow to get started.
This page also contains informational cards that provide you with the proper resources for Skylar One setup and configuration.
The informational cards on this page include:
- Get Started. Displays a list of available user journeys and their journey status. Click the name of the journey to get started. The journeys include:
- Take a Tour of Skylar One
- Discover and Monitor Hybrid Cloud Infrastructure
- Resources. Hosts additional external resources to help you with setup and configuration; these links include:
- Training Portal
- ScienceLogic Support
- Overview. Provides links to the user journeys. These journeys include guided tours and interactive wizards that help you set up and refine your Skylar One environment:
- Next Steps. Contains links to other pages in Skylar One where you can continue working after completing some or all of a journey:
- Manage Devices
- Manage Collector Groups
- Manage Organizations
- Manage Users
- Manage Access Hooks
Setting a Home Page in Skylar One
The Dashboards page is the default Home page (![]() ) when you first launch Skylar One. You can set any of the top-level pages that display in the left-hand navigation bar as your landing page, including Events, Devices, Business Services, Skylar AI, Maps, and Setup and Config. You can also set a specific dashboard from the Dashboards page as your home page.
) when you first launch Skylar One. You can set any of the top-level pages that display in the left-hand navigation bar as your landing page, including Events, Devices, Business Services, Skylar AI, Maps, and Setup and Config. You can also set a specific dashboard from the Dashboards page as your home page.
If you lose permission to the page or dashboard you set as your landing page, the Events page will be automatically set as your home page.
You cannot use any pages that display in the navigation bar below these pages as a landing page. This feature does not work with classic dashboards. For more information on what you can see and do on the default dashboards page,
To set your home page:
- In Skylar One, navigate to the page or the Skylar One dashboard that you want to set as your home page.
- Click your user name in the navigation bar at the top of the page and select Set as Home Page. That page or dashboard will be your home page the next time you launch Skylar One. If the page you are currently on cannot be used as a home page, the Set as Home Page option will be grayed out.
Filtering Inventory Pages
In Skylar One, an inventory page is any page (or tab) that contains a table with a list of items that you work with, like the Events page or the Devices page. At the top of most inventory pages in the Skylar One user interface are a set of filters for the columns in the table on that page.
On an inventory page, you can start typing filter text or select filter options in one or more of these filters to narrow down the items in the list to just the items you want to view.
In the following image, the user is filtering the Devices inventory page by typing part of an IP address in the filter for the IP Address column:

As you type text in the Filter field at the top of a column, Skylar One starts to filter the list to include only those elements that include your search terms.
Some filters, like the State filter, let you click a drop-down arrow to select search options from a drop-down menu. Also, any filters related to date and time let you click a calendar icon (![]() ) to select a date or a date range, and a clock icon (
) to select a date or a date range, and a clock icon (![]() ), where relevant, to select a time or a time range.
), where relevant, to select a time or a time range.
If you were using a version of Skylar One from before version 11.2.0, any list and column preferences you had configured will not be retained with the new features for inventory pages after you upgrade to 11.2.0 or later. This includes customizations such as which columns are visible, column widths, column order, and other customizations.
Skylar One retains your search filters on pages in the Skylar One user interface even after you refresh the browser or navigate to another page and then return to the page where you created your search.
On most inventory pages, you can use the Search field at the top of the inventory page to perform a Basic Search. For more information, see Using Basic Search. In addition, you can click the gear icon (![]() ) and select Advanced to "translate" your basic search into an Advanced Search. For more information, see Performing an Advanced Search.
) and select Advanced to "translate" your basic search into an Advanced Search. For more information, see Performing an Advanced Search.
Filter Syntax
When searching for a string in the Filter field on an inventory page, Skylar One matches sub-strings by default, even if you do not include any special characters. For example, searching for "hel" will match both "hello" and "helicopter".
When searching for a numeric value, Skylar One will not match a sub-string unless you use a special character.
If you type invalid search terms or incorrect syntax in a filter on an updated inventory page, Skylar One will highlight the headers in red. Skylar One will ignore the incorrect input until you fix it.
You can use the following set of syntax and special characters to search and filter each column on an inventory page (except columns that display date and time):
String and Numeric
-
, (comma). Specifies an "OR" operation. Works for string and numeric values.
For example: "dell, micro" matches all values that contain the string "dell" OR the string "micro".
-
& (ampersand). Specifies an "AND " operation. Works for string and numeric values.
For example: "dell & micro" matches all values that contain both the string "dell" AND the string "micro", in any order.
-
! (exclamation point). Specifies a "not" operation. Works for string and numeric values.
For example: "!dell" matches all values that do not contain the string "dell".
You can also use the "!" character in combination with the arithmetical special characters (min-max, >, <, >=, <=, =) described below.
String
-
^ (caret). For strings only. Specifies "match the beginning". Matches any string that begins with the specified string.
For example: "^sci" matches "scientific" and "sciencelogic", but not "conscious".
-
$ (dollar sign). For strings only. Specifies "match the ending". Matches any string that ends with the specified string.
For example: "ter$" matches the string "renter" but not the string "terrific".
Numeric
-
min-max. Matches numeric values only. Specifies any value between the minimum value and the maximum value, including the minimum and the maximum.
For example: "1-5 "matches 1, 2, 3, 4, and 5.
-
- (dash). Matches numeric values only. A "half open" range. Specifies values including the minimum and greater or including the maximum and lesser.
For example: "1-" matches 1 and greater. So matches 1, 2, 6, 345, etc. "-5" matches 5 and less. So matches 5, 3, 1, 0, etc.
-
> (greater than). Matches numeric values only. Specifies any value "greater than".
For example: ">7" matches all values greater than 7.
- < (less than). Matches numeric values only. Specifies any value "less than". For example:
"<12" matches all values less than 12.
-
>= (greater than or equal to). Matches numeric values only. Specifies any value "greater than or equal to".
For example: "=>7" matches all values 7 and greater.
-
<= (less than or equal to). Matches numeric values only. Specifies any value "less than or equal to".
For example: "=<12" matches all values 12 and less.
-
= (equal). Matches numeric values only. For numeric values, allows you to match a negative value.
For example: "=-5 " matches "-5" instead of being evaluated as the "half open range" as described above.
Examples
-
"silo". Matches text that contains "silo".
-
" !silo ". Matches text that does not contain "silo".
-
"aio$". Matches only text that ends with "aio".
-
"^shu". Matches only text that begins with "shu".
-
"^silo$". Matches only the text "silo", with no characters before or after.
-
"!^silo". Matches only text that does not start with "silo".
-
"!fer$" matches all values that do not end with "fer".
-
"!0$". Matches only text that does not end with "0".
-
"!^silo$". Matches only text that is not the exact text "silo", with no characters before or after.
-
"!". Matches null values, typically represented as "--" in most pages.
-
"!^$". Matches all text that is not null.
-
silo, !aggr". Matches text that contains the characters "silo" and also text that does not contain "aggr".
-
"silo, 02, !aggr". Matches text that contains "silo" and also text that contains "02" and also text that does not contain "aggr".
-
"silo, 02, !aggr, !01". Matches text that contains "silo" and also text that contains "02" and also text that does not contain "aggr" and also text that does not contain "01".
-
"!vol&!silo". Matches text that does not contain "vol" AND also does not contain "silo". For example, "volume" matches, because it contains "vol" but not "silo".
-
"!vol&02". Matches text that does not contain "vol" AND also contains "02". For example, "happy02" matches, because it does not contain "vol' and it does contain "02".
-
"aggr,!vol&02". Matches text that contains "aggr" OR text that does not contain "vol" AND also contains "02".
-
"aggr,!vol&!infra". Matches text that contains "aggr" OR text that does not contain "vol" AND does not contain "infra".
-
"3,7-8,11,24,50". Matches numbers 1, 2, 3, 7, 8, 11, 24, 50, and all numbers greater than 50.
-
"3,7-8,11,24,50,a". Matches numbers 1, 2, 3, 7, 8, 11, 24, 50, and all numbers greater than 50, and text that includes "a".
-
"!^$" matches all values that are not null.
-
"!^" matches null values.
-
"!$" matches null values.
-
"1-5" matches 1, 2, 3, 4, and 5.
-
"1-" matches 1 and greater. So matches 1, 2, 6, 345, etc.
-
"-5" matches 5 and less. So matches 5, 3, 1, 0, etc.
-
"=-5 " matches "-5" instead of being evaluated as the "half open range" as described above.
-
"<7" matches 1,2,3,4,5,6
-
">=3" matches anything greater than or equal to 3
Editing the Settings for an Inventory Page
On an inventory page, you can perform the following actions:
- Adjust and sort columns
- Create a Multi Sort
- Edit Column Preferences
- Adjust the row density
- Export to a CSV file
To change how often Skylar One updates this page, click Refresh and select a new timespan. You can also select Refresh Now to immediately update the page or select Pause to stop updating the page altogether.
Adjusting and Sorting Columns
You can adjust the columns on an inventory page in the following ways:
-
To rearrange the columns in the list, click and drag the column name to a new location.
-
To adjust the width of a column, click and drag the pipes (|) on either side of the column name.
-
To quickly sort a column in ascending or descending order, click the up arrow (ascending) or down arrow (descending) that appears when you hover over the column name.
-
To perform additional sorts and to hide or show columns, click the Menu icon (
 ) next to the column name and select an option from the drop-down menu.
 Hover over the column name to see the Menu icon (
).Your options include:
- Multi Sort. Creates multiple ascending or descending sorts, in order of importance. For more information, see Creating a Multi Sort.
- Unsort. Clears the existing sort.
- Sort by ASC. Sorts the column in ascending order: smallest to largest for numbers, or alphabetically for strings.
- Sort by DESC. Sorts the column in descending order: largest to smallest for numbers, or reverse alphabetically for strings.
- Hide. Removes that column from the inventory page.
- Show columns. Opens the Find column menu, from which you can add hidden columns and hide columns as needed. You can also choose to show all columns, reset the columns to their default display settings, and clear any column filters on the inventory page. For more information, see Editing Column Preferences.
If you use the check boxes to select one or more items in a list, the relevant buttons appear at the top of the page, above the column names.
Creating a Multi Sort
On an inventory page, if you click the gear icon (![]() ) to open the Grid Settings menu and select Multi Sort, you can create multiple ascending or descending sorts, in order of importance:
) to open the Grid Settings menu and select Multi Sort, you can create multiple ascending or descending sorts, in order of importance:
- Click Add Sort to add one or more sorts.
- Click to clear all of the existing sorts. You can also click the delete icon (
 ) next to a sort to remove that specific sort from the list.
 - Click to run the sort and show the results on the list page.
The Multi Sort settings are cleared if you sort a column from the inventory page.
Editing Column Preferences
On an inventory page, if you click the gear icon (![]() ) to open the Grid Settings menu and select Column Preferences, the Find column menu appears. On the menu, you can update the display settings for that inventory page:
) to open the Grid Settings menu and select Column Preferences, the Find column menu appears. On the menu, you can update the display settings for that inventory page:
- Select a column from the menu to add a hidden column.
- De-select a column from the menu to hide that column.
- Click Show All to show all columns.
- Column widths, order, sort, refresh interval, and other column attributes will persist after you adjust them. You can click Reset to return the columns to their default display settings.
From the Grid Settings menu, click Clear Filters to remove any column filters on that page.
Adjusting the Row Density
On an inventory page, if you click the gear icon (![]() ) to open the Grid Settings menu and select Density, you can change the size of the rows and the size of the text in the rows on that page by selecting:
) to open the Grid Settings menu and select Density, you can change the size of the rows and the size of the text in the rows on that page by selecting:
- Compact. Uses less padding between rows and a smaller font size to display more rows.
- Comfortable. Use more padding between rows and a larger font size to display fewer rows, but with more spacing between rows.
You can toggle the highlighting of the Message column by clicking the gear icon (![]() ) to open the Grid Settings menu and selecting Severity Highlighting Off or Severity Highlighting On.
) to open the Grid Settings menu and selecting Severity Highlighting Off or Severity Highlighting On.
Exporting to a CSV File
On an inventory page, if you click the gear icon (![]() ) to open the Grid Settings menu and select Export (.csv), you can save the current list of items as a comma-separated list.
) to open the Grid Settings menu and select Export (.csv), you can save the current list of items as a comma-separated list.
The list will include any column filters that you set up before clicking Export.
Viewing the Device Summary Modal from an Inventory Page
On the Events page and the Devices page, you can click the Open icon (![]() ) next to an event or device to open a Device Summary modal:
) next to an event or device to open a Device Summary modal:
NOTE: On the Events page, the Device Summary modal displays only for events that are aligned with devices.
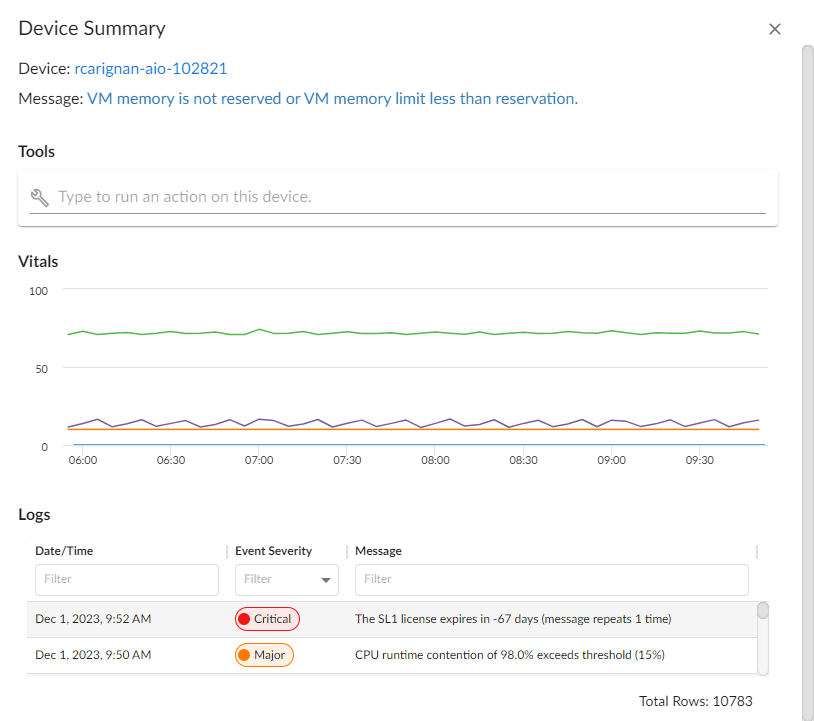
The detail window for that device contains the Tools pane, the Vitals graphs, and the Logs pane:
- The Tools pane enables you to run a set of diagnostic tools or user-initiated actions in the Activity Center, or to click on custom links that will open in a separate browser window. Click the search bar to search for tools, actions, or custom links that are available for the device.
- The Vitals pane displays graph data for the past four hours of CPU usage, memory usage, and latency for that device, where relevant. You can zoom in on a shorter time frame in the Vitals graph by clicking and dragging, and you can go back to the original time span by clicking the button.
- The Logs pane displays a list of events associated with that device.
To open the detail or Investigator page for an item, click the link for the item name at the top of the detail window.
Performing Bulk Actions
If an inventory page in Skylar One displays a list of items, and that page contains a checkbox (![]() ) to the left of each item in the list, you can select two or more items to perform bulk actions on all of the selected items at the same time.
) to the left of each item in the list, you can select two or more items to perform bulk actions on all of the selected items at the same time.
When you use the checkbox to select one or more items in a list, a set of relevant buttons appear at the top of the page. If there are many bulk actions available, the button appears, and you can search or click the down arrow to select an action. Select an action or click the relevant button to run that action on all of the selected items.
For example, on the Devices page, you can select two, twenty, or all of the devices on the page, and then you can click the button and select from a number of actions to run on all of the selected devices.

To select all of the items on a page, click the checkbox at the top of the list. To clear all of the selected items, click the checkbox at the top again.
To select a series of adjacent rows, you can hold down the key as you click the first item and then click the last item in the series.
Pages that contain lists use "infinite scrolling", where the list continues to populate as you scroll toward the bottom of the list. The scrolling stops when you reach the end of the list.
Using Basic Search
At the top of most lists in the Skylar One user interface, the Search field lets you look for specific elements in that list. The Search field contains a magnifying glass icon (![]() ) next to the words "Type to search" or "Search".
) next to the words "Type to search" or "Search".
As you type text in the Search field, Skylar One filters the list to include only those elements that include your search terms. When searching, Skylar One considers all relevant columns for the search, including those that are not currently displayed on the page.
Skylar One retains your search criteria on pages in the Skylar One user interface even after you refresh the browser or navigate to another page and then return to the search page using the button in the browser.
After you type search commands in the Search field, you can click the gear icon (![]() ) and select Advanced to "translate" your basic search into an Advanced Search. For more information, see Performing an Advanced Search.
) and select Advanced to "translate" your basic search into an Advanced Search. For more information, see Performing an Advanced Search.
To use the Search field:
-
Click the Search field and start typing search text. As you type, Skylar One provides potential matching values in a drop-down menu and starts filtering the list with your search text.
For example, if you start searching for "database" by typing data, a drop-down list appears with a list of columns that might contain that word, and the list is filtered by items that have "data" in one of their fields.
-
If you select one of the suggested search criteria from the list, such as message, a criteria button displays under the Search field. You can click the criteria button and edit the search text under the button, if needed.

If you select the ANY option from the drop-down menu, the search looks through all relevant columns for matches to your search text. If you select the ANY option for multiple search terms, this can cause issues with search queries, as every term has to be searched against every column in the database. Skylar One uses different search criteria for an "ANY" search based on the page you are currently on in Skylar One. ScienceLogic recommends that you do not use Basic Search in these situations, and instead use the Advanced Search feature. For more information, see Fields Used by an "ANY" Basic Search.
If you are unable to paste a copied string of text in the Search field, make sure that your copied text does not contain any hidden special characters.

- To edit the search criteria for your current search even further, click the criteria button and click the contains field. You can choose from additional search operators in the drop-down that appears, such as begins with, is null, equal to, and not equal to.
-
You can add another set of search criteria to an existing search by typing additional text in the Search field, and then selecting additional fields from the drop-down list. The new search terms are added to a second criteria button.

The search criteria button under the Search field also displays the search operator and value for the search as hovertext.

-
Alternately, you can click the menu icon (
 ) to the right of the Search field to open a menu containing related search criteria. Select an element from the list of criteria and type additional search information in the criteria button that appears under the Search field:
If you select a date-related search criteria from the list of criteria, you can use a drop-down calendar to select a specific date and time.

- To remove a search criteria, click the close icon (
 ) on the criteria button under the Search field.
- To switch to an Advanced Search, click the gear icon (
 ) to the right of the Search field and select Advanced.
 - To quickly clear a search, click the gear icon () to the right of the Search field and select Clear.
- To save a search so you can use it again, see Saving a Basic Search.
Fields Used by an "ANY" Basic Search
If you type search criteria into a Search field at the top of a page in Skylar One and then select the ANY option from the drop-down menu, the search looks through all relevant columns for matches to your search text.
If you select the ANY option for multiple search terms, this can cause issues with search queries, as every term has to be searched against every column in the database. ScienceLogic recommends that you do not use Basic Search in these situations, and instead use the Advanced Search feature.
Skylar One uses different search criteria for an "ANY" search, depending on the page you are currently on in Skylar One. For example, an "ANY" search on the Dashboards page searches for the search criteria in the Dashboard ID or Dashboard Name fields, while an "ANY" search on the Devices page searches for the search criteria in the Device Name, Hostname, Device Class, Collector Group, Organization, and additional fields. See the table below for details.
To see which fields Skylar One is using for a search, click the gear icon (![]() ) to the right of the Search field and select Advanced. The syntax of the Basic Search is converted into an Advanced Search, which lists the relevant fields being searched by Skylar One.
) to the right of the Search field and select Advanced. The syntax of the Basic Search is converted into an Advanced Search, which lists the relevant fields being searched by Skylar One.
The following table lists the fields that are used by an "ANY" search, based on the page you are on in Skylar One:
| Page in Skylar One user interface | Fields searched by Skylar One for that page |
|---|---|
| Main Pages | |
| Dashboards | Dashboard ID, Dashboard Name |
| Events | Event Message, Aligned Resource Name, Aligned Organization, Aligned Sub-entity Name, Device Name, Hostname, Device Class Logical Name, Device Class Description, Device Collector Group, Device Class, Device Group ID, Device Group Name, Device Class Category |
| Devices, Machine Learning, Device Services | Device Name, Hostname, Device Class Logical Name, Device Class Description, Device Class, Device Group, Device Class Category Name, Collector Group ID, Collector Group Name, Aligned Organization, Machine Learning Policy |
| Business Services and IT Services | Service Type, Service ID, Service Name, Service Label, Service Policy Name, Aligned Organization |
| Maps | Map Name, Map Description |
| Secondary Pages | |
| Agents | Agent Nickname, Agent Operating System, Hostname |
| Business Service Templates | Business Service Template Name, Business Service Template Descriptions |
| Credentials | Credential Name |
| Custom Attributes | Custom Attribute Label, Custom Attribute Name |
| Device Categories | Device Category Name |
| Device Classes | Device Class Name, Device Class Description, Virtual Type, Logical Name, Device Category Name |
| Discovery Sessions | Discovery Session Name, Aligned Collector Name, Aligned Organization |
| Event Policies | Event Policy Name |
| Subscription Usage (Current License Usage) | License Type, Device Name, Aligned Organization, Device Class Category Name |
If a page from the Skylar One user interface is not listed in the above table, then Skylar One only uses the relevant Name field on that page for an "ANY" search.
Saving a Search
If you are creating a complicated search using Basic Search or Advanced Search, or if you have a search that you use on a regular basis, you can save that search criteria so you can quickly use it again later.
To save a search:
-
After you have created a Basic or Advanced Search, click the gear icon (
) to the right of the Search field and select Save. A Save Search window appears. -
In the Search Name field, type the name of your search and click . The search is added to the list of saved searches.
To use a saved search:
-
Click the gear icon (
) to the right of the Search field and select Saved Searches. An Apply Search window appears. -
From the Select a search drop-down, select the search you want to use and click . That search is applied to the current list.
By default, saved searches apply only to your user profile, and they are not shared with other users.
To share a saved search:
-
Create a Basic Search and change it to an Advanced Search by clicking the gear icon (
) to the right of the Search field and selecting Advanced. -
Copy the Advanced Search code from the Search field and paste it into the relevant documentation so you can share the search with other users.
Performing an Advanced Search
The Skylar One user interface includes an Advanced Search option that lets you use customized search commands to search for data. The syntax for these Advanced Searches can be much more complex than a Basic Search, enabling you to find exactly what you need from a list of items.
Also, because the Basic Search only uses "AND" for multiple search criteria, you need to use an Advanced Search for an "OR" search using multiple search criteria, or if you want to create more complicated searches using Boolean Algebra.
At a minimum, an Advanced Search requires the following components, in the following order:
- A field. The general type of data for which you are searching, such as a device name or an event message.
- An operator. A word or symbol that specifies the relationship between the field and the value, such as equals or less than.
-
A value. A specific aspect or version of the field, such as a name or an amount. If a value is a string, it should be surrounded by "quotation marks" or 'apostrophes'.
As you type your Advanced Search, a red icon (![]() ) or a green icon (
) or a green icon (![]() ) appears at the end of the text field to show that your search is incorrectly or correctly formatted.
) appears at the end of the text field to show that your search is incorrectly or correctly formatted.
To view a list of all possible search commands in an Advanced Search, press + .
The Advanced Search fields and values vary based on the page you are on in the Skylar One user interface. For more information about fields, operators, and values, see Components of an Advanced Search.
Below are simple examples of Advanced Search syntax:
message contains 'risk is high'
organization has (company contains 'system')
attribute has (id = year and value = 2021)
name contains 'web_tier' and deviceClass has (description contains 'AppDynamics')
deviceClass has (description contains 'em7 admin portal')
For additional examples, including examples with more complex syntax, see Examples of Advanced Searches.
You can type search commands in the Search field for a Basic Search, and then click the gear icon (![]() ) and select Advanced to "translate" your basic search into an Advanced Search. You cannot go from an Advanced Search back to a Basic Search, however, without losing your search criteria.
) and select Advanced to "translate" your basic search into an Advanced Search. You cannot go from an Advanced Search back to a Basic Search, however, without losing your search criteria.
To create an Advanced Search:
- Click the gear icon () to the right of the Search field and select Advanced. The search type changes from Basic to Advanced (note the change in font style).
-
Start typing a field name for your search. As you type, Skylar One displays a list of available fields in a drop-down menu:

-
Select or type a field name.
-
To view a list of all possible search commands at any point in an Advanced Search, press . For example, the following operator options appear if you press after typing "message" and inserting a space:

-
Select or type an operator name. If you are typing, Skylar One provides a list of available options.

As you type your search command, a red icon (
 ) appears at the end of the text field if your command is incorrectly formatted or incomplete. Click the red icon to view additional details.


-
Type a value to complete your search, and type additional search commands as needed. When your search is complete and formatted correctly, a green icon (
 ) appears at the end of the text field:

-
Click the button. The results of your search appear.
Even if you have correct search syntax, Skylar One will save your search query only after you click . For example, some pages, such as a Device Service search, might not show all of the search results until you click .
- To clear a search, click the gear icon () to the right of the Search field and select Clear.
- You can save an Advanced Search to use later. By default, saved searches apply only to your user profile, and they are not shared with other users. For more information, see Saving a Search.
Components of an Advanced Search
At the minimum, an Advanced Search requires the following components, in the following order:
- A field. The general type of data for which you are searching, such as a device name or event message.
- An operator. A word or symbol that specifies the relationship between the field and the value, such as equals or less than.
- A value. A specific aspect or version of the field, such as a name or an amount. You must use either "quotation marks" or 'apostrophes' for your search strings, and strings are not case-sensitive.
You can also include the operators "and" or "or" to your search command. Basic Search in Skylar One uses only "AND" searches, unless you specify "Any" in your Basic Search.
When Skylar One evaluates an Advanced Search command, it evaluates the "OR" expressions first, followed by the "AND" filters.
For example, the following search command looks for events that have a status of Critical and contain a message with the word "error":
status = critical and message contains 'error'
The following search command looks for devices with a name of "device-name" or messages containing the word "error":
name = "device-name" or message contains "error"
You can use parentheses ( ) to group expressions and to ensure that the expressions are evaluated in the correct order. The following search command looks for either devices with a name of "device-name" and a status of Critical, or devices with a name of "device-name" and a status of Major:
(name = "device-name" and status = critical) or (name = "device-name" and status = Major)
Searches in Skylar One are not case-sensitive, so you can use any combination of upper-case and lower-case letters.
Fields
For most searches, you start your search command with a field name. When you start typing in an Advanced Search field, Skylar One provides a list of potential fields in a drop-down menu that you can select for your search command:

The list of potential fields depends upon the page you are currently on in Skylar One. The example above is from the Advanced Search field on the Devices page. If you typed the same letters in the Advanced Search field on the Events page, the drop-down menu would look like this:

The following table lists some of the more common fields, along with how to use them and examples of search commands that use those fields:
| Field name | Purpose | Example |
|---|---|---|
| alignedResourceName | Search for the name of a device aligned with an event. | alignedResourceName contains "lab" |
| asset | Search for an asset aligned with a device. | asset has (assetTag contains 1) |
| attribute | Search for devices based on custom attributes. In the example, the custom attribute is "year" and the value is "2021". | attribute has (id = year and value = 2021) |
| dateCreated | Search for the date and time a device was created. | dateCreated isNotNull |
| deviceClass | Search for devices belonging to a device class. | deviceClass has (class contains 'Cisco') |
| deviceGroup | Search for devices belonging to a device group. | deviceGroup has (name contains "Network") |
| hostname | Search for a device hostname | device has (hostname = "srv") |
| id | Search for the unique numeric ID assigned by Skylar One. | id contains "10" |
| isAcknowledged | Search for events that have or have not been acknowledged. | isAcknowledged = true |
| message | Search for details about an event message. | message contains "problem" |
| name | Search for the name of the device. | name = "server" |
| organization | Search for the organization to which the device is assigned. | organization has (company = "System")
organization has (company doesNotContain 'ABC Systems') |
| severity | Search for the severity of an event; severities range from 0 to 4, from Healthy to Critical. |
severity in 3,4 Searches for all Major and Critical events. |
| state | Search for the state of a device; states range from 0 to 4: Healthy, Notice, Minor, Major, and Critical. |
state in 0,1,2 Searches for all devices with a state of Healthy, Notice, and Minor. |
| suppressGroup | Hide data related to the specified group. | suppressGroup = sciencelogic |
Operators
For most searches, you follow a field with an operator. The operator establishes a relationship between the field and the value that comes after the operator.
The list of available operators changes based on the page where you are making your search.
The following table lists some of the more common operators, along with how to use them and examples of search commands that use those operators:
| Operator name | Purpose | Example |
|---|---|---|
| and | Include two or more search criteria before producing search results | deviceClass has (description contains 'rds instance') and name contains 'wordpress' |
| or | Include at least one of multiple search criteria. | name = "server" or message contains "error" |
| =, ==, eq | The field and the value are equal. | name == 'ECS 23' and ip doesNotContain '.' |
| <>, !=, neq | The field and the search value are not equal. | field != abc |
| <, lt | The field is less than the search value. | state < 2 |
| >, gt | The field is greater than the search value. | severity > 3 |
| <=, lte | The field is less than or equal to the search value. | state lte 2 |
| >=, gte | The field is greater than or equal to the search value. | severity gte 3 |
| contains | The field includes the specified string. | deviceClass has (description contains 'em7 admin portal') |
| doesNotContain | The field does not include the specified string. | name contains 'Skylar One Classic' or (description contains 'PowerFlow' and description doesNotContain 'Not Deployed') or (description contains 'Extended Architecture' and description doesNotContain 'Not Deployed') |
| has | The field contains a specific value. The value following "has" must be enclosed in parentheses. |
deviceClass has (deviceCategory has (name contains 'Server')) and deviceClass has (description doesNotContain 'vcenter') |
| in | The field must be part of a specific set of values. | severity in 2,3,4 |
| not | Opposite values; this operator precedes the field name. | not field = abc |
| isNull | The field is empty. | extTicketRef isNull |
| isNotNull | The field is not empty. | counter isNotNull |
Values
The value you type at the end of a search command depends on the field name and the operator you use. For most searches, you can type the value instead of picking it from the drop-down menu that lists possible search options.
In the following example, the first search value is a string (red text) and the second search value is a numeric value (blue text):

You must use either "quotation marks" or 'apostrophes' for search strings, and strings are not case-sensitive.
Strings
You can create a search command that searches for a specific set of words in a string. You must use either "quotation marks" or 'apostrophes' for your search strings, and strings are not case-sensitive.
The following table lists some of the more common string operators, along with how to use them and examples of search commands that use those string operators:
| String operator name | Purpose | Example |
|---|---|---|
| beginsWith | Search for strings beginning with a specified value | message beginsWith "Host Resource" |
| endsWith | Search for strings ending with a specified value | message endsWith 'shutdown' |
| contains | Search for strings containing a specified value | message contains "problem" |
| doesNotBeginWith | Search for strings that do not begin with a specified value | message doesNotBeginWith "front" |
| doesNotEndWith | Search for strings that do not end with a specified value | message doesNotEndWith 'warning' |
| doesNotContain | Search for strings that do not contain a specified value | message doesNotContain "codec" |
Escape characters
In double-quoted strings (strings surrounded by quotation marks), you can include quotation marks in the search by escaping the quotation marks. To escape those characters, add a backslash before each quotation mark, such as \".
For example:
"Error in \"process x\""
In single-quoted strings, you can include the single-quote character by escaping it with a backslash, such as \'.
For example:
'Eric\'s Laptop'
'Error in "process x"'
You do not need to add quotes around strings in your search commands. However, if your string contains only numbers, you might want to add quotes around it to ensure that Skylar One interprets it as a string.
If you do not include quotes around strings in your search commands, you must escape the following characters with a backslash:
- all empty spaces or white spaces
- comma
- end parenthesis
Examples:
Eric's\ Laptop
Error\ in\ "process\ x"
devices\ \(system\,\ server\)
Other than the escape characters mentioned above, you can escape any character. You must escape the backslash character if you want to use it in a string, such as \\.
The normal whitespace escape sequences can be used: \t (tab), \n (new line), \b (backspace), \r (carriage return), and \f (form feed).
You can also use four-digit Unicode hex escape codes in the form \uXXXX.
Examples of Advanced Searches
Because the search commands differ for each page in Skylar One, this section contains a set of search examples based on context.
To view a list of all possible search commands at any point in an Advanced Search, press .
Advanced Search Examples on the Events Page
The following table contains a set of sample Advanced Searches for the Events page:
| Purpose of Advanced Search on Events Page | Advanced Search Syntax |
|---|---|
| Search for events on devices by Device ID of 1, 2, or 3. | device has (id in 1,2,3) |
| Search for all events that contains the word "error" | message contains "error" |
| Search for all events on devices with a Device Category Name of "xtremio". | device has (deviceClass has (deviceCategory has (name contains 'xtremio'))) |
Advanced Search Examples for Dynamic Component Mapping (DCM) Scenarios
Dynamic Component Mapping (DCM) allows Skylar One to collect data from a single management system, such as a VMware ESX server, and then use that data to create multiple device records for the entities managed by that single management system. For example, the managed entities for a VMware ESX server would be the Guest VMs hosted by that ESX server.
The following table contains a set of sample Advanced Searches for DCM devices on the Devices page:
| Purpose of Advanced Search | Advanced Search Syntax |
|---|---|
| Search for all host devices from a specific vCenter and add those devices to a Device Service | componentRoot has (name contains "VCSA") and (componentParent has (deviceClass has (description contains 'Host Server')) or componentParent has (deviceClass has (description contains 'ESX'))) |
| Search for SQL servers than run as the master. |
deviceClass has (description contains 'SQL Instance') and componentRoot has (attribute has (id == 'DB_Role'and value contains 'Master')) |
The following sections contain more details about these two Advanced Searches and how they work.
Scenario 1: vCenters
a Skylar One system has multiple vCenters, each of which has multiple host servers. You want to include in a Device Service all Virtual Machines (VMs) from just one of the vCenters. This scenario includes the following elements:
-
The vCenter has a host name of VCSA hayward-hq.loc
-
One of the hosts has a Device Class of Host Server, and it contains four VMs
-
One of the hosts has a Device Class of ESX, and it contains 16 VMs

Search 1a
componentRoot has (name contains "VCSA") and deviceClass has (description contains "Virtual Machine")
This search works, but it only returns seven devices instead of the 16 devices you might have expected:

How the query works:
componentRoot has (name contains "VCSA")
This part of the query returns a list of all devices that have a root with a name that includes VCSA.
and deviceClass has (description contains "Virtual Machine")
This part of the query filters the results of the first part of the query to isolate the devices with Device Class of Virtual Machine
The reason why this Advanced Search does not result in the 16 VMs that we can see are hosted by both hosts is that some of the VMs have been merged. As a result, their Device Class has been reset to that of the operating system they are running.
Search 1b
componentRoot has (name contains "VCSA") and (componentParent has (deviceClass has (description contains 'Host Server')) or componentParent has (deviceClass has (description contains 'ESX')))
This search successfully returns all 16 VMs:

How the query works:
componentRoot has (name contains "VCSA")
This part of the query returns a list of all devices that have a root with a name that includes VCSA.
and (componentParent has (deviceClass has (description contains 'Host Server'))
This part of the query filters the results of the first part of the query to isolate the devices that have a parent of the Device Class Host Server.
or componentParent has (deviceClass has (description contains 'ESX')))
This part of the query then does a second search of the results of the first query, looking for devices with parents that have a Device Class of ESX.
Scenario 2: SQL Servers
A DB Cluster has two SQL Servers than run as the master and two SQL servers that run as the slave:

Four times a year the master and slave is swapped between the two pairs. As this is a planned, infrequent, and manual activity, you can manually swap a custom attribute on the four hosting devices to designate if a device is acting as master or slave:


For production or higher frequency and automated swapping, making the switch of the custom attributes could be embedded into a switching script and use the API or GQL interfaces to change the value of the custom attributes.
Searches
deviceClass has (description contains 'SQL Instance') and componentRoot has (attribute has (id == 'DB_Role'and value contains 'Master'))
This search returns the two SQL instances that are running on the two SQL hosts designated as the master pair:

deviceClass has (description contains 'SQL Instance') and componentRoot has (attribute has (id == 'DB_Role'and value contains 'Master'))
This search returns the two SQL instances that are running on the two SQL hosts designated as the slave pair:

How the query works:
deviceClass has (description contains 'SQL Instance')
This part of the query returns a list of all devices that have a Device Class of SQL Instance.
and componentRoot has (attribute has (id == 'DB_Role'and value contains 'Slave'))
This second part of the query then filters the results of the first query to isolate the devices that have a root device with a custom attribute of DB_Role set to Slave.
Customizing the Skylar One User Interface
A theme is a graphic template this is applied to the user interface. Skylar One includes one System Default theme, but you can completely customize the look and feel of your Skylar One system by creating new themes.
For example, you could create a theme that replaces the Skylar One logo with your company's logo and updates the colors used in the user interface to match those used in your company's branding. You can also choose between a light theme or a dark theme for the user interface.
For more information about customizing the user interface using themes, see
Getting Help and More Information
For product documentation about any page in Skylar One, click the button at the top right of any page in Skylar One.
The Help menu appears in a new pane on the right side of the Skylar One window:

If you click the View Product Documentation link at the bottom of the Help menu, a product documentation topic specific to the current page appears in a new browser window:

The product documentation includes a Search field at the top of the page that you can use to find additional topics related to the Skylar One user interface. To find a specific topic that is longer than one word, enclose all of the key words in parentheses, such as "business services".
Click the button on the bottom right of the product documentation window to send comments directly to the ScienceLogic Documentation team, such as reporting typos, inaccuracies, questions, or other comments about that specific page in the Product Documentation.
As of version 8.12.2 of Skylar One, ScienceLogic no longer updates the content that appears when you click the button in the classic user interface. All help content is maintained in the Help menu and the online product documentation, which is located at https://docs.sciencelogic.com.
The About Page
For more information about the components used by Skylar One, click your user name in the navigation bar at the top of any Skylar One page and select About.

The current version number and AP2 name of the Skylar One user interface displays in the ap2 row at the top of the list of components in the right-hand pane. Below the AP2 line is the current version of GraphQL used by Skylar One. The Platform section lists Skylar One version information for the various components in Skylar One, including Application Server, Collector Unit, and Database details, and All-In-One configurations (AO) where relevant.
In the left-hand pane, click any of the components in the Open Source Components pane to view licensing information about those components, along with links to relevant websites where relevant.
To search for a specific open-source component, type the name of that component in the Search field at the top of the page. The list of components is filtered by your search terms.
In addition, every page in Skylar One contains a footer that displays the Skylar One version, the build number, and the copyright date on the right side of the footer. You can click the Skylar One version text to go to the About page:

If you select the Display Previous Login In Footer option on the Behavior Settings page (System > Settings > Behavior), the footer will also display the date and time of the previous login or the last failed login (if applicable) on the left side of the footer:

Tips and Best Practices for Using the Product Documentation
Use the following tips and best practices when using the ScienceLogic Help Menu and product documentation:
General
- To ensure that you are always using the most recent version of the product documentation, check the URL for this site to make sure you are using https://docs.sciencelogic.com/latest/.
- The documentation at this site contains all manuals for the various features of Skylar One, Skylar AI, Skylar Automation, and Skylar Compliance. You can click the Download manual as PDF link at the top of each chapter to download the PDF version of the manual.
- The documentation at this site is the same documentation that appears when you click the button at the top of any Skylar One page. When you click , the Help Menu appears:
The content in the Help Menu is based on your current page in Skylar One, and it is a condensed version of what appears at this site.
If you click the View Product Documentation link at the bottom of the Help Menu, a product documentation topic specific to the current page appears in a new browser window:
- If you use the Version drop-down to navigate to a previous version of the product release notes or product documentation, the Version drop-down on the older version might contain links to archived, end-of-life versions of the site that display a 404 error.
- To hide the Table of Contents that displays at the left of the Help window, click the button (
 ). To show the Contents again, click the button (
 ).
).
Searching the Site
- To search for a specific item in the product documentation, type the relevant information in the Search bar at the top of the page. After you select a document from the search results page, type the same search into your browser's Search (Ctrl+F).
- If you are using a multiple-word search for a specific term, enclose those words in quotation marks ("").
- For example: "business services".
- If you do not use quotes around a term, the online docs assume you want to search for any of those terms, such as business OR services, as opposed to a search for business AND services with quotes.
- Use the following command to search the product documentation via the Skylar One API: https://docs.sciencelogic.com/latest/#search-<your-query-here>. For example: https://docs.sciencelogic.com/latest/#search-business services.
- After you click a link to a page from the search results, your search term or terms display as one or more highlighted colors. To get rid of the highlights, click the Remove Highlights button (
 ) on the toolbar at top right of the Help content pane.
Links
- If you want to share or save a link to specific location in the documentation, click the link icon (
 ) to the right of the heading for a topic or sub-topic. That topic moves to the top of the reading pane, and you can copy the URL in the Address bar of the browser to share or save that location.
 - If a link to an external site does not open properly in a new browser window or tab, right-click the link in the product release notes and select the option to open the link in a new tab or window.
Images
- An image in the product documentation might appear slightly blurry until you click that image to expand it in a pop-up window.
- If you clicked to expand an image in a pop-up window, you will need to click the expanded image in its pop-up window to return it to its regular size before you can click another image or link in the product documentation.
- You can also right-click an image and select Open Image in New Tab from the pop-up menu to make the image display at full size in the new browser tab.
Guides from the "Classic" User Interface
-
As of version 8.12.2 of Skylar One, ScienceLogic is no longer updating the help content that appears when you click the button in the user interface. All help content is maintained here at https://docs.sciencelogic.com.
Filtering the Items on a Classic Page
Many pages in the classic user interface for Skylar One that display data in tabular format include a "filter-while-you-type" filter above each table column. For example, the following filters appear on the Device Manager page (Devices > Device Manager or Devices > Classic Devices, or Registry > Devices > Device Manager in the classic user interface in the classic user interface).
You can filter the list of items on a page by entering values in one or more filters. The list of items is dynamically updated as you enter values. By default, the cursor is placed in the first Filter-While-You-Type field. You can use the <Tab> key or your mouse to move your cursor through the fields. There are two general types of filter:
- Text filters, where you enter text to match against. Skylar One will search for the items that contain the text you entered, including partial matches. For example, if you enter "server" in the Device Name filter in the Device Manager page, the list of devices will be filtered to include only the devices that include "server" in the device name. Most text filters support the following special characters:
- , (comma). Specifies an "or" operation. For example:
"dell, micro" would match all values that contain the string "dell" OR the string "micro".
- & (ampersand). Specifies an "and" operation. For example:
"dell & micro" would match all values that contain the string "dell" AND the string "micro".
- ! (exclamation mark). Specifies a "not" operation. For example:
"!dell" would match all values that do not contain the string "dell".
- ^ (caret mark). Specifies "starts with." For example:
"^micro" would match all strings that start with "micro," like "microsoft".
"^" will include all rows that have a value in the column.
"!^" will include all rows that have no value in the column.
- $ (dollar sign). Specifies "ends with." For example:
"$ware" would match all strings that end with "ware", like "VMware".
"$" will include all rows that have a value in the column.
"!$" will include all rows that have no value in the column.
- min-max. Matches numeric values only. Specifies any value between the minimum value and the maximum value, including the minimum and the maximum. For example:
"1-5" would match 1, 2, 3, 4, and 5.
- - (dash). Matches numeric values only. A "half open" range. Specifies values including the minimum and greater or including the maximum and lesser. For example:
"1-" matches 1 and greater, so it would match 1, 2, 6, 345, etc.
"-5" matches 5 and less, so it would match 5, 3, 1, 0, etc.
- > (greater than). Matches numeric values only. Specifies any value "greater than." For example:
">7" would match all values greater than 7.
- < (less than). Matches numeric values only. Specifies any value "less than." For example:
"<12" would match all values less than 12.
- >= (greater than or equal to). Matches numeric values only. Specifies any value "greater than or equal to". For example:
"=>7" would match all values 7 and greater.
- <= (less than or equal to). Matches numeric values only. Specifies any value "less than or equal to". For example:
"=<12" would match all values 12 and less.
- = (equal). Matches numeric values only. For numeric values, allows you to match a negative value. For example:
"=-5 " would match "-5" instead of being evaluated as the "half open range" as described above.
- Drop-down list filters, where you select a value from a list of pre-defined values. Skylar One will search the items that match the value you selected. For example, if you select ">=Notice" in the Current State filter in the Device Manager page, the list of devices will be filtered to include only the devices that have a current state of "Notice" or above.
If you select multiple filters, the list of values will be filtered to include only items that meet all the filter criteria.
Not all pages include "filter-while-you-type" filters and not all filters support all special characters.
You might experience issues with Skylar One such as pages becoming unresponsive if you enter more than 4,500 characters in a filter field.
Tool Tips
Some pages in Skylar One include question-mark icons next to one or more fields. These question-mark icons are called Tool Tips. When you move your mouse over a Tool Tip, Skylar One displays a brief description of the corresponding field.
New Features in the Rich Text Editor
The following pages contain an updated rich text editor that enables you to add free-form text, links, and images to a record in Skylar One:
- Asset Notes (Asset Properties > Actions > Notepad Editor)
- Classic Device Notes (Devices > Classic Devices > edit a device > Notes)
- Dynamic Application Properties (System > Manage > Dynamic Applications > edit a Dynamic Application)
- Event Policy Editor (Events > Event Manager > edit a policy); classic user interface only
- Organization Notes (Registry > Accounts > Organizations > edit an organization > Notes > Notepad)
- PowerPack Editor (System > Manage > PowerPacks > edit a PowerPack)
- Tickets (Tickets > edit a ticket)
- Ticket Template Editor (Registry > Ticketing > Templates > edit a template)
- User Account Properties (Registry > Accounts > User Accounts > edit an account > Properties)
- Vendor Notes (Registry > Accounts > Vendors > edit a vendor > Notepad)
The updated rich text editor includes the ability to drag and drop images into the notes, and the ability to attach more than one file.
The editor also contains a new button that lets you quickly create preformatted forms, documents, and reports:
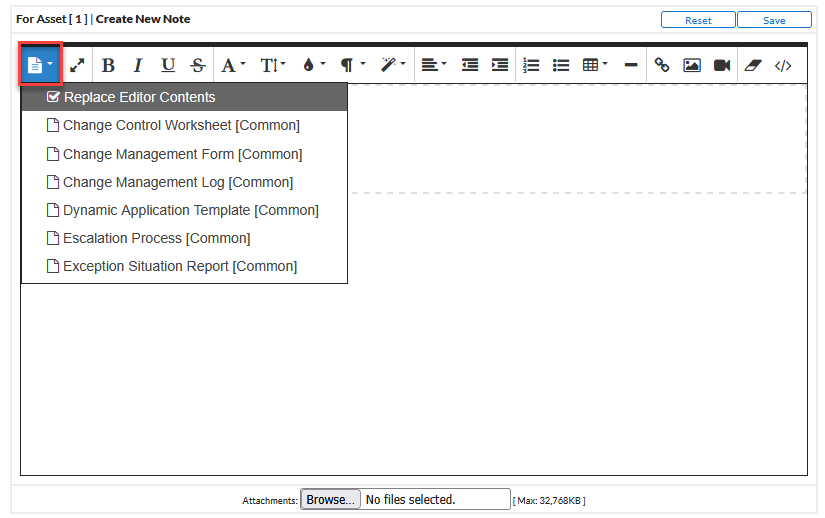
The following options are available with the button:
- Replace Editor Content.
- Change Control Worksheet.
- Change Management Form.
- Change Management Log.
- Dynamic Application Template.
- Escalation Process.
- Exception Situation Report.
- Problem Management Form.
- Project Definition Form.
- Root Cause Assessment Form.
- Scope Change Request Form.
- Stakeholder Analysis.
After you make your updates, click . You might need to click on the page or modal to view the new text box you created.
Creating and Using Bookmarks (Classic User Interface)
The Administer Bookmarks page (Misc > Bookmarks) allows you to create bookmarks in the classic user interface and quickly navigate to a selected page or to a selected result.
You can bookmark:
- The current page
- The results of a search, such as a search for all devices where the name begins with "cisco"
- A filtered list, such as a list of all tickets in the "Engineering" queue
- An editor page, with drop-down lists already selected. For example, you could bookmark the Dynamic Applications Create New Application page, with the Application Type of "XML Performance" already selected. The selected drop-down determines the other fields that appear in the subsequent pages.
To create a new bookmark:
- In Skylar One, navigate to the page and/or results you want to bookmark.
- Use the shortcut keys Ctrl + Alt + B to display the Administer Bookmarks page.
- In the Administer Bookmarks page (Misc > Bookmarks), supply a value in the Save Current Page field. Skylar One automatically supplies the page name in this field. You can edit the field to include more descriptive text.
- Click the button to save the new bookmark. The new bookmark appears at the bottom of the Administer Bookmarks page.
To access an existing bookmark, click its star icon (![]() ). Skylar One will display the bookmarked page.
). Skylar One will display the bookmarked page.
To delete a bookmark, click its delete icon (![]() ).
).
The Finder Tool
The Finder tool (Misc > Finder) allows you to easily find one or multiple elements in Skylar One. This prevents you from having to navigate through multiple pages to find the element you are interested in.
You can access the Finder tool from any place in the "classic" user interface by entering the following key combinations: Ctrl+Alt+F.
The Finder tool allows you to search for one or more of the following types of elements:
- Organizations
- Devices
- Assets
- IP networks
- Interfaces
- Vendors
- User Accounts
- Virtual Interfaces
- Device Groups
NOTE: To access the Finder page, accounts of type "user" must be granted one or more access keys that includes the following access hook: Finder. Accounts of type "user" will then be able to view the Finder tool.
- To search organizations, the user must be granted the access hook Org:View.
- To search for device, the user must be granted the access hook Dev:View.
- To search asset records, the user must be granted the access hook Asset:View.
- To search IPv4 Networks, the user must be granted the access hook Networks:IPv4:View.
- To search interfaces, the user must be granted the access hook networks:Interfaces:View.
- Top search vendor records, the user must be granted the access hook Vendor:View.
- To search user accounts, the user must be granted the access hook User:View.
- To search virtual interfaces, the user must be granted the access hook Networks:Interfaces:View.
Searching for One or More Elements
To use the Finder tool to search for one or more elements:
- Go to the Finder tool (Misc > Finder) page.
- Select the checkboxes for the element types you want to search. Choices are:
- Organizations
- Devices
- Assets
- IP networks
- Interfaces
- Vendors
- User Accounts
- Virtual Interfaces
- In the Search field, type the whole string of text or a partial string of text for which you want to search.
- You can include the asterisk (*) wildcard in the Search field.
- If placed at the beginning of a string, the asterisk says "match on this string, preceded by any number of any characters".
- If placed at the end of a string, the asterisk says "match on this string, followed by any number of any characters."
- Click the button.
- The elements that match the search requirements are displayed at the bottom of the Finder page.
The Toolbox (Classic User Interface)
The Toolbox appears in the upper right of the window in the classic user interface of Skylar One.
The Toolbox displays the following:
- Logged in. Displays the name of the current user. When you hover over the username, the IP address for the current session appears.
- Finder. If you enter a string in this field and click the button, Skylar One uses the Finder tool to search all possible element types. The results are returned in the Finder tool page.
- Toolbox. Clicking the button displays a set of links to commonly accessed pages and the shortcut keys for those pages. The button also displays links for License Information and Skylar One Version Information.
- The License Information link leads to a pop-up page with a list of all third-party licenses included in Skylar One.
- The Skylar One Information link leads to a pop-up page with information about the current version of Skylar One.
You can also access the following options from the menu bar on the left (![]() ) and from the Advanced menu (
) and from the Advanced menu (![]() ), under the Misc heading:
), under the Misc heading:
- Bookmarks (Misc > Bookmarks). Displays the Administer Bookmarks page for saved and saving bookmarked Skylar One pages.
- Finder (Misc > Finder). Displays the Finder search tool for searching for specific Skylar One features.
- Guides (Misc > Guides). Displays the Guide Browser, which you can search to find more information about the classic user interface. The Guides are no longer being updated. For the most recent Help information, click the button at the top right of any page in Skylar One.
- Clear Skylar One Cache (Misc > Clear Skylar One Cache). Removes cached items from Skylar One.
- Regular Expression Tester (Misc > Regular Expression Tester). Lets you type regular expressions and search text into fields and then test them without impacting anything in Skylar One.
- Skylar One License Info (Misc > Skylar One License Info). Displays a page of licensed software used by Skylar One.