![]()
Use the following menu options to navigate the Skylar One user interface:
- To view a pop-out list of menu options, click the menu icon (
 ).
). - To view a page containing all of the menu options, click the Advanced menu icon (
 ).
).
Administrative Processes for Business Services
Two administrative processes (System > Settings > Admin Processes) are used to calculate business service values:
- Business Services: Service Management Engine. This process aggregates all of the metric information from your devices and services to create the Health, Availability, and Risk values. This is a long-running process which typically runs every 15 minutes. You should only run it more frequently if you have a robust Database Server with room to support the more frequent collection.
- Business Services: Service Topology Engine. This process calculates the relationships between your services and your devices. By default, this process runs every 5 minutes. If your services and device relationships are relatively static, you can decrease the frequency to every 15 minutes.
Understanding Health, Availability, and Risk
None of the metrics described in these examples actually pinpoint the exact cause of the unavailability, degradation in health, or increase in risk, but they do bring it to your attention quickly and with a minimal level of administration. When you use key performance indicators (KPI) for responsiveness or availability, you may find it much easier than trying to model every way a service can break.
Understanding Availability
Availability assesses whether something is reachable or is performing at a level to be useful. Here are a few examples to help you understand availability:
- Website. The URL for a website must be responsive; that is, it must respond either with the expected page or with an error page indicating that the site is unreachable (up/down). The website's response also needs to be fast enough that users will not leave the page due to a slow response time. This should be considered when defining availability.
- Cluster of Database Servers. Assume one Database Server can process 1,000 transactions per second with good response times. To maintain those response times with 3,000 transactions per second, four equivalently configured Database Servers are put into a cluster. This method allows for any one Database Server to be down without losing acceptable throughput and responsiveness. If three Database Servers in the cluster become unavailable, the one remaining Database Server will not be able to maintain throughput or responsiveness, so the cluster is effectively unavailable.
- Processes. Consider that process A passes work to process B by way of a queue. If the queue depth sits at zero, it indicates that process A is not passing any new work and is considered to be unavailable. If the queue grows to a specified threshold, it indicates that process B is not pulling work from the queue and is considered to be unavailable.
Understanding Health
A decline in health for a given service or device means that one or more KPIs are degrading. Left unchecked, this can be expected to degrade throughput or responsiveness. Here are a few examples of issues that impact health:
- Database Server. On a Skylar One Database Server, a key database function is to retrieve and store events and Dynamic Applications data. You can create device service policies that degrade health as the volume of high frequency (HF) rows climbs, as this indicates the Database Server is becoming overloaded or slow to process incoming data. This could lead to delays in events from SL1 Collectors being presented to automation actions or the Events page, and can impact overall system performance.
- Windows server. In some cases, the CPU Queue depth on a Windows server starts to increase, indicating the CPU has insufficient bandwidth to process its workload. When this happens, all processes or applications running on the Windows server will run slowly, impacting either responsiveness or throughput. You can build a policy that lets you know if this is happening on any Windows server.
- Website. A website that is the face of an application has increasing web URL response times, indicating stress in the delivery of the URL. If it is known that the URL becomes functionally unavailable at 5 seconds, meaning that your customer may give up and goes to another vendor, then setting health to degrade for 1 to 4 seconds will give notice that the service health is degrading and investigations and resolution can be performed before the URL reaches an unavailable state.
Understanding Risk
In considering risk, think of the consequences of a KPI degrading. If a selected KPI is known to indicate situations that, if left unaddressed, will impact health or availability, you will want to create a policy for that. Some examples:
- On a Skylar One Database Server, if the InnoDB table runs out of space, MariaDB will stop, which leads the Database Server to become unavailable. A shrinking level of available InnoDB space will not degrade the responsiveness and throughput of MariaDB, and therefore the Database Server, but it can indicate that your Database Server availability is at risk.
- Another way to measure risk for devices in a service is by monitoring the level of severity for events. This provides a reasonable baseline for risk. For example, many critical events for a device either indicates a false positive that should be suppressed or that monitoring has found a condition that is deemed to be unacceptable.
Creating Services
You can create services in Skylar One using one of two methods:
- You can create a three-tier service, consisting of a business service, one or more IT services, and one or more device services.
- You can create a custom service model with a user-defined business hierarchy.
When designing your service structure, a good design principle is to begin with the end in mind. To create a new business service, you should first determine the following:
- Stakeholders. Who is the intended audience for the service?
- Purpose. What problem are you trying to solve for your stakeholders?
- Visibility. Who needs to see which services?
- Workflow. How are your stakeholders currently performing fault isolation?
- Right-sizing. What is the right number of services? Consider the following:
- The devices that impact the business service
- The IT services that impact the business service
- The specific conditions that you want to monitor, based on your business processes
If you follow the design flow described above, you will have an outline of which model type to create and which specific services you need to build. For example, if you provide email service, then a failure of your primary SMTP server and backup SMTP server would constitute a Critical status.
The next consideration is to determine which devices share a common description of health, availability, and risk rules. If two devices need different rules, you will need to create two Device Services.
You can copy an existing service on the Business Services page by clicking the button (![]() ) for that service and selecting Duplicate.
) for that service and selecting Duplicate.
Creating Business, IT, or Device Services
To create a business, IT, or device service:
- On the Business Services page, click the button. The New Service page appears.

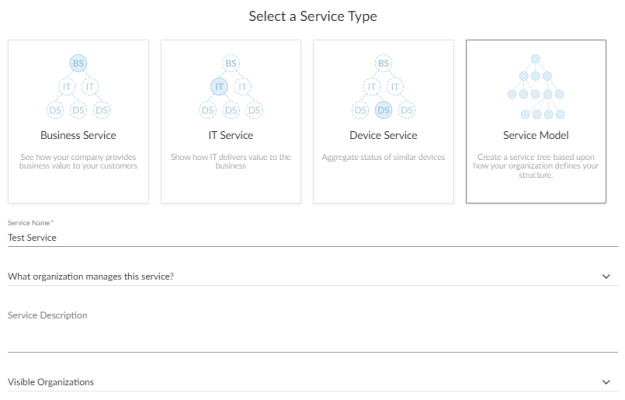
- Select a service type. You should start by creating your device services, then your IT services, and then finally your business service. Your options include:
- Device Service. Monitors a set of related devices.
- IT Service. Monitors a service that IT provides to your organization. An IT service includes one or more device services.
- Business Service. Monitors a service that your organization provides to your customers. A business service includes one or more IT services.
- Complete the remaining fields:
- Service Name. Type a unique name for this service.
- What organization manages this service?. Select the name of the organization that owns this service.
- Service Description. (Optional) Type a short description of this service and its purpose. You can use the text in this description to search for this service on the Business Services page. For example, if a collection of device services all have a description of "Shared Infrastructure", then an IT service can search to include every device service in the same organization that has a description of "Shared Infrastructure". As you add more "Shared Infrastructure" device services, the IT service will automatically expand to include them. This makes building service trees quick and self-maintaining, without resorting to rigid service names.
- Visible Organizations. (Optional) Select one or more organizations from which you can select devices to use in the service. For example, if you selected Acme for this field, then any service that is aligned with Acme can access devices in the Acme organization.
The Visible Organizations field allows the selected organizations to view the service and enables these organizations to query the service. For instance, if you want an IT service to have a device service as a child service, the device service will either need to be within the same organization as the IT service, or the device service will need to be included in the visible organizations that are aligned with the IT service.
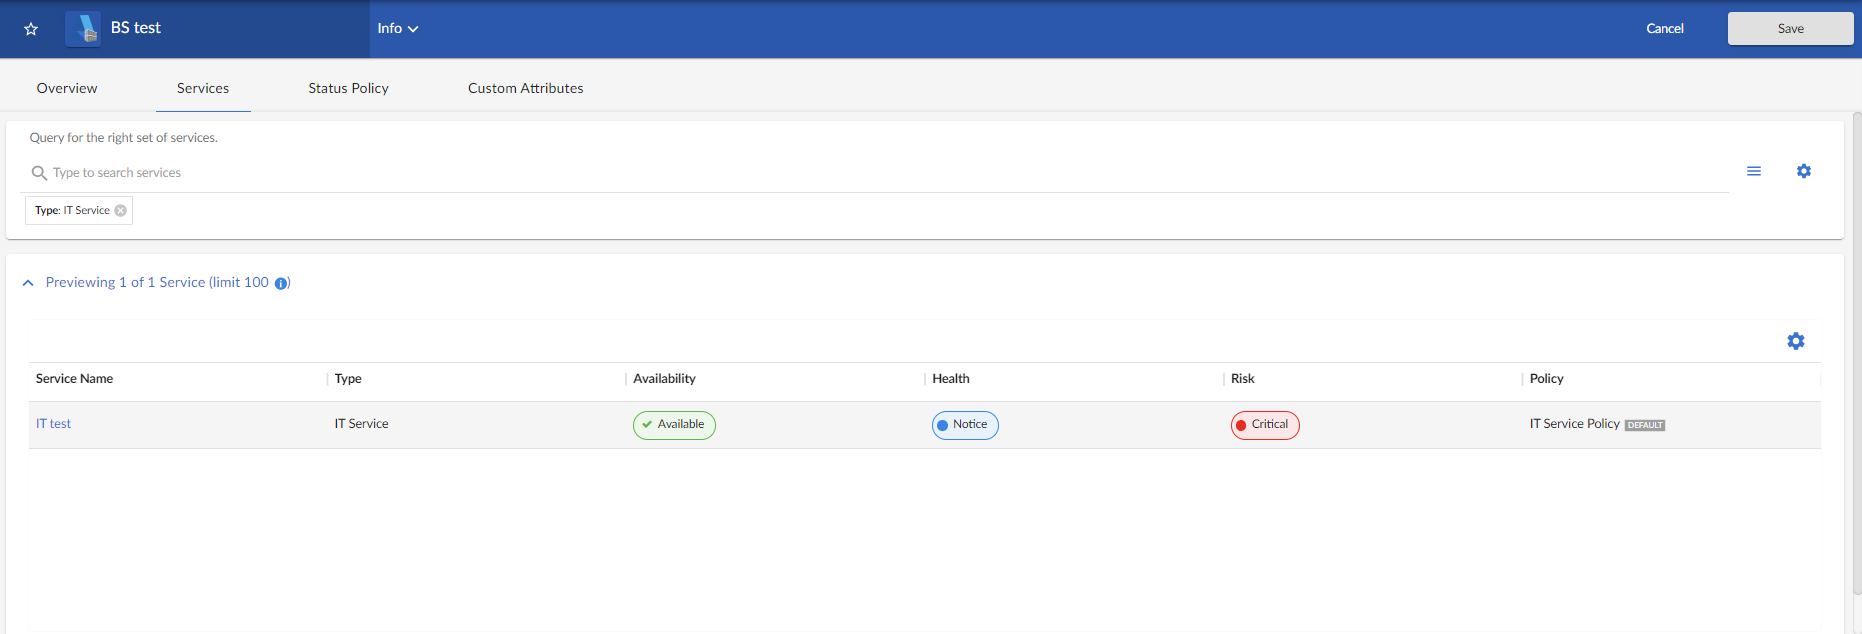
- Click the button. If you selected Device Service in step 2, the tab appears, with a list of available devices in the Preview section. If you selected Business Service or IT Service in step 2, the tab appears, with a list of available services in the Preview section.
- In the Search field, type search criteria for the services or devices you want to monitor. A list of services or devices that match your search criteria appears in the Preview pane.
If you are looking for a very specific set of services or devices, click the gear icon (![]() ) to the right of the Search field and select Advanced. In this mode you can create an advanced search using "AND" or "OR" for multiple search criteria. You must click before you can view the results of your search. For more information, see Performing an Advanced Search.
) to the right of the Search field and select Advanced. In this mode you can create an advanced search using "AND" or "OR" for multiple search criteria. You must click before you can view the results of your search. For more information, see Performing an Advanced Search.
If you want to search for devices that have specific custom attributes, use Advanced Search. Use the following format:
attribute has (id == custom attribute and value == value)
Note that search cannot process colons (:) in strings. The presence of a colon in service inclusion searches will stop the engine that calculates health, availability, and risk for that service.
The "ANY" search option is disabled on the or tab.
The Preview pane indicates the maximum number of constituent services or devices that will be used for computing health, availability, and risk.
There is a strict limit of 100 children for each service, whether it involves devices or services. If the rules of a service permit more than 100 children, the results might become unpredictable, as it will be unclear which 100 children will be chosen. You need to modify your design if you exceed this limit.
- When you have the right combination of services or devices, click . The default policy for the type of service you selected is automatically added to the new service.
- If you want to use a different business policy with the new service, see Selecting a Business Service Policy.
- If you want to create a new business policy to use with the new service, see Creating a Business Service Policy.
- Repeat this process until you have the right combination of device services and IT services in your business service (or business services, if needed).
Creating a Custom Service Model
If you require more flexibility in modeling your service beyond the standard three-tier business service/IT service/device service model, you can instead create a custom Service Model, which is also called an "N-tier" service model.
For example, if you needed to monitor individual conference rooms within your organization from a high level, you could build the following service model to do so:
Country > Region > State > City > Building > Floor > Conference Room
Custom service models enable you to build service hierarchies with a unique number of tiers that accurately reflect the service structures within your organization, using user-defined labels that can match the terminology used in your business.
You cannot convert a three-tier business service model to a custom service model.
Skylar One PowerFlow users can use custom service models and the applications in the "ServiceNow Configuration Management Database (CMDB)" Synchronization PowerPack to sync business services between Skylar One and ServiceNow.
Using this method, you can create, update, or delete services in ServiceNow and it will be reflected in Skylar One, or vice versa.
However, services that you want to sync between the two systems must either be built entirely in ServiceNow or entirely in Skylar One; you cannot merge services between the two.
ScienceLogic recommends syncing services from ServiceNow into Skylar One rather than building custom service models in Skylar One and syncing them into ServiceNow.
For more information, see
To create a custom service model:
- On the Business Services page, click the button. The New Service page appears.
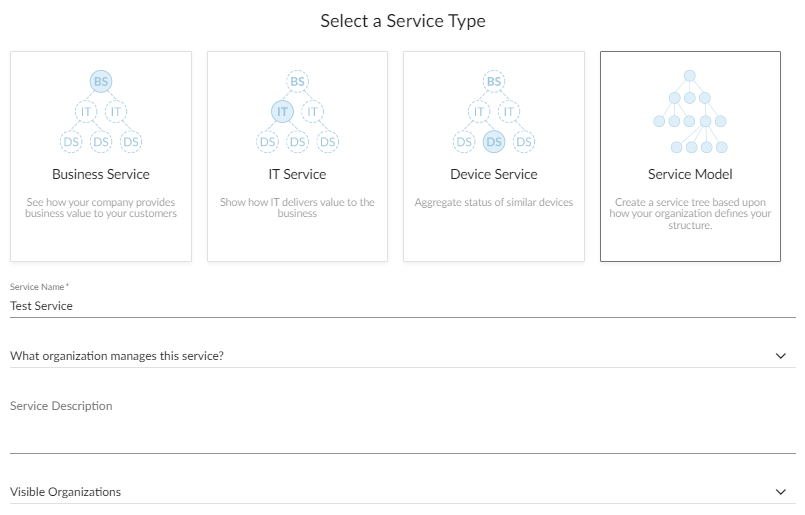
- Select Service Model, and then complete the following fields:
-
Service Name. Type a unique name for this service model.
-
What organization manages this service?. Select the name of the organization that owns this service model.
-
Service Description. (Optional) Type a short description of this service model and its purpose. You can use the text in this description to search for this service on the Business Services page. For example, if multiple services all have a description of "Shared Infrastructure", then you could create another service search to include every service in the same organization that has a description of "Shared Infrastructure". As you add more "Shared Infrastructure" services, the other services that include those "Shared Infrastructure" services will automatically expand to include them. This makes building service trees quick and self-maintaining, without resorting to rigid service names.
-
Visible Organizations. (Optional) Select one or more organizations from which you can select devices to use in the service model. For example, if you selected Acme for this field, then any service that is aligned with Acme can access devices in the Acme organization.
The Visible Organizations field allows the selected organizations to view the service and enables these organizations to query the service. For instance, if you want an IT service to have a device service as a child service, the device service will either need to be within the same organization as the IT service, or the device service will need to be included in the visible organizations that are aligned with the IT service.
- . The service creation page of the New Service wizard appears.
- Click . The model selection page of the New Service wizard appears.
- On the model selection page, do one of the following:
- Click the button to design a new service model. If you do this, proceed to step 6.
- Use the search bar if necessary to search for an existing model to which you want to make customizations or changes. If you do this, skip ahead to step 7.
- Use the search bar if necessary to search for an existing model to which you do not want to make any customizations or changes. Select that model's radio button and then click . If you do this, skip ahead to step 9.
If you are looking for a very specific set of models, click the gear icon (![]() ) to the right of the Search field and select Advanced. In this mode you can create an advanced search using "AND" or "OR" for multiple search criteria. For more information, see Performing an Advanced Search.
) to the right of the Search field and select Advanced. In this mode you can create an advanced search using "AND" or "OR" for multiple search criteria. For more information, see Performing an Advanced Search.
- On the New Model modal, type a name for the service model in the Model Name field and then click . The newly created service model is added to the model selection page.
- On the model selection page, select the new service model you just created or an existing model to which you want to make customizations or changes, and then customize the model as needed:

You can customize the service model to fit your business needs in the following ways:
- Click the model name, then type a new model name to replace the existing name.
- Use the plus (
 ) and minus (
 ) icons to build the tiers of your service model. For each tier, click the tier label and then type a new tier label to replace the existing label.
 - Click the save icon (
 ) to save your custom service model.
 - Click the delete icon (
 ) to delete your custom service model.
- When you are finished customizing the service model, click . The hierarchy creation page of the New Service wizard appears.
- On the hierarchy creation page, use the model you selected to build out the full hierarchy structure of your service:

You can customize the service hierarchy to fit your business needs in the following ways:
- Click the name of each tier in your service model, then for each tier, type a new label that is specific to the service you want to monitor. For example, your service model might have a tier labeled "U.S. Region"; you might click that tier and type "Northeast" if your service includes assets in the Northeast.
You must fill out a name for every service in the hierarchy before you can proceed to step 10.
- Click the expand (
 ) and contract (
 ) icons to expand and contract parts of the service hierarchy tree.
 - Click a hierarchy row to drag and drop that row (and any rows that fall below it on the service hierarchy) into a different location in the service hierarchy. If you are able to drop the row in a particular location, the row will turn solid blue. If you are unable to drop the row in a particular location, the row will be white with a red border.
- Click at the top of the service hierarchy to add a copy of the entire service model structure to the hierarchy. For example, if your service model includes five tiers and you click at the top of the service hierarchy, Skylar One will add an additional set of all five tiers to the hierarchy.
- Click for a particular row to add to a new set of sub-tier rows in the hierarchy under the existing row. For example, if you have a service model tier labeled "Physical Banking" and the next level of the service model under that is a tier labeled "Branch Locations" and under that are several other tiers, then when you click on the "Physical Banking" row, Skylar One will add a new "Branch Locations" tier along with all of its sub-tiers under the "Physical Banking" row.
- Click the Actions button (
 ) for a particular row and then select Delete to delete that row from the hierarchy.
 - If you want the next-to-last-level service row within the hierarchy to have device services below it, click the Actions button () for that row and then select Add Device Services. The Add Device Services modal appears. On that modal, search for and select any existing device services that you want to add below the selected service row, and then click .
- If you want the last-level service row within the hierarchy to contain devices, select Device Service from the service type drop-down at the end of the row. If you do not want the row to contain devices, select Service. All last-level services are set to Device Service by default. All service rows that are not last-level rows have a service type of Service Group.
- When you are finished customizing your service hierarchy, click . The tab for the new service appears:

- On the tab, you can update the managing organization and visible organizations for the individual levels within your service model hierarchy if they differ from the managing organization and visible organizations you selected for the entire model in step 3. To do so, click the hierarchy level on the left side of the page, and then complete the following fields:
- Owner. Select the name of the organization that owns the selected service level.
- Visible Organizations. Select one or more organizations from which you can select devices to use in the selected service level.
- Click the tab:

- On the tab, click on each row within your service hierarchy and then do one of the following for each:
- To apply an existing policy to the selected service level, search for and select the policy that you want to apply. When you select a policy from the list, the details of that policy appear in the right panel. If a service policy is already applied to a service level, "Current Policy" appears in the top right corner of the right panel; otherwise, a button appears. To apply a different policy, click the button.
- To create a new policy, click the button. In the Create Policy modal, type a Policy Name, and then click . The policy is added to the list. To apply it to the selected service level, select the policy from the list and then click the button in the top right corner of the right panel.
- Click . A confirmation message displays, indicating that your service model and its hierarchy have been created successfully.
After you have created the service model, you cannot use the New Service wizard to edit the model.
- Click .
- If you want to use a different service policy with the new service, see Selecting a Business Service Policy.
- If you want to create a new service policy to use with the new service, see Creating a Business Service Policy.
Advanced Search Criteria: Practical Use Cases
When creating services, you can type search criteria for the services or devices you want to monitor in the Search field. If you are looking for a very specific set of models, click the gear icon (![]() ) to the right of the Search field and select Advanced. In this mode you can create an advanced search using "AND" or "OR" for multiple search criteria. For more information, see Performing an Advanced Search.
) to the right of the Search field and select Advanced. In this mode you can create an advanced search using "AND" or "OR" for multiple search criteria. For more information, see Performing an Advanced Search.
- If you want to search for devices that have specific custom attributes, use the following format:
- <custom-attribute> is the unique identifier or name of the custom attribute you want to filter by. This variable is defined in your system or device management platform when you create custom attributes.
- <value> is the specific value assigned to that custom attribute for the devices you want to find.
For example:
attribute has (id == "Environment" and value == "Production")
attribute has (id == <custom-attribute> and value == <value>)
where:
- To search for devices aligned with a specific Dynamic Application, use the following format:
- <dynamic -application-name> is the name of the Dynamic Application.
For example:
alignedDynamicApplication has (dynamicApplication has (name contains "DNS Dynamic Update Performance") )
alignedDynamicApplication has (dynamicApplication has (name contains '<dynamic-application-name>') )
where:
- To search for all virtual machines (VM) whose names begin with a specified prefix that are hosted on a specified ESX service, use the following format:
- <esx-Service-Name> is the ESX service you want to filter on
- <VM-name-prefix> is the prefix for VM names.
For example:
name eq 'Prod1' and deviceClass has (description eq 'host server')) and componentAncestor has (name beginsWith 'ABC')
name eq '<esx-Service-Name>' and deviceClass has (description eq 'host server')) and componentAncestor has (name beginsWith '<VM-name-prefix>')
where:
Depending on the VM installation, the advanced search could be: name eq '<esx-Service-Name>' and deviceClass has (description eq 'ESC(i)')) and componentAncestor has (name beginsWith '<VM-name-prefix>').
Using Service Policies
Each service type requires a policy that determines what it monitors. A business service policy contains a set of rules and conditions that define the health, availability, and risk (HAR) values for the service, depending on your business needs. Each service requires that one policy be associated with a service at a time.
Creating a Service Policy
When you create a business service of any type, Skylar One automatically creates a policy without any rules for health, availability, or risk. A policy consists of a set of rules, and each rule begins with three conditions. You can also add more conditions to each rule.
Service policies for device services must not use Dynamic Application performance objects with polling frequencies longer than 15 minutes. If you select a Dynamic Application performance object with a polling frequency longer than 15 minutes, the health, availability, and risk values of these services will not be calculated.
Before you configure your service policy, it is important to understand why each severity can be configured by selecting a severity level for the service policy. For example, you can assign a number to the Critical severity level. If the number is exceeded, the health, availability, or risk rules will display the severity that was assigned. Suppose a device service for Linux servers has two risk rules: one for memory utilization and one for swap utilization. A server that has exhausted memory but still has free swap space to expand into will continue running but will slow down. A server that has exhausted swap space is likely to fail. Therefore, while both statuses can be bad, the lack of free swap space is worse than having low memory. When building risk rules, you could set 95% memory utilization as Critical with a score of 85, but set swap at 95% utilization to Critical with a score of 95. This will indicate that swap space is more causal then memory, and that as soon as you fix the swap space issue, you will need to check into the problems with memory.
To create a policy:
-
On the Business Services page, select the service for which you want to create a policy. The Service Investigator page appears.
-
Click the button in the upper right corner of the page. The tab for the service appears.
-
Click the tab, and then click in the Service Policies section. A Create Service Policy window appears.
- Enter a policy name in the Name field. You can also enter a description of the policy in the Description field.
- In the Health, Availability, and Risk columns, click the button to create the rules and conditions for each of the three values that make up this policy. Each column uses the same layout. The Edit Rule modal appears.
The "Availability" vital metric is not populated for component devices. Therefore, any device service that includes component devices will have a null "Availability" value, which is displayed as a hyphen. However, a potential alternative is to change the rule from "Availability" to "Count" and query devices that are enabled to collect data (isActive = true). This alternative works because "Count" is the number of devices that matches the filter query, and querying on isActive matches all devices that are currently collecting data.
- In the Edit Rule modal, complete the following fields:
-
Aggregate. Select an aggregation method for the data for this condition. Your options include Average, Minimum, Maximum, Count, Sum, and Percent.
For example, suppose you have a web server farm consisting of three web servers. You have created a rule for web response time and are building for Health. By default, the aggregation factor for IT, business, and service model service policies is Minimum.
-
Minimum will drive health based on the fastest responding web server.
-
Maximum will drive health based on the slowest responding web server.
-
Average will drive health based on the average between slowest and fastest. This might give false positives. For example, assume that 5 seconds is the ideal target response time. If web server 1 gives a .1-second response time, web server 2 gives a 5-second response time, and web server 3 gives a 10-second response time, then the average will be 5 seconds, masking the fact that one of the response times is grossly unacceptable.
-
Count determines how many devices are currently being included in the device service. (The devices must be available as seen on the Devices page). This is useful if you need at least 2 out of your 3 web servers to be active at any one time. If the rule does not have a rule filter, this value will display the number of devices in the service. If the rule has a rule filter, this value will display the number of devices and services that match the rule filter.
-
Sum is the result of adding up the value of the metric from all devices currently included in the device service. This is useful when you need to know how many devices are available across all the devices in the device service.
-
Percent determines the number of devices as a percentage of the total number of devices for the service query that fit the criteria of the filter rules.
For example, you might have a rule filter for devices for a service. If the service has 10 devices, and 5 match the rule filter, the percentage will be 50%.
-
- Metric. Select the metric you want to monitor for this condition:
- If this is a business service or an IT service, your options include Availability, Health, and Risk for the services you want to monitor.
- If this is a device service, select a device metric such as vitals like Availability and Latency, performance metrics, metrics collected by the Skylar One agent, or Dynamic Application metrics.
In the Edit Rule modal, when creating or editing rules for specific service policies, and when hourly summarization is available, a preview line graph displays threshold levels for these policies summarized on an hourly basis. Preview data is not available for all devices in a service, and can trigger a warning explaining that the preview data is not complete.
-
Timespan. Select a time frame for the data in the graph in the Conditions section below. Your options include Day, Week, and Month. This field uses summarized data. If the Dynamic Application's performance object is not set to Summarize, the preview graph will not display.
- In the Conditions section, select a severity level and the inequality sign. Then, add the numeric value you want to set for the severity level. You can add more conditions by clicking the button.
When creating or editing a service policy, you can insert new conditions directly into any rule within that policy by clicking the plus icon (+) under which you want to insert a new condition, rather than adding them to the end of the list of conditions.
To remove a condition from a rule, click the "X" icon for that condition in the Edit Rule modal. Alternatively, from the Edit Service Policy page, you can click the button (![]() ) for that condition and select Delete. To copy a condition, click the button (
) for that condition and select Delete. To copy a condition, click the button (![]() ) for that condition and select Duplicate.
) for that condition and select Duplicate.
You can also set custom alert thresholds for each severity level.
NOTE: The availability value calculates only the minimum (unavailable) and maximum (available) values for rules.
- Edit any additional conditions or rules on the remaining columns for this policy, and then click . The new policy is added to the Service Policies section on the tab. The policy will also display on the Service Policies page (Business Services > Service Policies).
You can save a service policy only when it has valid rules and conditions for health, availability and risk. If the rules' condition operators and values are not logically consistent, a red warning message displays and the button is disabled.
To edit your new service policy from the tab, you can click the button (![]() ) for the new policy and select Edit or click the icon (
) for the new policy and select Edit or click the icon (![]() ).
).
Use Cases for Service Policy Creation
This section outlines common scenarios for creating service policies, which define what a service monitors and how it behaves. A service policy is a collection of rules that define the service’s health, availability, and risk status. These rules can use any combination of performance metrics, data, events, or device state information provided by the devices within the service.
For example, a policy can include conditions that specify HAR (Health, Availability, and Risk) values for a service, ensuring that critical metrics are tracked consistently. Other use cases could involve applying environment-specific monitoring rules, or enforcing compliance standards across multiple services. By leveraging service policies, you can tailor monitoring to meet operational requirements and maintain service health effectively.
Below are several example use cases for service policies:
-
Availability threshold policy:
You need at least 50% of the devices in a service to be active for monitoring to classify the service as available. This policy helps maintain service reliability by requiring a minimum level of device availability before monitoring status is marked as healthy.
You need at least eight of the ten devices in a service to be active for monitoring to classify the service as available.
- Health Impact Based on MS-SQL Buffer Cache Hit Ratio
Configure the service health to decrease as the MS-SQL buffer cache hit ratio drops, indicating potential performance degradation in database operations.
- Risk Adjustment Based on /var/log Free Space
Increase the service risk level as the percentage of free space in /var/log decreases, helping to prevent issues related to log storage exhaustion.
- Aggregate Service Health Based on Constituent Services (Static Count)
Reflect the overall health of an aggregate service based on the health of its constituent services:
If all constituent services are healthy, the overall health is considered "Healthy".
If two to five constituent services have major or critical health, the overall health is considered "Major".
If more than five constituent services have major or critical health, the overall health is considered "Critical".
- Aggregate Service Health Based on Constituent Services (Percentage-Based)
Reflect the aggregate service health based on the percentage of constituent services with major or critical health:
If all constituent services are healthy, the overall health is considered "Healthy".
If 25% - 50% of the constituent services have major or critical health, the overall health is considered "Major".
If more than 50% of the constituent services have major or critical health, the overall health is considered "Critical".
Selecting a Service Policy
Each service type requires a policy that determines what it monitors. A business service policy contains a set of rules and conditions that define the health, availability, and risk (HAR) values for the service, depending on your business needs. Each service requires that one policy be associated with a service at a time.
The "Business Services Base Pack" PowerPack contains a set of business service policies you can use for your services.
When you create a business service of any type, Skylar One automatically uses the default policy for that particular type of business service. You can remove the default policy after you create a new policy. The default policies cannot be edited.
If a policy contains errors, an error icon (![]() ) appears next to the policy name. To view details about what makes the policy invalid, select the policy and hover over the error icon next to the policy name in the right-hand section. A pop-up window lists the problems with the policy. An error is most likely to occur between the time the policy is saved and the next HAR aggregation cycle. For best results, wait for the next HAR cycle before investigating whether there is a true error.
) appears next to the policy name. To view details about what makes the policy invalid, select the policy and hover over the error icon next to the policy name in the right-hand section. A pop-up window lists the problems with the policy. An error is most likely to occur between the time the policy is saved and the next HAR aggregation cycle. For best results, wait for the next HAR cycle before investigating whether there is a true error.
To select an existing business service policy:
- On the Business Services page, select the service that needs a policy.
- Click the button (
 ) for that policy and then select Edit. The or tab appears, depending on the service type.
 - Click the tab.
- In the Policies section on the left, select the policy you want to use.
You can type basic search criteria in the Search field to locate a specific policy in the list.
- To view the details of a selected policy, click the icon (
 ) for that policy. The Edit Service Policy page appears.
 - To edit a service policy, make updates to the policy while in edit mode and then click . Otherwise, click the button when you are done viewing the details for that policy.
- To add a policy to the service, select the policy in the Service Policies section and click the button () for that policy in the right-hand section, then select Use. A check mark icon (
 ) appears next to that policy in the Policies section.
 - To make a copy of a policy, click button () for that policy and select Duplicate.
- To delete a policy you no longer want to use, click the button () for that policy, select Delete, and then confirm that you want to delete the policy. If that policy is used by any other services, those services are then assigned the default policy type. You cannot delete a default policy.
Each column shows the number of associated rules in parentheses, provides a list of the rules in both view and edit modes, and includes an button when in edit mode.
Managing Service Policies
The Service Policies page (Business Services > Service Policies) lists all of your service policies and their respective statuses and service counts, among other information.
The Service Policies page includes the following information:
- Name. The name of the service policy.
- Type. The type of service policy.
- Status. Indicates the service policy's state, showing either "Valid" or "Invalid".
- Service Count. Indicates the number of services assigned to the service policy. To view all services aligned to a service policy, click on the number that displays under the Service Countcolumn. When you do so, the Business Services page appears, pre-filtered to only those services aligned to the service policy.
- Date Edited. The date the service policy was last edited.
- Last Edited By. The user to create or last edit the service policy
NOTE: You can delete a service policy only if the Service Count is zero. If you try to delete a service policy that has services assigned to it, you will receive an error message.
Deleting a Service Policy
On the Service Policies page (Business Services > Service Policies), you can search for and delete one or more service policies.
To delete a single service policy from the Service Policies page, click the button for the service policy you want to delete and then select Delete.
To delete multiple service policies from the Service Policies page, select the checkboxes of the policies you want to delete and then click at the top of the page.
To select all visible service policies, click the checkbox at the top of the list on the Service Policies page. Clear the checkbox at the top of the list to unselect all of the service policies.
When deleting a service policy, the Delete Policy modal displays all of the services that are currently using that policy. If the policy is deleted, the associated services will revert to using the default service policy
Creating a Service Template
You can create a service template from an existing service to simplify the process of replicating an entire service or service hierarchy on another Skylar One system. For example, if you want to create the same service hierarchy, but only change the owner of the service hierarchy, creating a service template from an existing service streamlines this process.
To create a service template:
- On the Business Services page, click the button () for the service you want to use as the basis for your template and select Create Template. The Create Template From Service window appears. This window contains important information about what you can and cannot do with a service template.
- After reading the information that appears on the Create Template From Service window, click . The next Create Template From Service window appears:

- Type a name for the template in the Template Name field and a description of the template in the Description field, if needed. Click . The next Create Template From Service window appears:

-
The left side of the window displays the tree for the service hierarchy that is being made into a template. You can select each service in the tree to see information related to that service on the right side of the window. For example, if you select a device service, the Devices tab displays the search query used for the devices included in that service. If you select a business service or an IT service, the Services tab displays the search query for that service. Note the following about the Dynamic? slider.
-
If Dynamic? is disabled, the template inherits the result of the services inclusion search. This is useful if you want to lock the service tree at the time of template creation. For example, a Managed Service Provider (MSP) might do this to allow end customers to create services from the template but not to modify them. Another use case is if you want to use searches for tags to lock in a set of services that matched the rules at template creation time. By default, Dynamic? is disabled.
-
If Dynamic? is enabled, the original rule is maintained in the template, so every service tree created from the template will be dynamic based on the services that match the rules.

The search uses the Advanced Search mode that lets you use "AND" or "OR" for multiple search criteria. For more information, see Performing an Advanced Search.
-

- Click the tab to view the service policy definition for Health, Availability, and Risk for that service.
- On the tab for a device service, you can add annotations for the policies in the template. When a new user uses the template on another system, your annotations can help that user understand the purpose of this policy.

- To leave an annotation for a service policy or rule, click the annotation icon (
 ) next to the rule or tab. Type your annotation text in the Annotation window and click . The annotation icon now displays as solid blue, while empty annotation icons contain a plus sign.
- Click . A confirmation window appears stating that you created the template. Click . The template appears on the Templates page (Business Services > Templates).
To delete one or more service templates, select the check boxes of the templates you want to delete from the Service Templates page and then click . You can delete a single service template by clicking the Actions button (![]() ) for that template and then selecting Delete. To select all visible service templates, click the checkbox at the top of the list on the Templates page. Clear the checkbox at the top of the list to unselect all of the service templates.
) for that template and then selecting Delete. To select all visible service templates, click the checkbox at the top of the list on the Templates page. Clear the checkbox at the top of the list to unselect all of the service templates.
Creating a Service From a Template
To create a service from a template:
- Go to the Templates page (Business Services > Templates) and click the button () for the template you want to use, then select Create Service. The Create Service from Template window appears.
You can also go to the Business Services page, click the down arrow on the button, and select Create Service from Template. When you do so, a list of templates you can use to create a service displays. Select the template that you want to use and then click .
- On the Create Service from Template page, complete the following fields:
- Service Name. Type a name for the new service.
- Description. Type a description of the new service. (Optional.)
- What organization manages this service? Select the organization that will manage the new service from the drop-down field.
- Click .
- To edit the names of the services in the hierarchy at the left, click the service name and update the name. Updating the service names is recommended if you are creating the new service on the same system from which the template was created.
- Any annotations for a device service that were added when the template was created will be present, and you can edit them and add new annotations.
- On the tab, you can view the rules for Health, Availability, and Risk for a device service in the template.
- Click the button to save your service. A confirmation window appears.
- Click the button. The new services appear on the Business Services page.
Exporting a Service Template
If you want to use a business service template on another Skylar One system, you can package that template into a PowerPack and then export it to the other system.
To package and export a service template:
-
Go to the PowerPack Manager page (System > Manage > PowerPacks.
-
Click the button and select Create New PowerPack. The PowerPack Properties page appears.
-
On the PowerPack Properties page , type a name for the PowerPack in the Name field and click .
You can also complete the other fields on the PowerPack Properties page. For more information, see the section on
-
On the left side of the PowerPack Properties page, click . Your template appears in the Available AP Content Objects pane.
You can use the filter fields at the top of the columns in the Available AP Content Objects pane to narrow down the list of potential templates.
-
Click the lightning bolt icon (
 ) next to the template you want to add to the PowerPack. The template moves up to the Embedded AP Content Objects pane.
 -
On the left side of the PowerPack Properties page, click . The Compiled PowerPacks page appears.
-
Click the Create a new build link at the top of the page.
-
In the Configure New Export File window, select Administrative (including export & license) from the Embedded license key drop-down list, and then click .
-
When the PowerPack finishes building, you can click the download icon (
 ) to download the build and use that file to upload the template to a new Skylar One system by importing and installing the PowerPack on that system. For instructions on how to import and install a PowerPack, see the section on
Service templates include every service policy assigned to the services in the template. Templates can back up a service hierarchy and its status policies at the current state. They also allow you to migrate service hierarchies between Skylar One systems.
Default Service Policy Settings
The following sections describe how the three default service policies calculate health, availability, and risk:
Device Service Default Policy
Health: Based upon the worst device severity, then uses the following settings:
- Critical = 0-20
- Major = 21-40
- Minor = 41-60
- Notice = 61-80
- Healthy = 81-100
Availability: Maximum available: if one device is available, then all are available
Risk: Based upon the worst device severity, then uses the following percentages:
- Healthy= 0-20%
- Notice = 21-40%
- Minor = 41-60%
- Major = 61-80%
- Critical = 81-100%
IT Service Default Policy
Health: Average health value of all services
Availability: Maximum available: If one service is available, then all are available
Risk: Maximum risk value of any service
Business Service Default Policy
Health: Average health value of all services
Availability: Maximum available: If one service is available, then all are available
Risk: Maximum risk value of any service
Custom Service Model Default Policy
Health: Average health value of all services
Availability: Maximum available: If one service is available, then all are available
Risk: Maximum risk value of any service
Unlike IT services and business services, which use "0" as the lowest possible health and risk values in their default service policies, custom service models use "10" as the lowest health and risk values in their default service policies.
Assigning an Icon to a Service
To assign an icon to a service:
- On the Business Services page, locate the service to which you want to add an icon.
- Click the button () for that service and select Assign Icon. The Select an Icon window appears:

- To use an existing icon, select that icon from the list of icons and click the button.
If an icon includes a tag, you can search for that icon by typing some or all of the tag text in the Search field.
- To upload an icon from your local drive, make sure that the image file meets the following criteria:
- The image file should be in .SVG format.
- The file should not be larger than 40 KB.
- The file should not be animated.
- The file should not contain bitmaps
- To start the upload process, click the button. The Add an Icon window appears:
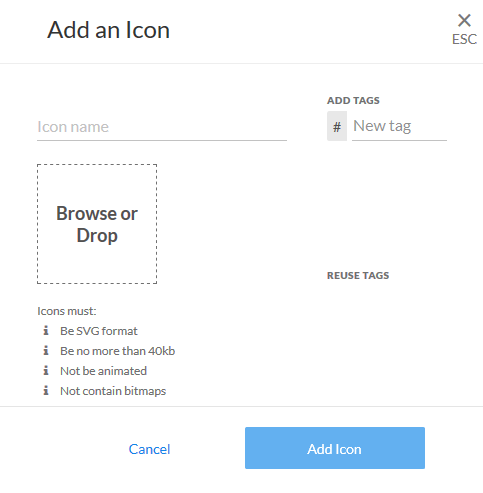
- In the Icon name field, type a name for the icon you want to upload.
- In the Add Tags field, type a short descriptor for the icon, without spaces. You can use this tag for searching later.
- You can click the Browse or Drop area to browse for and select the icon, or you can drag and drop the icon file onto the Add an Icon window.
- Click the button. The icon is added to the Select an Icon window.
- Click the button to add the icon to the service.
Exporting Service Data with the ScienceLogic API
By navigating to the GQL Browser, you can export business service data with the ScienceLogic API. The GQL Browser is a user interface for interactively exploring the capabilities of, and executing queries against, the Skylar One GraphQL API.
To export service data using the GQL Browser:
-
Go to the GQL Browser (System > Tools > GQL Browser).
-
In Skylar One, make a note of the URL that displays for the service you want to export. For example, if you have a service named "East Coast Tech," and its URL in Skylar One is http://sl1.sciencelogic.com/inventory/services/cjumt2se20p3izg6lmiqool5b/overview. Make a note of the unique value between /services and /overview. In this example, the value you need is cjumt2se20p3izg6lmiqool5b.
-
In the GQL Browser, create a harProvider query for the service you want to export, using the following format:
query {harProvider (id:"<Service_URI>") { name} }
where <Service_URI> is the value found in the URL for the Service you want to export.
-
Click the (Play) button to tell the GQL Browser to send the query to the GraphQL server and get the results.
-
To export additional data, use the filter-while-you-type capabilities of the GQL Browser to gather other information, such as the collection timestamp, health, availability, and risk.
-
After you finish updating your query, click the button.
-
For more information, ask your ScienceLogic contact for access to the ScienceLogic GraphQL documentation.