The following sections describe how to configure the credentials required to monitor Cisco Meraki devices using the "Cisco: Meraki [API]" PowerPack and the Meraki API.
Generating a Cisco Meraki API Key
To configure Cisco Meraki for monitoring using the Meraki API, you must first generate an API key for a read-only Meraki user. You will then enter this user's API key in the universal credential, SOAP/XML credential, or Basic/Snippet credential you create in SL1 to monitor Meraki.
While an API key for a read-only Meraki user is acceptable for most credential purposes in this PowerPack, an API key for a user with write permissions is required for the "Cisco: Meraki Update Switch Configuration [API]" and "Cisco: Meraki Reboot Device [API]" run book action policies, which allow you to change configurations and reboot devices.
If the read-only user has access to multiple organizations, then SL1 can discover all of those organizations with a single discovery session. In this scenario, each organization is created as a separate "root level" device, with the networks and devices for that organization modeled in the Dynamic Component Map tree as children of the organization. Organizations and their child components can be moved between Data Collectors after discovery for load balancing purposes.
However, if you want each Meraki organization to have its own corresponding ScienceLogic organization in SL1, ScienceLogic recommends creating a unique read-only user account and API key for each organization in Meraki. You can then create separate credentials in SL1 for each Meraki organization using those unique API keys, and then use those credentials to run separate discovery sessions for each organization.
To create a read-only Meraki user:
- Log in to the Cisco Meraki web interface.
- Go to Organization > Administrators, and then click the button.
- On the Create administrator page, complete the following fields:
- Name. Type the user's name.
- Email. Type the user's email address.
- Organization access. Select Read-only.
- Click . Cisco Meraki sends an email to the email address provided, describing how the user can complete the registration process. The user must complete those steps before generating the API key.
To generate a Cisco Meraki API key for that read-only user:
- Log in to the Cisco Meraki web interface as the read-only user.
- Go to Organization > Settings:
- In the Dashboard API access section, select the Enable access to the Cisco Meraki Dashboard API checkbox.
- Click the button.
- Click the profile link in the Dashboard API access section.
- In your user profile, navigate to the API access section and click the button.
- In the API access section, the API key appears. Copy and save the key value.
API keys are visible only to the user that created them.
Configuring a Credential for Cisco Meraki
To configure SL1 to monitor Cisco Meraki systems using the Meraki API, you must first create a credential. This credential allows the Dynamic Applications in the "Cisco: Meraki [API]" PowerPack to connect with the Cisco Meraki API. The "Cisco: Meraki [API]" PowerPack supports three credential types to use to connect with the Cisco Meraki API:
ScienceLogic recommends configuring a universal credential to connect with the Cisco Meraki API to best meet your needs, but you can configure a SOAP/XML credential if needed. While it is supported, ScienceLogic does not recommend using a Basic/Snippet credential, which does not support selective discovery or other features that might be added in future releases of the PowerPack.
Creating a Universal Credential for Cisco Meraki
To define a universal credential to access Cisco Meraki:
- Go to the Credentials page (Manage > Credentials).
- Click and select Create Meraki api Credential. The Create Credential modal page appears.
- Supply values in the following fields:
- Name. Type a name for your credential.
- All Organizations. Toggle on (blue) to align the credential to all organizations, or toggle off (gray) and then select one or more specific organizations from the from the What organization manages this service? drop-down field to align the credential with those specific organizations.
- Timeout (ms). Keep the default value of 1500.
- Meraki API Key. Type the Meraki API key.
- Verify SSL. Toggle on (blue) to verify SSL certificates for API calls made using this credential.
- Meraki API URL. Enter the preferred API endpoint from the Cisco Meraki documentation. Usually this is "api.meraki.com", but can be different depending on a number of factors, such as location.
- Port. Keep the default value.
- Timeout*. Keep the default value.
Use Proxy
Toggle on this field (blue) if you are using a proxy server to communicate with your Cisco Meraki account, then enter the values in the fields listed below:
- Proxy Protocol. Select http or https from the drop-down field.
- Proxy IP. Enter the hostname or the IP address associated with your device.
- Proxy Port. Enter the port number for the proxy server.
- Proxy User. Enter the username for the proxy server.
- Proxy Password. Enter the password for the proxy server.
Ignore Endpoints
Toggle on this field (blue) if you want to ignore certain API endpoints. Then, toggle on (blue) each endpoint that you want to be ignored during discovery. For more information about the API endpoints used by each Dynamic Application and their API rates, see the Cisco: Meraki [API] API Endpoints Appendix.
Discover Devices by Tag
Toggle on this field (blue) if you want to discover devices by tag, then enter the values in the fields listed below.
- Ignore Case. Toggle on (blue) if you want SL1 to match the tag values regardless of case.
- Tags. Enter one or more tag values. You can include multiple tag values in a string, using comma separators and no spaces. For example: "tagvalue1,tagvalue2,tagvalue3".
If you are using a tag to discover a device and want to discover that device's network, the device and its network must have the same tag applied.
Tag values can include wildcard characters:
-
An asterisk ( * ) will match any number of characters, including zero. For example, "a*c" will match "ac", "abc", and "abbbbbc".
-
A comma ( , ) will match exactly one character. For example, "a,c" will match "abc" and "adc", but not "ac" or "abbbbc"
After initial discovery, you can add more tag values and run discovery again to discover additional component devices. However, if you remove tag values and then run discovery again, the component devices that had been discovered based on the removed tag values will be updated to an unavailable state.
Credential Retry Override
The fields below should be changed only for troubleshooting purposes. Changing these values can cause collections to take longer to run, which could result in missing data or early termination (SIGTERM).
- Maximum number of retries. Keep the default value of 3 unless you are troubleshooting issues.
- Time between retries. Keep the default value of 0 unless you are troubleshooting issues.
- Click .
Creating a SOAP/XML Credential for Cisco Meraki
If you access Cisco Meraki systems through a third-party proxy server, you can create a SOAP/XML credential to enable the Dynamic Applications in the "Cisco: Meraki [API]" PowerPack to connect with the Cisco Meraki API via the proxy server.
Similarly, if you want to discover only some selected devices, you can create a SOAP/XML credential that specifies tag values that the Dynamic Applications in the "Cisco: Meraki [API]" PowerPack can use to determine which devices should be discovered.
If you are using an SL1 system prior to version 11.1.0, you will not be able to duplicate the sample credential. ScienceLogic recommends that you use the classic user interface and the Save As button to create new credentials from sample credentials. This will prevent you from overwriting the sample credential(s).
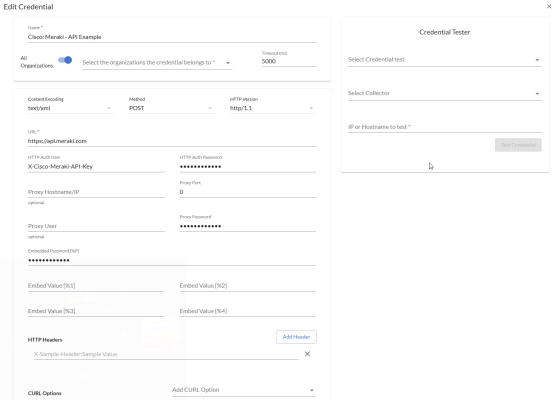
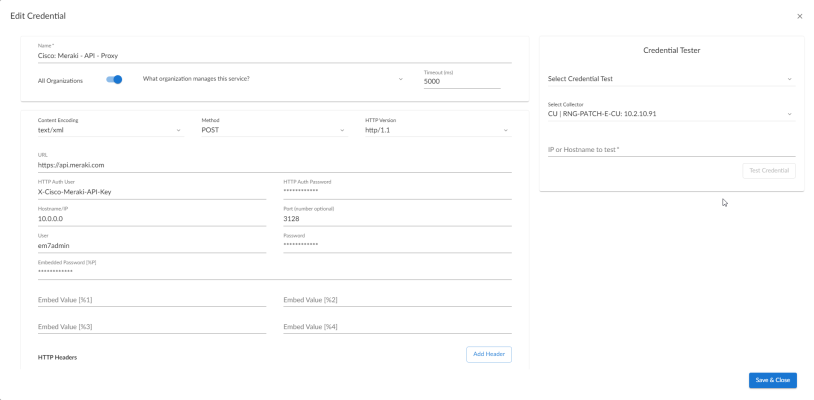
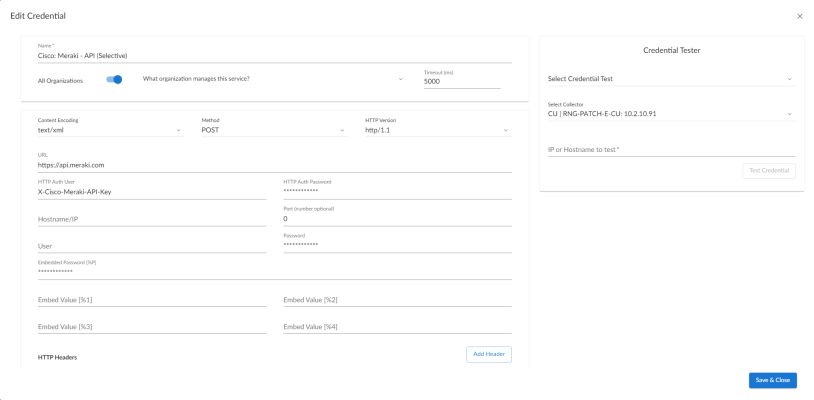
Three example SOAP/XML credentials that you can edit for your own use are included in the PowerPack:
- Cisco: Meraki - API Example, for users who want to connect to Meraki using a SOAP/XML credential
- Cisco: Meraki - API - Proxy Example, for users who connect to Meraki through a third-party proxy server
- Cisco: Meraki - API Example (Selective), for users who want to discover only some selected devices based on tag values
To define a SOAP/XML credential:
- Go to the Credentials page (Manage > Credentials).
- Locate the sample credential you want to use, then click its icon (
) and select Duplicate. A copy of the credential, called Cisco: Meraki - API Example copy, Cisco: Meraki - API - Proxy Example copy, or Cisco: Meraki - API Example (Selective) copy appears.
- Click the icon (
) for the credential copy and select Edit. The Edit Credential modal page appears.
- Supply values in the following fields:
- Name. Type a new name for your Meraki credential.
- All Organizations. Toggle on (blue) to align the credential to all organizations, or toggle off (gray) and then select one or more specific organizations from the What organization manages this service? drop-down field to align the credential with those specific organizations.
- Timeout (ms). Keep the default value.
- Content Encoding.Keep the default value.
- Method. Keep the default value.
- HTTP Version. Keep the default value.
- URL. Enter the preferred API endpoint from the Cisco Meraki documentation. Usually this is "api.meraki.com", but can be different depending on a number of factors, such as location.
- HTTP Auth User. Keep the default value.
- HTTP Auth Password. Type the Meraki API key.
Proxy Settings
You must complete the Proxy Settings fields only if you connect to the Meraki API through a third-party proxy server. If you do not use a proxy to connect to Meraki, then you can leave these fields blank.
- Hostname/IP. Type the server's hostname or IP address.
- Port.Type the port on the proxy server to which you will connect.
- User. Type the username used to access the proxy server.
- Password. Type the password used to access the proxy server.
HTTP Headers
- proxy_url_protocol:http. Edit this header if you want to connect a proxy using a different protocol, such as http or https. The default value is "http".
- Add a header. Click once if you want to include tag values for SL1 to match when it discovers Meraki devices, or click twice if you want to include tag values and specify that tag-matching should be case-insensitive. In the blank fields that appear, do one or both of the following:
- Type "tags:" in the first field, followed by one or more tag values. You can include multiple tag values in a string, using comma separators and no spaces. For example: "tags:value1,value2,value3".
- Type "regex:IGNORECASE" in the second field if you want SL1 to match the tag values regardless of case.
If you are using a tag to discover a device and want to discover that device's network, the device and its network must have the same tag applied.
Tag values can include wildcard characters:
-
An asterisk ( * ) will match any number of characters, including zero. For example, "a*c" will match "ac", "abc", and "abbbbbc".
-
A comma ( , ) will match exactly one character. For example, "a,c" will match "abc" and "adc", but not "ac" or "abbbbc"
After initial discovery, you can add more tag values and run discovery again to discover additional component devices. However, if you remove tag values and then run discovery again, the component devices that had been discovered based on the removed tag values will be updated to an unavailable state.
- If you want to remove specific API endpoints from collection when using this credential, click for each endpoint to skip, and then type "Skip-Endpoint:<endpoint>". For example, to skip collection of the /devices/availabilities endpoint, type "Skip-Endpoint:/devices/availabilities". The allowed endpoints to skip collection on are:
- /appliance/uplink/statuses
- /devices
- /devices/availabilities
- /devices/uplinksLossandLatency
- /licenses/overview
- /wireless/devices/connectionStats
Any endpoints not on this list will not be skipped, even if entered. For more information about the API endpoints used by each Dynamic Application and their API rates, see the Cisco: Meraki [API] API Endpoints Appendix.
- Click .
If you want to test your credential using the Credential Tester panel, click . For detailed instructions on using the Credential Tester panel, see the Testing the Cisco Meraki API Credential section.
Creating a SOAP/XML Credential in the SL1 Classic User Interface
If you access Meraki systems through a third-party proxy server, you can create a SOAP/XML credential to enable the Dynamic Applications in the "Cisco: Meraki [API]" PowerPack to connect with the Cisco Meraki API via the proxy server.
Similarly, if you want to discover only some selected devices, you can create a SOAP/XML credential that specifies tag values that the Dynamic Applications in the "Cisco: Meraki [API]" PowerPack can use to determine which devices should be discovered.
Three example SOAP/XML credentials that you can edit for your own use are included in the PowerPack:
- Cisco: Meraki - API Example, for users who want to connect to Meraki using a SOAP/XML credential
- Cisco: Meraki - API - Proxy Example, for users who connect to Meraki through a third-party proxy server
- Cisco: Meraki - API Example (Selective), for users who want to discover only some selected devices based on tag values
To define a SOAP/XML credential:
- Go to the Credential Management page (System > Manage > Credentials).
- Locate the Cisco Meraki example credential that you want to use and click its wrench icon (
 ). The Credential Editor modal page appears.
 - Enter values in the following fields:
Basic Settings
- Profile Name. Type a new name for your Meraki credential.
- URL. Enter the preferred API endpoint from the Cisco Meraki documentation. Usually this is "api.meraki.com", but can be different depending on a number of factors, such as location.
- HTTP Auth Password. Type the Meraki API key.
Proxy Settings
You must complete the Proxy Settings fields only if you connect to the Meraki API through a third-party proxy server. If you do not use a proxy to connect to Meraki, then you can leave these fields blank.
- Hostname/IP. Type the server's hostname or IP address.
- Port. Type the port on the proxy server to which you will connect.
- User. Type the username used to access the proxy server.
- Password. Type the password used to access the proxy server.
HTTP Headers
- proxy_url_protocol:http. Edit this header if you want to connect a proxy using a different protocol, such as http or https. The default value is "http".
- Add a header. Click once if you want to include tag values for SL1 to match when it discovers Meraki devices, or click twice if you want to include tag values and specify that tag-matching should be case-insensitive. In the blank fields that appear, do one or both of the following:
- Type "tags:" in the first field, followed by one or more tag values. You can include multiple tag values in a string, using comma separators and no spaces. For example: "tags:value1,value2,value3".
- Type "regex:IGNORECASE" in the second field if you want SL1 to match the tag values regardless of case.
If you are using a tag to discover a device and want to discover that device's network, the device and its network must have the same tag applied.
Tag values can include wildcard characters:
-
An asterisk ( * ) will match any number of characters, including zero. For example, "a*c" will match "ac", "abc", and "abbbbbc".
-
A comma ( , ) will match exactly one character. For example, "a,c" will match "abc" and "adc", but not "ac" or "abbbbc"
After initial discovery, you can add more tag values and run discovery again to discover additional component devices. However, if you remove tag values and then run discovery again, the component devices that had been discovered based on the removed tag values will be updated to an unavailable state.
- If you want to remove specific API endpoints from collection when using this credential, click for each endpoint to skip, and then type "Skip-Endpoint:<endpoint>". For example, to skip collection of the /devices/availabilities endpoint, type "Skip-Endpoint:/devices/availabilities". The allowed endpoints to skip collection on are:
- /appliance/uplink/statuses
- /devices
- /devices/availabilities
- /devices/uplinksLossandLatency
- /licenses/overview
- /wireless/devices/connectionStats
Any endpoints not on this list will not be skipped, even if entered. For more information about the API endpoints used by each Dynamic Application and their API rates, see the Cisco: Meraki [API] API Endpoints Appendix.
- Click the button, and then click .
Creating a Basic/Snippet Credential for Cisco Meraki
An example Basic/Snippet credential that you can edit for your own use is included in the "Cisco: Meraki [API]" PowerPack.
ScienceLogic recommends configuring a universal credential to connect with the Cisco Meraki API to best meet your needs, but you can configure a SOAP/XML credential if needed. While it is supported, ScienceLogic does not recommend using a Basic/Snippet credential, which does not support selective discovery or other features that might be added in future releases of the PowerPack.
If you are using an SL1 system prior to version 11.1.0, you will not be able to duplicate the sample credential. ScienceLogic recommends that you use the classic user interface and the Save As button to create new credentials from sample credentials. This will prevent you from overwriting the sample credential(s).
To create a Basic/Snippet credential:
- Go to the Credentials page (Manage > Credentials).
- Locate the Cisco: Meraki - API Basic Example sample credential, click its icon (
) and select Duplicate. A copy of the credential, called Cisco: Meraki - API Basic Example copy appears.
- Click the icon (
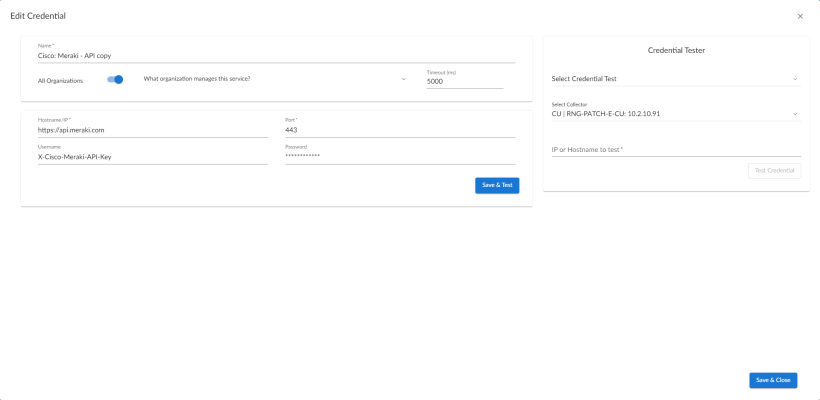
) for the Cisco: Meraki - API copy credential and select Edit. The Edit Credential page appears:
- Supply values in the following fields:
- Name. Type a new name for the Meraki credential.
- All Organizations. Toggle on (blue) to align the credential to all organizations, or toggle off (gray) and then select one or more specific organizations from the What organization manages this service? drop-down field to align the credential with those specific organizations.
- Timeout (ms). Keep the default value.
- Hostname/IP. Enter the preferred API endpoint from the Cisco Meraki documentation. Usually this is "api.meraki.com", but can be different depending on a number of factors, such as location.
- Port. Keep the default value.
- Username. Keep the default value.
- Password. Type the Meraki API key.
- Click .
If you would like to test your credential using the Credential Tester panel, click . For detailed instructions on using the Credential Tester panel, see the Testing the Cisco Meraki API Credential section.
Creating a Basic/Snippet Credential in the SL1 Classic User Interface
An example Basic/Snippet credential that you can edit for your own use is included in the "Cisco: Meraki [API]" PowerPack.
ScienceLogic recommends configuring a universal credential to connect with the Cisco Meraki API to best meet your needs, but you can configure a SOAP/XML credential if needed. While it is supported, ScienceLogic does not recommend using a Basic/Snippet credential, which does not support selective discovery or other features that might be added in future releases of the PowerPack.
To create a Basic/Snippet credential:
- Go to the Credential Management page (System > Manage > Credentials).
- Locate the Cisco: Meraki - API credential, and then click its wrench icon (
 ). The Edit Basic/Snippet Credential modal page appears.
- Complete the following fields:
- Credential Name. Type a new name for the credential.
- Hostname/IP. Enter the preferred API endpoint from the Cisco Meraki documentation. Usually this is "api.meraki.com", but can be different depending on a number of factors, such as location.
- Port. Keep the default value.
- Timeout(ms). Keep the default value.
- Username. Keep the default value.
- Password. Type the Meraki API key.
- Click the button.
- When the confirmation message appears, click .
Testing the Cisco Meraki API Credential
The "Cisco: Meraki [API]" PowerPack includes two credential tests for Cisco Meraki credentials. Credential tests define a series of steps that SL1 can execute on demand to validate whether a credential works as expected.
The Cisco Meraki credential tests can be used to test the Basic/Snippet and SOAP/XML credentials for monitoring the Cisco Meraki API using the Dynamic Applications in the "Cisco: Meraki [API]" PowerPack.
The Cisco: Meraki [API] (SOAP/XML) Credential tester and Cisco: Meraki [API] (Basic/Snippet) Credential tester perform the following steps:
- Test Meraki Reachability. Performs an ICMP ping request to the host specified in the credential.
- Test Meraki Port Availability. Performs an NMAP request to the TCP port specified in the credential on the host specified in the credential.
- Test Meraki Organization Request. Performs a check to see if the Meraki organization request has been collected appropriately.
To test the Cisco Meraki credential:
- Go to the Credentials page (Manage > Credentials).
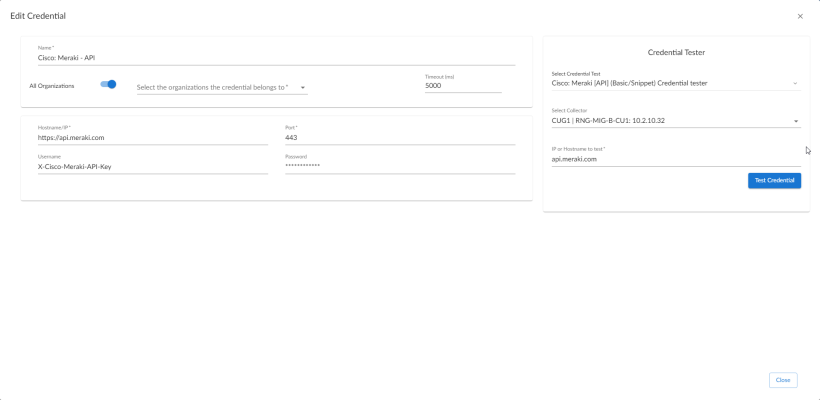
- Locate the credential you want to test, click the Actions button (
) next to it and select Edit/Test. The Edit Credential modal appears:
- In the Credential Tester pane on the right, fill out the following fields on this page:
- Select Credential Test. Select Cisco: Meraki [API] (SOAP/XML) Credential tester or the Cisco: Meraki [API] (Basic/Snippet) Credential tester, depending on which credential you are testing.
- Collector. Select the All-In-One Appliance or Data Collector that will run the test.
- IP or Hostname to Test. Enter "api.meraki.com" or the IP address of your Meraki system.
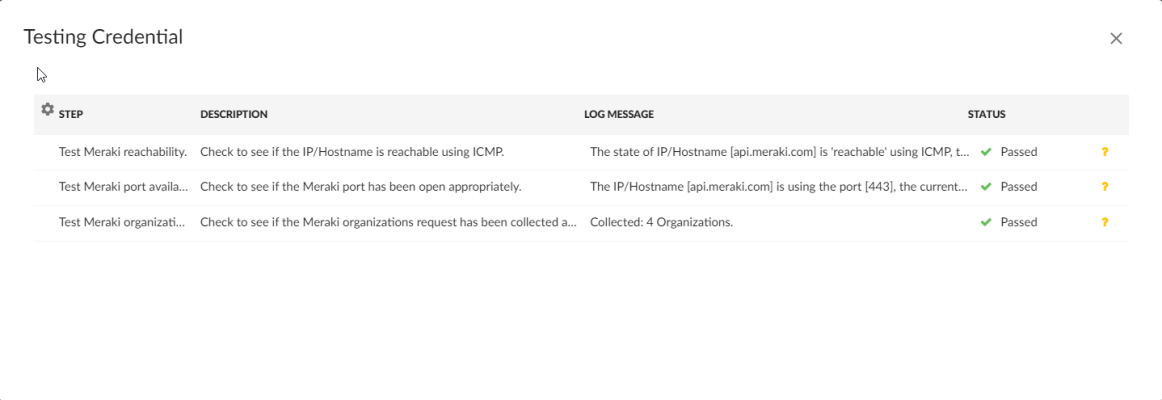
- Click the button to run the credential test. The Testing Credential window appears.
- Step. The name of the step.
- Description. A description of the action performed during the step.
- Log Message. The result of the step for this execution of the credential test.
- Status. Whether the result of this step indicates the credential and/or the network environment is configured correctly (Passed) or incorrectly (Failed).
- Step Tip. Mouse over the question mark icon (
 ) to display the tip text. The tip text recommends what to do to change the credential and/or the network environment if the step has a status of "Failed".
The Testing Credential window displays a log entry for each step in the credential test. The steps performed are different for each credential test. The log entry for each step includes the following information:
Testing the Cisco Meraki API Credential in the SL1 Classic User Interface
The "Cisco: Meraki [API]" PowerPack includes two credential tests for Cisco Meraki credentials. Credential tests define a series of steps that SL1 can execute on demand to validate whether a credential works as expected.
The Cisco Meraki credential tests can be used to test the SOAP/XML and Basic/Snippet credentials for monitoring the Cisco Meraki API using the Dynamic Applications in the "Cisco: Meraki [API]" PowerPack.
The Cisco: Meraki [API] (SOAP/XML) Credential tester and Cisco: Meraki [API] (Basic/Snippet) Credential tester performs the following steps:
- Test Meraki Reachability. Performs an ICMP ping request to the host specified in the credential.
- Test Meraki Port Availability. Performs an NMAP request to the TCP port specified in the credential on the host specified in the credential.
- Test Meraki Organization Request. Performs a check to see if the Meraki organization request has been collected appropriately.
To test the Cisco Meraki credential:
- Go to the Credential Test Management page (System > Customize > Credential Tests).
- Locate the Cisco: Meraki [API] (SOAP/XML) Credential tester or the Cisco: Meraki [API] (Basic/Snippet) Credential tester, depending on which credential you are testing, and click its lightning bolt icon (
 ). The Credential Tester modal page appears.
- Supply values in the following fields:
- Test Type. This field is pre-populated with the credential test you selected.
- Credential. Select the credential to test. This drop-down list includes only credentials that you have access to that can be tested using the selected credential test.
- Hostname/IP. Enter "api.meraki.com" or the IP address of your Meraki system.
- Collector. Select the All-In-One Appliance or Data Collector that will run the test.
- Click the button to run the credential test. The Test Credential window appears.
The Test Credential window displays a log entry for each step in the credential test. The steps performed are different for each credential test. The log entry for each step includes the following information:
- Step. The name of the step.
- Description. A description of the action performed during the step.
- Log Message. The result of the step for this credential test.
- Status. Whether the result of this step indicates the credential or the network environment is configured correctly (Passed) or incorrectly (Failed).
- Step Tip. Mouse over the question mark icon (
 ) to display the tip text. The tip text recommends what to do to change the credential or the network environment if the step has a status of "Failed".
