![]()
The following sections describe how to discover Dell EMC Unity storage arrays for monitoring by Skylar One using the "Dell EMC: Unity" PowerPack.
Discovering Dell EMC: Unity Component Devices
To model and monitor your Dell EMC Unity storage arrays, you must run a discovery session to discover the Unisphere that Skylar One will use as the root device for monitoring the Unity storage system.
After the discovery session completes, the Dynamic Applications in the "Dell EMC: Unity" PowerPack automatically align to the storage array device, and then the PowerPack discovers, models, and monitors the remaining Unity component devices.
To discover the Unity arrays that you want to monitor, perform the following steps:
- On the Devices page (
 ) or the Discovery Session page (Devices > Discovery Sessions), click the button. The Select page appears.
 - Click the button. Additional information about the requirements for discovery appears in the General Information pane to the right.
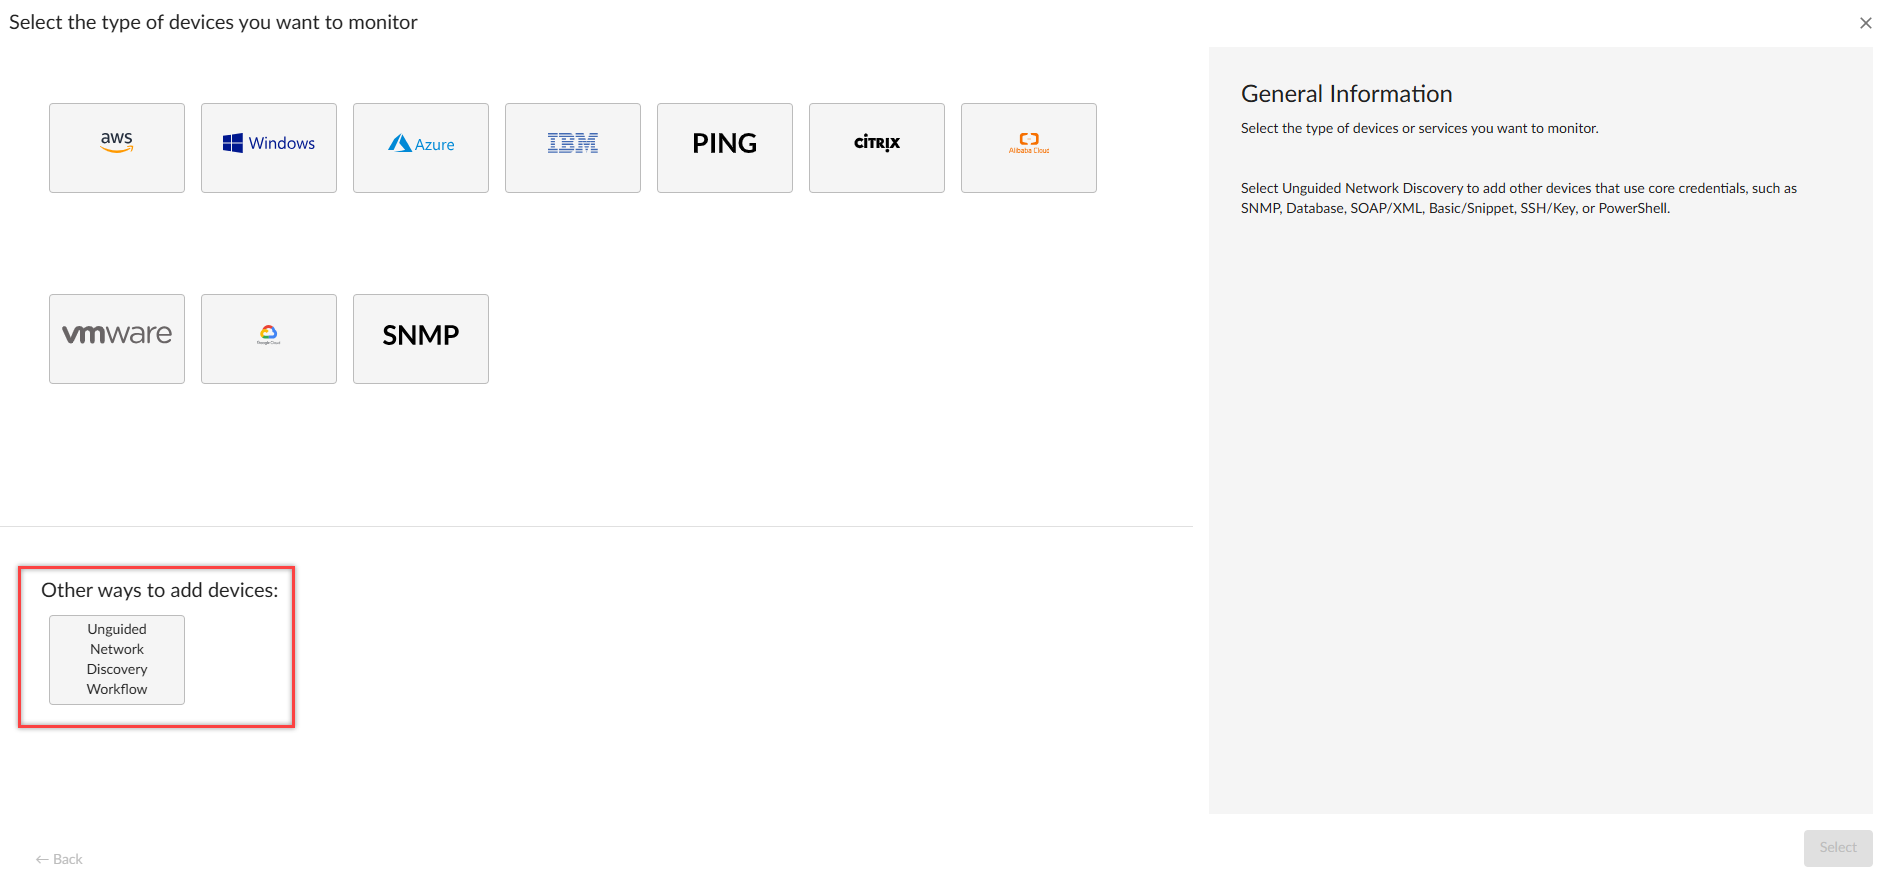
- Click . The Add Devices page appears.
- Complete the following fields:
- Discovery Session Name. Type a unique name for this discovery session. This name is displayed in the list of discovery sessions on the tab.
- Description. Type a short description of the discovery session. You can use the text in this description to search for the discovery session on the tab. Optional.
- Select the organization to add discovered devices to. Select the name of the organization to which you want to add the discovered devices.
- Click . The Credentials page of the Add Devices wizard appears.
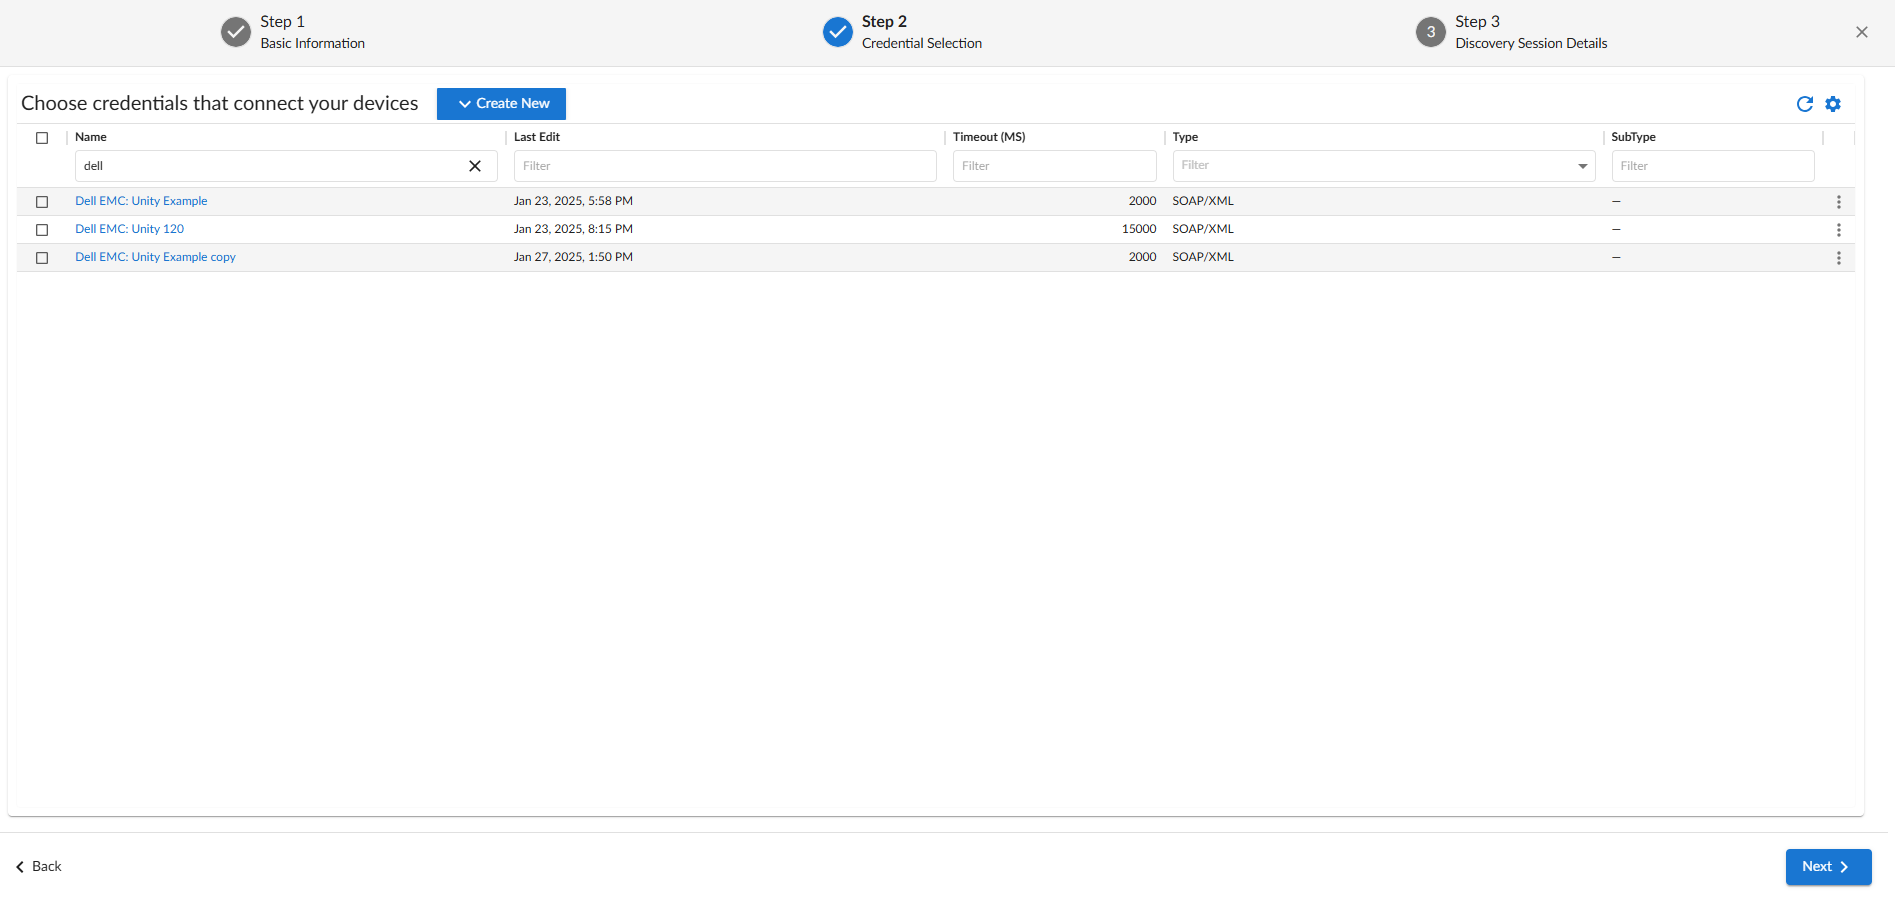
- On the Credentials page, locate and select the SOAP/XML credential you created for the Dell EMC Unity devices.
- Click . The Discovery Session Details page of the Add Devices wizard appears.
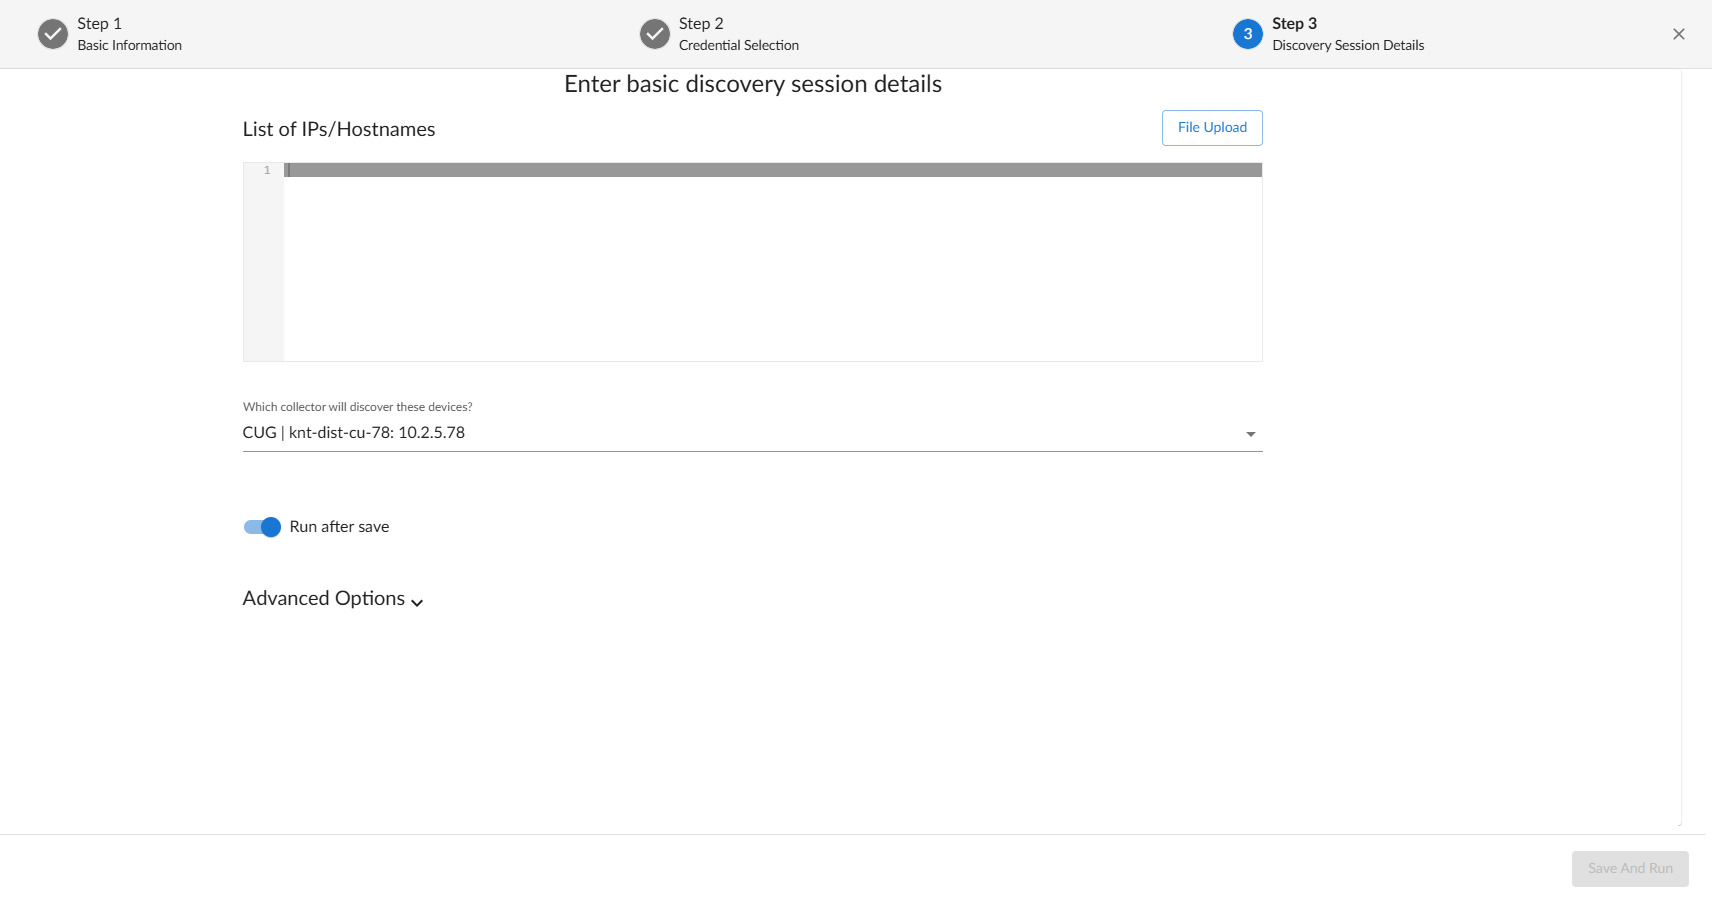
- Complete the following fields:
- List of IPs/Hostnames. Type the IP addresses for the Dell EMC Unity devices you want to monitor.
- Which collector will monitor these devices? Select an existing collector to monitor the discovered devices. Required.
- Run after save. Select this option to run this discovery session as soon as you save the session.
- Advanced options. Click the down arrow icon (
 ) to complete the following fields:
- Discover Non-SNMP. Enable this setting.
- Model Devices. Enable this setting.
- Click if you enabled the Run after save setting, or to save the discovery session. The Discovery Sessions page (Devices > Discovery Sessions) displays the new discovery session.
- If you selected the Run after save option on this page, the discovery session runs, and the Disovery Logs page displays any relevant log messages. If the discovery session locates and adds any devices, the Discovery Logs page includes a link to the Device Investigator page for the discovered device.
Discovering Dell EMC Unity Devices in the Classic User Interface
To discover the Unity arrays that you want to monitor, perform the following steps:
- Go to the Discovery Control Panel page (System > Manage > Classic Discovery).
- On the Discovery Control Panel page, click the button. The Discovery Session Editor page appears.
- Complete the following fields:
- IP Adress/Hostname Discovery List. Type the IP address for the Unisphere.
- Other Credentials. Select the SOAP/XML or Universal credential that you created for Unity devices.
- Discover Non-SNMP. Select this checkbox.
- Model Devices. Select this checkbox.
- Optionally, you can enter values in the other fields on this page. For more information about other fields on this page, see the Discovery & Credentials manual.
- Click the button to save the discovery session and then close the Discovery Session Editor window.
- The discovery session you created appears at the top of the Discovery Control Panel page. Click its lightning-bolt icon (
 ) to run the discovery session.
 - The Discovery Session window appears. After the devices are discovered, click the device icon (
 ) to view the Device Properties page for each device.
Verifying Discovery and Dynamic Application Alignment
To verify that Skylar One has automatically aligned the correct Dynamic Applications during discovery:
- After discovery has completed, click the device icon for the root device ().
- From the Device Properties page for the array device, click the tab. The Dynamic Application Collections page appears.
- All applicable Dynamic Applications for the device are automatically aligned during discovery.
It can take several minutes after the discovery session has completed for Dynamic Applications to appear in the Dynamic Application Collections page.
The "Dell EMC: Unity Array Discovery" and "Dell EMC: Unity Components Config" Dynamic Applications are automatically aligned to the root device, after which the rest of the Dynamic Applications in the PowerPack will be aligned.
HTTP Retries for Dell EMC: Unity
Due to multiple calls to the Unisphere REST API, the Dynamic Applications may encounter unsuccessful HTTP responses, which can lead to intermittent data collection. Therefore, a custom step was added to support retries for HTTP API calls with the following parameters:
- retry_value. Numbers of times to retry the request.
- time_before_entry. Time (in milliseconds) to wait before retrying.
- timeout_increment. Time (in milliseconds) to increase the timeout per retry. If the value is 0, the timeout for each retry will be the same as the credential.
These parameters are located in the snippet code of the Dynamic Applications and should only be edited if you are experiencing intermittent data collection in any Dynamic Application.
To configure the HTTP retry:
- Go to the Credentials page (Manage > Credentials).
- Click the Actions icon (
 ) of the credential that is used for the Dynamic Applications and then select Edit/Test. The Edit Credential page appears.
 - Edit the Timeout field to 5000 ms, and then click .
- Go to the Dynamic Applications Manager page (System > Manage > Dynamic Applications).
- Select the Dynamic Application you want to edit. Click its wrench icon (
 ) and then select the tab. The Snippet Editor & Registry page appears.
 - Click the wrench icon () next to the Snippet Name.
- Modify the retry parameter in the custom_substitution section. You must edit each snippet code that the Dynamic Application has.

- The default values are as follows, meaning that if the first attempt fails, only one retry will be made after 500 milliseconds:
- retry_value: 1
- time_before_retry : 500
- timeout_increment: 0
- The suggested values, found in the snippet of the Dynamic Applications, are as follows, meaning that if the first attempt fails, it will retry 5 times, every 2000 milliseconds, and increases the timeout by 1000 milliseconds in each retry:
- retry_value: 5
- time_before_retry : 2000
- timeout_increment: 1000
The Dynamic Applications use the retry parameters from the snippet code in the custom_substitution section. Unless this section is commented out, the default values will be used. You can edit the values in the snippet, but ScienceLogic does not recommend that you use higher numbers.
- Click the button.
Viewing Dell EMC: Unity Component Devices
In addition to the Device Manager page (Devices > Classic Devices, or Registry > Devices > Device Manager in the classic user interface), you can view the Unity storage devices in the following places in the user interface:
- The Device View modal page (click the bar-graph icon [
 ] for a device, then click the Topology tab) displays a map of a particular device and all of the devices with which it has parent-child relationships. Double-clicking any of the devices listed reloads the page to make the selected device the primary device:
 - The Device Components page (Devices > Device Components) displays a list of all root devices and component devices discovered by Skylar One in an indented view, so you can easily view the hierarchy and relationships between child devices, parent devices, and root devices. To view the component devices associated with Dell EMC: Unity, find the Unity component device and click its plus icon (+):
- The Component Map page (Classic Maps > Device Maps > Components) allows you to view devices by root node and view the relationships between root nodes, parent components, and child components in a map. This makes it easy to visualize and manage root nodes and their components. Skylar One automatically updates the Component Map page as new component devices are discovered. The platform also updates each map with the latest status and event information. To view the map for an Dell EMC: Unity arrays, go to the Component Map page and select the map from the list in the left NavBar. To learn more about the Component Map page,