This section describes how to configure Windows Server 2025, 2022, 2019, 2016, 2012, 2012r2, and Windows desktop systems for monitoring by Skylar One using SNMP.
Use the following menu options to navigate the Skylar One user interface:
- To view a pop-out list of menu options, click the menu icon (
 ).
). - To view a page containing all of the menu options, click the Advanced menu icon (
 ).
).
Configuring SNMP for Windows Server 2025, 2022, 2019, 2016, 2012, and 2012r2
To configure SNMP on a Windows server, you must:
- Configure "ping" responses.
- Install the SNMP service.
- Configure the SNMP service.
- Configure the firewall to allow SNMP requests.
- Configure Device Classes. (Windows Server 2016 only)
Configuring Ping Responses
For Skylar One to discover a device, including SNMP-enabled devices, the device must meet one of the following requirements:
- The device must respond to an ICMP "Ping" request.
- One of the ports selected in the Detection Method & Port field for the discovery session must be open on the device. If the Default Method option for the Detection Method & Port field is selected, Skylar One scans TCP ports 21, 22, 23, 25, and 80.
The default configuration for a Windows Server does not allow ICMP "Ping" requests and does not allow connections to TCP ports 21, 22, 23, 25, or 80. Therefore, to discover a Windows Server in Skylar One, you must perform one of the following tasks:
- Reconfigure the firewall on the Windows Server to allow ICMP "Ping" requests. This section describes how to perform this task.
- Reconfigure the firewall on the Windows Server to allow connections to port 21, 22, 23, 25, or 80. If you have already configured your Windows Server to accept SSH, FTP, Telnet, SMTP, or HTTP connections, this task might have been completed already. You should perform this task only if you were already planning to allow SSH, FTP, Telnet, SMTP, or HTTP connections to your Windows Server.
- When you create the discovery session that will discover the Windows Server, select at least one port in the Detection Method & Port field that is open on the Windows Server. For example, if your Windows Server is configured as an MSSQL Server, you could select port 1433 (the default port for MSSQL Server) in the Detection Method & Port field.
To reconfigure the firewall on a Windows Server to allow ICMP "Ping" requests, perform the following steps:
- In the Start menu search bar, enter "firewall" to open a Windows Firewall with Advanced Security window.
- In the left pane, select Inbound Rules.
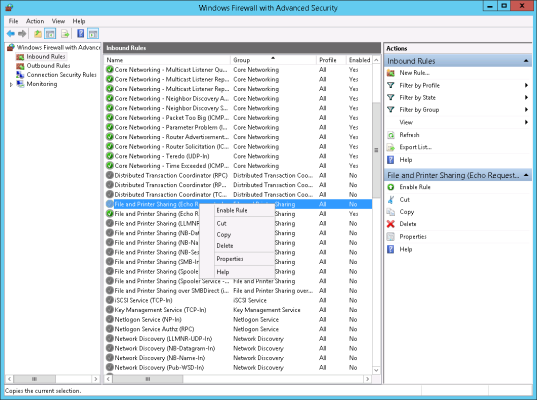
- If you want Skylar One to discover your Windows Server using an IPv4 address, locate the File and Printer Sharing (Echo Request - ICMPv4-In) rule.
- If you want Skylar One to discover your Windows Server using an IPv6 address, locate the File and Printer Sharing (Echo Request - ICMPv6-In) rule.
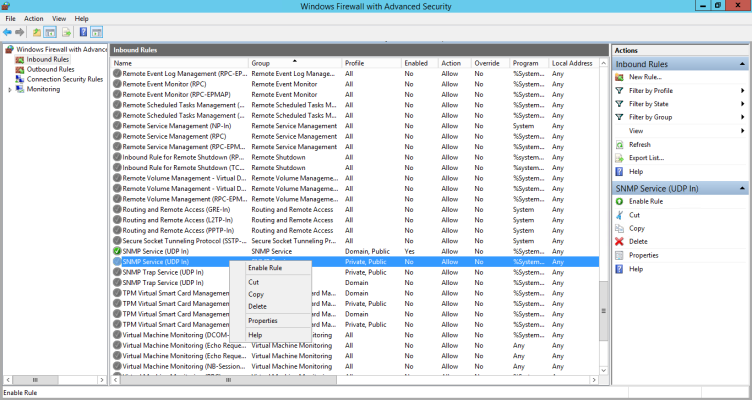
- Right click on the rule that you located, then select Enable Rule:
Installing the SNMP Service
To install the SNMP service on a Windows 2012 Server or Windows 2016 Server, perform the following steps:
- Open the Server Manager utility.
- In the upper-right of the window, select > Add Roles and Features. The Add Roles and Features window is displayed.
- If the server does not skip the Before you begin page, click the button to manually skip it. The Select installation type page is displayed:
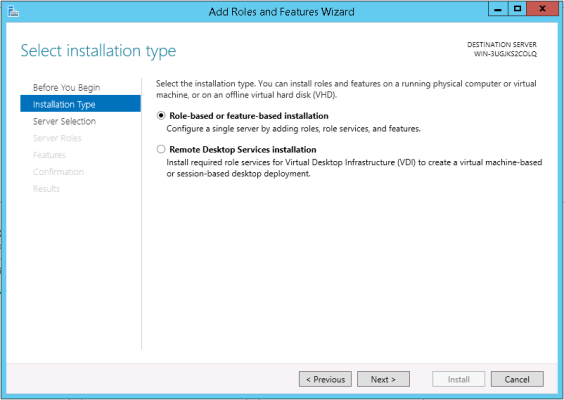
- Click the button to continue with Role-based or feature-based installation. The Select destination server page is displayed:
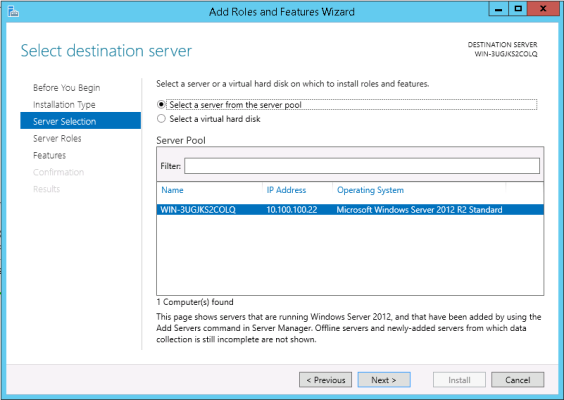
- Ensure the Windows 2012 server or Windows 2016 Server is selected and then click the button. The Select server roles page is displayed.
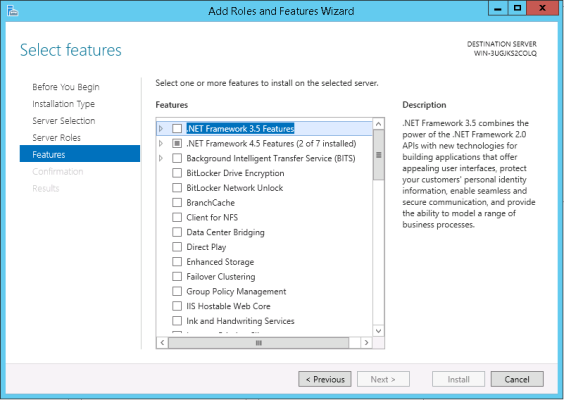
- Click the button without selecting any additional roles. The Select features page is displayed:
- Click the button.
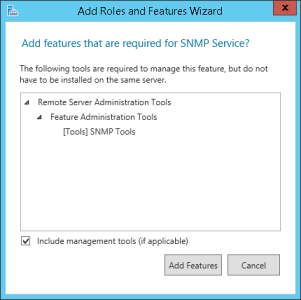
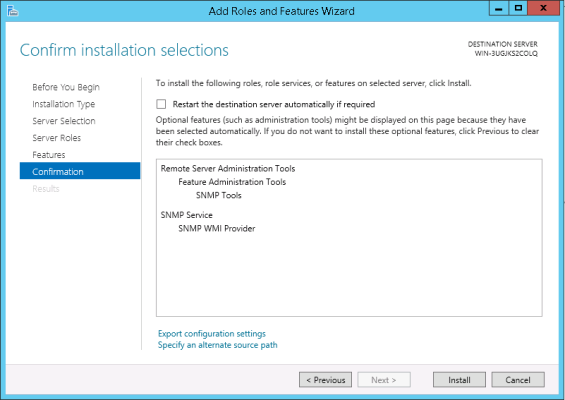
- In the Select features page, expand SNMP Service and select the SNMP WMI Provider checkbox.
- Click the button.
- After the installation is complete, click the button.
Configuring the SNMP Service
To configure the SNMP service on a Windows 2012 Server or Windows 2016 Server, perform the following steps:
If you recently installed the SNMP service, you must wait for the Server Manager window to refresh to allow the SNMP service snap-in to be added. You can manually refresh the Server Manager window by closing the Server Manager and then re-opening the Server Manager.
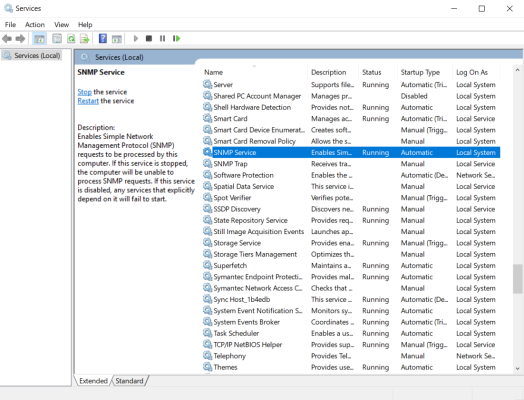
- In the upper-right of the Server Manager window, select > Services. The Services window is displayed.
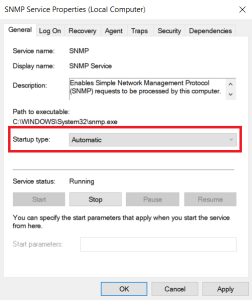
- In the Services window, right-click on SNMP Service, and then select Properties. The SNMP Service Properties window appears:
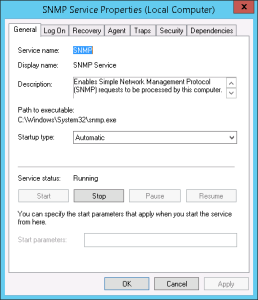
- In the Startup type: field, select Automatic.
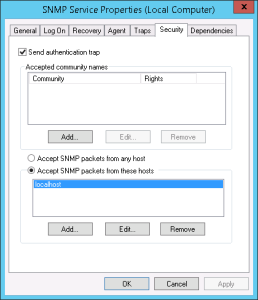
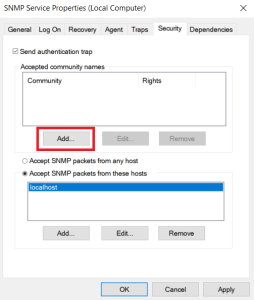
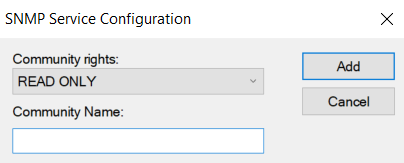
- In the Accepted community names panel, click the button. The SNMP Service Configuration pop-up window is displayed:
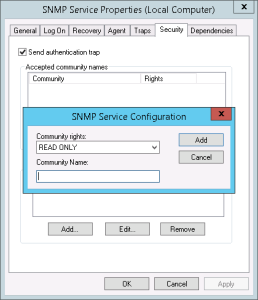
- Enter a value in the following fields:
- Community rights. Select one of the following options from the drop-down list:
- READ ONLY. Select this option to allow Skylar One to request information from this Windows 2012 Server or Windows 2016 Server using this SNMP community string. This option does not allow Skylar One to perform write operations on this Windows 2012 Server or Windows 2016 Server using this SNMP community string.
- READ WRITE. Select this option to allow Skylar One to request information from this Windows 2012 Server or Windows 2016 Server and to perform write operations on this Windows 2012 Server or a Windows 2016 Serve using this SNMP community string.
- Community name. Enter the SNMP community string that Skylar One will use when making SNMP requests to this Windows 2012 Server or Windows 2016 Server. When you create a credential for this Windows 2012 Server or Windows 2016 Server in Skylar One, you will enter this community string in one the following fields in the Credential Editor modal page:
- SNMP Community (Read-Only). Enter the SNMP community string in this field if you selected READ ONLY in the Community rights drop-down list.
- SNMP Community (Read/Write). Enter the SNMP community string in this field if you selected READ WRITE in the Community rights drop-down list.
- Click the button to add the community string to the list of community strings this Windows 2012 Server or Windows 2016 Server accepts.
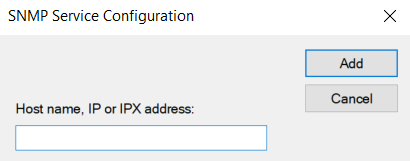
- In the Accept SNMP packets from these hosts panel, click the Add... button. The SNMP Service Configuration pop-up window is displayed:
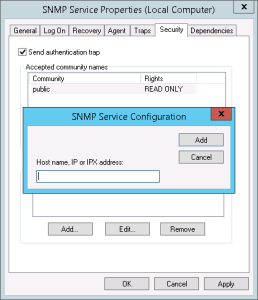
- In the Host name, IP or IPX address field, enter the IP address of the All-In-One Appliance or Data Collector that will monitor this server.
- Click the button to add the appliance to the list of authorized devices.
- If you are using Skylar One with a distributed architecture, repeat steps 8–10 for each Data Collector in the collector group that will monitor this server.
- Click the button to apply all changes.
Configuring the Firewall to Allow SNMP Requests
To configure the Windows Firewall to allow SNMP requests on a Windows 2012 server or Windows 2016 Server, perform the following steps:
- In the Start menu search bar, enter "firewall" to open a Windows Firewall with Advanced Security window.
- In the left pane, click Inbound Rules.
- Locate the two SNMP Service (UDP In) rules.
- If one or both of the rules is not enabled, right-click on the rule and then select Enable Rule:
Configuring Device Classes for Windows Server 2016 and Windows 10
There is a known problem with the Microsoft OID that contains the version number for the operating system. This problem prevents Skylar One from using SNMP to automatically align device classes to Windows 10 devices and Microsoft Server 2016 devices.
Because Microsoft has deprecated support of SNMP on Microsoft Server 2016 and Windows 10, users who want to use SNMP to monitor Windows 10 and Microsoft Server 2016 should use one of these workarounds:
- After discovering a Microsoft Server 2016 or Windows 10 device, manually align the device class and disable nightly auto-discovery
- Edit the registry key
Both workarounds are described in the following sections.
Manually Align the Device Class
After discovering Microsoft Server 2016 devices and Windows 10 devices, you can manually align a device class with the discovered devices. To preserve your manual changes, you must disable nightly auto-discovery for those devices. You can manually align the discovered devices with one of these device classes:
- Windows Server 2016
- Windows Server 2016 Domain Controller
- Windows 10 Workstation
For details on manually assigning a device class to a device, follow the steps in the section on Manually Changing the Device Class for a Device in the
Edit the Registry Key
You can log in to the device that you want to monitor and manually edit the Windows Registry Key "HKEY_LOCAL_MACHINE\Software\Microsoft\Windows NT\CurrentVersion". You can define the value CurrentVersion as either "2016" or "10.0". To do this:
- Click the Start menu and choose Run.
- In the Run dialog box, type regedit and then click OK.
- Navigate to HKEY_LOCAL_MACHINE\Software\Microsoft\Windows NT\CurrentVersion
- In the right pane, double click on the Default key.
- Enter the appropriate value:
- For Microsoft Server 2016, change the Value to 2016
- For Windows 10, change the Value to 10.0
Configuring SNMP for Windows Desktop Systems
This section describes how to configure devices that are running a desktop version of the Windows operating system for monitoring by Skylar One using SNMP.
Before performing the tasks described in this section, you must know the IP address of each Skylar One appliance in your network. If you have not installed a Skylar One appliance, you must know the future IP address that will be used by each Skylar One appliance.
To be monitored by Skylar One, a Windows device must be running the Windows 7 operating system or later.
TCP/IP must be installed and configured before you can install SNMP on a Windows device.
Enabling SNMP on Windows Desktop Systems
You must enable SNMP on each Windows device that you want to monitor with Skylar One.
The following instructions describe how to enable SNMP on devices running a desktop version of the Windows 10 operating system. For instructions on how to enable SNMP on earlier Windows versions, consult Microsoft's documentation.
To enable SNMP on a device running a desktop version of the Windows 10 operating system:
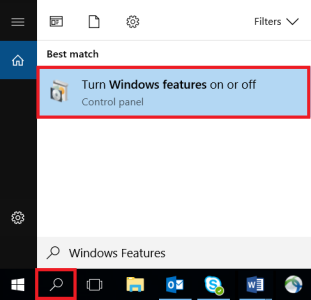
- Click the magnifying glass icon in the bottom-left corner and type "Windows Features" in the Search Windows field.
- Click Turn Windows features on or off.
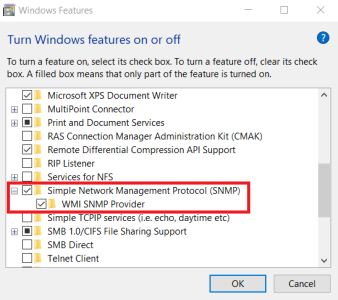
- In the Turn Features on or off window, expand the Simple Network Management Protocol (SNMP) folder and then select the WMI SNMP Provider checkbox.
- Click , and then click after the confirmation message appears.
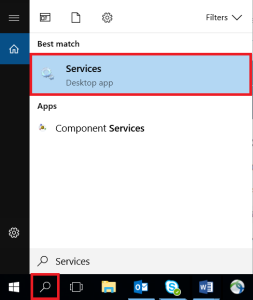
- Click the magnifying glass icon in the bottom-left corner and type "Services" in the Search Windows field.
- Click the Services Desktop app.
- From the list of services in the right pane, double-click SNMP Service.
- In the SNMP Service Properties dialog box, click the tab and enter the following:
- Startup type. Select Automatic.
- In the SNMP Service Properties dialog box, click the tab.
- In the Accepted community names pane, click [Add].
- In the SNMP Service Configuration dialog box, complete the following fields:
- Community rights. Select READ ONLY.
- Community Name. Type the SNMP Community String.
- Click the [Add] button.
- In the SNMP Service Properties dialog box, in the tab, select the Accept SNMP packets from these hosts checkbox and then click .
- In the SNMP Service Configuration dialog box, complete the following field:
- Host name, IP or IPX address. Type the IP address of your ScienceLogic Data Collector or All-In-One Appliance.
- Click [Add].
- In the SNMP Service Properties dialog box, click the tab.
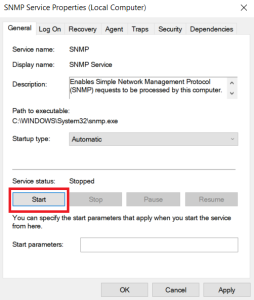
- If the service is not running, click the [Start] button in the Service status pane.
- Click [OK].
Additional Steps for Configuring SNMP for Windows 10
To configure SNMP for Windows 10 operating systems, you must also Configure Device Classes for Windows 10.
