
The following sections describe how to configure and discover Google Cloud Platform resources for monitoring by Skylar One using the "Google Cloud Platform" PowerPack:
Creating a Google Cloud Platform Service Account
To monitor Google Cloud Platform (GCP) resources with Skylar One, you must first create a GCP service account for Skylar One in the GCP Console. This service account belongs to Skylar One instead of an individual end user, and enables Skylar One to communicate with Google APIs when monitoring your GCP resources.
This service account's credentials will include a unique email address and a secret JSON key. You will include this email address and key information when you create the SOAP/XML credential that enables Skylar One to monitor your GCP resources.
To create a GCP service account:
-
Log in to the GCP Console and go to the Service accounts page. If prompted, select a project.
-
Click the button.
-
Complete the following fields on the Create service account page:
-
Service account name. Type a name for the service account.
-
Service account ID. This field auto-populates with a service account ID that is based on your Service account name.
-
Service account description. Type a description for the service account.
-
Click . Your service account is created, and the Service account permissions page displays.
-
Complete the following fields on the Service account permissions page:
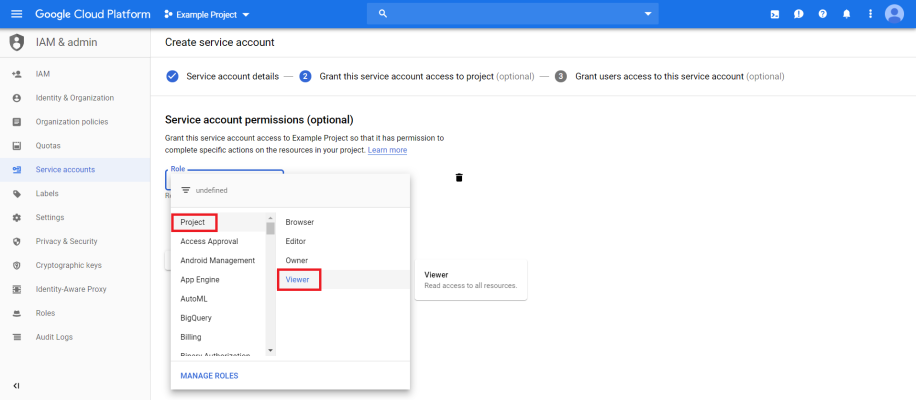
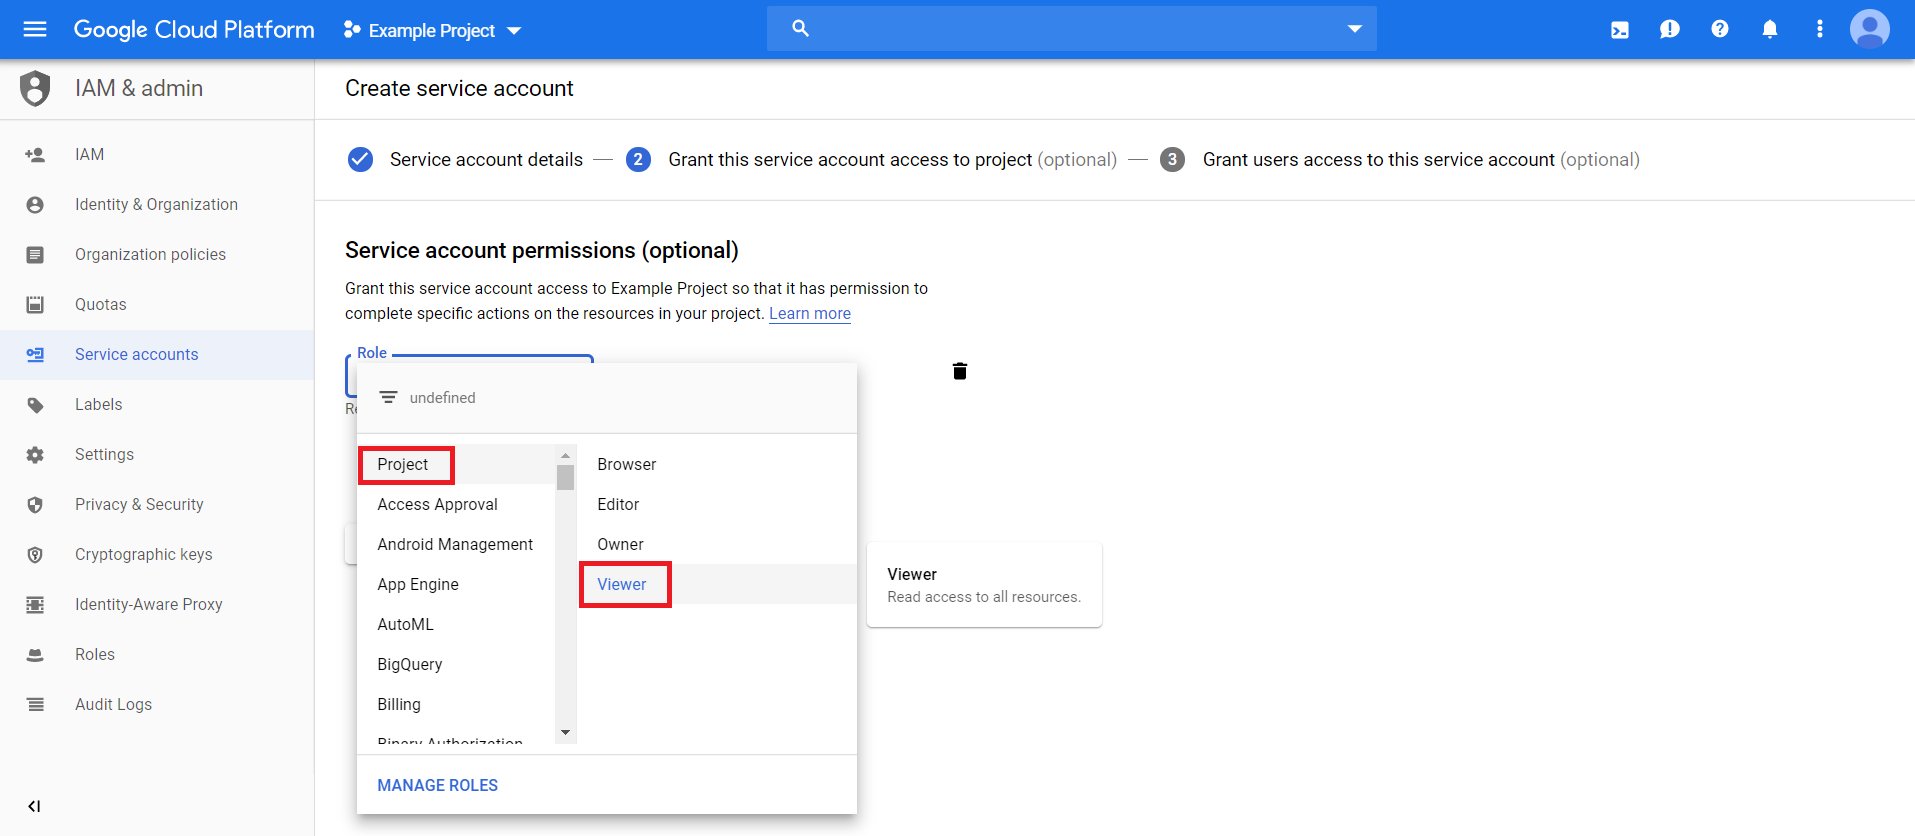
- Role. Select Project > Viewer. At a minimum, the service account must have a role of "Project" with "Viewer" permissions for the GCP service that you want to monitor.
-
Click . The Grant users access to this service account page displays.
-
Click . The Create key pane appears.
-
On the Create key pane, select the JSON radio button and then click . The private JSON key is saved to your computer.
-
Click , and then click .
-
Open the JSON file that was downloaded to your computer and copy the following information:
-
client_email
-
private_key
When you copy the private key from the JSON file, it must include the "BEGIN PRIVATE KEY" and "END PRIVATE KEY" lines, including all leading and ending dashes.
If you are discovering GCP resources at the Project level, then you can skip the following steps and continue on to the Enabling Google Cloud APIs section.
However, if you are discovering GCP resources at the Organization level, then you must also do the following:
-
In the GCP Console, go to the IAM page and select your organization.
-
Click .
-
Add your service account as a member of the organization, and then add the following mandatory roles:
- Role > Project > Viewer
- Role > Resource Manager >Folder Viewer
- Role > Resource Manager > Organization Viewer
-
When you are finished, click .
Enabling Google Cloud Platform APIs
Before Skylar One can monitor GCP, you must also enable two APIs in the GCP portal:
- Cloud Resource Manager API
- Compute Engine API
To enable these GCP APIs:
- Log in to the GCP Console for your project and go to the API & Services Dashboard page.
- Click . The API Library page appears.
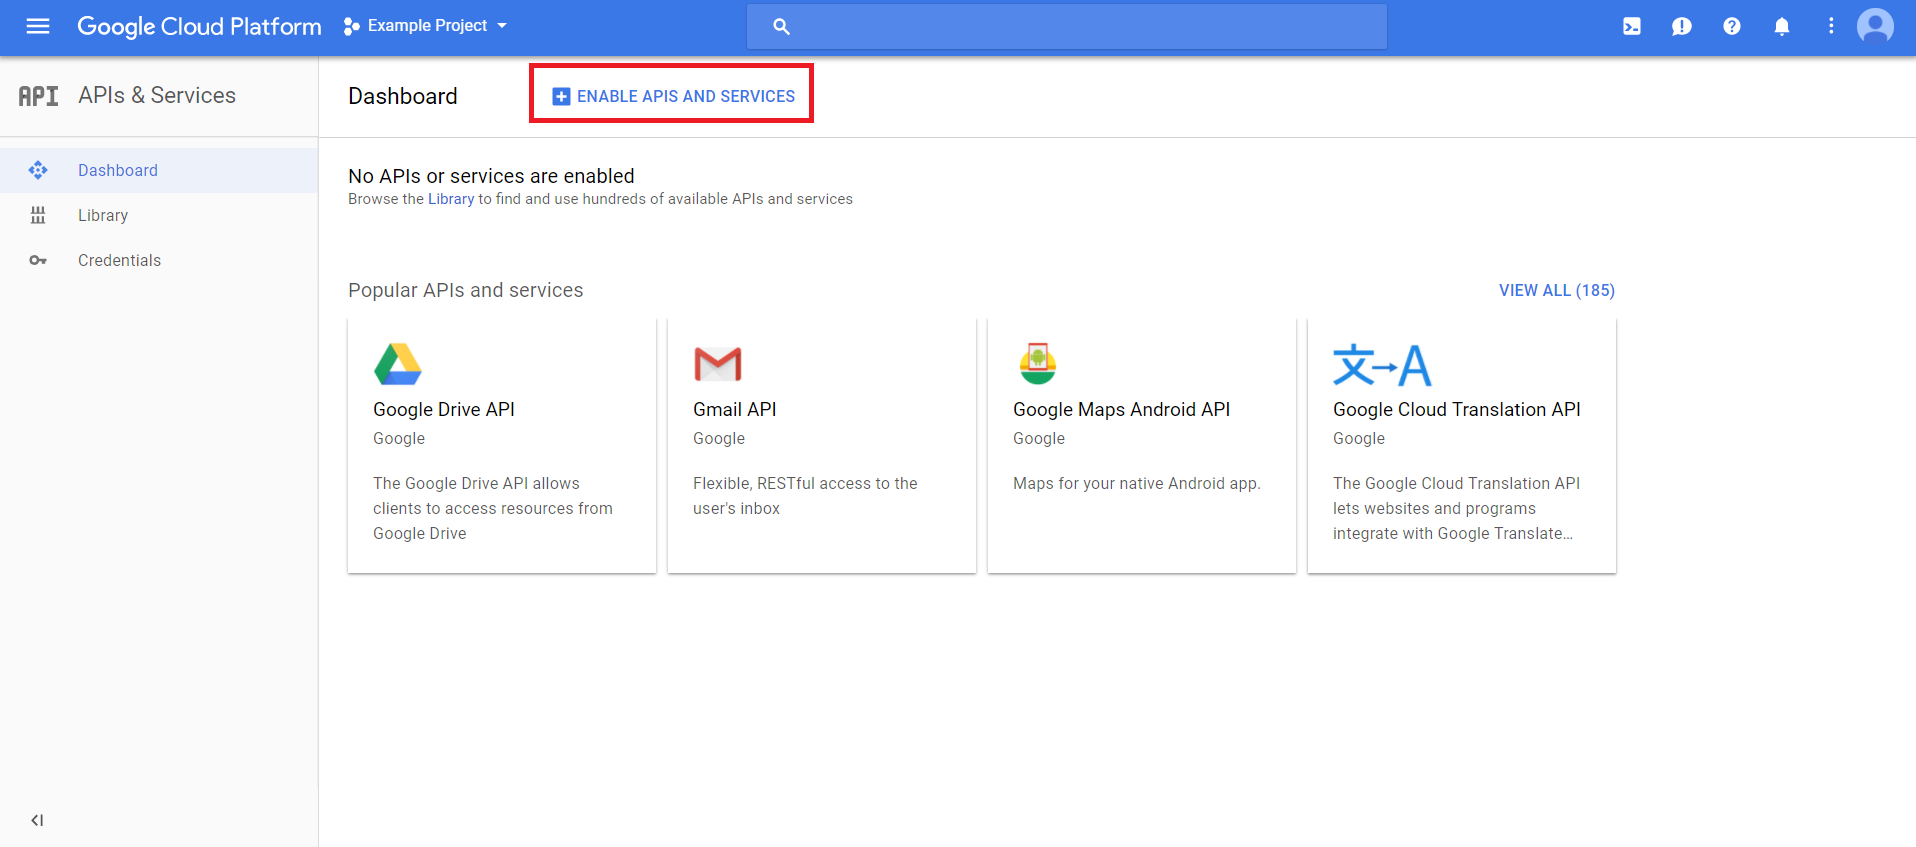
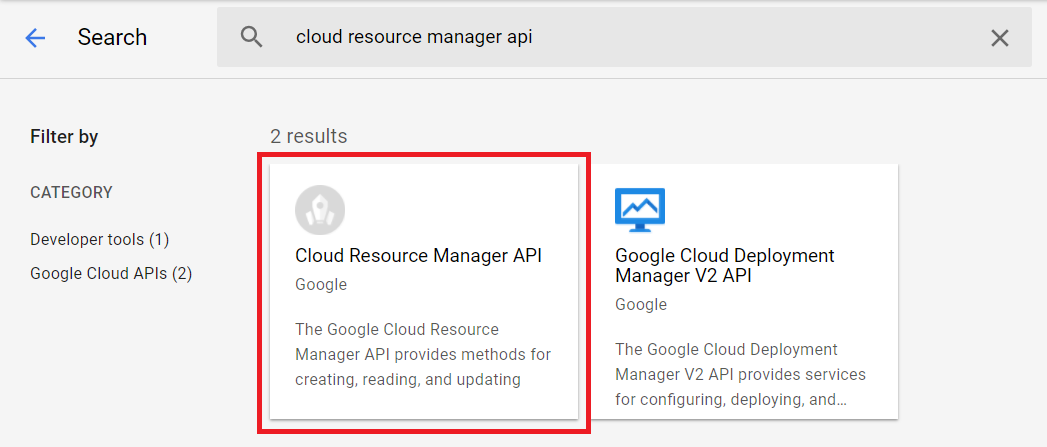
- In the search bar, type "Cloud Resource Manager API". The page will filter search results while you type.
- Click the Cloud Resource Manager API box.
- On the Cloud Resource Manager API page, click the button.
- Click on the API & Services left menu and then repeat steps 2-5 to enable the Compute Engine API.
Dynamic Applications that call Google's monitoring APIs for time-series based data (ScienceLogic performance applications) may experience delay. Google's API is subject to delay that exceed the expected data retrieval latency.
Creating a SOAP/XML Credential for Google Cloud Platform
To configure Skylar One to monitor GCP, you must create a SOAP/XML credential that allows the Dynamic Applications in the "Google Cloud Platform" PowerPack to connect with your GCP service. An example SOAP/XML credential that you can edit for your own use is included in the "Google Cloud Platform" PowerPack.
If you are using a Skylar One system prior to version 11.1.0, the new user interface does not include the Duplicate option for sample credential(s). ScienceLogic recommends that you use the classic user interface and the Save As button to create new credentials from sample credentials. This will prevent you from overwriting the sample credential(s).
To define a SOAP/XML credential:
- Go to the Credentials page (Manage > Credentials).
- Locate the GCP: v108 SOAP Credential Example sample credential, click its icon (
 ) and select Duplicate. A copy of the credential, called GCP: v108 SOAP Credential Example copy appears.
 - Click the icon () for the GCP: v108 SOAP Credential Example copy credential and select Edit. The Edit Credential modal page appears.
- Supply values in the following fields:
- Name. Type a new name for your Google Cloud credential.
SOAP Options
- Embedded Password [%P]. Paste the "private_key" value from the private key JSON file.
- Embed Value [%1]. Enter "GCPAuthToken".
- Embed Value [%2]. Type the "client_email" value from the private key JSON file. For example: myprojectid@myaccount.iam.gserviceaccount.com.
When you copy the "private_key" from the JSON file, it must include the "BEGIN PRIVATE KEY" and "END PRIVATE KEY" lines, including all leading and ending dashes.
- Remove all headers in the HTTP Headers field.
- For all remaining fields, use the default values.
- Click .
This step applies only when you are updating an existing credential, and it can only be done in the classic Skylar One user interface. To remove headers, go to the Credentials page (System > Manage > Credentials) in the classic Skylar One user interface, open the Credential Editor for the credential you want to modify, and delete the headers in the HTTP Headers section of the Credential Editor.
The SOAP/XML credential tester is not supported by the "Google Cloud Platform" PowerPack.
Creating a SOAP/XML Credential in the Classic Skylar One User Interface
To configure Skylar One to monitor GCP in the classic user interface, you must create a SOAP/XML credential that allows the Dynamic Applications in the "Google Cloud Platform" PowerPack to connect with your GCP service. An example SOAP/XML credential that you can edit for your own use is included in the "Google Cloud Platform" PowerPack.
To create a SOAP/XML credential to access GCP in the classic user interface:
-
Go to the Credential Management page (System > Manage > Credentials).
-
Locate the GCP: SOAP Credential Example and then click its wrench icon (
 ). The Edit SOAP/XML Credential modal page appears.
 -
Complete the following fields:
Basic Settings
- Profile Name. Type a new name for the credential.
SOAP Options
- Embedded Password [%P]. Paste the "private_key" value from the private key JSON file.
- Embed Value [%1]. Enter "GCPAuthToken".
- Embed Value [%2]. Type the "client_email" value from the private key JSON file. For example: myprojectid@myaccount.iam.gserviceaccount.com.
When you copy the "private_key" from the JSON file, it must include the "BEGIN PRIVATE KEY" and "END PRIVATE KEY" lines, including all leading and ending dashes.
-
For all remaining fields, use the default values.
-
Click the button, and then click .
Creating an OAuth2 Credential for Google Cloud Platform
To configure Skylar One to monitor GCP, you must also create an OAuth credential that allows the Dynamic Applications in the "Google Cloud Platform" PowerPack to connect with your GCP service. An example OAuth credential that you can edit for your own use is included in the "Google Cloud Platform" PowerPack.
NOTE: If you are using a Skylar One system prior to version 11.1.0, the new user interface does not include the Duplicate option for sample credential(s). ScienceLogic recommends that you use the classic user interface and the Save As button to create new credentials from sample credentials. This will prevent you from overwriting the sample credential(s).
To define an OAuth2 credential:
- Go to the Credentials page (Manage > Credentials).
- Locate the GCP: OAuth2 Credential Example sample credential, click its icon () and select Duplicate. A copy of the credential, called GCP: OAuth2 Credential Example copy appears.
- Click the icon () for the GCP: OAuth2 Credential Example copy credential and select Edit. The Edit Credential modal page appears.
- Supply values in the following fields:
- Name. Type a new name for your Google Cloud credential.
- Client ID. Enter your application's Client ID.
- Client Secret. Enter the password for your application.
- For all remaining fields, use the default values.
- Click .
Discovering Google Cloud Platform Devices
On the Devices page ( ) or the Discovery Sessions page (Devices > Discovery Sessions), you can add or "discover" new devices for monitoring in Skylar One. You add devices by creating a discovery session, which searches for devices on the network you specify.
The guided discovery process lets you select a discovery type specific to the type of devices you want to monitor. The guided discovery wizard provides a filtered list of relevant credentials, the ability to create new credentials, and a reduced set of application-specific fields to help you efficiently discover the devices you need.
To run a guided discovery:
-
On the Devices page (
) or the Discovery Sessions page (Devices > Discovery Sessions), click the button. The Select page appears.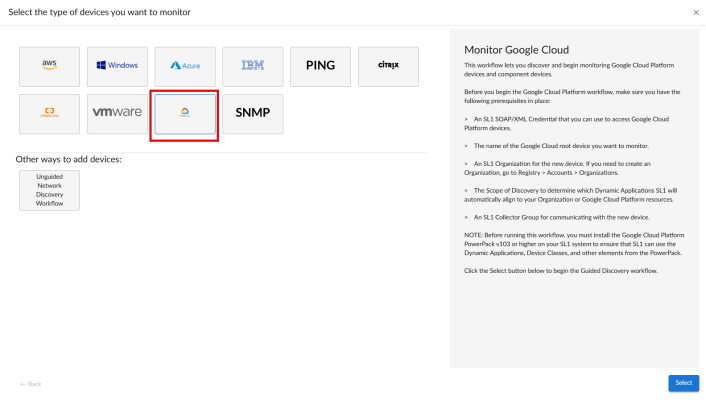
-
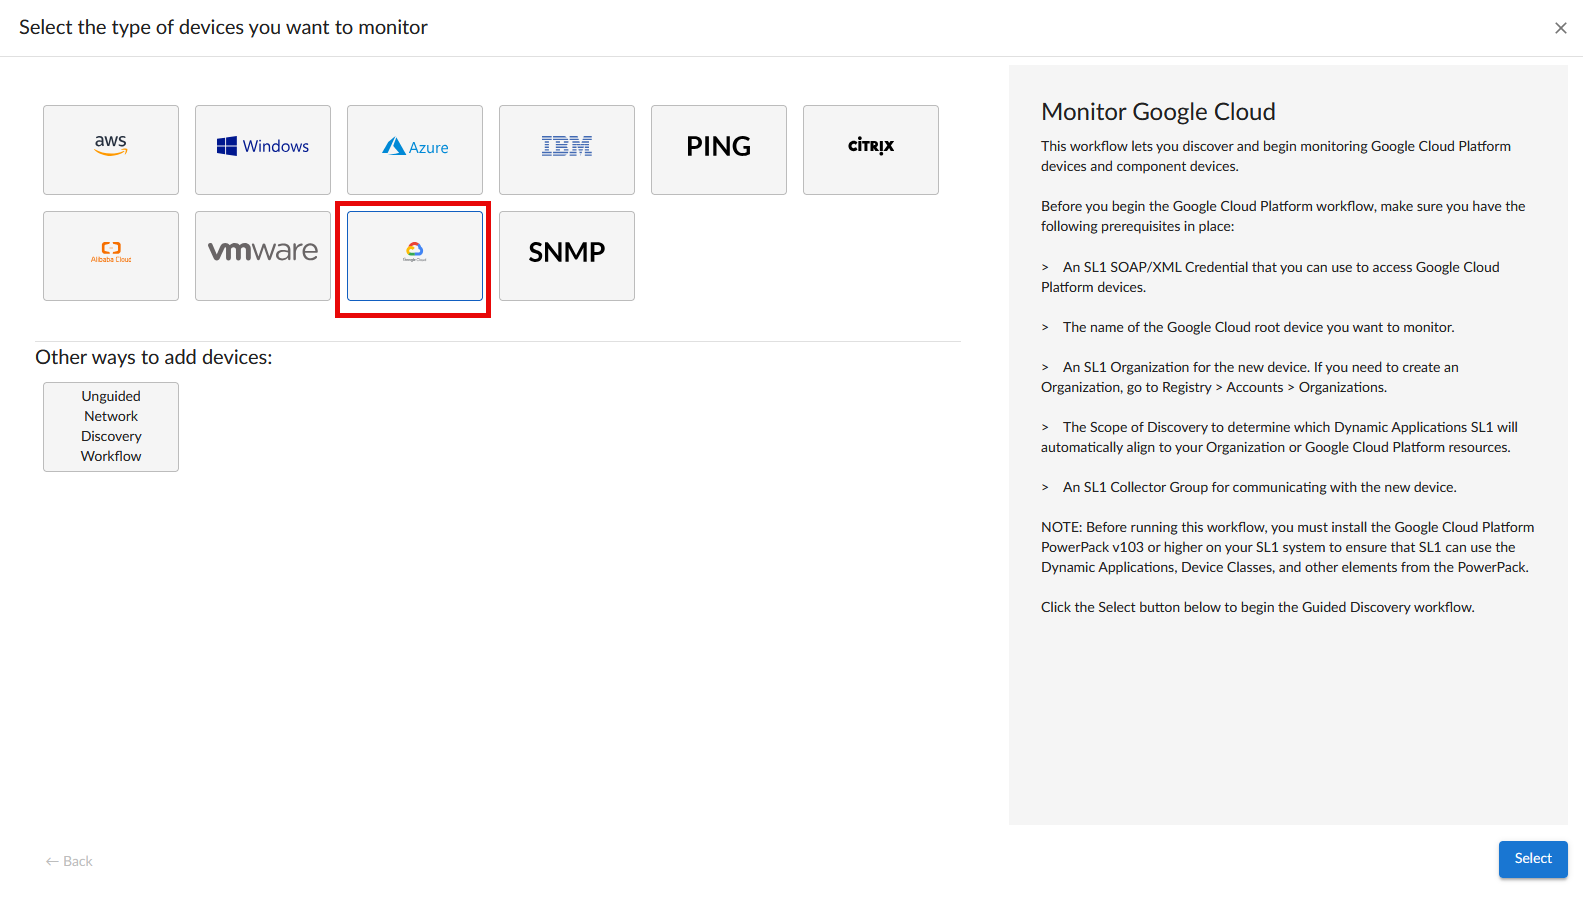
Click the button. Additional information regarding the requirements for device discovery appears in the pane on the right.
-
Click . The Credential Selection page appears.
During the guided discovery process, you cannot click until the required fields are completed on the page, nor can you skip to future steps. However, you can revisit previous steps that you have already completed.
- On the Credential Selection page of the guided discovery process, select the credential that you configured, and then click . The Root Device Details page appears.
- Complete the following fields:
- Root Device Name.Type the name of the cluster you want to monitor. Ensure you provide a unique cluster name to help identify the specific cluster being monitored, especially if you have multiple clusters. ScienceLogic does not recommend that you use the default GoogleCloudRootDevice name provided by the guided discovery.
- Select the organization to add discovered devices to. Select the name of the organization to which you want to add the discovered device.
- Collector Group Name. Type the collector group name. Select an existing collector group to communicate with the discovered device.
- Click . Skylar One creates the Google Cloud root device with the appropriate Device Class assigned to it and aligns the relevant Dynamic Applications. The Final Summary page appears.
- Click .
The results of a guided discovery do not display on the Discovery Sessions page (Devices > Discovery Sessions).
Discovering Google Cloud Platform Devices in the Classic Skylar One User Interface
You will first need to create a virtual device and align the appropriate Dynamic Application to that virtual device to discover GCP devices in classic Skylar One.
To create and run a discovery session that will discover your GCP system in the classic user interface, perform the following steps:
-
Go to the Discovery Control Panel page (System > Manage > Classic Discovery or System > Manage > Discovery in the classic user interface).
-
Click the button to create a new discovery session. The Discovery Session Editor window appears.
-
Enter values in the following fields:
- IP Address Discovery List. Type the IP addresses for the Google Cloud Platform systems you want to discover.
- SNMP Credentials. Select SNMP Public V2 if applicable.
- Other Credentials. Select the credential that you configured in the previous section.
- Discover Non-SNMP. If you are not using an SNMP credential, ensure that this checkbox is selected.
- Organization. Select your organization.
-
You can enter values in the other fields on this page, but are not required to and can simply accept the default values. For more information about the other fields on this page, see Discovering Devices.
-
Click the button and then close the Discovery Session Editor window.
-
The discovery session you created will appear at the top of the Discovery Control Panel page. Click its lightning-bolt icon (
 ) to run the discovery session.
 -
The Discovery Session window will be displayed.
-
When the GCP system is discovered, click its device icon (
 ) to view the Device Properties page for the GCP system.
 -
After the GCP system is discovered, the child components and devices associated with that system will also appear in the Device Manager page.
Creating a Google Cloud Platform Virtual Device
Because the GCP service does not have a static IP address, you cannot discover GCP devices using a regular discovery session. Instead, you must create a virtual device that represents the GCP service. A virtual device is a user-defined container that represents a device or service that cannot be discovered by Skylar One. You can use the virtual device to store information gathered by policies or Dynamic Applications.
To create a virtual device that represents your GCP service:
- Go to the Device Manager page (Devices > Classic Devices, or Registry > Devices > Device Manager in the classic user interface).
- Click the actions icon and select Create Virtual Device from the menu. The Virtual Device modal page appears.
- Complete the following fields:
- Device Name. Type a name for the device.
- Organization. Select the organization for this device. The organization you associate with the device limits the users that will be able to view and edit the device. Typically, only members of the organization will be able to view and edit the device.
- Device Class. Select GCP | Service.
- Collector. Select the collector group that will monitor the device.
- Click to create the virtual device.
Aligning the Google Cloud Platform Dynamic Applications
The Dynamic Applications in the "Google Cloud Platform" PowerPack are divided into the following types:
- Discovery. These Dynamic Applications poll GCP for new instances of services or changes to existing instances of services.
- Configuration. These Dynamic Applications retrieve configuration information about each service instance and retrieve any changes to that configuration information.
- Performance. These Dynamic Applications poll GCP for performance metrics.
When configuring Skylar One to monitor GCP services, you must manually align Dynamic Applications to discover GCP component devices.
Discovering Google Cloud Platform Component Devices
To discover all the components of your GCP service, you must manually align two Dynamic Applications with the GCP virtual device. The specific Dynamic Applications that you must align to the virtual device vary based on whether you are discovering GCP resources from the Organization level or the Project level:
- If you are discovering an Organization, align the "GCP: Organization Discovery" Dynamic Application.
- If you are discovering GCP resources from the Project level, align the "GCP: Project Discovery" Dynamic Application.
The "GCP: Token" Dynamic Application is no longer required, as the token is generated automatically when needed.
To manually align the Discovery Dynamic Application:
- Go to the Device Manager page (Devices > Classic Devices, or Registry > Devices > Device Manager in the classic user interface).
- Click the wrench icon () for your GCP virtual device.
- In the Device Administration panel, click the tab. The Dynamic Application Collections page appears.
- Click the button and select Add Dynamic Application from the menu.
- In the Dynamic Application Alignment modal:
- In the Dynamic Applications field, select either "GCP: Organization Discovery" or "GCP: Project Discovery", depending on your configuration.
- In the Credentials field, select the credential you created for your GCP service.
- Click to align the Dynamic Application with the GCP virtual device.
When you align the Dynamic Applications with the virtual device representing your GCP service, Skylar One creates a component device representing your GCP Organization or Project.
Skylar One then automatically aligns several other Dynamic Applications to that component device. These Dynamic Applications discover and create additional component devices representing your GCP resources.
Skylar One might take several minutes to align these Dynamic Applications and create the component devices in your GCP service.
Viewing Google Cloud Platform Component Devices
In addition to the Device Manager page (Devices > Classic Devices, or Registry > Devices > Device Manager in the classic user interface), you can view the GCP service and all associated component devices in the following places in the user interface:
- The Device View modal page (click the bar-graph icon [
 ] for a device, then click the Topology tab) displays a map of a particular device and all of the devices with which it has parent-child relationships. Double-clicking any of the devices listed reloads the page to make the selected device the primary device.
 - The Device Components page (Devices > Device Components) displays a list of all root devices and component devices discovered by Skylar One in an indented view, so you can easily view the hierarchy and relationships between child devices, parent devices, and root devices. To view the component devices associated with the GCP service, find the GCP virtual device and click its plus icon (+).
- The Component Map page (Classic Maps > Device Maps > Components) allows you to view devices by root node and view the relationships between root nodes, parent components, and child components in a map. This makes it easy to visualize and manage root nodes and their components. Skylar One automatically updates the Component Map as new component devices are discovered. The platform also updates each map with the latest status and event information. To view the map for the GCP service, go to the Component Map page and select the map from the list in the left NavBar. To learn more about the Component Map page,
Relationships Between Component Devices
In addition to parent/child relationships between component devices, Skylar One also creates relationships between the following component devices:
- Compute Instances and Storage Persistent Disks
- Compute Instances and Subnets
- Compute Instances and VPC Networks
- Load Balancing Global HTTPS and Backend Buckets
- Load Balancing Global HTTPS and Backend Services
- Load Balancing Global HTTPS and Default Backend Services
- Load Balancing Global SSL Proxy and Backend Services
- Load Balancing Global TCP Proxy and Backend Services
- Load Balancing Regional Network TCP/UDP and Compute Instances
- VPC Subnets and VPC Networks
If an instance is configured in GCP to automatically delete any associated read-write persistent disks when the instance is deleted, then that behavior will also occur in Skylar One: If the instance is deleted, its related persistent disks will also be deleted. This behavior is controlled in GCP on the VM Instances page by the Delete boot disk when instance is deleted checkbox for boot disks and the When deleting instance field for additional disks.
Additionally, Skylar One can also build relationships between GCP VM Instances and Kubernetes Nodes, for users who also have the "Kubernetes" PowerPack installed.