
This section describes how to configure and discover Oracle Solaris devices for monitoring by Skylar One using the "Oracle: Solaris Monitoring" PowerPack.
Supported Operating Systems
The "Oracle: Solaris Monitoring" PowerPack supports Solaris version 11 (SunOS 5.11). Older Solaris versions work if they support the commands in this section.
Prerequisites
To configure your Skylar One system to monitor Oracle Solaris devices using the "Oracle: Solaris Monitoring" PowerPack, you must have the following:
- The IP addresses/hostnames of the devices you want to monitor.
- A service account with the appropriate privileges:
- Username and password, OR
- Username and SSH private keys
- Port 22 (the default SSH port) open from the Skylar One Data Collector to the end device. You can use a custom port if you specify it in the credential.
Versions 100 and 101 of the "Oracle: Solaris Monitoring" PowerPack had "Community" support status, while versions 102 and later have "General Availability" support status. Upgrading to version 102 or later does not upgrade the "Community" versions of the PowerPack.
Configuring Oracle Solaris Devices to Collect Data
The following tables list the collection objects included in Oracle Solaris Dynamic Applications and the Solaris command that each collection object uses. You can use these commands to grant or restrict access to specific data types for the Solaris user account that you use to monitor your devices.
| Dynamic Application | Collection Object(s) | Solaris Command(s) Used |
| Oracle: Solaris Configuration Discovery | System OS Name | uname -a |
| Memory size (MB) | sudo /usr/sbin/prtconf | head -3 | grep "Memory"
|
|
| System Capability (bit) | isainfo -b | |
| OS Level | uname -r | |
| OS Version | uname -r | sed 's/\./ /g' | awk '{ if (NF>=2)print "SunOS "$1"."$2; else print "SunOS "$1}'
|
|
| Oracle: Solaris CPU Utilization | Logical CPU Utilization % | sar -u 1 3 |
| Oracle: Solaris ICDA Cache | Filesystem | df -k |
| Processes | ps -elf -o pid,s,osz,user,time,args | |
| Services | svcs -aHo state,fmri | |
| Uptime | uptime | |
| Oracle: Solaris Memory Stats | Memory Size | sudo /usr/sbin/prtconf | head -3 | grep "Memory" |
| Free Physical Memory | vmstat 1 1 | |
| Available Paging Memory | sudo /usr/sbin/swap -s | |
| Used Paging Memory | sudo /usr/sbin/swap -s | |
| Oracle: Solaris System Configuration | Application Architecture | uname -p |
| Domain | domainname | |
| Hardware Provider | showrev | |
| Host ID | hostid | |
| Host Name | hostname | |
| Kernel Architecture | uname -m | |
| CPU Model | kstat -m cpu_info | |
| CPU Name | kstat -m cpu_info | |
| CPU type | kstat -m cpu_info | |
| Number of Virtual Processors | kstat -m cpu_info | |
| Number of Cores | kstat -m cpu_info | |
| Processor Speed (MHz) | kstat -m cpu_info | |
| Total Physical Processors | kstat -m cpu_info | |
| Kernel Version | uname -a | |
| Machine | uname -a | |
| Release | uname -a | |
| Oracle: Solaris Uptime & Load Average | CPU Core Count | uname -X |
| Load average 1 min | uptime | |
| Load average 5 min | ||
| Load average 15 min | ||
| Total Uptime Minutes |
You can run all Solaris commands in this table with a standard Solaris user account, except the swap -s and prtconf commands. To run these two commands, grant passwordless sudo permissions to the account. For example, add this line to the /etc/sudoers file: username ALL=(ALL)NOPASSWD: <command>.
The showrev command works only for version 10 of Solaris.
The following table lists internal collection Dynamic Applications (ICDA) in the PowerPack. The "Oracle: Solaris ICDA Cache" Dynamic Application acts as a cache producer for these Dynamic Applications:
| Dynamic Application | Metrics | Solaris Command(s) Used |
| Oracle: Solaris IC Detail | System Uptime | uptime |
| Oracle: Solaris IC Filesystem Inventory | Filesystem | df -k |
| Oracle: Solaris IC Filesystem Performance | ||
| Oracle: Solaris IC Process Inventory | Processes | ps -elf -o pid,s,osz,user,time,args |
| Oracle: Solaris IC Process Performance | ||
| Oracle: Solaris IC Service Inventory | Service State | svcs -aHo state,fmri |
| Oracle: Solaris IC Service Performance |
The following Dynamic Application is disabled by default and is not included in the "Oracle: Solaris Dynamic Applications Template" device template. To use it, add it manually to your devices or to the device template:
| Dynamic Application | Metrics | Solaris Command(s) Used |
| Oracle: Solaris Filesystem | Filesystem | df -k |
The "Oracle: Solaris IC Filesystem Inventory" and "Oracle: Solaris IC Filesystem Performance" Dynamic Applications collect data for use in the standard internal file system collections. To define additional alerts or collection objects, use the "Oracle: Solaris Filesystem" Dynamic Application.
The "Oracle: Solaris IC Service Inventory" and "Oracle: Solaris IC Service Performance" Dynamic Applications report each Service Management Facility (SMF) service as running or not running, based on its SMF state:
- Running. online, legacy_run, and degraded.
- Not running. offline, disabled, maintenance, uninitialized, and incomplete.
You can use Skylar One service monitoring policies to generate events from the collected service state data.
Creating an SSH/Key Credential for Oracle Solaris
To configure Skylar One to monitor Oracle Solaris devices using SSH, you must first create an SSH/Key credential. This credential allows the Dynamic Applications in the "Oracle: Solaris Monitoring" PowerPack to connect to an Oracle Solaris device.
To create an SSH/Key credential:
- Go to the Credentials page (Manage > Credentials).
- Locate the "Solaris Example Credential" and click it. The Edit Credential modal appears:
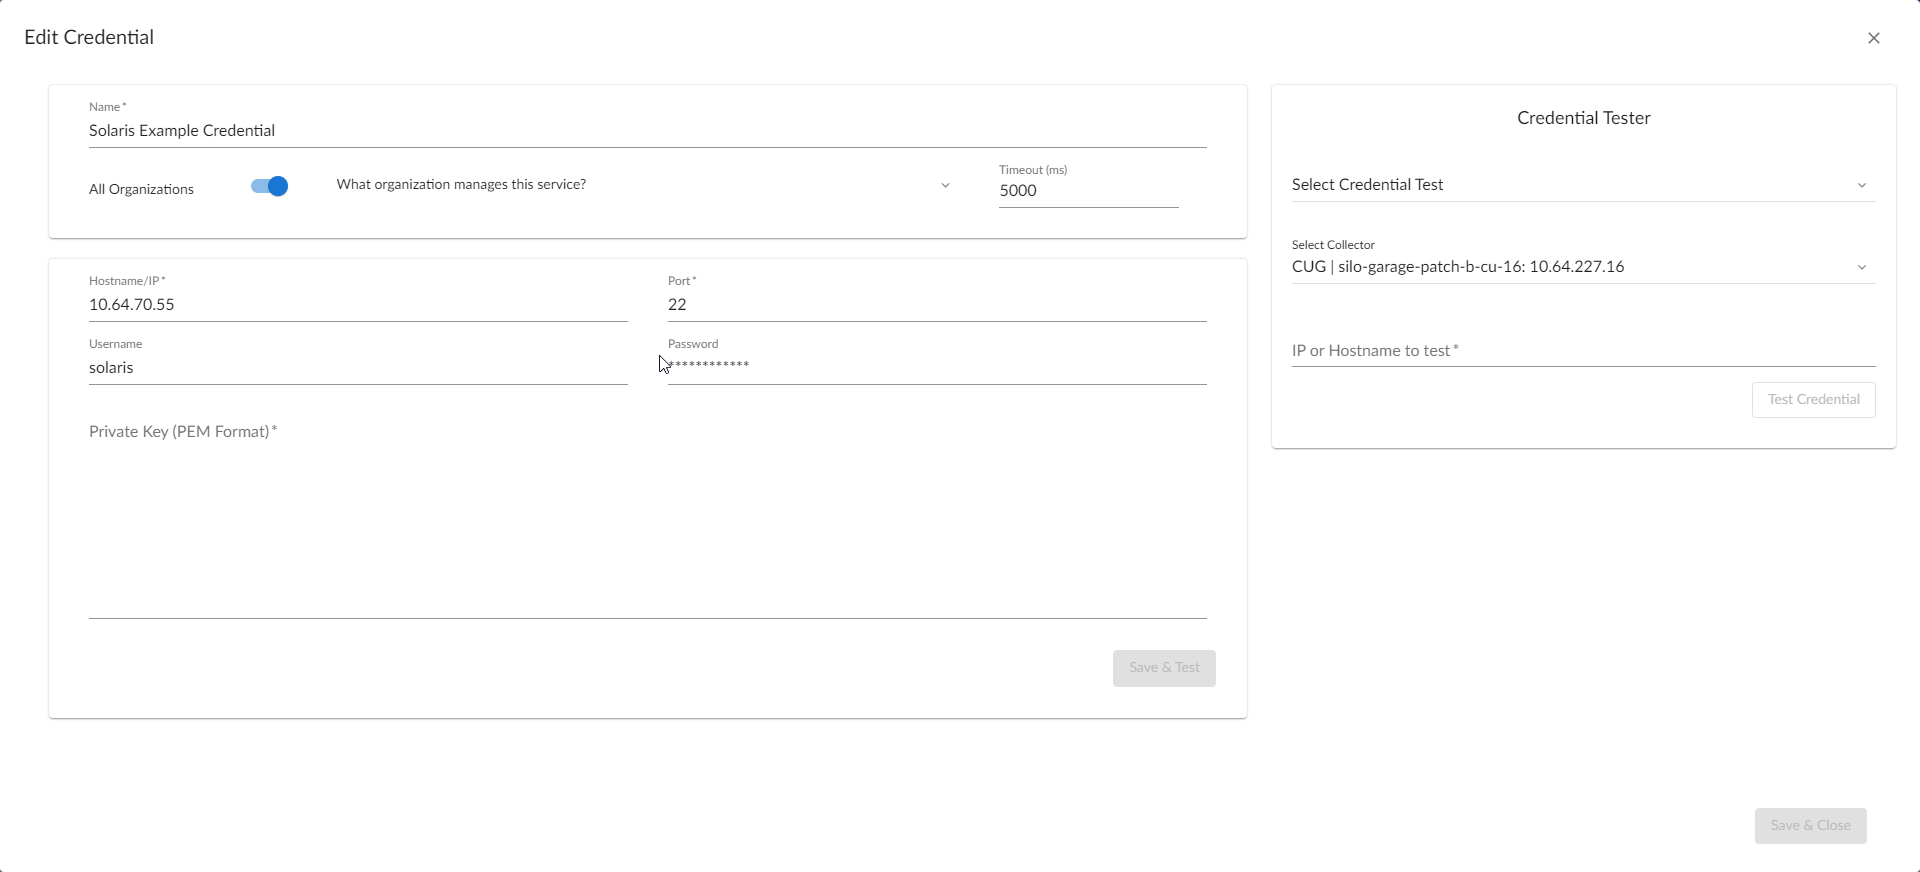
- Supply values in the following fields:
- Name. Type a new name for the credential. The name can be any combination of alphanumeric characters, up to 64 characters. This field is required.
- All Organizations. Toggle on (blue) to align the credential with all organizations. To align it with specific organizations instead, toggle off (gray), and then select one or more specific organizations from the Select the organizations the credential belongs to drop-down field. This field is required.
- Timeout (ms). Time, in milliseconds, after which Skylar One stops trying to communicate with the device from which you want to retrieve data.
- Hostname/IP. Type the hostname or IP address of the Oracle Solaris device you want to monitor. Alternatively, you can use the following variables:
- You can include the variable %D in this field. Skylar One replaces the variable with the IP address of the device that is currently using the credential.
- You can include the variable %N in this field. Skylar One replaces the variable with the hostname of the device that is currently using the credential. If Skylar One cannot determine the hostname, Skylar One replaces the variable with the primary management IP address for the current device.
- Port. Type the port number associated with the data you want to retrieve. This field is required.
The default TCP port for SSH servers is 22.
- Username. Username for an SSH or user account on the device to be monitored.
- Password. Password for an SSH user account on the device to be monitored.
- Private Key. Type or paste the SSH private key that you want Skylar One to use, in PEM format.
The private key must include the lines "BEGIN RSA PRIVATE KEY" and "END RSA PRIVATE KEY", as well as all preceding and following dashes on those lines.
The Private Key field is required only in the default Skylar One user interface (AP2). The Private Key field is not required if you are using the classic Skylar One user interface to define a credential.
The private key can have a maximum of 64 characters per line. Therefore, you cannot use keys in the OpenSSH format, because that format uses 70 characters per line. When you attempt to save the credential, Skylar One validates that the private key entered is in the correct format. You can save the credential only if the private key is correctly formatted.
- Click .
Creating an SSH/Key Credential for Oracle Solaris in the Classic Skylar One User Interface
To configure Skylar One to monitor Oracle Solaris devices using SSH, you must first create an SSH/Key credential. This credential allows the Dynamic Applications in the "Oracle: Solaris Monitoring" PowerPack to connect to an Oracle Solaris device.
To define an SSH/Key credential in the classic Skylar One user interface:
- Go to the Credential Management page (System > Manage > Credentials).
- On the Credential Management page, locate the "Solaris Example Credential" and click its wrench icon (
 ). The Credential Editor modal appears.
 - In the Credential Editor modal, supply values in the following fields:
- Credential Name. Type a new name for the credential.
- Hostname/IP. Type the hostname or IP address of the Oracle Solaris device you want to monitor. Alternatively, you can use the following variables:
- You can include the variable %D in this field. Skylar One replaces the variable with the IP address of the device that is currently using the credential.
- You can include the variable %N in this field. Skylar One replaces the variable with the hostname of the device that is currently using the credential. If Skylar One cannot determine the hostname, Skylar One replaces the variable with the primary management IP address for the current device.
- Port. Type the port number associated with the data you want to retrieve. This field is required.
The default TCP port for SSH servers is 22.
- Timeout (ms). Time, in milliseconds, after which Skylar One stops trying to communicate with the authenticating server.
- Username. Username for an SSH or user account on the device to be monitored.
- Password. Password for an SSH user account on the device to be monitored. (This field is optional if you are using a PEM key.)
- Private Key (PEM Format). Type or paste the SSH private key that you want Skylar One to use, in PEM format.
The private key must include the lines "BEGIN RSA PRIVATE KEY" and "END RSA PRIVATE KEY", as well as all preceding and following dashes on those lines.
The private key can have a maximum of 64 characters per line. Therefore, you cannot use keys in the OpenSSH format, because that format uses 70 characters per line. When you attempt to save the credential, Skylar One validates that the private key entered is in the correct format. You can save the credential only if the private key is correctly formatted.
The PowerPack has been tested with the following ciphers (host key algorithms): ssh-ed25519, ecdsa-sha2-nistp521, ecdsa-sha2-nistp384, ecdsa-sha2-nistp256, rsa-sha2-512, rsa-sha2-256. SSH-RSA and SSH-DSS are not supported.
- Click to save the new SSH/Key credential.
Configuring the Oracle Solaris Device Template
You can use a device template to save a device configuration and apply it to multiple devices. The Dynamic Applications in the "Oracle: Solaris Monitoring" PowerPack do not align automatically. To align them, configure the "Oracle: Solaris Dynamic Applications Template" device template and apply it when you discover your Oracle Solaris device.
To configure the Oracle Solaris device template:
- Go to the Configuration Templates page (Devices > Templates, or Registry > Devices > Templates in the classic user interface).
- Locate the "Oracle: Solaris Dynamic Applications Template" and click its wrench icon (). The Device Template Editor page appears.
- Click the tab. The Editing Dynamic Application Subtemplates page appears.
- Complete the following fields:
- Template Name. Type a new name for the device template.
- Credentials. Select the SSH/Key credential that you created for Oracle Solaris.
- Click the next Dynamic Application listed in the Subtemplate Selection section on the left side of the page, and then select the Oracle Solaris SSH/Key credential in the Credentials field.
- Repeat step 5 until you have selected the Oracle Solaris SSH/Key credential in the Credentials field for all of the Dynamic Applications listed in the Subtemplate Selection section.
- Click .
Do not click the button. If you click , you overwrite the "Oracle: Solaris Dynamic Applications Template," which you might need for future use.
Preventing Oracle Solaris Devices from Dynamically Aligning Unwanted Dynamic Applications
The Dynamic Applications in this PowerPack do not get automatically aligned during discovery. To prevent other Dynamic Applications from aligning to your Oracle Solaris device and increasing scale on your Skylar One system, you can disable the Dynamic Discovery setting on the device.
To disable the Dynamic Discovery setting on the Device Investigator page:
- Go to the Devices page (
 ), and then locate your Oracle Solaris device and click it. The Device Investigator page appears.
 - On the Device Investigator page, click the tab.
- Locate the Dynamic Discovery checkbox and clear it.
- Click .
To disable the Dynamic Discovery setting from the device template:
- Go to the Configuration Templates page (Devices > Templates, or Registry > Devices > Templates in the classic user interface), and then locate the "Oracle: Solaris Dynamic Applications Template" and click its wrench icon (). The Device Template Editor page appears.
- In the Device Preferences pane of the tab, click on Dynamic Discovery to make the option editable and then clear the Dynamic Discovery checkbox.
- Click .
Discovering Oracle Solaris Devices
To discover Oracle Solaris devices:
- On the Devices page () or the Discovery Sessions page (Devices > Discovery Sessions), click the button. The Select page appears.
- Click the button. Additional information about the requirements for discovery appears in the General Information pane to the right.
- Click . The Basic Information page appears.
- Complete the following fields:
- Name. Type a unique name for this discovery session. This name appears in the list of discovery sessions on the tab.
- Description. Optional. Type a short description of the discovery session. You can use the text in this description to search for the discovery session on the tab.
- Select the organization to add discovered devices to. Select the name of the organization to which you want to add the discovered devices.
- Click . The Credential Selection page of the Add Devices wizard appears.
- Locate and select the SSH/Key credential you created.
- Click . The Discovery Session Details page of the Add Devices wizard appears.
- Complete the following fields:
- List of IPs/Hostnames. Type the IP addresses for the Solaris devices you want to monitor, separated by commas.
- Which collector will monitor these devices? Select an existing collector to monitor the discovered devices. This field is required.
- Run after save. Select this option to run this discovery session as soon as you click .
- In the Advanced options section, click the down-arrow icon (
 ), and then complete the following fields:
- Discover Non-SNMP. Enable this setting.
- Model Devices. Enable this setting.
- Apply Device Template. Select the device template that you created for Solaris.
- Click to save the discovery session. The new discovery session appears on the Discovery Sessions page. If you selected Run after save, the discovery session runs and the Discovery Logs page appears. If the session adds a device, the Discovery Logs page includes a link to the Device Investigator page for that device.
Discovering Oracle Solaris Devices in the Classic Skylar One User Interface
To discover Oracle Solaris devices in the classic Skylar One user interface:
- Go to the Discovery Control Panel page (System > Manage > Classic Discovery or System > Manage > Discovery in the classic user interface).
- Click the button to create a new discovery session. The Discovery Session Editor modal appears.
- Enter values in the following fields:
- IP Address Discovery List. Type the IP addresses for the Solaris devices you want to monitor, separated by a comma.
- Other Credentials. Select the SSH/Key credential that you created for Solaris.
- Discover Non-SNMP. Select this checkbox.
- Model Devices. Select this checkbox.
- Apply Device Template. Select the device template that you created for Solaris.
- Optionally, you can enter values in the other fields on this page. For more information, see the section on Running a Classic Discovery Session.
- Click the button and then close the Discovery Session Editor modal. The discovery session you created appears at the top of the Discovery Control Panel page.
- To run the discovery session, click its lightning-bolt icon (
 ). The Discovery Session window appears.
 - When Skylar One discovers the Solaris device, click its device icon (
 ) to view the Device Properties page for the device.