
This
Creating an API Token in Proxmox
To authenticate with the Proxmox API, you must create a Service User and an API token with the appropriate permissions in the Proxmox user interface.
Creating a Service User
Before you can create an API token, you must first create a Service User in the Proxmox user interface. To create a service user in Proxmox:
-
On the Users page (Datacenter > Permissions > Users), click the button. The Add: User modal appears.
-
Complete all required fields, including the following:
-
User name. Enter skylarone-monitor or a similar value.
-
Realm. Select Linux PAM Standard authentication.
-
-
Click the button.
Creating the API Token
To create an API token in Proxmox:
-
On the API Tokens page (Datacenter > Permissions > API Tokens), click the button. The Add: Token modal appears.
-
Complete all required fields, including the following:
-
User . Select the user you created previously.
-
Token ID. Enter a value by which to identify your token.
-
Privilege Separation. Clear the checkbox.
-
Expire. Leave the default value.
-
-
Click the button. The Token Secret modal appears.
-
Record the Token ID and Secret values. The Secret value will only display once.
Assigning Permissions to the API Token
To assign permissions to the API token:
-
On the API Tokens page (Datacenter > Permissions), click the button and select API Token Permission. The Add: API Token Permission modal appears.
-
Complete the following fields:
-
Path. Select /.
-
API Token. Select the API token you created previously.
-
Role. Select PVEAuditor.
-
-
Click the button.
Creating a Universal Credential for Proxmox Virtual Environments
To configure Skylar One to monitor a Proxmox virtual environment, you must first create a credential. This credential allows the Dynamic Applications in the "Proxmox: Virtual Environment" PowerPack to communicate with your Proxmox virtual environment.
The PowerPack includes an example universal credential that you can edit and save for your own use.
To create a universal credential:
- Go to the Credentials page (Manage > Credentials).
- Click the button and select Low-code tools: rest v104 Credential. The Create Credential page appears.
- Enter values in the following fields:
- Name. Enter a new name for the credential. This field is required.
- All Organizations. Toggle on (blue) to align the credential to all organizations, or toggle off (gray) and then select one or more specific organizations from the Select the organizations the credential belongs to drop-down field to align the credential with those specific organizations.
- Timeout. Enter the time, in milliseconds, after which Skylar One will stop trying to communicate with the Proxmox virtual environment. This field is required.
The value in the Timeout field should be greater than 5000 ms.
- Authentication Type. Select Basic Authentication.
- Authenticator Override. Enter ProxmoxApiTokenAuth.
The value in the Authenticator Override field must be ProxmoxApiTokenAuth for the snippets in the PowerPack to function.
- Username. Enter the API Token ID number.
- Password. Enter the API Token Secret.
- URL. Enter the base Proxmox API endpoint using HTTPS, including the port number in the URL. For example: https:<any_node_ip>:<port_number>.
The IP address can be any node that is part of the Proxmox cluster. The PowerPack will use this endpoint to retrieve data for the entire cluster.
- Click .
Discovering Proxmox: Virtual Environment Devices
If you want to discover Proxmox: Virtual Environment devices, you must first create a virtual device for your Proxmox Virtual Environment system and then manually align the "Proxmox VE: Cluster Discovery" Dynamic Application to the virtual device. The rest of the Dynamic Applications should then automatically align.
Creating a Proxmox: Virtual Environment Virtual Device
A virtual device is a user-defined container that represents a device or service that cannot be discovered by Skylar One. You can use the virtual device to store information gathered by policies or Dynamic Applications.
You must use this method if you are using the classic Skylar One user interface. You can also use this method if you are using the default Skylar One user interface (AP2).
To create a virtual device that represents your Proxmox Virtual Environment system:
- Go to the Device Manager page (Devices > Classic Devices, or Registry > Devices > Device Manager in the classic user interface).
- Click and select Create Virtual Device from the menu. The Virtual Device modal appears.
- Enter values in the following fields:
- Device Name. Enter a name for the device.
- Organization. Select the organization for this device. The organization you associate with the device limits the users that will be able to view and edit the device. Typically, only members of the organization will be able to view and edit the device.
- Device Class. Select Proxmox [ Virtual Environment ].
- Collector. Select the collector group that will monitor the device.
- Click to create the virtual device.
Aligning the Dynamic Applications
To align the Proxmox Virtual Environment Dynamic Applications:
- After discovery has completed, click the device icon for the Proxmox Virtual Environment device (
 ). From the Device Properties page for the Proxmox Virtual Environment device, click the tab. The Dynamic Application Collections page appears.
It can take several minutes after the discovery session has completed for Dynamic Applications to appear in the Dynamic Application Collections page.
- Click the button and then select Add Dynamic Application. The Dynamic Application Alignment page appears.
- In the Dynamic Applications field, select Proxmox VE: Cluster Discovery.
- In the Credentials field, select the credential you created previously.
- Click the button. The remaining Dynamic Component Map tree should begin to build out.
Proxmox Virtual Environment DCM Tree
The Dynamic Component Map tree will build out as follows:
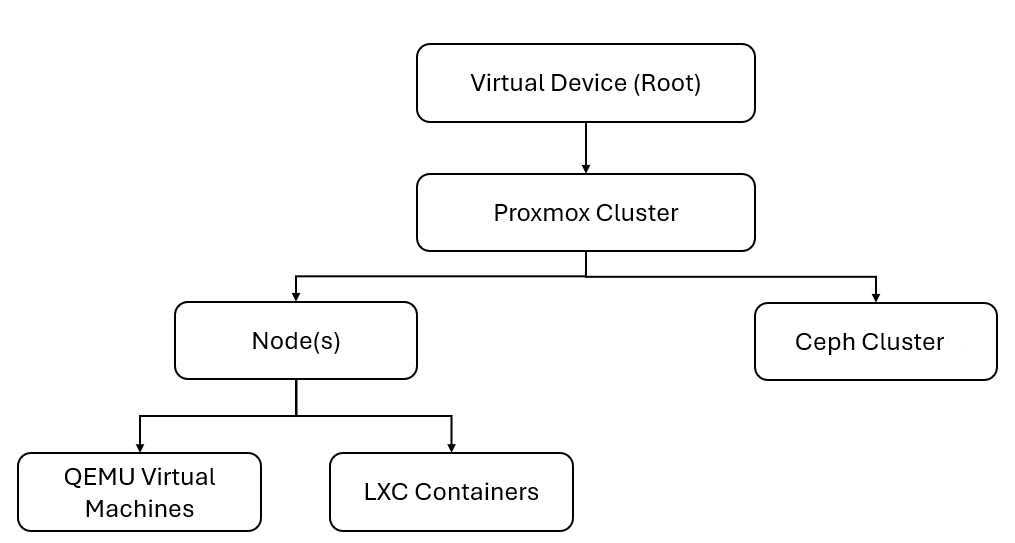
Viewing Proxmox: Virtual Environment Component Devices
In addition to the Device Manager page (Devices > Classic Devices, or Registry > Devices > Device Manager in the classic user interface), you can view the Proxmox Virtual Environment system and all associated component devices in the following places in the user interface:
- The Device View modal (click the bar-graph icon [
 ] for a device, then click the Topology tab) displays a map of a particular device and all of the devices with which it has parent-child relationships. Double-clicking any of the devices listed reloads the page to make the selected device the primary device.
 - The Device Components page (Devices > Device Components) displays a list of all root devices and component devices discovered by Skylar One in an indented view, so you can easily view the hierarchy and relationships between child devices, parent devices, and root devices. To view the component devices associated with a Proxmox Virtual Environment system, find the Proxmox Virtual Environment device and click its plus icon (+).
- The Component Map page (Classic Maps > Device Maps > Components) allows you to view devices by root node and view the relationships between root nodes, parent components, and child components in a map. This makes it easy to visualize and manage root nodes and their components. Skylar One automatically updates the Component Map as new component devices are discovered. The platform also updates each map with the latest status and event information. To view the map for an Proxmox Virtual Environment system, go to the Component Map page and select the map from the list in the left navigation bar. To learn more about the Component Map page,
Proxmox VE: Dashboard
The Proxmox VE: Dashboard displays the following information:
-
A leaderboard of Proxmox devices
-
Cluster Quorum Status
-
A count of offline nodes in a cluster
-
Proxmox High Availability Quorum and Daemons and their background daemon process states
-
Ceph Cluster Status
-
Ceph Storage Utilization percentage
-
A count of Ceph Object Storage Daemons (OSD), Pools, and Monitors
-
A Proxmox Topology Map
-
A graph displaying CPU usage per Node
-
A graph displaying CPU usage per Virtual Machine (QEMU/VM)
-
A graph displaying CPU usage per Linux Container (LXC)
-
A graph display memory usage per Node
-
A graph displaying memory usage per Quick Emulator (QEMU) and Virtual Machine (VM)
-
A graph displaying memory usage per Linux Container (LXC)
-
A table displaying Proxmox Events
The Proxmox VE: Dashboard is based on device class filters. Ensure all device classes are accurately assigned to all Proxmox devices, or the dashboard will not function correctly.
The "Proxmox: Virtual Environment" PowerPack assumes that Proxmox API responses are not paginated and return complete datasets in a single response.
Proxmox Virtual Environment API Endpoints
The following "Proxmox: Virtual Environment" Dynamic Applications make requests to the listed endpoints.
-
Proxmox VE: Cluster Discovery [API]. /api2/json/cluster/status, Returns cluster identity and quorum information.
-
Proxmox VE: Cluster Configuration [API]. /api2/json/cluster/status/api2/json/cluster/ha/status/current/api2/json/cluster/ha/status/manager_status/api2/json/cluster/backup/api2/json/cluster/tasks, Returns cluster configuration, HA state, backup and task data.
-
Proxmox VE: Cluster Performance [API]. /api2/json/cluster/status, Returns cluster-level utilization and summary metrics.
-
Proxmox VE: Node Discovery [API]. /api2/json/cluster/status, Returns node membership information.
-
Proxmox VE: Node Configuration [API]. /api2/json/nodes/<NODE>/status, Returns node configuration and status details.
-
Proxmox VE: Node Performance [API]. /api2/json/nodes/<NODE>/status, Returns node CPU, memory and uptime metrics.
-
Proxmox VE: Node Network Configuration [API]. /api2/json/nodes/<NODE>/network, Returns network interface configuration.
-
Proxmox VE: Node Network Performance [API]. /api2/json/nodes/<NODE>/rrddata, Returns node network time-series metrics.
-
Proxmox VE: Node Storage Configuration [API]. /api2/json/nodes/<NODE>/storage, Returns storage inventory and configuration.
-
Proxmox VE: Node Storage Performance [API]. /api2/json/nodes/<NODE>/storage, Returns storage utilization metrics.
-
Proxmox VE: Node Services [API]. /api2/json/nodes/<NODE>/services, Returns node service states.
-
Proxmox VE: QEMU VM Discovery [API]. /api2/json/nodes/<NODE>/qemu, Returns list of virtual machines.
-
Proxmox VE: QEMU VM Configuration [API]. /api2/json/nodes/<NODE>/qemu/<VMID>/config, Returns VM configuration data.
-
Proxmox VE: QEMU VM Performance [API]. /api2/json/nodes/<NODE>/qemu/<VMID>/status/current, Returns VM runtime and performance metrics.
-
Proxmox VE: LXC Container Discovery [API]. /api2/json/nodes/<NODE>/lxc, Returns list of containers.
-
Proxmox VE: LXC Container Configuration [API]. /api2/json/nodes/<NODE>/lxc/<CTID>/config, Returns container configuration.
-
Proxmox VE: LXC Container Performance [API]. /api2/json/nodes/<NODE>/lxc/<CTID>/status/current, Returns container runtime and performance metrics.
-
Proxmox VE: Ceph Cluster Discovery [API]. /api2/json/cluster/ceph/status, Returns Ceph cluster presence and summary.
-
Proxmox VE: Ceph Cluster Configuration [API]. /api2/json/cluster/ceph/status/api2/json/cluster/ceph/mon/api2/json/cluster/ceph/osd/api2/json/cluster/ceph/pool, Returns Ceph configuration, monitors, OSDs and pools.
-
Proxmox VE: Ceph Cluster Performance [API]. /api2/json/cluster/ceph/status, Returns Ceph health and capacity metrics.